Table of Contents
Advertisement
Available languages
Available languages
Quick Links
FAHRRADCOMPUTER /
BIKE COMPUTER / COMPTEUR VÉLO
FAHRRADCOMPUTER
Bedienungs- und Sicherheitshinweise
COMPTEUR VÉLO
Instructions d'utilisation et
consignes de sécurité
LICZNIK ROWEROWY
Wskazówki dotyczące
obsługi i bezpieczeństwa
TACHOMETER
Pokyny pre obsluhu a
bezpečnostné pokyny
IAN 307553
BIKE COMPUTER
Operation and safety notes
FIETSCOMPUTER
Bedienings- en
veiligheidsinstructies
TACHOMETR
Pokyny pro obsluhu a
bezpečnostní pokyny
Advertisement
Chapters
Table of Contents

Related Manuals for Crivit 307553


Summary of Contents for Crivit 307553
- Page 1 Bedienungs- und Sicherheitshinweise Operation and safety notes COMPTEUR VÉLO FIETSCOMPUTER Instructions d‘utilisation et Bedienings- en consignes de sécurité veiligheidsinstructies LICZNIK ROWEROWY TACHOMETR Wskazówki dotyczące Pokyny pro obsluhu a obsługi i bezpieczeństwa bezpečnostní pokyny TACHOMETER Pokyny pre obsluhu a bezpečnostné pokyny IAN 307553...
- Page 2 DE / AT / CH Bedienungs- und Sicherheitshinweise Seite GB / IE Operation and safety notes Page FR / BE Instructions d‘utilisation et consignes de sécurité Page NL / BE Bedienings- en veiligheidsinstructies Pagina 129 Wskazówki dotyczące obsługi i bezpieczeństwa Strona 167 Pokyny pro obsluhu a bezpečnostní...
- Page 4 max. 30° max. 70 cm...
- Page 8 max. 2 mm...
- Page 12 1598 mm 1759 mm 1916 mm 26 (650 A) 2073 mm 26,5 (Tubular) 2117 mm 26,6 (700 x 25C) 2124 mm 26,8 (700 x 28C) 2136 mm 27 (700 x 32C) 2155 mm 28 (700B) 2237 mm ATB24 x 1,75 1888 mm ATB26 x1,4 1995 mm...
-
Page 13: Table Of Contents
Einleitung ..........Seite 15 Bestimmungsgemäßer Gebrauch ..Seite 15 Funktionen .......... Seite 15 Teilebeschreibung ......Seite 17 Technische Daten ....... Seite 18 Lieferumfang ........Seite 18 Allgemeine Sicherheits hinweise.. Seite 19 Sicherheits hinweise für Batterien / Akkus ..........Seite 22 Vor der Inbetriebnahme .... - Page 14 Fahrradcomputer zurücksetzen ..Seite 42 Batterie auswechseln ......Seite 43 Fahrradcomputer vom Fahrrad abmontieren ........Seite 44 Fehlerbehebung ......... Seite 44 Reinigung und Pflege ..... Seite 47 Wartung ..........Seite 47 Entsorgung .......... Seite 47 Vereinfachte EU-Konformitätserklärung ... Seite 50 Garantie ..........
-
Page 15: Einleitung
Fahrradcomputer Einleitung Wir beglückwünschen Sie zum Kauf Ihres neuen Produkts. Sie haben sich damit für ein hochwertiges Produkt entschieden. Die Bedienungsanleitung ist Teil dieses Produkts. Sie enthält wichtige Hinweise für Sicherheit, Gebrauch und Entsorgung. Machen Sie sich vor der Benutzung des Produkts mit allen Bedien- und Sicherheitshinweisen vertraut. - Page 16 – Stoppuhr – Temperaturanzeige °C / °F – Memory-Funktion für min. und max. Temperatur – Fahrgeschwindigkeitsanzeige (0–99,9 km / h) – Durchschnittsgeschwindigkeitsanzeige (0–99,9 km / h) – Höchstgeschwindigkeitsanzeige (0–99,9 km / h) – Geschwindigkeitsvergleich – Geschwindigkeitstrend – Fahrtzeit-Timer (max. 9:59:59) (rückwärts oder vorwärts zählend) –...
-
Page 17: Teilebeschreibung
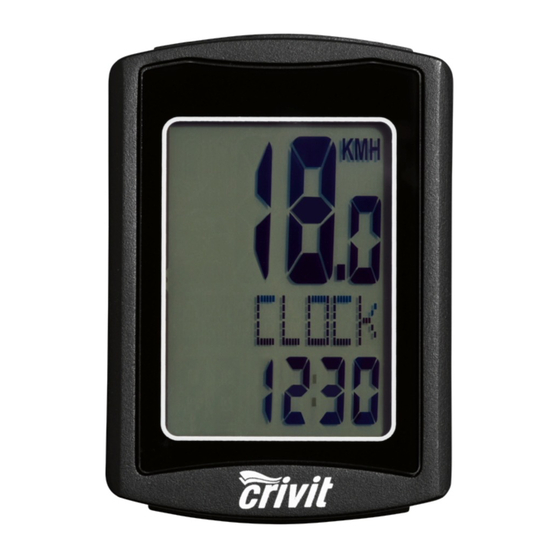
Teilebeschreibung Magnet Kabelbinder Batterie Dämpfer für Fahrradcomputerhalterung Halterung Sensor Batteriedeckel des Fahrradcomputers Fahrradcomputer Batteriefachdeckel des Sensors Primäre Funktionswertanzeige Funktionsanzeige Sekundäre Funktionswertanzeige LC–Display MODE-Taste (M) Geschwindigkeitsvergleich-Anzeige: Vergleicht die aktuelle Geschwindigkeit mit der Durchschnittsgeschwindigkeit ▲ höher als die Durchschnittsgeschwindigkeit ▼ niedriger als die Durchschnittsgeschwindig- keit SCAN-Display Wartungsintervallanzeige... -
Page 18: Technische Daten
Geschwindigkeitstrend Dies zeigt die Entwicklung, ob die Geschwin- digkeit steigt (großer Balken, rechts) oder sinkt (kleiner Balken, links). SET-Taste (S) Technische Daten Batterie: (Gleichstrom) (CR2032 Knopfzelle) Betriebstemperatur: 0–50 °C Frequenzband: 125 KHz +/-10 KHz Max. übertragene Leistung: 125 KHz <6,58 dBm Lieferumfang 1 Drahtloser Fahrradcomputer 1 Halterung für den Fahrradcomputer... -
Page 19: Allgemeine Sicherheits Hinweise
2 Ersatz-Dichtungsringe für Fahrradcomputer und Sensor 1 Bedienungsanleitung Allgemeine Sicherheits- hinweise BEWAHREN SIE ALLE SICHERHEITSHINWEISE UND ANWEISUNGEN FÜR DIE ZUKUNFT AUF! Dieses Produkt kann von Kindern ab 8 Jahren DE/AT/CH... - Page 20 und darüber sowie von Personen mit verringerten physischen, sensorischen oder mentalen Fähigkeiten oder Mangel an Erfah- rung und Wissen benutzt werden, wenn sie beauf- sichtigt oder bezüglich des sicheren Gebrauchs des Produktes unterwiesen wurden und die daraus resultierenden Gefahren verstehen. Kinder dürfen nicht mit dem Produkt 20 DE/AT/CH...
- Page 21 spielen. Reinigung und Benutzerwartung dürfen nicht von Kindern ohne Beaufsichtigung durch- geführt werden. Bitte beachten Sie, dass die Garantie keine Schä- den abdeckt, die durch unsachgemäße Handha- bung, Nichtbeachtung der Betriebs- und Sicher- heitshinweise oder Ge- brauch durch Unbefugte entstehen. DE/AT/CH...
-
Page 22: Sicherheits Hinweise Für Batterien / Akkus
Sicherheits- hinweise für Batterien / Akkus LEBENSGEFAHR! Halten Sie Batterien / Akkus außer Reichweite von Kindern. Suchen Sie im Falle eines Verschlu- ckens sofort einen Arzt auf! EXPLOSIONS- GEFAHR! 22 DE/AT/CH... - Page 23 Laden Sie nicht auflad- bare Batterien niemals wieder auf. Schließen Sie Batterien / Akkus nicht kurz und / oder öffnen Sie diese nicht. Überhitzung, Brandge- fahr oder Platzen können die Folge sein. Werfen Sie Batterien / Akkus niemals in Feuer oder Wasser.
- Page 24 Setzen Sie Batterien / Akkus keiner mecha- nischen Belastung aus. Risiko des Auslaufens von Batterien / Akkus Vermeiden Sie extreme Bedingungen und Temperaturen, die auf Batterien / Akkus einwir- ken können, z. B. auf Heizkörpern / direkte Sonneneinstrahlung. 24 DE/AT/CH...
- Page 25 Wenn Batterien / Akkus ausgelaufen sind, ver- meiden Sie den Kontakt von Haut, Augen und Schleimhäuten mit den Chemikalien! Spülen Sie die betroffenen Stellen sofort mit klarem Wasser und suchen Sie einen Arzt auf! SCHUTZ - HAND- SCHUHE TRAGEN! Ausgelaufene oder be- DE/AT/CH...
- Page 26 schädigte Batterien / Akkus können bei Berüh- rung mit der Haut Verät- zungen verursachen. Tragen Sie deshalb in diesem Fall geeignete Schutzhandschuhe. Im Falle eines Auslaufens der Batterien / Akkus ent- fernen Sie diese sofort aus dem Produkt, um Beschädigungen zu vermeiden.
- Page 27 Verwenden Sie nur Batterien / Akkus des gleichen Typs. Mischen Sie nicht alte Batterien / Akkus mit neuen! Entfernen Sie die Batterien / Akkus, wenn das Produkt längere Zeit nicht verwendet wird. Risiko der Beschädi- gung des Produkts Verwenden Sie aus- schließlich den angege- DE/AT/CH...
- Page 28 benen Batterietyp / Akkutyp! Setzen Sie Batterien / Akkus gemäß der Pola- ritätskennzeichnung (+) und (-) an Batterie / Akku und des Produkts ein. Reinigen Sie Kontakte an Batterie / Akku und im Batteriefach vor dem Einlegen! Entfernen Sie erschöpfte Batterien / Akkus umge- hend aus dem Produkt.
-
Page 29: Vor Der Inbetriebnahme
Vor der Inbetriebnahme Entfernen Sie vor dem ersten Gebrauch die Schutzfolie vom LC-Display Hinweis: Dieses Produkt sollte nicht an einem E-Bike verwendet werden. Der Motor könnte Funktionsstörungen am Produkt auslösen. Batterie einlegen Gehen Sie zum Einlegen der Batterie vor, wie in Abb. A dargestellt. Verwenden Sie zum Öffnen des Batteriefachs eine Münze. -
Page 30: Fahrradcomputer Anbringen
Drehen Sie den Batteriefachdeckel mit der Münze im Uhrzeigersinn auf das Batteriefach, um dieses zu schließen. Fahrradcomputer anbringen Gehen Sie zum Anbringen des Produktes vor, wie in den Abbildungen B bis I dargestellt. Schneiden Sie die überstehenden Enden der mit einem geeigneten Werk- Kabelbinder zeug, beispielsweise Seitenschneider, ab. - Page 31 > Gewicht > Zeitformat > Uhrzeit > Datumsformat > Datum > CO2-Emission > Wartungsintervall > Hintergrundlicht EIN / AUS > ETA-Distanz > ETA- Modus > Kraftstoffformat > Kraftstoffverbrauch > Temperatureinheit Wichtige Funktionen: MODE-Taste zur Einstellung der Werte / SET- zur Bearbeitung und Übernahme der Taste Einstellungen –...
- Page 32 – Gewichtseinheit: Auswahl zwischen KG und LB. – Gewicht: Eingabe einer dreistelligen Zahl, alternativ in der Enheit KG oder LB. – Zeitformat: Auswahl zwischen 12 und 24 Stunden. – Uhrzeit: Eingabe von Stunde und Minute. – Datumsformat: Auswahl zwischen DD-MM-YY und MM-DD-YY.
- Page 33 – ETA-Modus: Auswahl zwischen CLOCK (Uhrzeit) und TIME (Fahrzeit). – Kraftstoffformat: Auswahl zwischen LITER und GALLON (Gallone). – Kraftstoffverbrauch: Eingabe einer dreistelligen Zahl in den Einheiten L / 100 KM (LITER) oder mpg (GALLONEN). – Temperatureinheit: Auswahl zwischen °C und °F.
-
Page 34: Fahrradcomputer Mit Dem Sensor Verbinden
Fahrradcomputer mit dem Sensor verbinden Verwenden Sie den Magneten , um den Sensor einzuschalten, und der Geschwindig- keitstrend zeigt eine Kurve zur Bestätigung der erfolgreichen Verbindung. Der Fahrrad- computer ist jetzt zur Verwendung bereit. Wenn die Verbindung abbricht, folgen Sie bitte den Schritten im Kapitel „Fehlerbehebung“... - Page 35 Drücken Sie die MODE-Taste mehrfach, um durch die verschiedenen Funktionen zu scrollen. Drücken und halten Sie die SET-Taste , um die gespeicherten Werte aufzurufen oder zurückzusetzen. Der Fahrradcomputer verfügt über die folgenden Funktionen: FORTGES-Modus: Durch Drücken der MODE- Taste können Sie aus den folgenden Funktions- anzeigen auswählen: UHRZEIT>...
- Page 36 UHRZEIT: Zeigt die Uhrzeit an. Drücken und halten Sie die SET-Taste für 3 Sekunden und drücken Sie die SET-Taste erneut, um Zeit- und Datumseinstellungen aufzurufen. Hinweis: Sie können durch Drücken der SET-Taste zwischen Zeit- und Datumsan- zeige hin- und herschalten. GESAMTKM: Gesamtkilometerzähler.
- Page 37 MAX-KMH: Höchstgeschwindigkeit. Drücken und halten Sie die SET-Taste für 3 Sekunden, um die Höchstgeschwindigkeit auf 0 zu stellen. DURCH-KM: Durchschnittsgeschwindigkeit. Drücken und halten Sie die SET-Taste für 3 Sekunden, um die Durchschnittsgeschwin- digkeit auf 0 zu stellen. FAHRZEIT: Fahrtzeit. GRAD: Thermometer. Drücken Sie die SET-Taste , um den höchsten bisher gemessenen Temperaturwert anzuzeigen...
- Page 38 STOPPUHR: Stoppuhr. Drücken Sie die SET-Taste , um die Stopp- uhr zu starten. Drücken Sie die SET-Taste erneut, um die Stoppuhr zu stoppen. Drücken und halten Sie die SET-Taste für 3 Sekunden, um die Stoppuhr auf 0 zu stellen. KAL RATE: Momentaner Kalorienverbrauch. KALORIE: Kalorienzähler.
- Page 39 erneut, um die Einstellung der Einheit und des Referenzwerts vom Kraftstoffverbrauch aufzurufen. ETA: Erwartete Ankunftszeit Im Display erscheint ETASTART: Drücken Sie die SET- und MODE-Taste , um die ETA-Funktion zu aktivieren. Drücken und halten Sie die SET-Taste für 3 Sekunden, um die ETA-Distanz bzw. den ETA- Modus zu verändern.
-
Page 40: Customize (Anpassungs)-Modus
SCAN: Scan Hinweis: Im Scan-Modus wechselt der Display auto matisch zwischen Fahrdistanz, Höchstge- schwindigkeit, Durchschnittsgeschwindigkeit und Fahrtzeit. Hinweis: Zur Änderung der Einstellungen lesen Sie das Kapitel „Veränderung der Grundein- stellungen“. Hinweis: Um den Scan-Modus zu beenden, , um zum drücken Sie die MODE-Taste FORTGES-Modus zurückzukehren. -
Page 41: Verwendung Der Hintergrundbeleuchtung
Drücken und halten Sie die SET-Taste , um in den CUSTOMIZE (Anpassungsmodus)- Modus zu gelangen. Drücken Sie die SET-Taste erneut. Drücken Sie die MODE-Taste , um individuelle Ein- stellungen zu aktivieren oder zu deaktivieren (d. h. UHRZEIT). Wählen Sie „ON“, um die gewählte Funktion zum EINFACH-Modus hinzuzufügen. -
Page 42: Fahrradcomputer Zurücksetzen
Die Hintergrundbeleuchtung schaltet sich nach kurzer Zeit automatisch aus. Fahrradcomputer zurücksetzen Drücken und halten Sie zuerst die SET-Taste und halten Sie die MODE-Taste , um in den Einstellungsmodus zu gelangen. SETTING OPEN (Einstellungen öffnen) oder SETTING RESET (Einstellungen zurücksetzen) wird an- gezeigt. -
Page 43: Batterie Auswechseln
Batterie auswechseln Hinweis: Die Batterie des Fahrradcomputers muss gewechselt werden, wenn die Batteriestatusanzeige auf dem LC-Display angezeigt wird. Drücken und halten Sie zuerst die MODE-Taste , halten Sie gleichzeitig die SET-Taste und lassen Sie beide gedrückt, bis auf dem LC-Display das Batterie- symbol und {{----}} angezeigt wird. -
Page 44: Fahrradcomputer Vom Fahrrad Abmontieren
Hinweis: Wenn die Batterie entfernt ist, werden nach etwa 20 Sekunden alle Daten gelöscht. Fahrradcomputer vom Fahrrad abmontieren Drehen Sie den Fahrrad-Computer gegen den Uhrzeigersinn, um diesen abzunehmen (Abb. K). Um die Kabelbinder zu entfernen, verwen- den Sie ein geeignetes Werkzeug, beispiels- weise einen Seitenschneider. - Page 45 Problem Lösung Leeres LC-Display oder Entnehmen Sie die Bat- keine Antwort nach er- terie. Führen Sie einen neutem Einlegen der spitzen Gegenstand Batterie (z. B. Schraubendre- her) in das mit „RESET“ ge - kennzeichnete Loch. Setzen Sie die 3 V-Batterie so in das Batteriefach ein, dass der +-Pol nach oben weist.
- Page 46 Problem Lösung Display schwarz Die Umgebungstempe- ratur ist zu hoch oder der Fahrradcomputer wurde zu lange direkter Sonnenstrahlung aus- gesetzt. Entfernen Sie das Produkt aus dem direkten Sonnenlicht und lassen Sie es eine Weile abkühlen. Das LC-Display zeigt Entnehmen Sie die irreguläre Symbole.
-
Page 47: Reinigung Und Pflege
Reinigung und Pflege Benutzen Sie zur Reinigung keine Flüssigkeiten oder Reinigungsmittel. Ansonsten drohen Schäden am Produkt. Reinigen Sie das Produkt nur äußerlich mit einem weichen, trockenen Tuch. Wartung Entfernen Sie die Batterie, wenn Sie das Produkt für längere Zeit nicht verwenden werden. - Page 48 Beachten Sie die Kennzeichnung der Verpackungsmaterialien bei der Abfall- trennung, diese sind gekennzeichnet mit Abkürzungen (a) und Nummern (b) mit folgender Bedeutung: 1–7: Kunststoffe / 20–22: Papier und Pappe / 80–98: Verbundstoffe. Das Produkt und die Verpackungs- materialien sind recycelbar, entsorgen Sie diese getrennt für eine bessere Ab- fallbehandlung.
- Page 49 bei Ihrer zuständigen Verwaltung infor- mieren. Defekte oder verbrauchte Batterien / Akkus müssen gemäß Richtlinie 2006/66/EG und deren Ände- rungen recycelt werden. Geben Sie Batterien / Akkus und / oder das Produkt über die angebotenen Sammeleinrichtungen zurück. Umweltschäden durch falsche Entsorgung der Batterien / Akkus! Batterien / Akkus dürfen nicht über den Hausmüll entsorgt werden.
-
Page 50: Eu-Konformitätserklärung
Vereinfachte EU- Konformitätserklärung Hiermit erklärt OWIM GmbH & Co. KG, Stiftsberg straße 1, DE-74167 Neckarsulm, DEUTSCHLAND, dass das Produkt (Fahrradcomputer, HG00734A) den Richtlinien 2014/53/EU und 2011/65/EU entspricht. Der vollständige Text der EU-Konformitätserklärung ist unter der folgenden Internetadresse verfügbar: www.owim.com Garantie Das Produkt wurde nach strengen Qualitätsrichtlinien sorgfältig produziert und vor Anlieferung gewissen- haft geprüft. - Page 51 Original-Kassenbon gut auf. Diese Unterlage wird als Nachweis für den Kauf benötigt. Tritt innerhalb von 3 Jahren ab dem Kaufdatum dieses Produkts ein Material- oder Fabrikationsfehler auf, wird das Produkt von uns – nach unserer Wahl – für Sie kostenlos repariert oder ersetzt. Diese Ga- rantie verfällt, wenn das Produkt beschädigt, nicht sachgemäß...
- Page 52 Introduction ........Page Intended use ........Page Functions ...........Page Parts description .......Page Technical data ........Page Scope of delivery ......Page General safety instructions ..Page Safety instructions for batteries / rechargeable batteries ...Page Before use..........Page Inserting the battery ......Page Attaching the bicycle computer..Page Initial use ..........Page Changing basic settings ....Page Connecting the bicycle computer to the sensor ........Page...
- Page 53 Removing the bicycle computer from the bicycle ........Page Troubleshooting........Page Cleaning and care ......Page Maintenance ........Page Disposal ..........Page Simplified EU declaration of conformity ........Page Warranty ...........Page GB/IE...
-
Page 54: Introduction
Bike Computer Introduction We congratulate you on the purchase of your new product. You have chosen a high quality product. The instructions for use are part of the product. They contain important information concerning safety, use and disposal. Before using the product, please familiarise yourself with all of the safety information and instructions for use. -
Page 55: Parts Description
– Temperature display °C / °F – Memory function for min. and max. temperature – Bike speed display (0–99.9 km / h) – Average speed display (0–99.9 km / h) – Maximum speed display (0–99.9 km / h) – Speed comparator –... - Page 56 Battery Damper for bicycle computer bracket Bracket Sensor Bicycle computer battery cap Bicycle computer Sensor battery cap Primary functional value display Function indicator Secondary functional value display LC display MODE button (M) Speed comparator display: Compares the current speed with the average speed ▲...
-
Page 57: Technical Data
Speed tendency: This displays the trend in terms of whether the speed is increasing (large bar, right) or decreasing (small bar, left). SET button (S) Technical data Battery: (direct current) (CR2032 button cell battery) Operating temperature: 0–50 °C Frequency Band: 125 KHz +/-10 KHz Max. -
Page 58: General Safety Instructions
2 Replacement O-rings for bicycle computer and sensor 1 Instructions for use General safety instructions KEEP ALL SAFETY NOTICES AND INSTRUC- TIONS FOR FUTURE REFERENCE! This product may be used by children 8 years and up as well as persons with physical, sensory or 58 GB/IE... - Page 59 mental impairments or lacking experience and knowledge, when super- vised or instructed in the safe use of the product and understand the as- sociated risks. Do not al- low children to play with the product. Cleaning and user maintenance must not be performed by children without su- pervision.
- Page 60 Please note that the guarantee does not cover damages caused by incorrect handling, non-compliance with the safety instructions or use by unauthorised per- sons. 60 GB/IE...
- Page 61 Safety instructions for batteries / rechargeable batteries DANGER TO LIFE! Keep batteries / recharge- able batteries out of reach of children. If accidentally swallowed seek immediate medical attention. GB/IE...
- Page 62 DANGER OF EXPLOSION! Never recharge non- rechargeable batteries. Do not short-circuit bat- teries / rechargeable batteries and / or open them. Overheating, fire or bursting can be the result. Never throw batteries / rechargeable batteries into fire or water. 62 GB/IE...
- Page 63 Do not exert mechanical loads to batteries / rechargeable batteries. Risk of leakage of batteries / rechargea- ble batteries Avoid extreme environ- mental conditions and temperatures, which could affect batteries / rechargeable batteries, e.g. radiators / direct sunlight. GB/IE...
-
Page 64: Batteries / Rechargeable Batteries
Avoid contact with the skin, eyes and mucous membranes. In the event of contact with battery acid, thoroughly flush the affected area with plenty of clean water and seek immediate medical attention. WEAR PRO- TECTIVE GLOVES! Leaked or damaged batteries / rechargeable 64 GB/IE... - Page 65 batteries can cause burns on contact with the skin. Wear suitable protective gloves at all times if such an event occurs. In the event of a leakage of batteries / rechargea- ble batteries, immediately remove them from the product to prevent damage.
- Page 66 mix used and new bat- teries / rechargeable batteries. Remove batteries / rechargeable batteries if the product will not be used for a longer period. Risk of damage of the product Only use the specified type of battery / rechargeable battery! 66 GB/IE...
- Page 67 Insert batteries / rechar- geable batteries accord- ing to polarity marks (+) and (-) on the battery / rechargeable battery and the product. Clean the contacts on the battery / rechargea- ble battery and in the battery compartment before inserting! Remove exhausted batteries / rechargeable GB/IE...
-
Page 68: Before Use
batteries from the prod- uct immediately. Before use Remove the protective film from the LC display before you use the device for the first time. Note: Do not use this product on electric bikes. The motor could cause the product to malfunction. Inserting the battery To insert the battery proceed as depicted... -
Page 69: Attaching The Bicycle Computer
Turn the battery cap clockwise onto the battery compartment using the coin to close it. Attaching the bicycle computer To attach the product, proceed as depicted in Fig. B to I. Trim the protruding ends of the cable ties using a suitable tool such as a side cutter. Note: Ensure that the bicycle computer attached less than 70 cm from the sensor Attach the bicycle computer... - Page 70 Important functions: MODE button to configure values / SET button to edit and adopt settings – Language: 6 language can be select. – Application profile: ADVANCE or EASY can be select. – Tyre size: Enter the circumference for your tyres size in mm, 4 digit number can be input.
- Page 71 – CO2 emission rate: 3 digit number can be input in unit of G / KM. – Maintenance interval: 3 digit number can be input in unit of KM or MILE per select. Note: If the maintenance interval input “000” will switch off the service indicator.
-
Page 72: Connecting The Bicycle Computer To The Sensor
If you wish to change the basic settings, please follow the steps outlined in the chapter “Resetting the bicycle computer“ and reset all basic settings. Connecting the bicycle computer to the sensor Use the magnet to trigger the sensor shows a curve to con- the speed tendency firm successful connection. - Page 73 Press the MODE button repeatedly to scroll through the different functions. Press and hold the SET button to request or reset the saved values. The bicycle computer features the following functions: ADVANCE mode: By pressing the MODE button you can select the following function displays: CLOCK >...
- Page 74 CLOCK: Displays the time. Press and hold the SET button for 3 seconds and press the SET button again to request the time and date settings. Note: Press SET button to can be switch display of the time / date. TOTALODO: Total mileage counter.
- Page 75 MAXSPEED: Maximum speed. Press and hold the SET button for 3 seconds to set the maximum speed to 0. AVGSPEED: Average speed. Press and hold the SET button for 3 seconds to set the average speed to 0. TRIPTIME: Trip time. TEMP: Thermometer.
- Page 76 CAL RATE: Current calorie consumption. CALORIE: Calorie counter. Press and hold the SET button for 3 seconds to set the calorie counter to 0. FAT-BURN: Fat-burning in grams. Press and hold the SET button for 3 seconds to set the fat-burning value to 0. CO2 KG: CO2 saved.
- Page 77 KM + / -: Kilometer counter. Press and hold the SET button for 3 seconds and press the SET button again to request the kilometer counter settings. The LC display will show the symbol for increasing or decreas- ing the number (+ or -) and distance counter value.
-
Page 78: Customize Mode
CUSTOMIZE mode Alongside ADVANCE and EASY mode, you can also apply your own settings in CUSTOMIZE mode. Press and hold the MODE button 3 seconds and press the SET button to en- ter the application profile setting. to select EASY Press MODE button mode. -
Page 79: Using The Backlight
Using the backlight Press the SET button to temporarily activate the backlight. The backlight will switch off au- tomatically after a short amount of time. Resetting the bicycle computer Press and hold the SET button first and to proceed to hold the MODE button setting mode. -
Page 80: Replacing The Battery
Replacing the battery Note: The bicycle computer battery must be replaced when the battery state indicator shown on the LC display . Press and hold the MODE button first and hold the SET button at the same time and keep them pressed until the battery symbol and {{----}} are shown on the LC display. -
Page 81: Removing The Bicycle Computer From The Bicycle
Removing the bicycle computer from the bicycle Turn the bicycle computer counter-clockwise to remove it (Fig. K). To remove the cable ties using a suitable tool such as a side cutter. Troubleshooting Note: This product contains delicate electronic components. Therefore, interference may occur when it is near products which transmit radio signals. - Page 82 Problem Solution Empty LC display or no Remove battery. If re- response after putting quired, guide a sharp the battery in again instrument (e.g. a screw- driver) into the hole labelled “RESET”. Insert a 3 V battery into the battery compartment in such a way that the + terminal points upwards.
- Page 83 Problem Solution Display is black The ambient tempera- ture is too high or the bicycle computer was exposed to direct sunlight for too long. Remove product from direct sunlight and let it cool off for a while. The LC display shows Remove battery and irregular symbols.
-
Page 84: Cleaning And Care
Cleaning and care Do not use any liquids or cleaning agents for cleaning. Otherwise there is a risk of damag- ing the product. Clean the product on the outside only with a soft, dry cloth. Maintenance Remove the battery from the product if the product is not going to be used for a pro- longed period. - Page 85 Observe the marking of the packaging materials for waste separation, which are marked with abbreviations (a) and numbers (b) with following meaning: 1–7: plastics / 20–22: paper and fibreboard / 80–98: composite materials. The product and packaging materials are recyclable, dispose of it separately for better waste treatment.
-
Page 86: Simplified Eu Declaration Of Conformity
Faulty or used batteries / rechargeable batteries must be recycled in accordance with Directive 2006/66/EC and its amendments. Please return the batteries / rechargeable batteries and / or the product to the available collection points. Environmental damage through incorrect disposal of the batter- ies / rechargeable batteries! Batteries / rechargeable batteries may not be dis- posed of with the usual domestic waste. -
Page 87: Warranty
declares that the product (Bike Computer, HG00734A) is in compliance with Directive 2014/53/EU and 2011/65/EU. The full text of the EU declaration of conformity is available at the following internet address: www.owim.com Warranty The product has been manufactured to strict quality guidelines and meticulously examined before deli- very. - Page 88 product has been damaged, or used or maintained improperly. The warranty applies to defects in material or ma- nufacture. This warranty does not cover product parts subject to normal wear, thus possibly consi- dered consumables (e.g. batteries) or for damage to fragile parts, e.g.
- Page 89 Introduction ........Page Utilisation conforme ......Page Fonctions ...........Page Descriptif des éléments ....Page Caractéristiques techniques.....Page Contenu de la livraison....Page Instructions générales de sécurité ..........Page Consignes de sécurité relatives aux piles / aux piles rechargeables ...Page Avant la mise en service ....Page 105 Mise en place de la pile....Page 106 Mise en place du compteur vélo ..Page 107 Mise en service ........Page 107...
- Page 90 Réinitialisation du compteur de vélo ...........Page 118 Remplacement de la pile ....Page 119 Démonter le compteur vélo .....Page 120 Dépannage ........Page 121 Nettoyage et entretien ....Page 123 Maintenance ........Page 124 Mise au rebut ........Page 124 Déclaration de conformité UE simplifiée ........Page 126 Garantie ..........Page 127 90 FR/BE...
-
Page 91: Introduction
Compteur vélo Introduction Nous vous félicitons pour l‘achat de votre nouveau produit. Vous avez opté pour un produit de grande qualité. Le mode d‘emploi fait partie intégrante de ce produit. Il contient des indications importantes pour la sécurité, l’utilisation et la mise au rebut. Veuil- lez lire consciencieusement toutes les indications d‘utilisation et de sécurité... -
Page 92: Fonctions
Fonctions – Langues du menu : GB, DE, FR, NL, IT, ES – Horloge – Chronomètre – Affichage de la température °C / °F – Fonction mémoire pour température min. et max. – Affichage de la vitesse (0–99,9 km / h) –... -
Page 93: Descriptif Des Éléments
– Économie en carburant – Rétroéclairage MARCHE / ARRÊT Descriptif des éléments Aimant Attache-câbles Pile Amortisseur pour fixation du compteur de vélo Support Capteur Couvercle de la pile du compteur de vélo Compteur de vélo Couvercle du compartiment à pile du capteur Affichage primaire de la valeur de fonction Affichage de la fonction Affichage secondaire de la valeur de fonction... -
Page 94: Caractéristiques Techniques
Écran SCAN Affichage de l‘intervalle d‘entretien Indicateur d‘état de la batterie (pour comp- teur de vélo) Tendance de la vitesse Indique l‘évolution du parcours, à savoir si la vitesse augmente (barre plus grande à droite) ou diminue (barre plus petite à gauche). Touche SET (S) Caractéristiques techniques Pile :... -
Page 95: Instructions Générales De Sécurité
1 aimant 6 attache-câbles 2 piles, 3 V (courant continu), pile bouton mo- dèle CR2032 2 bagues d‘étanchéité de rechange pour comp- teur vélo et capteur 1 mode d‘emploi Instructions générales de sécurité CONSERVEZ TOUTES LES CONSIGNES DE SÉCURITÉ ET INSTRUC- TIONS POUR L‘AVENIR ! FR/BE... - Page 96 Le produit peut être uti- lisé par des enfants âgés de 8 ans et plus, ainsi que par des personnes ayant des capacités physiques, sensorielles ou mentales réduites ou manquant d‘expérience ou de connaissances s‘ils sont surveillés ou s‘ils ont été informés de l‘utilisation sûre du pro- duit et s‘ils comprennent les risques liés à...
- Page 97 utilisation. Les enfants ne doivent pas jouer avec le produit. Le nettoyage et l‘entretien du produit ne doivent pas être ef- fectués par des enfants laissés sans surveillance. Sachez que la garantie ne couvre aucun dom- mage dû à une utilisation inappropriée, au non- respect des consignes de fonctionnement et de...
-
Page 98: Consignes De Sécurité Relatives
sécurité ou à une utilisa- tion par des personnes non autorisées. Consignes de sécurité relatives aux piles / aux piles rechargeables DANGER DE MORT ! Rangez les piles / piles rechargeables hors de la portée des enfants. 98 FR/BE... - Page 99 En cas d’ingestion, consultez immédiate- ment un médecin ! RISQUE D‘EX- PLOSION ! Ne rechargez jamais des piles non rechargeables. Ne court-circuitez pas les piles / piles rechar- geables et / ou ne les ouvrez pas ! Autrement, vous risquez de provo- quer une surchauffe, un FR/BE...
- Page 100 incendie ou une explo- sion. Ne jetez jamais des piles / piles rechargeables au feu ou dans l’eau. Ne pas soumettre les piles / piles rechargeables à une charge mécanique. Risque de fuite des piles / piles rechar- geables Évitez d’exposer les piles / piles rechargeables à...
- Page 101 des conditions et tempé- ratures extrêmes suscep- tibles de les endommager, par ex. sur des radiateurs / ex- position directe aux rayons du soleil. Lorsque les piles / piles rechargeables fuient, évitez tout contact du produit chimique avec la peau, les yeux ou les muqueuses ! Rincez les zones touchées à...
- Page 102 claire et consultez immé- diatement un médecin! PORTER DES GANTS DE PROTECTION ! Les piles / piles rechargeables endommagées ou sujettes à des fuites peuvent provoquer des brûlures au contact de la peau. Vous devez donc porter des gants adéquats pour les manipuler. 102 FR/BE...
- Page 103 En cas de fuite des piles / piles rechargeables, retirez-les aussitôt du produit pour éviter tout endommagement. Utilisez uniquement des piles / piles rechargeables du même type. Ne mé- langez pas des piles / piles rechargeables usées et neuves ! Retirez les piles / piles rechargeables, si vous ne comptez pas utiliser...
- Page 104 le produit pendant une période prolongée. Risque d‘endomma- gement du produit Exclusivement utiliser le type de pile / pile rechargeable spécifié. Insérez les piles / piles recharge ables confor- mément à l‘indication de polarité (+) et (-) in- diquée sur la pile / pile 104 FR/BE...
-
Page 105: Avant La Mise En Service
rechargeable et sur le produit. Nettoyez les contacts de la pile / pile rechargeable et du compartiment à pile avant d‘insérer la pile ! Retirez immédiatement les piles / piles rechar- geables usées du pro- duit. Avant la mise en service Retirez le film de protection de l‘écran LCD avant la première utilisation. -
Page 106: Mise En Place De La Pile
Remarque : ce produit ne doit pas être utilisé sur un vélo électrique. Le moteur du vélo pourrait occasionner le dysfonctionnement du produit. Mise en place de la pile Pour insérer la pile , veuillez procéder comme le montre la Fig. A. Utilisez une pièce de monnaie pour ouvrir le compartiment à... -
Page 107: Mise En Place Du Compteur Vélo
Mise en place du compteur vélo Pour la pose du produit, procédez comme le montrent les figures B à I. Coupez les extrémités qui dépassent des attachecâbles à l‘aide d‘un outil appro- prié, une pince coupante par exemple. Remarque : assurez-vous que le compteur vélo est installé... - Page 108 Fonctions importantes : Touche MODE pour régler la valeur / touche afin de modifier et accepter les réglages – Langue : Sélection entre 6 langues. – Profil de l‘utilisateur : sélection entre AVANCE (avancé) et FACILE (simple). – Taille des pneus : indiquez la taille des pneus en mm, saisie d‘un nombre à...
- Page 109 – Émission CO2 : saisie d‘un nombre à trois chiffres dans l‘unité G/KM. – Intervalle d‘entretien : saisie d‘un nombre à trois chiffres, alternativement dans l‘unité KM ou MILE. Indication : lorsque l‘intervalle d‘entretien est sur „000“, l‘affichage de l‘entretien est établi. –...
-
Page 110: Connecter Le Compteur De Vélo Avec Le Capteur
Confirmez votre choix avec la touche SET Appuyez sur la touche MODE , afin de terminer les réglages. Les réglages de base ont été effectués avec succès. Si vous souhaitez modifier les réglages de base, suivez les étapes du chapitre «Réinitiali- sation du compteur de vélo»... -
Page 111: Utilisation Du Compteur De Vélo
Utilisation du compteur de vélo Remarque : lorsque le compteur de vélo n‘est pas utilisé durant plus de 5 minutes, il passe auto- matiquement en mode de veille. Une pression d‘une touche quelconque ou une vibration réactive le compteur. L‘affichage de fonction indique le mode actuel. - Page 112 CO2 KG> EPARGNE> ETA> KM+/-> TIMER+/-> SCAN Mode FACILE : en appuyant sur la touche MODE , vous pouvez sélectionner les fonctions suivantes : DISJOUR > VIT-MAX > VITMOYEN > TEMPPARC Indication : vous pouvez également régler individuellement les fonctions que vous souhaitez. Référezvous pour cela au chapitre „CUSTOMIZE Modus (mode personnaliser).
- Page 113 compteur kilométrique et de l‘intervalle d‘en- tretien. TIME-TOT : durée totale du trajet. Appuyez et maintenez enfoncée la touche pendant 3 secondes, puis appuyez de nouveau sur la touche SET , afin de mo- difier la durée totale de trajet enregistrée. DISJOUR : distance de trajet.
- Page 114 mesurée jusqu‘à maintenant. Appuyez de nouveau sur la touche SET , afin d‘afficher la valeur de température minimale (LO) mesu- rée jusqu‘à maintenant. Appuyez sur la touche SET et maintenez-la pendant que les températures maximale et minimale sont affichées, afin de revenir à la température ac- tuelle et de supprimer les données enregis- trées.
- Page 115 Appuyez et maintenez enfoncée la touche pendant 3 secondes, afin de remettre le compteur de calories à 0. GRAS : combustion de graisse en grammes. Appuyez et maintenez enfoncée la touche pendant 3 secondes, afin de remettre la valeur de combustion des graisses à 0. CO2 KG : économie en CO2.
- Page 116 Appuyez sur la touche SET et maintenez-la enfoncée pendant 3 secondes pour modifier la distance ETA et le mode ETA. KM+ / - : compteur kilométrique. Appuyez et maintenez enfoncée la touche pendant 3 secondes, puis appuyez de nouveau sur la touche SET , afin de consulter les réglages du compteur kilomé- trique.
-
Page 117: Mode Customize (Adaptation)
Remarque : afin de quitter le mode Scan, ap- puyez sur la touche MODE . Vous revenez au mode AVANCE. Mode CUSTOMIZE (adaptation) En plus des modes AVANCE et FACILE, vous pouvez également réaliser vos réglages individuels sous le mode CUSTOMIZE. Pressez et maintenez enfoncée la touche MODE pendant 3 secondes et pressez... -
Page 118: Utilisation Du Rétroéclairage
Sélectionnez «ON» pour ajouter la fonction choisie au mode FACILE. Sélectionnez «OFF» si vous ne souhaitez pas ajouter la fonction choisie au mode FACILE. Appuyez sur la touche SET , afin de confir- mer votre saisie. Appuyez sur la touche MODE pour passer à... -
Page 119: Remplacement De La Pile
ou SETTING RESET (Réinitialiser les réglages) s‘affiche. Appuyez sur la touche MODE jusqu‘à voir apparaître SETTING RESET. Confirmez la réinitialisation de votre produit, en appuyant sur la touche SET Vous pouvez à présent adapter les réglages de base effectués précédemment (langue, âge, poids, heure). -
Page 120: Démonter Le Compteur Vélo
procédez comme le montre l‘illustration A. Tournez le couvercle du compartiment à pile dans le sens anti-horaire, en direction du symbole , à l‘aide d‘une pièce de monnaie pour l‘ouvrir. Retirez la pile usagée et remplacez-la par une pile neuve. Lors de la mise en place de la pile, veillez à... -
Page 121: Dépannage
Dépannage Remarque : le produit contient des composants électroniques. Des interférences sont donc possibles à proximité de produits émettant des signaux radio. – En cas de problèmes d‘affichage à l‘écran, éloi- gnez ces produits de la proximité du produit. En cas de dysfonctionnements de ce type, retirez la pile pendant quelques instants et remettez-la en place. - Page 122 Problème Solution Écran LCD vide, ou Retirez la pile. Insérez aucune réaction après un objet pointu (par réinsertion de la pile ex. un tournevis) dans le trou portant la men- tion «RESET». Insérez la pile 3 V dans son compartiment, de sorte à...
-
Page 123: Nettoyage Et Entretien
Problème Solution Écran noir La température am- biante est trop élevée ou le compteur vélo a été exposé trop long- temps aux rayons du soleil. Éloignez le produit de la lumière solaire et laissez-le refroidir quelques instants. L'écran LCD affiche des Retirez la pile quelques symboles irréguliers. -
Page 124: Maintenance
Maintenance Lorsque l’appareil reste inutilisé pendant une période prolongée, retirez la pile du boîtier. Contrôlez régulièrement le produit ainsi que tous ses composants quant à l‘assise correcte et la présence de dommages. Mise au rebut L’emballage se compose de matières recyclables pouvant être mises au rebut dans les déchetteries locales. - Page 125 Le produit et les matériaux d’emballage sont recyclables, mettez-les au rebut sé- parément pour un meilleur traitement des déchets. Le logo Triman n’est valable qu’en France. Votre mairie ou votre municipalité vous renseigneront sur les possibilités de mise au rebut des produits usagés. Afin de contribuer à...
-
Page 126: Déclaration De Conformité Ue Simplifiée
doivent être retournés dans les centres de collecte proposés. Pollution de l’environnement par la mise au rebut incorrecte des piles / piles rechargeables ! Les piles / piles rechargeables ne doivent pas être mises au rebut avec les ordures ménagères. Elles peuvent contenir des métaux lourds toxiques et doivent être considérées comme des déchets spé- ciaux. -
Page 127: Garantie
est en accord avec les directives 2014/53/UE et 2011/65/UE. Le texte complet de la déclaration de conformité est disponible à l’adresse Internet suivante : www.owim.com Garantie Le produit a été fabriqué selon des critères de qua- lité stricts et contrôlé consciencieusement avant sa livraison. - Page 128 produit est endommagé suite à une utilisation inappropriée ou à un entretien défaillant. La garantie couvre les vices matériels et de fabri- cation. Cette garantie ne s’étend ni aux pièces du produit soumises à une usure normale (p. ex. des piles) et qui, par conséquent, peuvent être considé- rées comme des pièces d’usure, ni aux dommages sur des composants fragiles, comme des interrup-...
- Page 129 Inleiding ........Pagina Correct gebruik ......Pagina Functies ........Pagina Beschrijving van de onderdelen . Pagina Technische gegevens ....Pagina Omvang van de levering.... Pagina Algemene veiligheids instructies....Pagina Veiligheids instructies voor batterijen / accu‘s ......Pagina Voor de ingebruikname ..Pagina Batterij plaatsen ......
- Page 130 Gebruik van de displayverlichting ......Pagina Fietscomputer resetten ....Pagina Batterij vervangen ....... Pagina Fietscomputer van de fiets demonteren ......... Pagina Storingen oplossen ..... Pagina Reiniging en onderhoud ..Pagina Onderhoud ........Pagina Afvoer ..........Pagina Vereenvoudigde EU- Conformiteitsverklaring ..Pagina Garantie ........
-
Page 131: Inleiding
Fietscomputer Inleiding Hartelijk gefeliciteerd met de aankoop van uw nieuwe product. U heeft voor een hoogwaardig product gekozen. De gebruiksaanwijzing is een deel van het product. Deze bevat belangrijke aan- wijzingen voor veiligheid, gebruik en verwijdering. Maakt U zich voor de ingebruikname van het pro- duct met alle bedienings- en veiligheidsvoorschriften vertrouwd. - Page 132 – Temperatuurweergave °C / °F – Memory-functie met min. en max. temperatuur – Weergave v / d snelheid (0–99,9 km / h) – Weergave gemiddelde snelheid (0–99,9 km / h) – Weergave hoogste snelheid (0–99,9 km / h) – Snelheid-vergelijking –...
-
Page 133: Beschrijving Van De Onderdelen
Beschrijving van de onderdelen Magneet Kabelbinder Batterij Demping voor de fietscomputer-houder Houder Sensor Batterijdeksel van de fietscomputer Fietscomputer Batterijdeksel van de sensor Weergave primaire functiewaarde Functie-weergave Weergave secondaire functiewaarde LC-display MODE-knop (M) Weergave snelheid-vergelijking: Vergelijkt de huidige snelheid met de gemiddelde snelheid ▲... -
Page 134: Technische Gegevens
Snelheidstrend Deze geeft de trend weer, of de snelheid toe- neemt (grote balk rechts) of afneemt (kleine balk links). SET-knop (S) Technische gegevens Batterij: (gelijkstroom) (CR2032 knoopcel) Bedrijfstemperatuur: 0–50 °C Frequentieband: 125 KHz +/-10 KHz Max. zendvermogen: 125 KHz <6.58 dBm Omvang van de levering 1 draadloze fietscomputer 1 houder voor de fietscomputer... - Page 135 2 reserve afdichtringen voor de fietscomputer en sensor 1 gebruiksaanwijzing Algemene veiligheids- instructies BEWAAR ALLE VEILIG- HEIDSINSTRUCTIES EN AANWIJZINGEN OM DEZE EVENTUEEL LATER TE KUNNEN RAADPLE- GEN! NL/BE...
- Page 136 Dit product kan door kinderen vanaf 8 alsmede door personen met verminderde fysieke, sensorische of mentale vaardigheden of een gebrek aan ervaring en kennis worden gebruikt, als zij onder toezicht staan of geïnstrueerd werden met betrekking tot het veilige gebruik van het product en zij de hieruit voortvloeiende 136 NL/BE...
- Page 137 gevaren begrijpen. Kin- deren mogen niet met het product spelen. Reiniging en onderhoud mag niet door kinderen zonder toezicht worden uitge- voerd. Houd er alstublieft reke- ning mee, dat de garantie niet geldt voor schade, die wordt veroorzaakt door onjuiste omgang, het niet in acht nemen van de gebruiksaanwijzing NL/BE...
-
Page 138: Veiligheids Instructies Voor Batterijen / Accu's
en veiligheidsinstructies of het gebruik door on- bevoegden. Veiligheids- instructies voor batterijen / accu‘s LEVENSGEVAAR! Houd batterijen / accu‘s buiten het bereik van kinderen. Raadpleeg bij inslikken onmiddellijk een arts! 138 NL/BE... - Page 139 EXPLOSIEGE- VAAR! Laad niet oplaadbare batterijen nooit op. Sluit de batte- rijen / accu‘s niet kort en / of open deze niet. Daardoor kan de batterij oververhit raken, in brand vliegen of exploderen. Gooi batterijen / accu‘s nooit in het vuur of water. Stel batterijen / accu‘s nooit bloot aan mecha- nische belastingen.
- Page 140 Risico dat de batte- rijen / accu’s lekken Vermijd extreme omstan- digheden en temperaturen die invloed op de batte- rijen / accu‘s zouden kunnen hebben bijv. ra- diatoren / direct zonlicht. Vermijd contact met huid, ogen en slijmvliezen! Spoel in geval van con- tact met batterijzuur de desbetreffende plekken direct af met voldoende...
- Page 141 schoon water en raad- pleeg onmiddellijk een arts! DRAAG VEILIGHEIDS- HANDSCHOENEN! Lekkende of beschadigde batterijen / accu‘s kunnen in geval van huidcontact chemische brandwonden veroorzaken. Draag daarom in dit geval ge- schikte veiligheidshand- schoenen. NL/BE...
- Page 142 Als de batterijen / accu‘s lekken, dient u deze direct uit het product te halen om beschadigin- gen te vermijden. Gebruik alleen batte- rijen / accu‘s van het- zelfde type. Gebruik nooit nieuwe en oude batterijen / accu‘s door elkaar! Verwijder de batterijen / accu‘s, als u het product 142 NL/BE...
- Page 143 gedurende een langere periode niet gebruikt. Risico op beschadi- ging van het product Gebruik uitsluitend het aangegeven type batterij / accu! Plaats de batterijen / accu‘s volgens de weer- gegeven polariteit (+) en (-) op batterij / accu en op product. NL/BE...
-
Page 144: Voor De Ingebruikname
Reinig de contacten van de batterij / accu en die in het batterijvak, voor- dat u deze plaatst! Verwijder verbruikte batterijen / accu‘s direct uit het product. Voor de ingebruikname Verwijder voor de eerste ingebruikname de be- schermende folie van het LC-display Opmerking: dit product mag niet in combinatie met een E-bike gebruikt worden. -
Page 145: Fietscomputer Monteren
Gebruik voor het openen van het batterijvak een munt. Draai hiermee het batterijvakdeksel linksom. Let erop, dat de batterij juist in het batterijvak wordt geplaatst (polariteit). Deze wordt in het batterijvakje aangegeven. Con- troleer dat de afdichtring voor het plaatsen van de batterij correct is aangebracht. -
Page 146: Ingebruikname
ten opzichte van de sensor binnen een hoek van 30 ° zoals weergegeven op afb. B. Ingebruikname Aanpassen van de basis-instellingen Basis-instellingen: Taal > Gebruiksprofiel > Bandenmaat > Lengte-eenheid > Leeftijd > Ge- wichtseenheid > Gewicht > Tijdnotatie > Tijd > Datumnotatie >... - Page 147 Opmerking: u kunt de omtrek (U) van de band berekenen door de diameter (D) van de band te vermenigvuldigen met 3,1416 (afb. L). De tabel (afb. M) vermeldt de omtrek (U) van de meest gangbare diameters (D). – Lengte-eenheid: keuze tussen KM / KMH of MILE / MPH.
- Page 148 – Achtergrondverlichting AAN / UIT: IN- resp. UIT- SCHAKELEN van de achtergrondverlichting. Bij ingeschakelde achtergrondverlichting kunt u het INSCHAKEL- resp. het UITSCHAKELMOMENT invoeren. U kunt de achtergrondverlichting tijdens de invoer inschakelen. – ETA-afstand: invoer van maximaal vijf cijfers, naar keuze in de eenheid KM of MILE. –...
-
Page 149: Fietscomputer Verbinden Met De Sensor
Fietscomputer verbinden met de sensor Gebruik de magneet om de sensor activeren, en de snelheidstrend toont een curve ter bevestiging van de succesvolle ver- binding. De fietscomputer is nu gereed voor gebruik. Als de verbinding wordt verbro- ken, volg dan de stappen uit het hoofdstuk „Storingen oplossen“... - Page 150 ingedrukt om de opgeslagen waarden te be- kijken of te resetten. De fietscomputer beschikt over de volgende functies: ERVAREN-modus: door te drukken op de MODE- knop kunt u kiezen uit de volgende functie- weergaven: TIJD> TOTAALKM> TOTAALTM> DAG-KM> MAX-KM / H> GEM-KM / H> RIT-TIJD> TEMP> STPWATCH>...
- Page 151 SET-knop om de tijd- en datum-instellingen op te roepen. Opmerking: u kunt door het indrukken van wisselen tussen tijd- en de SET-knop datumweergave. TOTAALKM: totaal aantal gereden kilometers. Druk op de SET-knop en houd deze 3 seconden ingedrukt, druk opnieuw op de om de instellingen voor banden- SET-knop maat, tripteller en onderhoudsinterval te reset-...
- Page 152 MAX-KM / H: hoogste snelheid. Druk op de SET-knop en houd deze 3 seconden ingedrukt om de hoogst gereden snelheid op 0 te zetten. GEM-KM / H: gemiddelde snelheid. Druk op de SET-knop en houd deze 3 seconden ingedrukt om de gemiddeld gereden snelheid op 0 te zetten.
- Page 153 STPWATCH: stopwatch. Druk op de SET-toets om de stopwatch te starten. Druk opnieuw op de SET-knop de stopwatch te stoppen. Druk op de SET-knop en houd deze 3 seconden ingedrukt om de stopwatch op 0 te zetten. CAL CONS: actueel calorieverbruik. CALORIE: calorieën-teller.
- Page 154 SET-knop om de instelling voor de een- heid en de referentiewaarde van het brand- stofverbruik op te roepen. ETA: verwachte aankomsttijd Op het display verschijnt ETASTART: druk op de SET- en MODE-knop om de ETA- functie te activeren. Druk op de SET-knop en houd deze 3 seconden ingedrukt om de ETA-afstand resp.
- Page 155 SCAN: scan Opmerking: in de scan-modus wordt automatisch gewisseld tussen de weergave van de trip-afstand, hoogste snelheid, gemiddelde snelheid en triptijd. Opmerking: raadpleeg het hoofdstuk „Wijzigen van de basis-instellingen“ voor het veranderen van de instellingen. Opmerking: om de scan-modus af te sluiten, om terug te keren drukt u op de MODE-knop naar de ERVAREN-modus.
-
Page 156: Gebruik Van De Displayverlichting
Druk op de SET-knop en houd deze inge- drukt om in de CUSTOMIZE (aangepaste) modus te komen. Druk nogmaals op de SET-knop . Druk op de MODE-knop om individuele instellingen te activeren of te deactiveren (d.w.z. TIJD). Kies „ON“ om de geselecteerde functie toe te voegen aan de BEGINNER-modus. -
Page 157: Fietscomputer Resetten
Fietscomputer resetten Druk eerst op de SET-knop en houd deze ingedrukt, houd vervolgens de MODE-knop ingedrukt om bij de instelling-modus te ko- men. SETTING OPEN (instellingen openen) of SETTING RESET (instellingen resetten) wordt weergegeven. Druk op de MODE- knop tot SETTING OPEN wordt weerge- geven. - Page 158 Druk eerst op de MODE-knop en houd deze ingedrukt, druk eveneens op de SET-knop houd beide ingedrukt tot op het lcd-scherm het batterijsymbool en {{----}} wordt weergegeven. Voor het vervangen van de batterij gaat u te werk zoals aangegeven in afbeelding A. Draai het batterijdek- sel met een munt linksom in de richting van het -symbool om het batterijvak te openen.
-
Page 159: Fietscomputer Van De Fiets Demonteren
Fietscomputer van de fiets demonteren Draai de fietscomputer linksom om deze te demonteren (Afb. K). Om de kabelbinder te verwijderen dient u een geschikt gereedschap, zoals een zijknip- tang, te gebruiken. Storingen oplossen Opmerking: het product bevat elektronische componenten. Daarom kunnen er, indien het zich in de buurt van producten bevindt, die radiosigna- len uitstralen, storingen worden veroorzaakt. - Page 160 Probleem Oplossing Leeg LC-display of Verwijder de batterij. geen antwoord na het Steek een puntig hernieuwd plaatsen voorwerp (bijv. een van de batterij schroevendraaier) in het met “RESET” ge- markeerde gat. Plaats de 3 V batterij zo in het batterijvak, dat de +pool naar boven wijst.
-
Page 161: Reiniging En Onderhoud
Probleem Oplossing Display zwart De omgevingstempe- ratuur is te hoog of de fietscomputer werd te lang aan direct zon- licht blootgesteld. Ver- wijder het product uit het directe zonlicht en laat het een poosje afkoelen. Het LC-display toont Verwijder de batterij onregelmatige symbolen. -
Page 162: Onderhoud
Onderhoud Verwijder de batterij, als het product gedu- rende een langere periode niet wordt gebruikt. Controleer het product inclusief alle onderdelen regelmatig op beschadiging en een goede bevestiging. Afvoer De verpakking bestaat uit milieuvriendelijke grond- stoffen die u via de plaatselijke recyclingcontainers kunt afvoeren. - Page 163 Het product en de verpakkingsmaterialen zijn recyclebaar; verwijder deze afzon- derlijk voor een betere afvalbehande- ling. Het Triman-logo geldt alleen voor Frankrijk. Informatie over de mogelijkheden om het uitgediende product na gebruik te verwijderen, verstrekt uw gemeentelijke overheid. Gooi het afgedankte product omwille van het milieu niet weg via het huisvuil, maar geef het af bij het daarvoor bestemde depot of het gemeentelijke...
-
Page 164: Vereenvoudigde Eu- Conformiteitsverklaring
Milieuschade door foutieve verwijdering van de batterijen / accu‘s! Batterijen / accu‘s mogen niet via het huisvuil worden weggegooid. Ze kunnen giftige zware metalen bevatten en vallen onder het chemisch afval. De chemische symbolen van de zware metalen zijn: Cd = cadmium, Hg = kwik, Pb = lood. -
Page 165: Garantie
Garantie Het product wordt volgens strenge kwaliteitsricht- lijnen zorgvuldig geproduceerd en voor levering grondig getest. In geval van schade aan het product kunt u rechtmatig beroep doen op de verkoper van het product. Deze wettelijke rechten worden door onze hierna vermelde garantie niet beperkt. Op dit product verlenen wij 3 jaar garantie vanaf aankoopdatum. - Page 166 beschadigingen aan breekbare onderdelen, zoals bijv. schakelaars, accu’s of dergelijke onderdelen, die gemaakt zijn van glas. 166 NL/BE...
- Page 167 Wstęp ..........Strona Użycie zgodne z przeznaczeniem......Strona Funkcje .......... Strona Opis części ........Strona Dane techniczne ......Strona Zawartość ........Strona Ogólne wskazówki bezpieczeństwa ......Strona Wskazówki bezpieczeń- stwa dla baterii / akumulatorów ..Strona Przed uruchomieniem ....Strona Wkładanie baterii ......
- Page 168 Tryb CUSTOMIZE (dopasowania) ......Strona Zastosowanie podświetlenia ..Strona Resetowanie komputera rowerowego ......... Strona Wymiana baterii ......Strona Demontowanie komputera z roweru ........Strona Usuwanie usterek ......Strona Czyszczenie i pielęgnacja ..Strona Konserwacja ........ Strona Utylizacja ........Strona Uproszczona deklaracja zgodności UE ........
-
Page 169: Wstęp
Licznik rowerowy Wstęp Gratulujemy Państwu zakupu nowego produktu. Tym samym zdecydowali się Państwo na zakup produktu wysokiej jakości. Instrukcja obsługi jest częścią tego produktu. Zawiera ona ważne wska- zówki dotyczące bezpieczeństwa, użytkowania i utylizacji. Przed pierwszym użyciem produktu należy zapoznać się ze wszystkimi wskazówkami dotyczącymi obsługi i bezpieczeństwa. -
Page 170: Funkcje
Funkcje – Języki menu: GB, DE, FR, NL, IT, ES – Zegar – Stoper – Termometr °C / °F – Funkcja pamięci temperatury min. i maks. – Wskaźnik prędkości jazdy (0–99,9 km / h) – Wskaźnik średniej prędkości (0–99,9 km / h) –... -
Page 171: Opis Części
Opis części Magnes Opaska kablowa Bateria Amortyzator do uchwytu komputera rowerowego Uchwyt Czujnik Pokrywa komory na baterie komputera rowerowego Komputer rowerowy Pokrywa komory na baterię czujnika Podstawowy wskaźnik wartości funkcji Wskaźnik funkcji Drugorzędny wskaźnik wartości funkcji Wyświetlacz LC Przycisk MODE (M) Wskaźnik porównania prędkości Porównuje aktualną... -
Page 172: Dane Techniczne
Wskaźnik stanu baterii (dla komputera rowerowego) Trend prędkości Pokazuje rozwój, czy prędkość wzrasta (duży słupek, po prawej) lub maleje (mały słupek, po lewej). Przycisk SET (S) Dane techniczne Bateria: (prąd stały) (bateria guzikowa typu CR2032) Temperatura robocza: 0–50 °C Pasmo częstotliwości: 125 KHz +/-10 KHz Maks. -
Page 173: Ogólne Wskazówki Bezpieczeństwa
2 baterie, 3 V (prąd stały), model CR2032 bateria guzikowa 2 wymienne pierścienie uszczelniające do komputera rowerowego i czujnika 1 instrukcja obsługi Ogólne wskazówki bezpieczeństwa PROSIMY O ZACHOWA- NIE WSZYSTKICH WSKAZÓWEK BEZPIE- CZEŃSTWA I INSTRUKCJI OBSŁUGI! - Page 174 Niniejszy produkt może być używany przez dzieci od lat 8 oraz przez osoby z obniżonymi zdolno- ściami fizycznymi, senso- rycznymi lub mentalnymi lub brakiem doświadcze- nia i/lub wiedzy, jeśli po- zostają pod nadzorem lub zostały pouczone w kwestii bezpiecznego użycia produktu i rozu- mieją...
- Page 175 mogą bawić się produk- tem. Czyszczenie i kon- serwacja nie mogą być wykonywane przez dzieci bez nadzoru. Proszę pamiętać, że gwarancja nie obejmuje szkód spowodowanych z niewłaściwą obsługą, nieprzestrzeganiem wskazówek do dotyczą- cych obsługi i bezpie- czeństwa lub użyciem...
- Page 176 przez osoby nieupoważ- nione. Wskazówki bezpieczeń- stwa dla baterii / akumulatorów ZAGROŻENIE ŻYCIA! Baterie / akumulatory należy trzymać poza zasięgiem dzieci. W przypadku połknięcia należy natychmiast udać się do lekarza! 176 PL...
- Page 177 NIEBEZPIE- CZEŃSTWO WYBUCHU! Baterii jednorazowego użytku nie wolno ładować po- nownie. Baterii / akumu- latorów nie należy zwierać i / lub otwierać. Może to doprowadzić do prze- grzania, pożaru lub wybuchu. Nigdy nie należy wrzu- cać baterii / akumulato- rów do ognia lub wody.
- Page 178 Nigdy nie należy narażać baterii / akumulatorów na obciążenia mecha- niczne. Ryzyko wycieku kwasu z baterii / akumulatorów Należy unikać ekstre- malnych warunków i temperatur, które mogą oddziaływać na baterie / akumulatory, np. kalory- ferów / bezpośredniego 178 PL...
- Page 179 działania promieniowa- nia słonecznego. Jeśli wyciekną baterie / akumulatory, należy uni- kać kontaktu skóry, oczu i błon śluzowych z che- mikaliami! Dotknięte miejsca natychmiast przepłukać czystą wodą i udać się do lekarza! ZAKŁADAĆ RĘKAWICE OCHRONNE! Wylane lub uszkodzone baterie /...
- Page 180 akumulatory po dotknięciu skóry mogą spowodować poparzenia chemiczne. Dlatego należy w takim przypadku nakładać odpowiednie rękawice ochronne. W przypadku wycieku baterii / akumulatorów natychmiast usunąć je z produktu, aby uniknąć uszkodzeń. Używać wyłącznie baterii / akumulatorów 180 PL...
- Page 181 tego samego typu. Nie zakładać razem nowych oraz zużytych baterii / akumulatorów! Jeżeli produkt nie jest przez dłuższy czas uży- wany, baterie / akumula- torynależy wyjąć. Ryzyko uszkodzenia produktu Używać wyłącznie zale- canego rodzaju baterii / akumulatora!
- Page 182 Włożyć baterie / akumu- latory zgodnie z ozna- czeniem biegunów (+) i (-) na baterii / akumula- torze i produkcie. Jeśli to konieczne, oczy- ścić styki baterii / akumu- latora i w komorze baterii przed włożeniem baterii! Zużyte baterie / akumu- latory wyjąć...
-
Page 183: Przed Uruchomieniem
Przed uruchomieniem Przed pierwszym użyciem usunąć folię ochronną z wyświetlacza LC Wskazówka: Produktu nie powinno się używać na rowerze elektrycznym. Silnik mógłby wywołać zakłócenia funkcji produktu. Wkładanie baterii W celu założenia baterii należy postępo- wać w sposób przedstawiony na rysunku A. Do otwarcia komory na baterię... -
Page 184: Montaż Komputera Rowerowego
Przekręcić pokrywę komory przy użyciu monety w kierunku zgodnym z ruchem wskazówek zegara na komorze na baterię, aby ją zamknąć. Montaż komputera rowerowego Aby założyć produkt, należy postępować zgodnie z rysunkami od B do I. Przyciąć wystające końce opaski kablowej za pomocą... - Page 185 długości > wiek > prędkość > waga > format czasu > godzina > format daty > data > oszczęd- ność CO2 > interwał konserwacji > podświetlenie WŁ./WYŁ. > odległość ETA > tryb ETA > format paliwa > zużycie paliwa > jednostka temperatury Ważne funkcje: Przycisk MODE do ustawiania wartości / przy-...
- Page 186 – Waga: Wprowadzenie trzycyfrowej liczby, alternatywnie w jednostce KG lub LB. – Format czasu: Wybór pomiędzy 12 a 24 godzinami. – Godzina: Wprowadzenie godziny i minut. – Format daty: Wybór pomiędzy DD-MM-RR a MM-DD-RR. – Data: Wprowadzenie roku, miesiąca i dnia. –...
-
Page 187: Połączenie Komputera Rowerowego Z Czujnikiem
– Tryb ETA: Wybór pomiędzy CLOCK (godzina) a TIME (czas jazdy). – Format paliwa: Wybór pomiędzy LITER a GALLON (galon). – Zużycie paliwa: Wprowadzenie trzycyfrowej liczby w jednostkach L / 100 KM (LITR) lub mpg (GALON). – Jednostka temperatury: Wybór pomiędzy °C a °F. Potwierdzić... -
Page 188: Zastosowanie Komputera Rowerowego
połączenia. Komputer rowerowy jest teraz gotowy do zastosowania. Jeśli połączenie zo- stanie przerwane, należy postępować zgod- nie z krokami opisanymi w sekcji „Usuwanie usterek“ i zresetować wszystkie ustawienia podstawowe. Następnie trzeba będzie po- wtórzyć połączenie pomiędzy komputerem ro- werowym a czujnikiem Zastosowanie komputera rowerowego Wskazówka: Komputer rowerowy automatycz-... - Page 189 Komputer rowerowy posiada następu- jące funkcje: Tryb ADVANCE: Poprzez naciśnięcie przycisku można wybrać następujące wskaźniki MODE funkcji: CLOCK > TOTALODO > TOTAL-TM > TRIPDIST > MAXSPEED > AVGSPEED > TRIPTIME > TEMP > STPWATCH > CAL RATE > CALORIE > FAT-BURN >...
- Page 190 Wskazówka: Przez naciskanie przycisku można przełączać pomiędzy wskaź- nikiem czasu i daty. TOTALODO: Licznik wszystkich kilometrów. Nacisnąć i przytrzymać przycisk SET przez 3 sekundy i ponownie nacisnąć przy- cisk SET , aby zmienić ustawienia wielko- ści opon, drogomierza i interwału konserwacji.
- Page 191 AVGSPEED: Prędkość średnia. Nacisnąć i przytrzymać przycisk SET przez 3 sekundy, aby ustawić średnią pręd- kość na 0. TRIPTIME: Czas jazdy. TEMP: Termometr. Nacisnąć przycisk SET , aby wyświetlić najwyższą jak dotąd zmierzoną wartość tem- peratury (HI). Ponownie nacisnąć przycisk SET , aby wyświetlić...
- Page 192 przytrzymać przycisk SET przez 3 se- kundy, aby stoper ustawić na 0. CAL RATE: Aktualnie spalone kalorie. CALORIE: Licznik kalorii. Nacisnąć i przytrzymać przycisk SET przez 3 sekundy, aby ustawić licznik kalorii na 0. FAT-BURN: Spalanie tłuszczu w gramach. Nacisnąć i przytrzymać przycisk SET przez 3 sekundy, aby ustawić...
- Page 193 ETA: Oczekiwany czas przybycia Na wyświetlaczu pojawi się ETASTART: Nacisnąć przycisk SET- i MODE , aby aktywować funkcję ETA. Nacisnąć i przytrzymać przycisk SET przez 3 sekundy, aby zmienić odległość ETA lub tryb ETA. KM+/-: Licznik kilometrów. Nacisnąć i przytrzymać przycisk SET przez 3 sekundy i ponownie nacisnąć...
-
Page 194: Tryb Customize (Dopasowania)
SCAN: Funkcja skanowania Wskazówka: W trybie Scan wyświetlacz auto- matycznie przełącza się między dystansem jazdy, maksymalną prędkością, średnią prędkością a czasem jazdy. Wskazówka: W celu zmiany ustawień należy przeczytać rozdział „Zmiana ustawień podstawo- wych“. Wskazówka: Aby zakończyć tryb Scan, należy nacisnąć... -
Page 195: Zastosowanie Podświetlenia
Nacisnąć i przytrzymać przycisk SET , aby przejść do trybu CUSTOMIZE (dopasowa- nia). Ponownie nacisnąć przycisk SET . Nacisnąć przycisk MODE , aby aktywować lub dez- aktywować indywidualne ustawienia (tzn. UHRZEIT). Wybrać „ON“, aby dodać wybraną funkcję do trybu EASY. Wybrać „OFF“, jeśli wybrana funkcja nie ma być... -
Page 196: Resetowanie Komputera Rowerowego
Resetowanie komputera rowerowego Nacisnąć i przytrzymać wpierw przycisk SET a następnie przytrzymać przycisk MODE , aby przejść do trybu ustawień. Wyświe- tlone zostanie SETTING OPEN (otwieranie ustawień) lub SETTING RESET (resetowanie ustawień). Nacisnąć przycisk MODE aż pojawi się SETTING RESET. Potwierdzić reset produktu, w tym celu należy nacisnąć... - Page 197 pojawi się wskaźnik stanu baterii . Nacisnąć i przytrzymać wpierw przycisk MODE równo- cześnie przytrzymać przycisk SET i przytrzymać oba wciśnięte, aż na wyświetlaczu LC pojawi się symbol baterii i {{----}}. W celu wymiany baterii na- leży postąpić jak pokazane jest to an rysunku A. Przekręcić...
-
Page 198: Demontowanie Komputera Z Roweru
Demontowanie komputera z roweru Przekręcić komputer rowerowy w kierunku od- wrotnym do ruchu wskazówek zegara, aby go zdjąć (rys. K). Aby usunąć opaski kablowe , użyć odpo- wiedniego narzędzia, na przykład obcinaczki boczne. Usuwanie usterek Wskazówka: Produkt zawiera wrażliwe części elektroniczne. - Page 199 Problem Rozwiązanie Pusty wyświetlacz LC Wyjąć baterię. lub brak odpowiedzi po Wprowadzić zaostr- ponownym włożeniu zony przedmiot (np. baterii śrubokręt) w otwór oz- naczony jako „RESET“. Włożyć baterię 3 V w taki sposób do komory na baterię, aby biegun + wskazywał w górę. Pokrywę...
- Page 200 Problem Rozwiązanie Czarny wyświetlacz Temperatura otoczenia jest zbyt wysoka lub licznik rowerowy wy- stawiony był zbyt długo na bezpośrednie promienie słoneczne. Usunąć produkt z bez- pośredniego światła słonecznego i schłodzić je przez chwilę. Wyświetlacz LC Wyjąć baterię, a pokazuje nieregularne następnie włożyć...
-
Page 201: Czyszczenie I Pielęgnacja
Czyszczenie i pielęgnacja Nie używać do czyszczenia żadnych cieczy ani detergentów. W innym razie grozi to uszkodzeniem produktu. Obudowę produktu należy czyścić wyłącznie miękką suchą szmatką. Konserwacja Usunąć baterię, jeśli produkt nie będzie uży- wany przez dłuższy czas. Należy regularnie sprawdzać produkt włącz- nie ze wszystkimi komponentami pod kątem uszkodzenia i bezpiecznego ułożenia. - Page 202 Przy segregowaniu odpadów prosimy zwrócić uwagę na oznakowanie mate- riałów opakowaniowych, oznaczone są one skrótami (a) i numerami (b) o na- stępującym znaczeniu: 1–7: Tworzywa sztuczne / 20–22: Papier i tektura / 80–98: Materiały kompozytowe. Produkt i materiał opakowania nadają się...
- Page 203 godzinach otwarcia udziela odpowiedni urząd. Uszkodzone lub zużyte baterie / akumulatory muszą być poddane recyklingowi zgodnie z dy- rektywą 2006/66/WE i jej zmianami. Oddać baterie / akumulatory i / lub produkt w dostępnych punktach zbiórki. Niewłaściwa utylizacja baterii / akumulatorów stwarza zagrożenie dla środowiska naturalnego! Baterii / akumulatorów nie należy wyrzucać...
-
Page 204: Uproszczona Deklaracja Zgodności Ue
Uproszczona deklaracja zgodności UE Niniejszym OWIM GmbH & Co. KG, Stiftsbergstraße 1, DE-74167 Neckarsulm, NIEMCY oświadcza, że HG00734A produkt (Licznik rowerowy ) spełnia wymagania dyrektyw 2014/53/UE, 2011/65/UE. Pełen tekst deklaracji zgodności UE dostępny jest na poniższej stronie internetowej: www.owim.com Gwarancja Produkt wyprodukowano według wysokich stan- dardów jakości i poddano skrupulatnej kontroli przed wysyłką. - Page 205 dokonujemy – według własnej oceny – bezpłatnej naprawy lub wymiany produktu. Świadczenie gwarancyjne obejmuje wady mate- riałowe i fabryczne. Gwarancja nie obejmuje części produktu ulegających normalnemu zużyciu, uznawanych za części zużywalne (np. baterie) oraz uszkodzeń części łamliwych, np. przełączni- ków, akumulatorów lub wykonanych ze szkła.
- Page 206 Úvod ..........Strana Použití ke stanovenému účelu ..Strana Funkce ........... Strana Popis dílů ........Strana Technická data ......Strana Obsah dodávky ......Strana Všeobecná bezpečnostní upozornění ........Strana Bezpečnostní pokyny pro baterie a akumulátory ....Strana Před uvedením do provozu ... Strana Vložení...
- Page 207 Reset cyklopočítače ..... Strana Výměna baterie ......Strana Demontáž cyklistického počítače .. Strana Odstranění poruch ....... Strana Čistění a ošetřování ....Strana Údržba ..........Strana Zlikvidování ......... Strana Zjednodušené EU prohlášení o konformitě ......... Strana Záruka ..........Strana...
-
Page 208: Úvod
Tachometr Úvod Blahopřejeme Vám ke koupi nového výrobku. Rozhodli jste se pro kvalitní produkt. Návod k ob- sluze je součástí tohoto výrobku. Obsahuje důležité pokyny pro bezpečnost, použití a likvidaci. Před použitím výrobku se seznamte se všemi pokyny k obsluze a bezpečnostními pokyny. Používejte vý- robek jen popsaným způsobem a na uvedených místech. - Page 209 – Funkce Memory (paměť) pro min. a max. teplotu – Zobrazení rychlosti jízdy (0–99,9 km / h) – Zobrazení průměrné rychlosti (0–99,9 km / h) – Zobrazení nejvyšší rychlosti (0–99,9 km / h) – Porovnání rychlostí – Trend rychlosti – Načasování doby jízdy (max. 9:59:59) (odpočet nebo přičítání) –...
-
Page 210: Popis Dílů
Popis dílů Magnet Stahovací páska Baterie Tlumič držáku cyklopočítače Držák Senzor Víčko přihrádky na baterie cyklopočítače Cyklopočítač Víčko přihrádky na baterie senzoru Primární zobrazení hodnoty funkce Kontrolka funkce Sekundární zobrazení hodnoty funkce Displej LC Tlačítko MODE (M) Ukazatel porovnání rychlosti: Porovnání... -
Page 211: Technická Data
Tato funkce zobrazuje vývoj, zda se rychlost zvyšuje (velký sloupeček vpravo) nebo snižuje (menší sloupeček vlevo). Tlačítko SET (S) Technická data Baterie: (stejnosměrný proud) (CR2032 knoflíkový článek) Provozní teplota: 0–50 °C Frekvenční pásmo: 125 KHz +/-10 KHz Maximální přenosný výkon: 125 KHz <6.58 dBm Obsah dodávky 1 bezdrátový... -
Page 212: Všeobecná Bezpečnostní Upozornění
2 náhradní těsnění pro cyklocomputer a senzor 1 návod k obsluze Všeobecná bezpečnostní upozornění USCHOVEJTE SI VŠECHNY BEZPEČNOSTNÍ UPOZOR- NĚNÍ A POKYNY PRO BUDOUCNOST! Tento výrobek mohou používat děti od 8 let, osoby se sníženými 212 CZ... - Page 213 fyzickými, smyslovými nebo duševními schop- nosti nebo s nedostateč- nými zkušenostmi a znalostmi, jestliže budou pod dohledem nebo byly poučeny o bezpečném používání výrobku a chápou nebezpečí, která z jeho používání vyplývají. S výrobkem si děti nesmí hrát. Děti nesmí bez do- hledu provádět čištění...
- Page 214 Vezměte na vědomí, že se záruka nevztahuje na škody způsobené neod- borným zacházením, nerespektováním bez- pečnostních pokynů a pokynů k provozu nebo použitím neoprávněnou osobou. 214 CZ...
-
Page 215: Bezpečnostní Pokyny Pro Baterie A Akumulátory
Bezpečnostní pokyny pro baterie a akumulátory NEBEZPEČÍ OHRO- ŽENÍ ŽIVOTA! Uchovávejte baterie a akumulátory mimo dosah dětí. V případě spolknutí okamžitě vyhledejte lékařskou pomoc! NEBEZPEČÍ VÝBUCHU! - Page 216 Nenabíjecí baterie nikdy znovu nenabíjejte. Baterie nebo akumulátory ne- zkratujte ani je neoteví- rejte. Hrozí přehřátí, nebezpečí požáru nebo jejich prasknutí. Nikdy neházejte baterie nebo akumulátory do ohně ani do vody. Nevystavujte baterie nebo akumulátory mechanickému zatížení. 216 CZ...
- Page 217 Nebezpečí vytečení baterií / akumulátorů Zabraňte extrémním podmínkám a teplotám, např. na topení anebo na slunci, které mohou negativně ovlivnit funkci baterií nebo akumulátorů. Vyhýbejte se kontaktu s pokožkou, očima a sliz- nicemi! Po kontaktu s kyselinou baterií ihned omyjte postižená místa dostatečným množstvím...
- Page 218 čisté vody a okamžitě vyhledejte lékařskou pomoc! NOSTE OCHRANNÉ RUKAVICE! Vyteklé i poškozené baterie nebo akumulátory mohou při kontaktu s pokožkou způsobit její poleptání. Noste proto vhodné rukavice. V případě vytečení ihned odstraňte baterie nebo 218 CZ...
- Page 219 akumulátory z výrobku, abyste zabránili jeho poškození! Používejte jen baterie nebo akumulátory stej- ného typu. Nekombinujte staré baterie nebo aku- mulátory s novými! Odstraňte baterie nebo akumulátory při delším nepoužívání z výrobku.
- Page 220 Nebezpečí poškození výrobku Používejte jen udaný typ baterie nebo akumulá- toru! Nasazujte baterie nebo akumulátory podle ozna- čení polarity (+) a (-) na bateriích nebo akumulá- torech a na výrobku. Vyčistěte před vložením kontakty baterie nebo akumulátoru a kontakty v přihrádce na baterie! 220 CZ...
-
Page 221: Před Uvedením Do Provozu
Vybité baterie nebo akumulátory ihned vyjměte z výrobku. Před uvedením do provozu Před prvním použitím stáhněte ochranou fólii z LC displeje Upozornění: Tento výrobek se nemá používat na E-Bike. Motor může rušit výrobek. Vložení baterie Při vkládání baterie postupujte podle obr. A. K otevření... -
Page 222: Připevnění Cyklocomputeru
Poznámka: V obsahu dodávky jsou 2 náhradní těsnění pro cyklocomputer a senzor. K uzavření přihrádky na baterie našroubujte na ní víčko pomocí mince. Připevnění cyklocomputeru Při připevňování výrobku postupujte podle ob- rázků B až I. Odstřihněte přesahující konce vázacích pásků vhodným nástrojem, například štípacími kleštěmi. - Page 223 času > Čas > Formát zobrazení data > Datum > Emise CO2 > Interval údržby > Světlo ZAP / VYP > Vzdálenost ETA > Režim ETA > Formát zobrazení paliva > Spotřeba paliva > Jednotka teploty Důležité funkce: Tlačítko MODE k nastavení...
- Page 224 – Formát zobrazení času: výběr zobrazení 12 a 24 hodin. – Čas: zadání hodiny a minuty. – Formát zobrazení data: výběr zobrazení DD-MM-RR a MM-DD-RR. – Datum: zadání roku, měsíce a dne. – Emise CO2: zadání třímístného čísla v jednotkách G/KM. –...
-
Page 225: Připojení Cyklopočítače K Senzoru
– Spotřeba pohonné hmoty: zadání třímístného čísla v jednotkách L/ 100 km (LITR) nebo gal (GALONŮ). – Jednotka teploty: výběr mezi jednotkami °C a °F. Potvrďte výběr tlačítkem SET Stiskněte tlačítko MODE k ukončení nasta- vení. Nyní jste provedli úspěšně základní na- stavení. -
Page 226: Použití Cyklopočítače
obnovit spojení mezi cyklopočítačem senzorem Použití cyklopočítače Upozornění: Déle než 5 minut nepoužívaný cy- klopočítač se automaticky přepne do pohotovost- ního režimu standby. Stisknutí libovolného tlačítka nebo vibrace počítač reaktivují. Ukazatel funkcí zobrazí aktuální režim. Opakovaným stisknutím tlačítka MODE můžete procházet funkce. Stiskněte a podržte tlačítko SET stisknuté, tím vyvoláte nebo resetujete uložené... - Page 227 EASY režim: stisknutím tlačítka MODE můžete zvolit násle- dující funkce: TRIPDIST > MAXSPEED > AVGSPEED > TRIPTIME Poznámka: Vámi požadované funkce můžete také individuálně nastavit. K tomu viz také kapitola „CUSTOMIZE režim (přizpůsobení). CLOCK: ukazuje čas. Stiskněte a podržte tlačítko SET na 3 vteřiny a znovu stiskněte tlačítko SET k vyvolání...
- Page 228 TRIPDIST: ujetá vzdálenost. Stiskněte tlačítko SET na 3 vteřiny k vynu- lování (nastavení na 0) ujeté vzdálenosti, nejvyšší rychlosti, průměrné rychlosti a doby jízdy. MAXSPEED: nejvyšší rychlost. Stiskněte a podržte tlačítko SET na 3 vte- řiny stisknuté, tím nastavíte nejvyšší rychlost na hodnotu 0.
- Page 229 STPWATCH: stopky. Stiskněte tlačítko SET ke spuštění stopek. Dalším stisknutím tlačítka SET stopky za- stavíte. Stiskněte a podržte tlačítko SET 3 vteřiny stisknuté, tím nastavíte stopky na hodnotu 0. CAL RATE: aktuálně spalované kalorie. CALORIE: počitadlo kalorií. Stiskněte a podržte tlačítko SET na 3 vteřiny stisknuté...
- Page 230 k vyvolání nastavení jednotek a referenční hodnoty spotřeby paliva. ETA: očekávaný čas dojezdu Na displeji se objeví ETASTART: stiskněte tlačítko SET a tlačítko MODE , pro aktivací funkce ETA. Ke změně ETA distance resp. ETA režimu stiskněte tlačítko SET na 3 vteřiny. KM+ / -: počitadlo kilometrů.
-
Page 231: Režim Customize (Vlastní Nastavení)
kapitolu „Změna základních nastavení“. Upozornění: K ukončení režimu skenování stisk- něte tlačítko MODE , tím se vrátíte do režimu ADVANCE. Režim CUSTOMIZE (vlastní nastavení) Kromě režimu ADVANCE (pokročilé) a EASY (základní) můžete v režimu CUSTOMIZE provést vlastní nastavení. Pro přechod k nastavení profilu stiskněte tlačítko MODE na 3 vteřiny a potom stiskněte tlačítko SET... -
Page 232: Použití Podsvícení
v případě, že nechcete požadovanou funkci přidat k režimu EASY. Stiskněte tlačítko SET k potvrzení zadané hodnoty. Stisknutím tlačítka MODE pře- jděte do další funkce a opakujte výše popsaný postup. Stiskněte tlačítko MODE , k ukončení nastavení. Použití podsvícení Stiskněte tlačítko SET k dočasnému zapnutí podsvícení. -
Page 233: Výměna Baterie
Nyní můžete předem provedená základní na- stavení upravit (jazyk, věk, hmotnost, čas). Zbývající data uložená do paměti se smažou. Poznámka: ke změně nastavení - nikoliv k jejich smazání - můžete zvolit SETTING OPEN. Pro změnu nastavení si přečtěte také kapitolu „Změna základ- ních nastavení“. -
Page 234: Demontáž Cyklistického Počítače
na baterii mincí ve směru hodinových ručiček ve směru symbolu , tím přihrádku na baterii zavřete. Stisknutím libovolného tlačítka se vrátíte do běžného provozního režimu. Upozornění: Po vyjmutí baterie dojde po 20 vteřinách k vymazání všech dat. Demontáž cyklistického počítače K sejmutí cyklocomputeru ho otočte doleva (obr. - Page 235 Problém Řešení Prázdný LC displej Vyjměte baterii. nebo žádné zobrazení Zasuňte špičatý před- po vložení baterie mět (např. šroubovák) do otvoru s označením RESET. Vložte do přihrádky baterii 3 V tak, aby + pól směřoval nahoru. Nasaďte víčko na přihrádku baterie. Mikroprocesor se vrátí...
-
Page 236: Čistění A Ošetřování
Problém Řešení Černý displej Příliš vysoká venkovní teplota anebo byl přístroj příliš dlouho vystaven přímému slunečnímu záření. Umístěte výrobek do stínu a nechte ho chvíli vychladnout. Displej zobrazuje Vyjměte baterie a nenormální symboly. znovu je nasaďte. Čistění a ošetřování Na čištění nepoužívejte žádné kapaliny nebo čisticí... -
Page 237: Údržba
Údržba Jestliže nebudete výrobek delší dobu používat, odstraňte z něho baterie. Kontrolujte pravidelně výrobek, jeho držení a veškeré komponenty, jestli nejsou poškozené. Zlikvidování Obal se skládá z ekologických materiálů, které můžete zlikvidovat prostřednictvím místních sběren recyklovatelných materiálů. Při třídění odpadu se řiďte podle ozna- čení... - Page 238 O možnostech likvidace vysloužilých zařízení se informujte u správy vaší obce nebo města. V zájmu ochrany životního prostředí vysloužilý výrobek nevyhazujte do do- movního odpadu, ale předejte k odborné likvidaci. O sběrnách a jejich otevíra- cích hodinách se můžete informovat u příslušné...
-
Page 239: Zjednodušené Eu Prohlášení O Konformitě
symboly těžkých kovů: Cd = kadmium, Hg = rtuť, Pb = olovo. Proto odevzdejte opotřebované baterie / akumulátory u komunální sběrny. Zjednodušené EU prohlášení o konformitě Tímto prohlačuje firma OWIM GmbH & Co. KG, Stiftsbergstraße 1, DE-74167 Neckarsulm, NĚMECKO že výrobek (Tachometr, HG00734A) odpovídá... - Page 240 si dobře originál pokladní stvrzenky. Tuto stvrzenku budete potřebovat jako doklad o zakoupení. Pokud se do 3 let od data zakoupení tohoto výrobku vyskytne vada materiálu nebo výrobní vada, výro- bek Vám – dle našeho rozhodnutí – bezplatně opravíme nebo vyměníme. Tato záruka zaniká, jestliže se výrobek poškodí, neodborně...
- Page 241 Úvod ..........Strana Používanie v súlade s určeným účelom .......... Strana Funkcie .......... Strana Popis častí ........Strana Technické údaje ......Strana Obsah dodávky ......Strana Všeobecné bezpečnostné upozornenia ......... Strana Bezpečnostné upozornenia týkajúce sa batérií / akumu látorových batérií ....Strana Pred uvedením do prevádzky ........
- Page 242 Režim CUSTOMIZE (prispôsobenie) ......Strana Používanie osvetlenia pozadia ... Strana Vynulovanie nastavení cyklopočítača ....... Strana Výmena batérie ......Strana Demontáž cyklopočítača z bicykla .......... Strana Odstraňovanie porúch ....Strana Čistenie a údržba ......Strana Údržba ..........Strana Likvidácia ........Strana Zjednodušené...
-
Page 243: Úvod
Tachometer Úvod Blahoželáme Vám ku kúpe Vášho nového výrobku. Rozhodli ste sa pre veľmi kvalitný výrobok. Návod na obsluhu je súčasťou tohto výrobku. Obsahuje dôležité upozornenia týkajúce sa bezpečnosti, používania a likvidácie. Skôr ako začnete výrobok používať, oboznámte sa so všetkými pokynmi k obsluhe a bezpečnosti. - Page 244 – stopky – zobrazenie teploty °C / °F – pamäťová funkcia pre min. a max. teplotu – zobrazenie rýchlosti jazdy (0–99,9 km / h) – zobrazenie priemernej rýchlosti (0–99,9 km / h) – zobrazenie maximálnej rýchlosti (0–99,9 km / h) –...
-
Page 245: Popis Častí
Popis častí Magnet Viazač káblov Batéria Tlmič pre držiak cyklopočítača Držiak Senzor Kryt priečinka pre batériu cyklopočítača Cyklopočítač Kryt priečinka pre batériu senzora Primárne zobrazenie funkčných hodnôt Funkčný displej Sekundárne zobrazenie funkčných hodnôt LC displej Tlačidlo MODE (M) Zobrazenie porovnania rýchlostí: Porovnáva aktuálnu rýchlosť... -
Page 246: Technické Údaje
Zobrazuje trend, či rýchlosť stúpa (veľká pa- lička, vpravo) alebo klesá (malá palička, vľavo). Tlačidlo SET (S) Technické údaje Batéria: (jednosmerný prúd) (CR2032 gombíková batéria) Prevádzková teplota: 0 – 50 °C Frekvenčné pásmo: 125 KHz +/-10 KHz Max. prenášaný výkon: 125 KHz <6.58 dBm Obsah dodávky 1 bezdrôtový... -
Page 247: Všeobecné Bezpečnostné Upozornenia
2 náhradné tesniace krúžky pre cyklopočítač a senzor 1 návod na používanie Všeobecné bezpečnostné upozornenia VŠETKY BEZPEČNOSTNÉ UPOZORNENIA A POKYNY USCHOVAJTE PRE NE- SKORŠIE POUŽITIE! Tento výrobok môžu používať deti od 8 rokov,... - Page 248 ako aj osoby so zníže- nými psychickými, senzo- rickými alebo mentálnymi schopnosťami alebo s ne- dostatkom skúseností a vedomostí, ak sú pod dozorom, alebo ak boli poučené ohľadom bez- pečného používania vý- robku, a ak porozumeli nebezpečenstvám spoje- ným s jeho používaním. Deti sa s výrobkom nesmú...
- Page 249 nesmú vykonávať deti bez dozoru. Myslite prosím na to, že garancia sa nevzťahuje na škody, ktoré vzniknú neodbornou manipulá- ciou, nerešpektovaním prevádzkových a bez- pečnostných upozornení alebo používaním skrze nekompetentné osoby.
- Page 250 Bezpečnostné upozornenia týkajúce sa batérií / akumu- látorových batérií NEBEZPEČENSTVO OHROZENIA ŽIVOTA! Batérie / akumulátorové batérie držte mimo do- sahu detí. V prípade prehltnutia okamžite vyhľadajte lekára! 250 SK...
- Page 251 NEBEZPEČEN- STVO EXPLÓ- ZIE! Nenabíjateľné batérie nikdy znova nenabíjajte. Batérie / akumulátorové batérie neskratujte a / alebo neotvárajte. Následkom môže byť prehriatie, požiar alebo explózia. Batérie / akumulátorové batérie nikdy nehádžte do ohňa alebo vody.
- Page 252 Nevystavujte batérie / akumulátorové batérie mechanickej záťaži. Riziko vytečenia batérií / akumuláto- rových batérií Batérie / akumulátorové batérie nikdy nevystavujte extrémnym podmienkam a teplotám, ktoré by na ne mohli pôsobiť, napr. na vykurovacích telesách / 252 SK...
- Page 253 priamom slnečnom žiarení. Ak batérie / akumuláto- rové batérie vytiekli, za- bráňte kontaktu pokožky, očí a slizníc s chemiká- liami! Ihneď vypláchnite postihnuté miesta väčším množstvom čistej vody a okamžite vyhľadajte lekára! NOSTE OCHRANNÉ RUKAVICE! Vytečené...
- Page 254 alebo poškodené batérie / akumulátorové batérie môžu pri kontakte s po- kožkou spôsobiť polep- tanie. V takom prípade preto noste vhodné ochranné rukavice. V prípade vytečenia ba- térií / akumulátorových batérií ich ihneď vyberte z výrobku, aby ste predišli vzniku škôd. Používajte iba batérie / akumulátorové...
-
Page 255: Akumulátorových Batérií
rovnakého typu. Nekom- binujte staré batérie / akumulátorové batérie s novými! Ak produkt dlhší čas nepoužívate, vyberte z neho batérie / akumulá- torové batérie. Riziko poškodenia produktu Používajte výhradne uvedený typ batérií / akumulátorových batérií! - Page 256 Vložte batérie / akumu- látorové batérie podľa označenia polarity (+) a (-) na batérii / akumu- látorovej batérii a vý- robku. Pred vložením vyčistite kontakty na batérii / akumulátorovej batérii a v priečinku pre batérie! Vybité batérie / akumu- látorové batérie ihneď vyberte z produktu.
-
Page 257: Pred Uvedením Do Prevádzky
Pred uvedením do prevádzky Pred prvým použitím odstráňte z LC displeja ochrannú fóliu Poznámka: Tento produkt by nemal byť použí- vaný na elektrických bicykloch. Motor by mohol vyvolať funkčné poruchy na produkte. Vkladanie batérie Pre vloženie batérie postupujte ako je uvedené... -
Page 258: Montáž Cyklopočítača
Mincou zatočte kryt priečinka pre batériu v smere hodinových ručičiek na priečinok pre batériu, aby ste ho zatvorili. Montáž cyklopočítača Pre upevnenie výrobku postupujte podľa obrázkov B až I. Odstrihnite prebytočné konce viazačov vhodným náradím, napr. odstriho- káblov vačom. Poznámka: Zabezpečte, aby bol cyklopočítač upevnený... - Page 259 emisia > Údržbový interval > Osvetlenie pozadia ZA-/ VYPNUTÉ > ETA-vzdialenosť > ETA-režim > Formát paliva > Spotreba paliva > Jednotka teploty Dôležité funkcie: Tlačidlo MODE pre nastavenie hodnôt /tlačidlo pre spracovanie a prevzatie nastavení - Jazyk: Výber zo 6 jazykov. - Používateľský...
- Page 260 - Časový formát: Výber medzi 12 a 24 hodín. - Čas: Zadanie hodiny a minúty. - Formát dátumu: Výber medzi DD-MM-YY a MM-DD-YY. - Dátum: Zadanie roka, mesiaca a dňa. - CO2 emisia: Zadanie trojmiestneho čísla v jed- notke G/KM. - Údržbový...
-
Page 261: Spojenie Cyklopočítača So Senzorom
- Spotreba paliva: Zadanie trojmiestneho čísla v jednotkách L / 100 KM (LITER) alebo mpg (GALÓN). - Jednotka teploty: Výber rmedzi °C a °F. Potvrďte Váš výber pomocou tlačidla SET Stlačte tlačidlo MODE pre ukončenie na- stavení. Teraz ste úspešne uskutočnili základné nastavenia. -
Page 262: Používanie Cyklopočítača
znovu vytvoriť spojenie medzi cyklopočítačom a senzorom Používanie cyklopočítača Poznámka: Ak cyklopočítač nepoužívate dlhšie ako 5 minút, automaticky sa prepne do režimu standby. Stlačenie ľubovoľného tlačidla alebo každá vibrácia reaktivuje počítač. Funkčné zobra- zenie ukazuje aktuálny režim. Viackrát stlačte tlačidlo MODE , aby ste sa posúvali cez rôzne funkcie. - Page 263 EASY režim: Stlačením tlačidla MODE môžete zvoliť nasledujúce funkcie: TRIPDIST > MAXSPEED > AVGSPEED > TRIPTIME Poznámka: Môžete si individuálne nastaviť i Vami želané funkcie. Pozrite si preto kapitolu „Režim CUSTOMIZE (prispôsobenie). CLOCK: Zobrazí sa denný čas. Stlačte a na 3 sekundy podržte stlačené tla- čidlo SET a znova stlačte tlačidlo SET aby ste načítali nastavenie času a dátumu.
- Page 264 TRIPDIST: Denná trasa. Stlačte a na 3 sekundy podržte stlačené tlačidlo SET , aby ste vynulovali dennú trasu, najvyššiu rýchlosť, priemernú rýchlosť a dobu jazdy. MAXSPEED: Maximálna rýchlosť. Stlačte a na 3 sekundy podržte stlačené tlačidlo SET , aby ste vynulovali najvyššiu rýchlosť.
- Page 265 znova stlačte tlačidlo SET , aby ste načítali nastavenie teplotnej jednotky. STPWATCH: Stopky. Stlačte tlačidlo SET pre spustenie stopiek. Znova stlačte tlačidlo SET pre zastavenie stopiek. Stlačte a na 3 sekundy podržte stla- čené tlačidlo SET , aby ste vynulovali stopky. CAL RATE: Momentálna spotreba kalórií.
- Page 266 aby ste načítali nastavenie jednotky a referenčnú hodnotu spotreby paliva. ETA: Očakávaný čas príchodu Na displeji sa objaví ETASTART: Stlačte tlačidlo SET a tlačidlo MODE , aby ste aktivovali funkciu ETA. Stlačte a na 3 sekundy podržte tlačidlo SET , aby ste zmenili ETA-vzdialenosť resp. ETA- režim.
-
Page 267: Režim Customize (Prispôsobenie)
SCAN: Skenovanie Poznámka: V režime skenovania displej auto- maticky prepína medzi zobrazením dennej trasy, najvyššej rýchlosti, priemernej rýchlosti a času jazdy. Poznámka: Pre zmenu nastavení si prečí- tajte kapitolu „Zmena základných nastavení“. Poznámka: Pre ukončenie režimu skenovania stlačte tlačidlo MODE a opäť... -
Page 268: Používanie Osvetlenia Pozadia
Znova stlačte tlačidlo SET . Stlačte tlačidlo MODE , aby ste aktivovali alebo deaktivo- vali individuálne nastavenia (tzn. ČAS). Zvoľte „ON“, aby ste zvolenú funkciu pridali do režimu EASY. Zvoľte „OFF“, ak želanú funkciu nechcete pridať do režimu EASY. Pre potvrdenie Vášho zadania stlačte tlačidlo . -
Page 269: Výmena Batérie
SETTING OPEN (otvoriť nastavenia) alebo SETTING RESET (vynulovať nastavenia). Stlačte tlačidlo MODE , až kým sa zobrazí SET- TING RESET. Potvrďte vynulovanie Vášho produktu tak, že stlačíte tlačidlo SET Teraz môžete prispôsobiť predtým uskutočnené nastavenia (jazyk, vek, hmotnosť, denný čas). Ostatné... -
Page 270: Demontáž Cyklopočítača Z Bicykla
otvorili priečinok pre batériu. Vyberte starú batériu a nahraďte ju novou batériou. Pri vkladaní dbajte na správnu polaritu. Tá je znázornená v priečinku pre batériu. Pred vložením batérie sa uistite, že je tesniaci krúžok správne umiestnený. Mincou otočte kryt priečinka pre batériu v smere hodinových ručičiek v smere symbola , aby ste zatvorili priečinok pre batériu. - Page 271 nachádza v blízkosti produktov, ktoré vysielajú rádiové signály. – Ak sa na displeji zobrazia chybové hlásenia, odstráňte takéto výrobky z okolia produktu. Pri takýchto funkčných poruchách vyberte na krátky čas batériu a znova ju vložte.
- Page 272 Problém Riešenie Prázdny LC displej Vyberte batériu. Za- alebo žiadna odpoveď veďte ostrý predmet po novom vložení (napr. šrobovák) do batérie otvoru označeného s „RESET“. Vložte 3 V batériu do priečinka pre batériu tak, aby +-pól ukazoval nahor. Vložte kryt priečinka pre batériu na batériový...
- Page 273 Problém Riešenie Displej čierny Teplota okolia je príliš vysoká alebo bol cyklopočítač príliš dlho vystavený priamemu slnečnému žiareniu. Odstráňte produkt z priameho slnečného žiarenia a nechajte ho chvíľu vychladnúť. LC displej zobrazuje Vyberte batériu a ná- nesprávne symboly. sledne ju znova vložte.
-
Page 274: Čistenie A Údržba
Čistenie a údržba Na čistenie nepoužívajte žiadne kvapaliny alebo čistiace prostriedky. Inak hrozí poško- denie produktu. Produkt čistite iba zvonku mäkkou, suchou handričkou. Údržba Ak výrobok dlhší čas nepoužívate, vyberte batériu z výrobku. Pravidelne kontrolujte výrobok vrátane všetkých komponentov ohľadom prípadných poškodení... - Page 275 Všímajte si prosím označenie obalových materiálov pre triedenie odpadu, sú označené skratkami (a) a číslami (b) s nasledujúcim významom: 1–7: Plasty / 20–22: Papier a kartón / 80–98: Spojené látky. Výrobok a obalové materiály sú recyk- lovateľné, zlikvidujte ich oddelene pre lepšie spracovanie odpadu.
-
Page 276: Zjednodušené Konformitné Prehlásenie
Defektné alebo použité batérie / akumulátorové batérie musia byť odovzdané na recykláciu podľa smernice 2006/66/ES a jej zmien. Batérie / aku- mulátorové batérie a / alebo výrobok odovzdajte prostredníctvom dostupných zberných stredísk. Nesprávna likvidácia batérií / akumulátorových batérií ničí životné prostredie! Batérie / akumulátorové... -
Page 277: Záruka
že výrobok (Tachometer HG00734A) zodpovedá smerniciam 2014/53/EÚ, 2011/65/EÚ. Úplný text EÚ konformitného prehlásenia je k dispozícii na nasledujúcej internetovej adrese: www.owim.com Záruka Tento výrobok bol dôkladne vyrobený podľa prís- nych akostných smerníc a pred dodaním svedomito testovaný. V prípade nedostatkov tohto výrobku Vám prináležia zákonné... - Page 278 zaniká, ak bol produkt poškodený, neodborne po- užívaný alebo neodborne udržiavaný. Poskytnutie záruky sa vzťahuje na chyby materiálu a výrobné chyby. Táto záruka sa nevzťahuje na časti produktu, ktoré sú vystavené normálnemu opotrebovaniu, a preto ich je možné považovať za opotrebovateľné diely (napr. batérie) alebo na poškodenia na rozbitných dieloch, napr.
- Page 279 DE-74167 Neckarsulm GERMANY Model-No.: HG00734A Version: 10 / 2018 Stand der Informationen · Last Information Update Version des informations · Stand van de informatie Stan informacji · Stav informací · Stav informácií: 09 / 2018 · Ident.-No.: HG00734A092018-8 IAN 307553...
Need help?
Do you have a question about the 307553 and is the answer not in the manual?
Questions and answers