Table of Contents
Advertisement
3M Personal Safety Division
3M Center St. Paul, MN 55144-1000
FOR MORE INFORMATION
In United States, contact:
Website: www.3M.com/PELTOR
Technical Assistance: 1-800-665-2942
PELTOR.comms@mmm.com
In Canada, contact: 1-855-484-3093
PELTOR.comms.canada@mmm.com
For other 3M products: 1-800-3M-HELPS or 1-651-737-6501
FP3869REVB
Please recycle.
© 3M 2020. All rights reserved.
3M is a trademark of 3M Company, used under
license in Canada. PELTOR is a trademark of 3M Company,
used under license in Canada.
Patent: www.3M.com/patent
3M PSD products are for occupational use only.
PARA OBTENER MÁS INFORMACIÓN en los Estados
Unidos:
Internet: www.3M.com/PELTOR
Información técnica: 1-800-665-2942
© 3M 2020. Todos los derechos reservados. 3M es
una marca registrada de la Compañía 3M, utilizadas bajo
licencia en Canadá. PELTOR es una marca registrada de la
Compañía 3M, utilizada bajo licencia en Canadá.
Los productos de la División de Protección Personal (PSD, por
su sigla en inglés) de 3M son solo para uso profesional.
TM
3M Personal Safety Division
3M Canada Company
P.O. Box 5757, London, Ontario N6A 4T1
Division de la protection individuelle - 3M Company
Canada
3M Canada, C.P. 5757 London
(Ontario) N6A 4T1
FOR MORE INFORMATION/POUR OBTENIR DE PLUS
AMPLES RENSEIGNEMENTS
In Canada, contact/Au Canada, communiquer avec :
Internet : www.3M.ca/safety
Technical Assistance/Assistance technique : 1 800 267-4414
Centre d'aide à la clientèle/Customer Care Center : 1 800
364-3577
© 3M 2020. Tous droits réservés.
3M est une marque de commerce de 3M
Company utilisées sous licence au Canada. PELTOR est
une marque de commerce de 3M Company, utilisée sous
licence au Canada.
Les produits de la DPI de 3M sont destinés à une utilisation
professionnelle seulement.
Advertisement
Table of Contents

Related Manuals for 3M Peltor ComTac VII MT14H41A-300NA


Summary of Contents for 3M Peltor ComTac VII MT14H41A-300NA
- Page 1 3M Company, utilisée sous Compañía 3M, utilizada bajo licencia en Canadá. licence au Canada. Les produits de la DPI de 3M sont destinés à une utilisation Los productos de la División de Protección Personal (PSD, por professionnelle seulement.
- Page 3 ComTac™ VII...
- Page 4 LABORATORY ATTENUATION U.S. EPA specifies the NRR as the measure of hearing protector noise reduction. However, 3M makes no warranties as to the suitability of the NRR for this purpose. 3M strongly recommends personal fit testing of hearing protectors. Research suggests that users may receive less noise reduction than indicated by the attenuation label value(s) on the packaging due to variation in fit, fitting skill, and motivation of the user.
- Page 7 3M™ PELTOR™ ComTac™ VII 1-16 17-32 33-48...
-
Page 8: Intended Use
For correct use, consult supervisor and User Instructions, or call 3M Technical Services. If your hearing seems dulled or you hear a ringing or buzzing during or after any noise exposure (including gunfire), or for any other reason you suspect a hearing problem, leave the noisy environment immediately and consult a medical professional and/or your supervisor. -
Page 9: Fcc And Ic Information
This device complies with Part 15 of the FCC rules and Indus- type. try Canada’s license-exempt Radio Standards Specifications. • Always use product-specific 3M replacement parts. Use of Operation is subject to the following two conditions: (1) This unauthorized replacement parts may reduce the protection device may not cause harmful interference, and (2) this you receive from this product. -
Page 10: Explanation Of Symbols
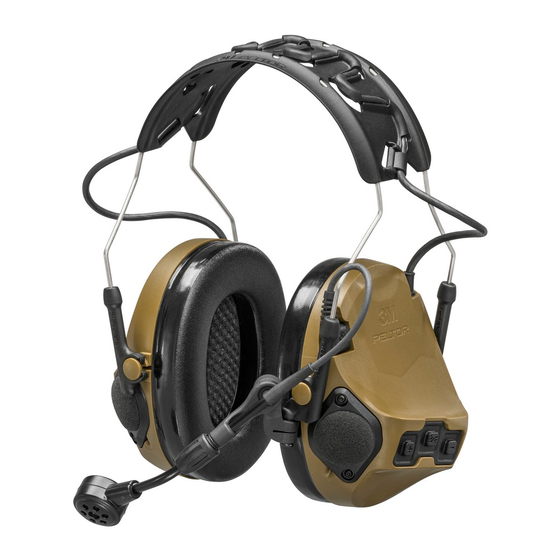
OVERVIEW A Headband K Environmental/Ambient microphone B Headband cable L + button C Ear cushion M NIB button D Foam liner N - button E Headband wire O Earcup F Guide P Battery compartment cover G Communication microphone connector Q Guide for the headband cable H Communication microphone R Communication microphone guide I Communication microphone arm... - Page 11 TO FIT THE HEADSET Caution: The ARC connector should be positioned directly above the ear to ensure correct positioning of the headset 7.1. TO FIT THE HEADBAND earcup. 1. Put the earmuffs in position over your ears. NOTE: Make sure that the headband is in position across the top of your head.
- Page 12 INSTRUCTIONS FOR OPERATION 7.3. COMMUNICATION MICROPHONE To maximize the performance of the communication 8.1. OPERATING TEMPERATURE microphone in noisy areas, position the communication micro- -20°C/-4°F to 50°C/122°F. phone very close to your mouth (< 3 mm / < 1/8 in.). Note: When used in high altitudes/aviation the surrounding 8.2.
-
Page 13: To Adjust The Volume
8.4. TO CONNECT THE HEADSET TO A PAIRED 8.6. TO USE THE NIB FUNCTION SCU-300 NIB offers electronic, headset-to-headset communication with a transmission range of ≈10 m/11 yd from the speaker. There This product uses Near Field Magnetic Induction (NFMI), to is no limit regarding how many people within that connect wirelessly to the SCU-300. - Page 14 Pressure Level (SPL). The NIB Button can be used as a PTT device, such as the 3M™ E-A-R™ Classic™ earplug. for NIB communications in noise levels less than 80 dB SPL.
- Page 15 MENU FUNCTIONS COMTAC™ VII • Patrolling - Optimized for enhanced auditory awareness when moving by foot by reducing sounds such as 9.1. TO NAVIGATE THE MENU SYSTEM footsteps and personal equipment noise. • Press the + button and the - button at the same time to •...
-
Page 16: Troubleshooting
Ensure you are pressing and holding the NIB button on the headset when transmitting. Refer to receive NIB communi- the manual for “3M™ PELTOR™ Tactical Modular Audio System”. cations. Make sure that the NIB button is pressed down during the complete message. - Page 17 11. TO CONVERT THE HEADSET FROM 5. Turn the earcup with the microphone 90 degrees to unlock HEADBAND TO A HELMET ATTACHMENT position. 1. Unplug the microphone cable from the left earcup. 2. Remove the headband cable from the headband. 6.
- Page 18 9. Turn the guide on the right headband wire on the hardhat 13. Turn the guide 90 degrees to locked position. attachment 90 degrees to unlocked position. 10. Remove the guide by pulling it straight out. 14. Turn the earcup without battery compartment according to the illustration and attach the guides to the earcup.
- Page 19 15. Turn the earcup 90 degrees to lock position. 17. Turn the earcup 90 degrees to lock position. 16. Turn the other earcup according to the illustration and 18. Connect the microphone cable to the earcups. attach the guides to the earcup. 19.
- Page 20 TO CONVERT THE HEADSET FROM HELMET 4. Turn the earcup with microphone 90 degrees to unlock ATTACHMENT TO HEADBAND position. 1. Unplug the microphone cable from the left earcup. 2. Turn the earcup without microphone 90 degrees to unlock 5. Pull the guide outwards. position.
Need help?
Do you have a question about the Peltor ComTac VII MT14H41A-300NA and is the answer not in the manual?
Questions and answers