Table of Contents
Advertisement
Quick Links
Installation and care
Installation and care
instructions
instructions
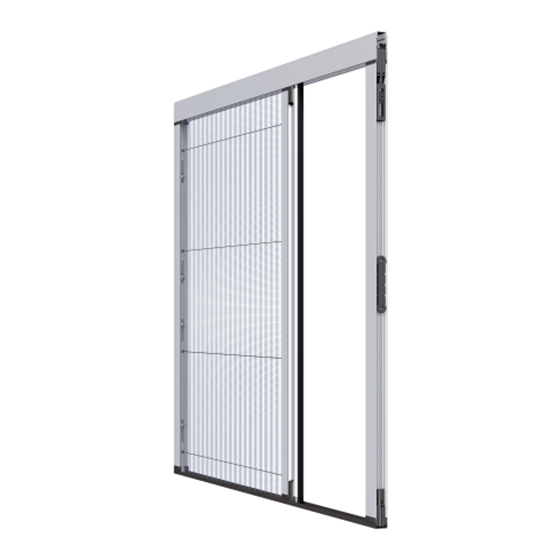
Insect screen pleated blind
Insect screen pleated blind
1
Safety and product information
Warnings are marked in the instructions with this
symbol.
Read through the product instructions before
use.
Observe all safety and setting instructions.
The basic safety instructions
can be viewed under
(www.warema.de/Sicherheitshinweise).
Target group
These instructions are intended for use by persons who
install, operate, care for and/or maintain the product.
Persons installing the product must be familiar with the
following areas: occupational safety, accident prevention
regulations, working with ladders, usage of fixing materials,
and the commissioning and operation of the product.
If the fitter lacks any one of these qualifications, the work
must be carried out by a specialist fitting company.
Contents
These instructions are an integral part of the following
product:
Insect screen pleated blind P1.Q.xx (one-wing) and P2.Q.xx
(two-wing)
Intended use
The following details apply to the following product: Insect
screen pleated blind P1.Q.xx (one-wing) and P2.Q.xx (two-
wing)
The product is a horizontally movable insect screen pleated
blind for outdoor use.
The product does not offer fall protection at windows. The
necessary safety measures must be provided as legally
stipulated.
2021216 [Rev. 2 - en]/2017-04-19
2021216 [Rev. 2 - en]/2017-04-19
The intended use also includes observing these instructions
and adhering to the service requirements they describe.
Parts description
Designation
Description
P1.Q.20
Insect screen pleated blind without
mounting frame
P1.Q.21
Insect screen pleated blind with 4-
sided mounting frame
P1.Q.22
Insect screen pleated blind with 3-
sided mounting frame (open at the
bottom)
P1.Q.23
Insect screen pleated blind with lat-
eral mounting frame profiles
P2.Q.xx
Insect screen pleated blind, two-wing
(for model, see P1.Q.xx)
Tab. 1:
Overview of models
3
2
1
1
Fabric package with
handle rail and end
profile
Ceiling profile
2
Guide rail, top
3
Fig. 1:
Parts overview of insect screen pleated blind
P1.Q.20
For qualified technicians only
For qualified technicians only
To be handed over to the opera-
To be handed over to the opera-
tor.
tor.
Please keep for future use.
Please keep for future use.
Valid from 19 April 2017
Valid from 19 April 2017
4
5
4
End profile, opposite
side
Base profile
5
Page 1 | 8
Page 1 | 8
Advertisement
Table of Contents

Related Manuals for WAREMA P2.Q Series


Summary of Contents for WAREMA P2.Q Series
- Page 1 P1.Q.22 Insect screen pleated blind with 3- The basic safety instructions sided mounting frame (open at the can be viewed under bottom) (www.warema.de/Sicherheitshinweise). P1.Q.23 Insect screen pleated blind with lat- eral mounting frame profiles P2.Q.xx Insect screen pleated blind, two-wing (for model, see P1.Q.xx)
-
Page 2: Installation
If any items are damaged or not as specified Mounting profile, left in the order, stop installation and contact In P1/2.Q.22, no mitre cut at the bot- WAREMA. tom. In P1/2.Q.23, no mitre cut and fixing holes in the same surface. -
Page 3: Product Position
Installation Designation Order width B Order height H Chipboard screw P1/2.Q.21/22/23: P1/2.Q.20 Back edge of pack- Top edge of ceil- 3.5x25 AW20 with Mounting frame/pro- age to back edge of ing profile to bottom pan head files opposite side edge of base profile Chipboard screw P1/2.Q.20/23: Ceiling P1/2.Q.21... - Page 4 Installation Installing the lateral profiles (P1/2.Q.23) Attaching the base profile Hold the mounting pro- P1/2.Q.20-23 file (one side) in the re- Slide the fixing brack- veal. Watch the edge ets into the base profile distances. at the bottom on both Transfer the drill hole sides.
- Page 5 Installation Installing the pleated blind P1/2.Q.20 Transfer the attachment Inserting the pleated blind in the ceiling and base of the fixing bracket at profiles the top to the mounting Insert the package in substructure. the guide rail. Drill the fixing holes. Lower the package into the base profile.
-
Page 6: Cleaning And Care
Installation Maintenance Check if the top guide rail has moved down. If necessary, ensure Proper and regular cleaning and the use of original spare that the guide rail has parts only are essential for fault-free operation and a long moved down by pulling service life. -
Page 7: Maintenance
Performing detailed cleaning surfaces. The WAREMA cleaning agent can be used for metal and plastic surfaces and is certified by the GRM Prepare the bucket with (Gütegemeinschaft Reinigung von Fassaden e.V.) water and cleaning agent. -
Page 8: Warranty
The maintenance tasks may only be performed by a qualified specialist. We recommend signing a service contract. The WAREMA warranty becomes invalid if the unit is not maintained properly at least once a year. INFO To retain the warranty, maintenance must be performed by a qualified specialist according to the WAREMA maintenance checklist.
Need help?
Do you have a question about the P2.Q Series and is the answer not in the manual?
Questions and answers