Table of Contents
Advertisement
Quick Links
Advertisement
Table of Contents

Related Manuals for Datalogic Viper CE Cradle


Summary of Contents for Datalogic Viper CE Cradle
- Page 1 Viper™CE Cradle User’s Manual...
- Page 3 Viper™CE Cradle USER'S MANUAL...
- Page 4 ALL RIGHTS RESERVED Datalogic reserves the right to make modifications and improvements without prior notification. Datalogic shall not be liable for technical or editorial errors or omissions contained herein, nor for incidental or consequential damages resulting from the use of this material.
-
Page 5: Table Of Contents
CONTENTS GENERAL INFORMATION ................1 Viper™CE Cradle ..................1 INSTALLATION.................... 3 Mounting the Cradle..................3 2.1.1 Portable Desktop Use ................... 3 2.1.2 Fixed Desktop Use..................4 Installing Device Drivers on PC..............5 2.2.1 RS232 Device Driver Installation ..............5 2.2.2 USB Device Driver Installation .............. -
Page 7: General Information
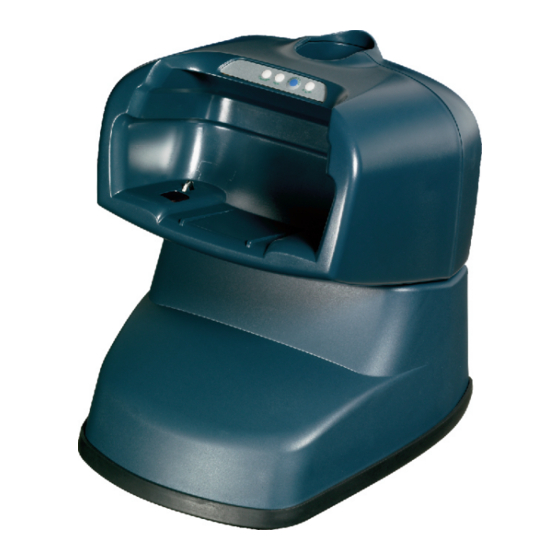
GENERAL INFORMATION 1 GENERAL INFORMATION VIPER™CE CRADLE The Viper™CE cradle paired with one Viper™CE terminal builds a Reading System for the collection, decoding and transmission of barcoded data. The communication between terminal and host PC through the Viper™CE cradle may occur also by using the standard ActiveSync connection. Figure 1 –... - Page 8 Viper™CE Cradle The Viper™CE cradle is a serial communication adapter between the host computer and the IrDA optical interface on the Viper™CE. It also functions as a battery charger. By inserting the Viper™CE terminal into the cradle data can be transmitted to the host and its battery begins charging.
-
Page 9: Installation
INSTALLATION 2 INSTALLATION MOUNTING THE CRADLE The Viper™CE cradle consists of a cradle and a base and can be mounted for portable or fixed desktop usage. The Viper™CE cradle package contains the following: Viper™CE Cradle 4 rubber feet This User's Manual 2 screws CD-ROM 1 CAB-417 RS232 cable... -
Page 10: Fixed Desktop Use
Viper™CE Cradle 2.1.2 Fixed Desktop Use Fixing screw (2) Figure 5 - Fixing Screw Placement Before performing the following operation it is necessary to detach the cradle from its base by holding the base and pushing the cradle upwards. For fixed desktop installation proceed as follows: Position the base on the desired surface;... -
Page 11: Installing Device Drivers On Pc
INSTALLATION INSTALLING DEVICE DRIVERS ON PC To guarantee a correct RS232 or USB connection between the host and the Viper™CE terminal through the Viper™CE cradle, the related drivers have to be installed. In order to install the RS232 driver, it is necessary to have at least the following: PC with a Pentium processor;... - Page 12 Viper™CE Cradle Select “Yes, I have already connected the hardware”: Select the “Add a new hardware device” option from the list below to add the new driver: Choose the option allowing to manually select the hardware to be installed:...
- Page 13 INSTALLATION Select “Infrared device” as hardware type: Select “Vishay Telefunken” as Infrared device to be installed: Then, a further window will appear to confirm the selection of the infrared device. Select the COM port to which you are installing the selected infrared device:...
-
Page 14: Usb Device Driver Installation
Viper™CE Cradle Click on the “Finish” button to complete the procedure: Only one infrared device at a time must be active. To disable other infrared devices, use the Device Manager available in the Control Panel\System\Hardware folder. NOTE 2.2.2 USB Device Driver Installation For installing the USB driver on the PC, proceed as follows: Select the “Viper™CE Cradle USB-IrDA Adapter”... -
Page 15: Connections
CONNECTIONS 3 CONNECTIONS Connections should always be made with power OFF! CAUTION The Viper™CE cradle can be connected to a host by means of an RS232 interface, or an USB interface. Each connection requires a power supply to be connected to the cradle. We recommend DL FPS18 power supply. - Page 16 Viper™CE Cradle Figure 7 - RS232 Connection The cable (provided in the package) and the power supply with its order number are listed below: A) Host computer B) CAB-417 RS232 cable C) Viper™CE cradle D) 94ACC4595 FPS18 power supply without cord Pinout The CAB-417 allowing the RS232 connection has the following pinout: Cradle side...
-
Page 17: Usb Connection
CONNECTIONS USB CONNECTION Viper™CE cradle can be connected to the host by means of a CAB-381 cable (see par. 2.2.2 for details about the USB driver installation). Then, it is necessary to insert the power supply plug into the jack on the cradle and attach the power supply to a power outlet. -
Page 18: Technical Features
Viper™CE Cradle 4 TECHNICAL FEATURES Viper™CE Cradle Electrical Features Power supply * 14 ± 5% VDC Consumption Max. 2 A Indicators Power on LED (green) IrDA LED (red) Multi-function LED (two-colors) see par. 1.1 Charge time Li-Ion batteries: max. 5 hours Communication Features Interface RS232, USB 1.1 version...
Need help?
Do you have a question about the Viper CE Cradle and is the answer not in the manual?
Questions and answers