Table of Contents
Advertisement
Advertisement
Table of Contents

Related Manuals for Uniden HomePatrol-2


Summary of Contents for Uniden HomePatrol-2
- Page 2 ii...
- Page 3 5,491,772; 5,247,579; and 5,226,084. These patents are all licensed from Digital Voice Systems, Inc. (DVSI). ©2020 Uniden America Corporation, Irving, Texas. SAVE YOUR RECEIPT! It is your proof of purchase and is required to establish warranty. HomePatrol is a registered trademark of Uniden America Corporation, Ft. Worth, Texas. HomePatrol-2 Issue 1.1, August 2020 Ques%ons? Problems? Get help on the web at www.HomePatrol-2.com or www.uniden.com.
- Page 4 ii...
-
Page 5: Table Of Contents
TABLE OF CONTENTS TABLE OF CONTENTS ............................ IMPORTANT INFORMATION .......................... What are HomePatrol-2’s Features ......................HomePatrol-2 Version 2 ..........................How Does the HomePatrol-2 Work? ......................What You Do ............................What You Hear in the United States ..................... What Else Can HomePatrol-2 Do? ......................Create Favorites Lists ..........................Avoid Transmissions ..........................Replay Transmissions ..........................Record Transmissions ........................... Use GPS Input ............................UpdaSng HomePatrol-2 Firmware ........................ UpdaSng the HomePatrol-2 Database ......................HOMEPATROL-2 HARDWARE AND SOFTWARE ..................... Hardware ..............................Base Unit .............................. Main Screen .............................. Main Screen Overview .......................... - Page 6 OTHER FEATURES ............................Avoid/Unavoid Transmissions ......................... How to Set the Avoid Default Value ....................How to Avoid a Transmission ......................Replay ..............................Record ..............................Weather ..............................Monitoring Weather Channels ......................Monitoring Weather Alerts ........................ Displaying Unit IDs ..........................Using HomePatrol-2 with an Accessory GPS Receiver ................ConnecSng Your GPS to HomePatrol-2 ....................Se]ng Up GPS ............................HOMEPATROL-2 AND SENTINEL SOFTWARE ....................Manage Profiles ............................Manage Favorites Lists ........................... Manage Databases ..........................Create New or Edit ExisSng Systems ...................... Share Favorites Lists ..........................Manage Firmware Updates ........................
- Page 7 Installing SenSnel ........................... How to Install HomePatrol-2 SenSnel Sodware ..................TROUBLESHOOTING ........................... BATTERY AND POWER INFORMATION ......................Recharging the Baeeries ........................APPENDICES ..............................Appendix A: HomePatrol-2 SpecificaSons ..................... Appendix B: Band Coverage ........................Appendix C: Services Types ........................ONE-YEAR LIMITED WARRANTY ........................iii...
-
Page 9: Table Of Contents
IMPORTANT INFORMATION The FCC Wants You to Know This scanner has been tested and found to comply with the limits for a Class B digital device, pursuant to Part 15 of the FCC Rules. These limits are designed to provide reasonable protection against harmful interference in a residential installation. - Page 10 This might be particularly true of the type of earphone that is placed in the ear canal. Liquid Exposure Warning Uniden does not represent this unit to be waterproof. To reduce the risk of fire or electrical shock, do not expose this unit to rain or moisture! Power DisconnecHon CauHon Important: Always turn the scanner off before disconnecting external power.
-
Page 11: What Are Homepatrol-2'S Features
WHAT IS THE HOMEPATROL-2? Uniden’s HomePatrol-2 is the first digital TrunkTracker IV CommunicaSons Receiver that requires no user programming. Simply turn it on, enter your locaSon, and you will immediately begin hearing communicaSons in your area. This funcSonality is made possible by combining the rich radio system database from RadioReference.com with Uniden’s patented radio system selecSon methods to correctly idenSfy and monitor only nearby systems. With the HomePatrol-2, you can also listen to NaSonal Oceanic and Atmospheric AdministraSon (NOAA) weather channels and monitor weather alerts. Set your HomePatrol-2 to monitor these transmissions when it is in a standby state or when it is turned on. What are HomePatrol-2’s Features System support: • o APCO 25 Trunked and ConvenSonal o Motorola Analog and Mixed Digital o EDACS Narrow and Wide o LTR o ConvenSonal o Phase 2 TDMA 2 GB micro SD for storing favorites lists and recording transmissions • Factory programmed for all known radio systems in the United States and Canada • Zip code entry for instant recepSon of local Police, Fire, and Emergency Medical Services (EMS) • City selecSon for instant recepSon of local services • Autolocate that can quickly find local systems even if you don’t know where you are • ConnecSble to a GPS accessory receiver (not included) for precise system selecSon and • conSnuing reselecSon when traveling USB connecSon to PC for updates through HomePatrol-2 SenSnel sodware • Weather Alert Standby (SAME) •... -
Page 12: Homepatrol-2 Version 2
HomePatrol-2 Version 2 StarSng with Version 2, the HomePatrol-2 includes many advanced features available by purchasing a registraSon key from Uniden. For informaSon on unlocking and using these features, see the separate HomePatrol Extreme Users Guide. Even without the registraSon key, you can take advantage of these advanced features, many of which can be programmed using HomePatrol SenSnel sodware: Per-channel delay – lets you determine how long the HomePatrol-2 stays on a channel ader the • transmission ends. Longer delays help prevent missing replies. Shorter delays improve overall scanning speed. Beeer locaSon precision for systems – allows you to define a department’s locaSon and range • using up to 32 rectangles instead of a single circle (circles are sSll supported). MulS-Favorite List Support – lets you monitor up to 256 Favorites List at a Sme, or combine • Favorites Lists and the Full Database for monitoring. Channel Alerts – sounds a programmable alert when a channel set to alert becomes acSve. • Unit ID Tagging – displays an alpha tag showing the informaSon about a specific radio unit being • received. ID Search – stops on all unavoided radio traffic, even if the channel is not in HomePatrol-2’s • database. Emergency Alert – sounds an alert when a unit triggers their emergency status (on compaSble • radio systems). A coordinated HomePatrol-2 website (www.HomePatrol.com) provides a variety of support features and informaSon. Become part of the HomePatrol-2 family by ge]ng involved in the discussion forums. How Does the HomePatrol-2 Work? What You Do When you set your locaSon, HomePatrol-2 searches its databases for channels near that locaSon. If you enter your zip code, HomePatrol-2 searches within a 10 mile radius of the center of that zip code. If you enter the city, that range is 20 miles from the center of the city. If you use the AutoLocate feature, that range increases to 30 miles. If you manually enter your laStude and longitude or connect an accessory GPS receiver, your HomePatrol-2 will select channels that apply to your precise locaSon. HomePatrol-2 uses these databases: Radio System Database – provided by www.radioreference.com, this database contains radio • system informaSon including frequencies, trunked talk groups, and geographic locaSons for radio systems across most of North America. -
Page 13: What You Hear In The United States
What You Hear in the United States Your HomePatrol-2 receiver has over 10,000 police, fire, ambulance, business, uSlity, and other agencies set for instant access. You can also listen to weather channels and weather alerts, and you can set your HomePatrol-2 to monitor weather alerts while it is in a standby state. NOTE: There are some communica%ons that the public is locked out from monitoring. Your HomePatrol-2 cannot receive agencies that scramble their communica%ons; it also cannot receive agencies on private proprietary systems. Because there are so many different kinds of communicaSons going on, you can turn on specific types of agencies you want to hear (and turn off those you don’t). Tap Menu/Service Types to select these agencies. Appendix C provides a list of service types and a brief descripSon of them. What Else Can HomePatrol-2 Do? Create Favorites Lists As you find transmissions you like and would like to monitor again, you can save them to a Favorites List. When you opt to listen to a Favorites List, HomePatrol-2 will monitor only the transmissions on that list. Avoid Transmissions You can also select transmissions for HomePatrol-2 to avoid (ignore). Replay Transmissions HomePatrol-2’s Replay feature acts as an instant replay of the transmissions you’ve just heard. You can set how long a period Replay records for instant playback. This period can range from 30 seconds to 240 seconds (4 minutes). While you can replay that recording immediately and conSnue replaying it, you cannot save it for future listening. Record Transmissions With HomePatrol-2, you can tap a bueon and begin recording transmissions. When you begin recording, HomePatrol-2 adds the Replay recording buffer to the recording. HomePatrol-2 will conSnue recording unSl you tap again to stop. These recording sessions are saved and can be replayed on demand. Rename and delete sessions through the Review Recordings screen, accessed through Advanced Menu/Replay OpAons/Review Recordings (tap on the session to bring up an opSons screen). Use GPS Input HomePatrol-2 works with an accessory GPS receiver to provide the most accurate locaSon se]ng possible. You can set HomePatrol-2 to use GPS se]ngs while you are traveling so you always receive the most accurate transmissions for your locaSon. A Word About HomePatrol-2 Pro2iles When you entered your zip code the first Sme, you began creaSng your first HomePatrol-2 profile. A profile contains se]ngs like your locaSon and associated transmissions from the database, Favorites Lists and Avoids, etc. You automaScally develop a profile as you monitor transmissions and save some to Favorites Lists, avoid others, and adjust how HomePatrol-2 receives and plays them. -
Page 14: Updasng Homepatrol-2 Firmware
HomePatrol-2 operates on a single profile at a Sme, so, if you want to significantly change your current profile, save it to SenSnel first. The saved profile becomes a snapshot of your HomePatrol-2 configuraSon at that moment. When you want to restore that specific profile later, write it back to HomePatrol-2. For example, if you are traveling to another city and you will be creaSng a profile for that city, write your current profile to SenSnel. You can restore that profile when you return and all your se]ngs will be saved. Refer to HomePatrol-2 SenSnel Sodware Help files for detailed informaSon about profiles. Updating HomePatrol-2 Firmware From Sme to Sme, Uniden will release firmware updates to improve exisSng funcSonality, add new features, or address issues found in its operaSon. UpdaSng the firmware takes just a few minutes and is easily accomplished using the HomePatrol SenSnel Sodware you installed on your PC at HomePatrol-2 iniSalizaSon. If you did not install SenSnel sodware, refer to the HomePatrol-2 and SenAnel secSon later in this manual. Simply connect your HomePatrol-2 to your PC using the supplied USB cable and select “Mass Storage”. Then, in SenSnel select UPDATE ! Update Firmware and follow the on-screen prompts. Updating the HomePatrol-2 Database To update the HomePatrol-2’s database, connect it to your PC using the supplied USB cable. If you have upgraded to the extreme features, then select “Mass Storage”. Then, in SenSnel select UPDATE ! Update Master HPDB. Finally, write the new database to your HomePatrol-2 by selecSng HomePatrol ! Write to Homepatrol. -
Page 15: Homepatrol-2 Hardware And Software
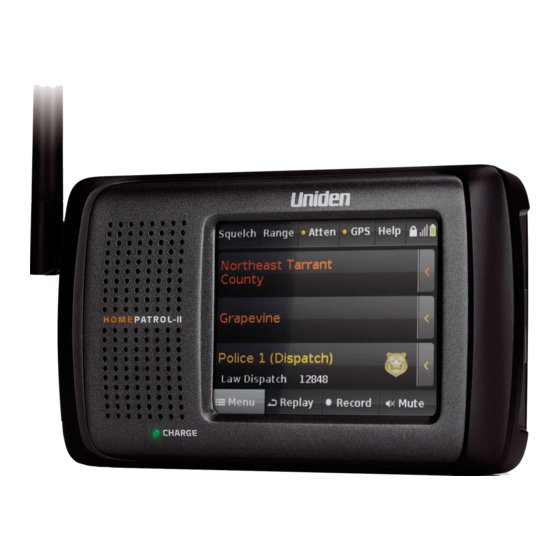
HOMEPATROL-2 HARDWARE AND SOFTWARE Hardware The HomePatrol-2 unit comprises a base unit and antenna. Accessories included in the box are: MiniUSB to USB ConnecSon Cable • 4 X AA NiMH Rechargeable Baeeries • Rubber Antenna • MicroSD card (installed) • Table Stand • Base Unit The HomePatrol-2 base unit is 3.3 in (84.5 mm) H x 5.9 in (149 mm) W x 1.5 in (38.4 mm) D. It contains a 3.5-inch diagonal color touch-sensiSve LCD screen. The led side of the unit provides headphone and line out jacks and SMA antenna jack while the right side contains the USB port, and serial port for GPS. Main Screen The HomePatrol-2 Main screen is the screen you will see when monitoring. From that screen, you can also access other screens that let you adjust various se]ngs and manage HomePatrol-2 features. -
Page 16: Main Screen Overview
Main Screen Overview The Main screen is the primary screen for HomePatrol-2. It displays the names of the transmission you are listening to and gives you access to other features. The following secSons provide a general overview of this screen. System, Department, and Channel Transmission The three center rows of the Main screen display the system, department, and channel associated with the transmission. If you want to hold on any of these, tap on it. HomePatrol-2 will hold and monitor that specific level unSl you tap it again. A lock icon on that row displays to indicate the hold. Level Name Descrip%on The overall system being monitored. (Example: Dallas) System The small text below the system name indicates which Favorite List is being used (or “Full Database” for the main database). The name of the department being monitored. This department is part of the system Department described previously. (Example: Dallas Area Rapid Transit Authority) The name of the channel being monitored. (Example: DART Transit Police). Also shows Channel the service type, frequency or talk group ID and Unit ID (if enabled) for the channel. - Page 17 Submenu Pop-Ups ‹ Tap on the tab on the right side of each line and a submenu pop-up displays. You can select from a set of operaSons for that level, although some operaSons are not available for every level. Submenu Defini%on System Department Channel Blocks HomePatrol-2 from receiving Avoid transmissions for a specific element. Provides access to advanced features, such as Advanced site informaSon as well as those unlocked by purchasing a V2 registraSon key. Provides informaSon about that transmission Info level. Prev Backs through the selected level. Note Moves HomePatrol-2 to the next system, Next department, or channel. Fave Lets you add the channel to a Favorites list. Radio Control Bar The row of bueons across the top of the Main screen lets you fine-tune HomePatrol-2 recepSon, access Help, and reenter system configuraSon. BuNon Defini%on Squelch Sets how strong a signal must be before HomePatrol-2 stops on it. Controls how many channels are selected based on your locaSon and systems’ Range locaSons. Small range se]ngs result in fewer systems and departments selected. A selecSon bar lets you set the range in 2-mile increments. Each screen tap is 0.5 miles. Reduces signal interference if you are in an area where there are a lot of radio signals.
- Page 18 Status Icons Three status icons reside in the right corner of the Main screen: Icon Descrip%on Shows the status of the screen touch lock. Tap to lock (grey color icon)/unlock (gold color icon) the screen controls. NOTE: The gold locked icon is the same icon that displays when you lock a transmission level. Shows relaSve signal strength. (Example shows three bars strong) Baeery level/charge status. When AC power is connected, a lightning bolt displays on the icon. Feature Navigation Bar The row of bueons across the boeom of the Main screen allows you to record and play back transmissions; the Menu bueon allows you to configure specific elements of the HomePatrol-2 system (i.e., Audio OpSons, Replay OpSons, Set Charge Time, etc). BuNon Descrip%on Menu Displays opSons for managing HomePatrol-2 features and operaSons Provides an instant replay of the previous transmissions (30 – 240 seconds as set Replay through the Replay OpAons menu). Tap and hold this bueon to display Replay OpAons. Records ongoing transmissions. When you begin recording, the Record status Record indicator turns red. Tap Record again to stop recording. Tap and hold this bueon to see a list of saved recordings. Mutes the current transmission for as long as the Mute value has been set. Tap and hold Mute to display the Mute OpAons menu. Set the length of Sme for Mute to be Mute acSve and the Mute level (0 – 6). From this menu you can also silence the transmissions and/or the keytap volume.
-
Page 19: Homepatrol-2 Operations
HOMEPATROL-2 OPERATIONS Start-Up Wizard The first Sme you turn on your HomePatrol-2, it will take you through a startup wizard to install the HomePatrol SenSnel sodware and set up basic scanning criteria. To run the startup wizard again, tap and hold the Help bueon. Running the Startup Wizard 1. Plug the provided USB cable into your computer and into HomePatrol-2’s USB jack. HomePatrol-2’s screen turns white during PC connecSon. When connected to the PC, HomePatrol-2 installs like an addiSonal drive. 2. Allow the installaSon to Autorun. If you don’t see an Autorun prompt, open the drive and navigate to the setup.exe file in the Setup folder. Double click setup.exe to run that program. 3. SenSnel will ask you where you want to install the sodware. Once the sodware is installed, click Close when prompted. NOTE: Sen%nel uses the internet to check for firmware and radio data updates. 4. Ader installing SenSnel, disconnect HP from the PC. HomePatrol-2 restarts iniSalizaSon. Selecting Channels to Monitor HomePatrol-2 operaSons revolve around the ability for you to listen to the transmissions you want to. There are many ways to fine-tune the transmissions your HomePatrol-2 receives: Change your locaSon • Select service types • Change the Range • Select Favorites Lists to use • Avoid transmissions • While HomePatrol-2 selects channels, the Channel SelecAon screen appears. For the first 5 seconds, the screen shows the message “0 Channels Selected” with Cancel (acSvated) and Other OpAon (deacSvated) in the Feature NavigaSon bar. Ader 5 seconds, the screen shows the number of channels selected, increasing as more channels are selected. When channel selecSon completes, Other OpAons is acSvated and Cancel changes to Listen. If you select Other OpAons at this point, you can choose to take any of the acSons listed previously except Avoid transmissions. If your selecSon results in many channels, your HomePatrol-2 will warn you that it will take a long Sme to scan through all selecSons and recommend that you change your criteria to reduce the number of channels selected. -
Page 20: Select Service Types
• of a connected GPS receiver or change GPS input se]ngs. Select Service Types Service types are categories of transmissions that have similar content. Service type examples include (but are not limited to) Aircrad, Emergency Ops, Fire-Talk, and Law Dispatch. Select service types through the Select Service Types menu on the Menu screen. Appendix C provides a list of service types and their definiSons. By default, only public safety (Law, Fire, EMS, and MulS) dispatch channels and Custom 1 are selected. How to Select Service Types 1. Tap the following: Menu • Select Service Types • 2. The Select Service Types menu displays. Scroll through the entries, tapping UP or DOWN to change pages. Tap on the service types you want to listen to. That entry turns orange. Tap it again to deslect it. 3. When you have tapped on the service types you want, tap Accept. 4. HomePatrol-2 selects channels based on your service type requirements and then begins monitoring them. Set Range Range lets you set how far out from your set locaSon HomePatrol-2 will search for channels to select. Tapping Range from the Radio Control bar or selecSng Set Range from the Set Your LocaAon menu displays an indicator bar. Each of the 15 bars equals 2 miles for a total of a 30 mile range. Tap + or – (or press and release the volume key) to increase or decrease the range in .5 mile increments or tap and hold + or – (or press hold the volume key) to increase or decrease the range in 1 mile increments. Select Favorites Lists to Monitor SelecSng one or more Favorites Lists to monitor tells HomePatrol-2 that you want to listen to the transmissions that have been saved to that list. You can use Favorites Lists and the full database at the same Sme, or select a combinaSon of Favorites lists to monitor. Select the Favorites List you want to monitor through the Main Menu/Manage Favorites Lists screens. (Refer to BUILDING FAVORITES LISTS later in this manual for detailed informaSon.) Avoiding Transmissions As you monitor transmissions, you will come across transmissions that you don’t care to listen to. Tap Avoid in the submenu pop-up. (Refer to Avoid/Unavoid Transmissions later in this manual for detailed... -
Page 21: Selecsng Nasonwide Systems
Selecting Nationwide Systems Some systems contain informaSon about common channels used naSonwide. Systems like this include Railroad frequencies, GMRS and FRS frequencies, and more. To enable these systems: 1. Tap the following: Menu • Advanced Menu • Select NaSonwide Systems • 2. The list of naSonwide systems displays. Scroll through entries, tapping UP or DOWN to change pages. Tap on the naSonwide systems you want to monitor. Selected entries turn orange. Customizing Your Monitoring Experience HomePatrol-2 has many opSons that you can set according to your own preference. You can decide how bright the screen will display, how loud screen taps are, and how long default Sme is when you tap Mute. You can also set the defaults for instant replay length and automaSc shutoff. No single menu lets you adjust all se]ngs at one Sme. You access these se]ngs individually. Many, however, are found in the Menu and Advanced Menu. The following table provides a quick guide to these se]ngs and how to access them. Detailed informaSon for select operaSons follows the table. To set this… Tap this… Then tap… Location Menu/Set Your Location Enter Zip Code Enter City Auto Locate Manual Location Input Set Up GPS... - Page 22 Menu/Advanced Menu/ Sets the internal clock. Set Clock Set Charge Time Menu/Advanced Menu/ Sets the amount of time HomePatrol-2 will take to Set Charge Time recharge batteries that have been drained. (Maximum charge time is 14.0 hours) Avoid Options Menu/Advanced Menu/ Default Avoid –...
-
Page 23: Adjussng Listening Volume
Clear User Data – Tap to restore all default settings, Restore Options delete all avoid lists, favorites lists, recordings, log files, and weather event records. Reset User Settings – Tap to return all settings to their default values. Adjusting Listening Volume The volume adjustment bueon is located on the top led of the HomePatrol-2 unit. Tap + to increase the volume or – to decrease it. Adjusting Screen Tap Volumes You can adjust how loudly the unit will indicate a screen tap through the Audio OpAons screen. Equalizing the Volume Level AutomaSc Gain Control (AGC) aeempts to equalize the audio volume for different channels. Note that AGC cannot compensate for extreme volume differences. -
Page 24: Se]Ng Automasc Shutoff
Setting Automatic Shutoff You can set your HomePatrol-2 to automaScally turn off ader a specified amount of Sme. How to Set Automatic Shutoff 1. Tap the following screens: Menu • Advanced Menu • Set Auto Shutoff • 2. Tap + or – to select a shutoff Sme. 3. Tap Shutoff Mode to select the mode HomePatrol-2 will use when it shuts off. These modes are: Clock Standby • WX Standby • All Off •... -
Page 25: Building Favorites Lists
BUILDING FAVORITES LISTS As you listen to HomePatrol-2, you’ll find that there are certain channels you want to listen to. You can create groups of related channels that you can have HomePatrol-2 exclusively monitor, or monitor along with the Full Database or other Favorites lists. For example, you can create a list enSrely of police department dispatchers, emergency operaSons, or a specific city’s transmissions. If there is a special event coming up, like a car race, you can create a list just for that event. You can save a maximum of 256 Favorites Lists. Once you have Favorites Lists saved on HomePatrol-2, you can copy them to HomePatrol SenSnel on your PC. If you need to reset your HomePatrol-2, you can restore your Favorites Lists from there. You can also create and manage Favorites Lists in SenSnel, then move them to your HomePatrol-2 Creating a Favorites List There is more than one way to create a new Favorites List: From Fave on a submenu pop-up. While you are monitoring transmissions, open a submenu • pop-up and tap Fave. This method is useful when you are already monitoring a channel you’d like to save. If you don’t have Favorites Lists already established, you can create a Favorites List and save the transmission locaSon to it. NOTE: The FAVE submenu pop-up displays different screens depending on whether or not you have Favorites Lists already saved. Both of these procedures are described later in this sec%on. Tap Menu/Manage Favorites Lists. This method is useful when you know you want to create a • Favorites List for specific transmissions you know you will be monitoring. You can create the list and then save transmissions to it as you come across them. Listen for a while using the Full Database and avoid transmissions you do not want to listen to. • Once you have not needed to avoid a channel for a while, create a new Favorites List database and select Add Current Channels to add all unavoided channels from your current selecSon. This is probably the easiest way to quickly make a local Favorites List using your HomePatrol-2. Use the HomePatrol SenSnel sodware to create a Favorites List. • All of these methods will take you to the Create New List keyboard, but through different paths. Using Submenu Pop-Up to Create a Favorites List (No Favorites Lists Exist) 1. Tap the following: Submenu pop-up tab on channel you want to save. • Fave • 2. The Saving Channel to Favorites List confirmaSon screen displays. Tap OK. -
Page 26: Saving To An Exissng Favorites List
2. The Add to Favorites screen displays, indicaSng that the channel will be added to the last used Favorites List. Tap Other List to display a list of all your Favorites Lists. 3. The Favorite List SelecSon screen displays. Tap New. 4. The Create New List keyboard displays. Enter the name of the new Favorites List and tap Accept. 5. The Favorites List SelecAon screen displays again with the new Favorites List. Tap the new Favorites List. HomePatrol-2 saves the transmission to that list and returns to monitoring. Saving to an Existing Favorites List 1. Tap the following: Submenu pop-up tab on channel you want to save. • Fave • 2. The Saving Channel to Favorites List confirmaSon screen displays. If you have saved to a Favorites List during your current session, the confirmaSon screen indicates that the channel will be saved to that list. Tap Other List if you want to save to a different Favorites List. 3. The Favorite List SelecSon screen displays. Tap the appropriate Favorites List. 4. HomePatrol-2 saves the transmission to that list and returns to monitoring. Managing Favorites Lists You can create mulSple Favorites Lists for any HomePatrol-2 profile and use one or more Favorites Lists with our without the Full Database for monitoring. When you use SenSnel to Read from HomePatrol, all Favorites Lists in your HomePatrol-2 are also read and saved to the current profile. Using Favorites Lists to Monitor Special Services SenSnel v2 and later allows users to easily share their own Favorites Lists. Watch the HomePatrol Community at hep://www.HomePatrol.com and the HomePatrol Twiki site at hep://info.uniden.com/ HomePatrol for Favorites Lists that cover common services such as Railroad, Marine Radio, Civilian and Military Air bands, and more. -
Page 27: Other Features
OTHER FEATURES Avoid/Unavoid Transmissions The Avoid feature lets you block systems, departments, and channels from being received. Avoid does not delete the channel from the database; it simply prevents HomePatrol-2 from stopping on it. You can Avoid transmissions by tapping Avoid on the submenu pop-up. Avoids can be either Temporary or Permanent. A temporary avoid clears when you cycle power to the unit. Permanent avoids must be cleared through the Avoid OpAons menu from the Advanced Menu. You can set the default avoid value. NOTE: You can also tap and hold Avoid in a submenu pop-up to see the Review Avoid List screen. How to Set the Avoid Default Value 1. Tap the following: Menu • Advanced Menu • Avoid OpSons • 2. The Avoid OpSons screen displays. 3. Tap Default Avoid to toggle the se]ng between Temporary and Permanent. 4. Tap Listen to return to normal recepSon or Back to return to Advanced Menu. How to Avoid a Transmission 1. Tap Avoid on the submenu pop-upon any transmission level (System, Department, or Channel). An Avoided dialog box displays, indicaSng that that transmission level has been avoided according to the default value previously set. 2. It also displays the following opSons: OK (Tap OK if this se]ng is acceptable; HomePatrol-2 returns to monitoring transmissions.) • Make Permanent/Temporary (Tap this entry to make the Avoid a different se]ng than the • default se]ng. For example, if the default is Temporary avoid, the screen asks if you wish to make the avoid a Permanent avoid. Cancel (Tap this entry to cancel the Avoid acSon and return to monitoring transmissions.) • 3. The Main screen displays ader a selecSon is made. -
Page 28: Replay
4. To unavoid all entries, tap Clear All Avoids on the boeom menu bar and then tap Yes on the Stop All Avoiding popup dialog box. The Avoid OpSons screen displays. To unavoid a single entry, tap that entry and then tap Yes on the Stop Avoiding popup dialog box. The Review Avoid List screen displays. 5. Tap Listen to return to normal recepSon or Back to return to the Advanced Menu. Replay The Replay funcSon works like an “Instant Replay” of the transmissions you have just heard. You can set the duraSon that HomePatrol-2 will buffer these transmissions (30 seconds to 240 seconds) through the Replay OpAons menu on the Advanced Menu. You can replay the transmissions but you cannot save them. When you are finished listening to the replayed transmission, HomePatrol-2 automaScally deletes them. NOTE: Replay will not work when the baNery is low or not installed, regardless of HomePatrol-2’s connec%on to AC power. Set Replay Options 1. Tap the following: Menu • Advanced Menu • Replay OpSons • The Replay OpAon screen displays. • 2. Tap Set Replay DuraSon. Tap again to increase the replay duraSon by 30 seconds each Sme you tap. 3. Tap Listen to return to normal recepSon or Back to return to the Advanced Menu. Replay Transmissions 1. Tap Replay on the Feature NavigaSon bar. HomePatrol-2 plays back transmissions for as long as the Replay DuraSon has been set. A Replay screen displays the system/department/channel of the transmission being replayed. 2. When all transmissions have been replayed, a dialog box asks if you want to play the transmissions again. Tap Yes to replay the transmissions or No to return to monitoring transmissions. -
Page 29: Record
Confirm that you want to begin recording and HomePatrol-2 will record unSl you tap Record again to stop. HomePatrol-2 adds the transmissions in the Replay buffer so you will not miss the beginning of the transmission. On the Main screen, the status indicator turns red during recording and reverts to white when recording stops. When you stop recording, you have the opSon of saving the session or deleSng it. You can record up to 1000 sessions, but HomePatrol-2 stops recording when memory is down to 512MB. NOTE: Record will not work when the baNery is low or not installed, regardless of HomePatrol-2 being connected to AC power. How to Record Transmissions 1. On the Main screen, tap Record. A Recording Started confirmaSon screen displays. 2. Tap OK to accept recording or Cancel to take no acSon before returning to monitoring transmissions. 3. When you return to monitoring, the Record status indicator changes from a white circle to red. How to Stop Recording Transmissions 1. On the Main screen, tap Record. A Recording Stopped confirmaSon screen displays. 2. Tap OK to stop recording or Cancel to take no acSon and conSnue to record transmissions. 3. If you tap OK, HomePatrol-2 asks if you would like to save the recorded files. 4. Tap OK to save the recorded files or No to delete the recorded files. Either selecSon will take you back to HomePatrol-2 to monitor transmissions. 5. When you return to monitoring transmissions you will see that the Record status indicator has changed from red to white. How to Play Back a Recorded Session You can play back any sessions you’ve recorded. 1. Tap and hold Record on the Feature NavigaSon bar. The Review Recordings screen displays. NOTE: You can also access the Review Recordings screen by tapping Menu/Advanced Menu/ Replay OpAons/Review Recordings. The same Review Recordings screen displays. 2. Tap on a recording session to replay. The Recording Session screen displays the following: Play Session • Delete Session •... -
Page 30: Monitoring Weather Channels
NOTE: When HomePatrol-2 is in Weather Alert Standby mode, it cannot receive other transmissions. Tap Listen to return to monitoring. Monitoring Weather Channels When you select Monitor NOAA Weather (Menu/Weather Mode), HomePatrol-2 displays a weather channel. Tap UP or DOWN unSl you can hear a local weather broadcast. NOTE: If you are too far from the weather site, you might need to adjust squelch to a lower se_ng to hear any transmissions. Monitoring Weather Alerts Monitoring weather alerts places HomePatrol-2 in standby mode. It will monitor the selected NOAA weather frequency for alerts and sound different tones when it detects advisories, watches, and warnings. HomePatrol-2 also record alerts as they play. It will retain the alerts as long as they are acSve. The Weather Alert screen (Menu/Weather Mode/Weather Alert Standby) has two lines that will display acSve alerts. If more than two alerts are recorded, press UP or DOWN arrows to display them. You can tap on the alert for more informaSon. Displaying Unit IDs Unit IDs are the idenSfiers for specific radios operaSng on Motorola, P25, and EDACS trunked radio systems. These IDs can help you determine the specific individuals involved in a transmission. To turn on the Unit ID Display feature, tap MENU from the main screen. Then, select Display OpSons and tap Unit ID Display: Off -- turns off the Unit ID Display Mode 1 – Unit ID informaSon appears in the 2 line of the Channel bar. The Channel’s main alpha tag might be truncated. Mode 2 – Unit ID informaSon appears in the boeom line of the Channel bar. The service type and TGID informaSon will not display. Note that Unit IDs will not appear if the HomePatrol-2 starts receiving a transmission ader the communicaSon has started. -
Page 31: Using Homepatrol-2 With An Accessory Gps Receiver
Using HomePatrol-2 with an Accessory GPS Receiver Teaming HomePatrol-2 with a GPS receiver, such as Uniden’s BC-GPSK lets you conSnually monitor channels along your route as well as stay aware of events in your current area. As you travel from place to place, HomePatrol-2 uses the locaSon informaSon provided by the GPS and selects channels to match your locaSon. You can decide whether HomePatrol-2 will use or ignore GPS input. Tap and hold GPS on the Radio Control bar to display the Set Up GPS screen. This screen lets you set your coordinates’ display format, change your GPS Baud Rate, and indicate GPS status. Connecting Your GPS to HomePatrol-2 NOTE: Uniden’s GPS Accessory Cable (BWZG1844001) is required to connect an accessory GPS receiver to HomePatrol. Connect HomePatrol-2 to the GPS receiver’s serial port. • Once the GPS receiver acquires satellite signals and determines its locaSon, it starts providing • valid locaSon data to your HomePatrol-2 and the GPS Detected screen displays. Tap Use GPS if you want your GPS device to automaScally enable/disable channels based on the current locaSon. Tap Ignore GPS if you want to conSnue using the last set locaSon. HomePatrol-2 selects channels and begins monitoring transmissions. • Note: The channel selecSon process occurs in the background. The only Sme you will noSce a • database change is when you approach a state border. Setting Up GPS Tapping GPS LocaAon from the Set Your LocaAon (or tap and hold the GPS bueon on the Radio Control bar) menu allows you to set HomePatrol-2 formats to match your GPS: LocaSon format. DD.dddd (Decimal Degrees) or DMS (Degrees Minutes Seconds) are two • different ways of presenSng laStude and longitude. (Default – DD.dddd) GPS Baud Rate • 4800 (normal se]ng, default) 9600 19200 38400 57600 115200 “Ignore GPS” selector. If you have a GPS system in operaSon, you can set HomePatrol-2 to ignore • GPS input and it will focus on transmissions from the last locaSon set. Otherwise, HomePatrol-2 will conSnually update locaSon based on GPS input. -
Page 32: Homepatrol-2 And Sentinel Software
HOMEPATROL-2 AND SENTINEL SOFTWARE HomePatrol-2’s SenSnel sodware, which you had the opportunity to load to your PC on installaSon, lets you manage your HomePatrol-2 profiles, Favorites Lists, databases, and firmware updates. Manage ProViles HomePatrol-2 profiles are “snapshots” of your HomePatrol-2 set up. A profile contains all your configuraSon se]ngs as well as all of your Favorites Lists, Avoids, and System se]ngs. SenSnel can save mulSple HomePatrol-2 profiles so you can also restore different profiles as you need them. For example, If you regularly visit a specific locaSon, you can create a profile for that locaSon. You can save it to SenSnel to use whenever you visit. Refer to HOMEPATROL-2 PROFILES later in this manual or HomePatrol-2 SenSnel Help files for more informaSon and details on managing profiles. Manage Favorites Lists You can create Favorites Lists in SenSnel and then associate them with specific profiles. When those profiles are wrieen to HomePatrol-2, only those specified Favorites Lists are wrieen. Refer to the HomePatrol-2 SenSnel Help files for more informaSon and details on managing Favorites Lists. Manage Databases The HomePatrol-2 website updates transmission databases every week. You can decide how oden you want to update the databases on your HomePatrol-2 unit. When you update them through SenSnel, it checks the website for the most current database and copies it to HomePatrol-2. Refer to the HomePatrol-2 SenSnel Help files for more informaSon and details on managing databases. Create New or Edit Existing Systems SenSnel v2 and later allows you to create your own systems, or edit systems already in a Favorites list. These systems can include informaSon not provided by the weekly database downloads. Share Favorites Lists Create and share favorites lists with your friends or others in the HomePatrol community. Manage Firmware Updates HomePatrol-2 updates its firmware through SenSnel. In that process, SenSnel connects to the internet and checks for the current firmware version to download. Refer to the HomePatrol-2 SenSnel Help files for more informaSon and details on managing firmware updates. Installing Sentinel When you iniSally turn on HomePatrol-2, it will recommend that you connect HomePatrol-2 to your PC and install the SenSnel sodware. This is an opSonal step that could take several minutes. HomePatrol-2 will install to your PC like an addiSonal drive. Open the drive and navigate to the setup.exe file in the Setup folder. Double-click setup.exe. If you are unable to locate this file, download the latest version from hep://info.uniden.com/ HomePatrol. SenSnel will automaScally noSfy you if a more recent version is available. -
Page 33: How To Install Homepatrol-2 Sensnel Sodware
How to Install HomePatrol-2 Sentinel Software If you have not already installed HomePatrol-2 SenSnel sodware, follow these procedures. 1. Use the USB cable to connect HomePatrol-2 to your PC. 2. Turn on HomePatrol-2 if it is not already on. Select Mass Storage. The HomePatrol-2 screen turns white while it is connected to the PC. 3. SenSnel sodware installaSon should begin immediately. If it does not, open the drive folder and run Setup.exe in the Setup folder. 4. When installaSon is complete, SenSnel sodware and various documents are installed on your PC. 5. Disconnect the USB cable. HomePatrol-2 begins iniSal setup procedures. -
Page 34: Troubleshooting
Make sure you are holding the power button down long off. enough. Press and hold for at least 3 – 5 seconds. Because HomePatrol-2 writes data to the SD memory card during these operations, they are disabled if you are Recording and Replay do not operating from external power only, with batteries not work. -
Page 35: Battery And Power Information
BATTERY AND POWER INFORMATION HomePatrol-2 comes with an AC adapter to connect the unit to an AC power source and a DC adapter for use in your automobile. In addiSon, HomePatrol-2 also requires four (4) AA Alkaline or NiMH rechargeable baeeries (one set of four NiMH rechargeable baeeries is included with the unit). NOTE: These rechargeable baNeries do not require a recharging sta%on; you can leave them in the unit and select to recharge them when HomePatrol-2 is connected to AC power. Installing the Batteries From the back of the HomePatrol-2 unit: 6. Slide the baeery cover lock to the right to unlock the baeery cover. 7. Press and push down on the center to disengage the baeery cover. 8. Insert the baeeries according to the direcSonal label inside. 9. Replace and relock the baeery cover. Recharging the Batteries The rechargeable baeeries included with HomePatrol-2 are 2300 mAh. You can set how long it will take to recharge a baeery from a drained state to a fully charged state through the Set Charge Time menu on the Advanced Menu. The maximum recharge Sme HomePatrol accepts is 14 hours. Then, when you connect HomePatrol-2 to a power source and allow baeery charging, HomePatrol-2 uses that data to charge the baeeries. HomePatrol will charge the baeeries whether or not the unit is turned on, in standby mode, or powered off. When baeery power drops below a certain level, a Baeery Low pop-up displays the following message: “Baeeries are low. Replay and Recording disabled. Connect external power to prevent data loss.”... - Page 36 NOTE: With this configura%on, HomePatrol-2 cannot charge if it is turned on. Standard USB Adapter 1. Plug the miniUSB end of the cable into the HomePatrol-2 and the USB end of the cable to a USB to AC Power Adapter that is less (less than 500mA) than 500mA (not included). HomePatrol-2 displays the "Select USB Mode”...
- Page 37 SmartPhone USB Adapter 1. Plug the miniUSB end of the cable into the HomePatrol-2 and the USB end of the cable to a USB to DC Power Adapter (not (more than 1000 mA) included). HomePatrol-2 displays the "Select USB Mode” screen.
-
Page 38: Appendices
APPENDICES Appendix A: HomePatrol-2 SpeciVications Display Standard 3.5-inch Hi Color LCD (65K) with backlight QVGA 320 X 240 (3.5 inch) Touch Panel LCD with Touch Panel Controls/Switches Power On/Off Volume Control Reset Switch External Jacks/Slots ANT. Jack - SMA Type Phone Jack - 3.5 mm (Stereo Type) - Page 39 Trunk Tracking Motorola Type I 800 Motorola Type II 800, 900, UHF, VHF EDACS Wide, Narrow LTR APCO P25 Phase 2 Sensitivity (12dB SINAD) Band Unit Nominal VHF Low 1 Band (AM) 25.005 MHz 0.3uV µ (NFM) 40.840 MHz 0.3uV µ (NFM) 53.980 MHz 0.3uV µ Aircraft Band (AM) 118.800 MHz 0.3uV µ (AM) 127.175 MHz 0.3uV µ...
- Page 40 (NFM) 806.000 0.3uV µ (NFM) 857.150 0.3uV µ (NFM) 954.9125 MHz 0.3uV µ...
-
Page 41: Appendix B: Band Coverage
Appendix B: Band Coverage Frequency (MHz) Modula%on Step (kHz) Remark (Note 1) (Note 2) Lower Edge Upper Edge 25.0000 26.9600 Petroleum Products & Broadcast Pickup 26.9650 27.4050 CB Class D Channel 27.4100 27.9950 Business & Forest Products 28.0000 29.6950 20.0 10 Meter Amateur Band 29.7000 49.9950 10.0 VHF Low Band 50.0000 53.9950 20.0 6 Meter Amateur Band 108.0000 136.9950 8.33 Aircrad Band 137.0000 143.9950 12.5 Military Land Mobile 144.0000... - Page 42 Note 1: Modulation Quick Frequency Entry default settings. Select from AM / FM / NFM. Preprogrammed frequency modulation cannot be changed. Note 2: Step Quick Frequency Entry default settings. Select from AUTO, 5k,6.25k, 7.5k, 8.33k, 10k, 12.5k, 15k, 20k, or 25k. If Auto is selected for Step setting, HomePatrol uses the default step setting.
-
Page 43: Appendix C: Services Types
Appendix C: Services Types NOTE: Not all service types are available in all areas. This list may change from %me to %me. Service Type Description Aircrad For civilian air and air traffic control operations. Business Most business related entities not covered by other tags. CorrecSons Jail/prison operations and other corrections activities, including federal prisons. Emergency Ops Emergency Operation Centers and similar emergency management or disaster related operations. -
Page 44: One-Year Limited Warranty
WARRANTOR: UNIDEN AMERICA CORPORATION (Uniden) ELEMENTS OF WARRANTY: Uniden warrants, for one year, to the original retail owner, this Uniden Product to be free from defects in materials and craftsmanship with only the limitations or exclusions set out below. WARRANTY DURATION: This warranty to the original user shall terminate and be of no further effect 12 months after the date of original retail sale. - Page 45 shipping and handling) incurred by warrantor or its representatives in connection with the performance of this warranty. THE LIMITED WARRANTY SET FORTH ABOVE IS THE SOLE AND ENTIRE WARRANTY PERTAINING TO THE PRODUCT AND IS IN LIEU OF AND EXCLUDES ALL OTHER WARRANTIES OF ANY NATURE WHATSOEVER, WHETHER EXPRESS, IMPLIED OR ARISING BY OPERATION OF LAW, INCLUDING, BUT NOT LIMITED TO ANY IMPLIED WARRANTIES OF MERCHANTABILITY OR FITNESS FOR A PARTICULAR PURPOSE.
- Page 46 The Product should be shipped freight prepaid, by traceable means, or delivered, to warrantor at: Uniden America Corporation C/O Saddle Creek 743 Henrietta Creek Rd., Suite 100...
Need help?
Do you have a question about the HomePatrol-2 and is the answer not in the manual?
Questions and answers