Table of Contents
Advertisement
Available languages
Available languages
Portable Evaporative Air Cooler
EN
User Manual
Read and save these instructions before use
Refroidisseur d'air par évaporation portatif
FR
Mode d'emploi
Lire ces instructions avant l'utilisation et les conserver
Enfriador de Aire Evaporativo Portátil
ES
Manual de Instrucciones
Lea y guarde estas instrucciones antes de usar la unidad
Customer Support:
Assistance Au Client:
Servicio de atencion a clientes:
Web: www.jmatek.com
USA: 1-800-474-2147 | usinfo@jmatek.com
CANADA^: 1-888-209-0999 | canadainfo@jmatek.com
^ Canada Customer Support service available for models sold in Canada only.
^ Le Service Client Canadien est disponible uniquement pour les modèles vendus sur le territoire Canadien.
^ Servicio de Atención A Clientes en Canadá disponible solo para modelos vendidos en Canadá.
Model / Modèle / Modelo:
DLC203AE Series / Série / Serie
Advertisement
Table of Contents

Related Manuals for Honeywell DLC203AE Series


Summary of Contents for Honeywell DLC203AE Series
- Page 1 Enfriador de Aire Evaporativo Portátil Manual de Instrucciones Lea y guarde estas instrucciones antes de usar la unidad Model / Modèle / Modelo: DLC203AE Series / Série / Serie Customer Support: Assistance Au Client: Servicio de atencion a clientes: Web: www.jmatek.com USA: 1-800-474-2147 | usinfo@jmatek.com...
-
Page 2: Parts Description
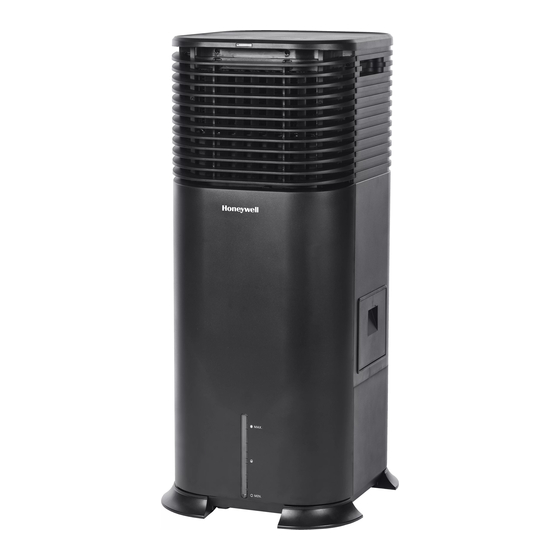
PARTS DESCRIPTION Control Panel Honeycomb Cooling Media Remote Control Signal Receiver Remote Control Battery (included) Louvers Remote Control Water Level Indicator Water Tank Handle Drain Plug Water Fill Door Screws Casters Bottom Base Stands Power Cord Wrap Ice Packs Rear Grill & Mesh Filter Power Cord WARNING -- READ AND SAVE THE AIR COOLER SAFETY &... -
Page 3: Use And Operation
USE & OPERATION COOLER LOCATION Make sure to position the air cooler on a flat floor base with appropriate cross-ventilation, before you set up and start using the product. Please refer to the COOLER LOCATION section of the separate Safety & Maintenance Guide. BASE INSTALLATION (OPTIONAL) Before installation, make sure the unit is unplugged from the electrical outlet and that no water is inside the unit. -
Page 4: Control Panel
USE & OPERATION CONTROL PANEL Icons on Display Screen Swing Speed: Timer: Wind Type I = Ultra Low Cool Filter Alert II = Low III = Medium Sleep IV = High Buttons on Control Panel Power Speed Swing Timer Mode Cool... -
Page 5: Function Buttons
USE & OPERATION (CONTINUED) FUNCTION BUTTONS STAND BY MODE Once the unit is plugged in, the POWER indicator light will be illuminated. POWER Press the to turn the unit on. The cooler will start automatically at Ultra Low speed. To turn the unit off, press button again. - Page 6 USE & OPERATION (CONTINUED) FUNCTION BUTTONS (CONTINUED) COOL Press the COOL button until is illuminated on the display screen. This activates evaporative cooling. The water pump will operate and you will feel the cooler air after the Honeycomb Cooling Media is completely wet. When the is not illuminated on the display screen, the unit switches to a fan only mode, without evaporative cooling.
- Page 7 USE & OPERATION (CONTINUED) REMOTE CONTROL POWER : ON / OFF COOL Evaporative Cooling ON / OFF SWING Controls the motion of the louvers LIGHT Display screen light On / Off SPEED Ultra Low / Low / Medium / High MODE Natural / Sleep / Normal TIMER...
-
Page 8: Filling With Water
USE & OPERATION (CONTINUED) FILLING WITH WATER CAUTION: Unplug the unit from the electrical socket before emptying or refilling the water tank. Open the Water Fill Door located on the side of the unit. The Water Level Indicator is located at the front of the unit. Refill the Water water tank when water level is low. - Page 9 USE & OPERATION (CONTINUED) ADDING ICE PACKS Four re-freezble Ice Packs are included to help enhance the cooling effect when required. Freeze the ice packs in a freezer. When frozen, you can insert them into the water tank of the air cooler.
-
Page 10: Low Water Indicator
USE & OPERATION (CONTINUED) LOW WATER INDICATOR In cooling mode, when water in the tank is below the minimum level the unit will automatically pause evaporative cooling and then will flash. Refill the water tank to deactivate the indicator in cooling mode. First switch OFF the unit and unplug from the power outlet. - Page 11 USE & OPERATION (CONTINUED) CLEANING THE MESH FILTER AND HONEYCOMB COOLING MEDIA WARNING: Before cleaning the unit, switch the unit OFF and disconnect the power adapter from the unit and electrical socket. • The appliance is supplied with a Mesh Filter and Honeycomb Cooling Media. •...
-
Page 12: Description Des Pieces
DESCRIPTION DES PIECES Panneau de Contrôle Système de refroidissement en nid d’abeilles Récepteur de signal pour Piles pour télécommande télécommande (inclus) Grilles d'Aération Télécommande Indicateur de Niveau d'Eau Réservoir d’eau Poignée Bouchon de vidange Porte de remplissage d'eau Des vis Roulettes Supports pour base inférieure Rembobineur de cordon... -
Page 13: Utilisation Et Fonctionnement
UTILISATION ET FONCTIONNEMENT POSITION DU REFROIDISSEUR D’AIR Veiller à placer le refroidisseur d’air comme il se doit avant de l’installer et de l’utiliser. Il convient de se reporter à la section POSITION DU REFROIDISSEUR D’AIR (IMPORTANT à LIRE) du Guide de sécurité et d’entretien. -
Page 14: Panneau De Commande
UTILISATION ET FONCTIONNEMENT (SUITE) PANNEAU DE COMMANDE Icônes sur l’écran d’affichage Oscillation Type de vent Vitesse: Minuterie: 1 = Ultra bas Refroidissement Alerte filtre 2 = Faible 3 = Moyenne Sommeil 4 = Élevée Bouton sur panneau de commande Interrupteur Vitesse Oscillation Mode... - Page 15 UTILISATION ET FONCTIONNEMENT (SUITE) BOUTONS DE FONCTION MODE VEILLE Lorsque l'appareil est branché, le voyant lumineux de l'ALIMENTATION s'allumera. INTERRUPTEUR Appuyez sur le bouton pour activer l'appareil. Le refroidisseur se mettra automatiquement en route à la vitesse ultra-basse. Pour éteindre l'appareil, appuyez de nouveau sur le bouton VITESSE Appuyer sur le bouton de la à...
- Page 16 UTILISATION ET FONCTIONNEMENT (SUITE) BOUTONS DE FONCTION (SUITE) REFROIDISSEMENT Appuyer le bouton REFROIDISSEMENT jusqu'à ce que soit illuminé sur l'écran d'affichage. Ceci active le refroidissement par évaporation. La pompe d'eau fonctionnera et vous sentirez l'air frais une fois que le Système de Refroidissement Honeycomb. est entièrement trempé. Lorsque n'est pas éclairé, l'unité...
- Page 17 UTILISATION ET FONCTIONNEMENT (SUITE) TÉLÉCOMMANDE INTERRUPTEUR EN MARCHE / ÉTEINDRE REFROIDISSEMENT Enfriamiento Evaporativo Enc / Apag OSCILLATION Commande le mouvement des grilles d’aération LUMIÈRE Rétro-éclairage de l'écran activé / désactivé VITESSE Ultra bas / Faible / Moyenne / Élevée MODE Naturel / Sommeil / Normal Commandes minuterie / préréglage MINUTERIE...
- Page 18 UTILISATION ET FONCTIONNEMENT (SUITE) REMPLISSAGE ATTENTION: Débrancher l’appareil avant de vider ou de remplir le réservoir d’eau. Pour remplir, faites glisser le réservoir d'eau situé sur le devant de l'unité. Porte de remplissage L’indicateur du niveau d’eau se trouve à l’avant de l’unité. Remplir le de l’eau réservoir d’eau lorsque le niveau d’eau est faible.
- Page 19 UTILISATION ET FONCTIONNEMENT (SUITE) INSERTION DES BLOCS DE GLACE Quatre 4 blocs de glace re-congelables sont inclus pour renforcer l'effet de refroidisseur au besoin. Placez les blocs de glace au congélateur. Une fois congelés, vous pouvez les insérer dans le réservoir d'eau du refroidisseur d'air.
- Page 20 UTILISATION ET FONCTIONNEMENT (SUITE) INDICATEUR DU FAIBLE NIVEAU D'EAU Au mode refroidissement, lorsque l'eau du réservoir se situe au-dessous du niveau minimum, l'appareil interrompra automatiquement le refroidissement par évaporation, puis le voyant lumineux clignotera. Remplir le réservoir d’eau pour désactiver l’avertisseur en mode REFROIDISSEMENT. Éteindre en premier lieu l’appareil et le débrancher de la prise électrique.
- Page 21 UTILISATION ET FONCTIONNEMENT (SUITE) NETTOYAGE DU FILTRE ET DU SYSTÈME DE REFROIDISSEMENT EN NID D’ABEILLES AVERTISSEMEN: Avant de nettoyer l’appareil, il convient de l’éteindre, puis de le débrancher de la prise électrique. • L’appareil est vendu avec un filtre et un système de refroidissement en nid d’abeilles. •...
-
Page 22: Descripción De Partes
DESCRIPCIÓN DE PARTES Panel de Control Filtro de Enfriamiento Honeycomb Receptor de Señal del Control Batería del Control Remoto Remoto (incluida) Deflectores Control Remoto Indicador de Nivel de Tanque de Agua Agua Manija Tapón de Agua Puerta de Llenado Empulgueras de Agua Ruedas Soporte de la Base Inferior... -
Page 23: Uso Y Funcionamiento
USO Y FUNCIONAMIENTO UBICACIÓN DEL ENFRIADOR Antes de configurar y empezar a usar el producto, asegúrese de colocar el enfriador de aire en una base de piso plano con ventilación cruzada adecuada. Por favor, consulte la sección de la Guía de seguridad y de mantenimiento separada. -
Page 24: Panel De Control
USO Y FUNCIONAMIENTO (CONTINUACIÓN) PANEL DE CONTROL Iconos en la Pantalla Display Oscilación Velocidad: Temporizador: Tipo de Viento 1 = Ultra Bajo Alerta de Filtro 2 = Bajo Frío 3 = Media Nocturno 4 = Alta Botones en la Pantalla Display Velocidad Oscilación Encendido... - Page 25 USO Y FUNCIONAMIENTO (CONTINUACIÓN) BOTONES DE FUNCIONES MODO STAND BY Una vez que la unidad esté enchufada, la luz indicadora ENCENDIDO se iluminará. ENCENDIDO / APAGADO Presione para encender la unidad. El enfriador iniciará automáticamente a velocidad ultra baja. Para apagar la unidad, presione el botón nuevamente.
- Page 26 USO Y FUNCIONAMIENTO (CONTINUACIÓN) BOTONES DE FUNCIONES (CONTINUACIÓN) FRÍO Presione el botón COOL hasta que el indicador se ilumina en la pantalla. Esto activa la refrigeración por evaporación. La bomba de agua funcionará y usted sentirá el aire más fresco después de que el filtro de enfriamiento Honeycomb esté...
- Page 27 USO Y FUNCIONAMIENTO (CONTINUACIÓN) CONTROL REMOTO ENCENDIDO Encendido / Apagado Encendido / Apagado del modo FRÍO enfriamiento evaporativo OSCILACIÓN Controla el movimiento de los deflectores Luz de la pantalla Encendido / Apagado VELOCIDAD Ultra Bajo / Bajo / Media / Alta MODE Natural / Nocturno / Normal Control del Temporizador / Función Presente...
- Page 28 USO Y FUNCIONAMIENTO (CONTINUACIÓN) LLENAR CON AGUA Y HIELO PRECAUCIÓN: Desenchufe la unidad de la toma de corriente eléctrica antes de vaciar o llenar el depósito de agua. Para rellenar, deslice hacia afuera el tanque de agua localizado al frente de la unidad.
- Page 29 USO Y FUNCIONAMIENTO (CONTINUACIÓN) AÑADIENDO PAQUETES DE HIELO Se incluyen cuatro paquetes de hielo para ayudar a eficientar el efecto de enfriamiento cuando sea requerido Congelar los paquetes de hielo en el congelador. Cuando estén congelados, puede insertarlos en el depósito de agua del enfriador de aire.
- Page 30 USO Y FUNCIONAMIENTO (CONTINUACIÓN) INDICADOR BAJO NIVEL DE AGUA En Modo Enfriamiento, cuando el agua esté por abajo del nivel minímo la unidad comenzará automáticamente a pausar el enfriamiento y entonces estará parpadeando Vuelva a llenar el tanque de agua para desactivar la alarma en el modo de Frío. Primero apague la unidad y desenchufe desde la toma de corriente.
- Page 31 USO Y FUNCIONAMIENTO (CONTINUACIÓN) LIMPIEZA DEL FILTRO DE MALLA Y FILTRO DE ENFRIAMIENTO HONEYCOMB ADVERTENCIA: Antes de limpiar la unidad, apague la unidad y desconecte de la toma de corriente. • El aparato tiene un Filtro de Malla y un Medio de Enfriamiento Honeycomb. •...
- Page 32 Hecho en China © 2019 JMATEK Limited. Todos los derechos reservados. La marca Honeywell es usada bajo licencia de Honeywell International Inc. Honeywell International Inc. no representa ni garantiza este producto. Este producto es fabricado por Airtek Int'l Corp. Ltd.
Need help?
Do you have a question about the DLC203AE Series and is the answer not in the manual?
Questions and answers