Table of Contents
Advertisement
Quick Links
Advertisement
Chapters
Table of Contents

Related Manuals for HNF-NICOLAI SD3 Urban


Summary of Contents for HNF-NICOLAI SD3 Urban
- Page 1 SD3 Urban Originalbetriebsanleitung Manual (p.63)
- Page 3 Hersteller: HNF GmbH Bahnhofstraße 14 16359 Biesenthal Deutschland Mail: info@hnf-nicolai.com Web: hnf-nicolai.com V1, Juli 2020 Layout, Fotos und Text: HNF GmbH, Biesenthal, Deutschland Die erwähnten Markennamen unterliegen Schutzrechten und sind auch ohne wei- tere Kennzeichnung Eigentum ihrer rechtmäßigen Besitzer. Nachdruck, auch aus- zugsweise, nur mit schriftlicher Genehmigung.
-
Page 4: Table Of Contents
Inhalt Ihr Fahrzeug 1.1. Bestimmungsgemäßer Gebrauch 1.2. Fahrzeugübersicht 1.3. Lieferumfang 1.4. Nutzung eines Anhängers oder Kindersitzes Inbetriebnahme 2.1. Pedale montieren 2.2. Lenker gerade stellen 2.3. Sattelhöhe einstellen 2.4. Akku laden 2.5. Ein-/Ausschalten des Bosch Antriebssystems 2.6. Unterstützungslevel anpassen 2.7. Licht ein-/ausschalten 2.8. - Page 5 Ergonomieeinstellung 5.1. Sattelposition und -neigung einstellen 5.2. Bremshebel 5.2.1. Bremshebelposition anpassen 5.2.2. Winkel der Bremshebel 5.2.3. Bremshebelabstand anpassen Instandhaltung 6.1. Liste der Verschleißteile 6.2. Empfohlene Wartungsintervalle 6.3. Nach einem Unfall 6.4. Akku 6.5. Reifen 6.6. Reifen-/Schlauchwechsel 6.6.1. Vorderrad ausbauen 6.6.2. Hinterrad ausbauen 6.6.3.
- Page 6 Hier finden Sie nützliche Informationen zur Handhabung des Produkts. Wichtige Information Die Bedienungsanleitung Ihres SD3 Urban wird laufend auf Aktualität über- prüft. Die vorliegende Anleitung spiegelt den Wissensstand zur Zeit der Drucklegung wider. Sollte sich etwas ändern, finden Sie das aktualisierte...
-
Page 7: Ihr Fahrzeug
Bauteile gelegt und sind überzeugt, dass Sie viele Jahre lang Freude an Ihrem SD3 Urban haben werden. Das SD3 Urban ist ein Fahrrad, das den Fahrer mit einem Elektromotor unterstützt. Die Anpassung der Unterstützung findet über eine Steuerung statt, die Daten von drei Sensoren (Geschwindigkeit, Trittfrequenz und Drehmoment) auswertet und an- hand des gewählten Unterstützungsgrads den Motor regelt. - Page 8 Eine Erhöhung der maximalen Unterstützungsgeschwindigkeit (=Tuning) auf mehr als 25 km/h an Ihrem SD3 Urban Pedelec verwandelt das Fahr- zeug in ein Kleinkraftrad. Es drohen ernsthafte Konsequenzen bei einer Fahrzeugkontrolle oder einem Unfall, da es sich um ein Fahrzeug ohne Be- triebserlaubnis und Versicherung handelt! Rotierende Teile wie Laufräder, Riemenscheibe, Tretkurbel oder Pedale...
-
Page 9: Fahrzeugübersicht
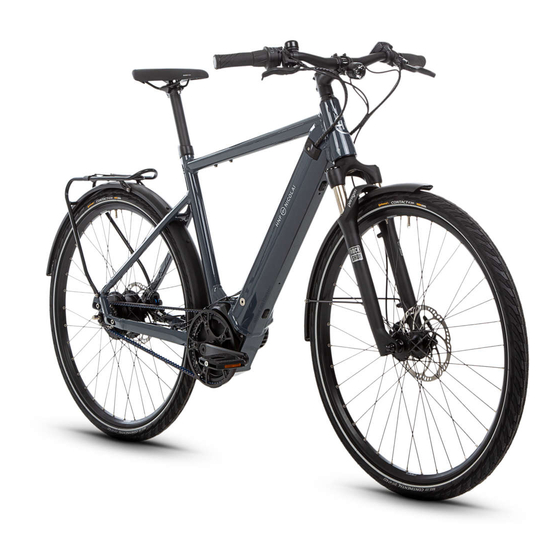
1 Enviolo Nabe 2 Gates Riemen 3 Typenschild 4 Ladebuchse linke Seite 5 Rahmennummer 6 Akku ‡ 7 Purion Bordcomputer Bitte notieren Sie die Rahmennummer des SD3 Urban hier:___________________ 1.3. Lieferumfang • Bosch-Ladegerät • 2 Schlüssel für Akkuschloss • 2 Transportsicherungen für die Magura MT4 •... -
Page 10: Nutzung Eines Anhängers Oder Kindersitzes
über dem sich der Kindersitz befindet. Inbetriebnahme In diesem Kapitel erfahren Sie, wie Sie Ihr HNF SD3 Urban fahrbereit machen. Pumpen Sie zunächst die Reifen auf. Die Luftdruckempfehlung finden Sie in Abschnitt 3.1. Wenn Ihr SD3 Urban vollständig montiert ausgeliefert wurde, entfallen die Abschnitte 2.1 und 2.2. -
Page 11: Lenker Gerade Stellen
Inbetriebnahme 2.2. Lenker gerade stellen • Lockern Sie die seitlichen Schrauben (1) am Vorbau mit dem passenden Innensechskant- schlüssel. • Drehen Sie den Vorbau in die gewünschte Position. • Ziehen Sie die seitlichen Schrauben (1) mit 5-6 Nm an. •... -
Page 12: Akku Laden
Inbetriebnahme Zum Ändern der Sattelhöhe: • Lösen Sie mit einem Innensechskantschlüssel die Schraube der Sattelstützenklemmung so weit, dass Sie die Sattelhöhe verändern kön- nen. • Ziehen Sie die Schraube danach mit einem Drehmoment von 10-15 Nm wieder fest. Die Sattelstützenklemmschraube ist fest genug angezogen, wenn sich die Sattelstütze nicht verdrehen lässt bzw. -
Page 13: Ein-/Ausschalten Des Bosch Antriebssystems
Inbetriebnahme Entnahme: • Drehen Sie den Schlüssel im Akkuschloss im Uhrzeigersinn bis zum Anschlag, der Akku springt dadurch nach oben. • Fassen Sie mit dem Zeigefinger in die Öffnung unterhalb des Akkus, drücken Sie den Plastik- clip der Rückhaltesicherung ein und ziehen Sie den Akku nach oben aus dem Rahmen heraus Einsetzen: •... -
Page 14: Licht Ein-/Ausschalten
Inbetriebname 2.7. Licht ein-/ausschalten Die Lichtschaltfunktion wird über die "+"-Taste gesteuert. Einschalten: mittellanger Tastendruck (1 bis 2,5 Sekunden) auf „+“. Ausschalten: langer Tastendruck (mehr als 2,5 Sekunden) auf „+“. 2.8. Schiebehilfe Die Schiebehilfe unterstützt Sie beim Schieben des Pedelecs mit max. 6 km/h (im größten Gang , sonst entsprechend langsamer). -
Page 15: Vor Jeder Fahrt
Vor jeder Fahrt Vor jeder Fahrt 3.1. Reifen überprüfen Reifenhersteller Continental erlaubt 3,0-4,0 bar Druck für den Reifen Contact 47-622. Es gilt: • Je höher Ihr Gewicht, desto höheren Luftdruck sollten Sie wählen. • Der Hinterradreifen sollte mit etwas mehr Druck als der Vorderradreifen gefah- ren werden (0,2 - 0,5 bar), da auf dem Hinterrad ca. -
Page 16: Antriebsriemen Überprüfen
Vor jeder Fahrt Als Druckpunkt ist die Stelle des Hebelwegs definiert, an der die Bremse anspricht. Funktioniert die Bremse einwandfrei - sind also keine Luftblasen in der Hydraulikleitung - liegt bei jedem Bremsvorgang der Druckpunkt an der gleichen Hebelstellung an. Berühren Sie die Bremsscheiben nicht mit Ihren Händen. -
Page 17: Verschraubungen Überprüfen
Vor jeder Fahrt 3.6. Verschraubungen überprüfen Prüfen Sie vor jeder Fahrt, ob die Achsen von Vorderrad und Hinterrad fest angezo- gen sind. Überprüfen Sie außerdem, ob die folgenden Teile sich nicht verdrehen lassen: • Sattel • Sattelstütze • Lenker • Vorbau Heben Sie das Fahrzeug leicht an und lassen Sie es mit den Reifen auf den Boden fal- len. -
Page 18: Bedienung
Bosch Bedienungsanleitung OBJ_BUCH-2819-002.book Page 2 Monday, May 22, 2017 11:27 AM Bedienung 4.1. Bosch-Antriebssystem 4.1.1. Purion Bordcomputer L L K L K K K K K K K K W W A W W W W W W A A A 1 270 020 XBP | (22.5.17) Bosch eBike Systems... - Page 19 Bosch Bedienungsanleitung L L K L K K K K K K K K W W A W W W W W W W A A A Bosch eBike Systems 1 270 020 XBP | (22.5.17)
- Page 20 Bosch Bedienungsanleitung...
- Page 21 Bosch Bedienungsanleitung...
- Page 22 Bosch Bedienungsanleitung...
- Page 23 Bosch Bedienungsanleitung...
- Page 24 Bosch Bedienungsanleitung...
- Page 25 Bosch Bedienungsanleitung...
- Page 26 Bosch Bedienungsanleitung...
-
Page 27: Drive Unit Active Line Plus
OBJ_BUCH-3139-001.book Page 2 Wednesday, May 31, 2017 12:10 PM Bosch Bedienungsanleitung 4.1.2. Drive Unit Active Line Plus 0 275 007 AD5 | (31.5.17) Bosch eBike Systems... - Page 28 Bosch Bedienungsanleitung...
- Page 29 Bosch Bedienungsanleitung...
- Page 30 Bosch Bedienungsanleitung...
- Page 31 Bosch Bedienungsanleitung...
- Page 32 Vor jeder Fahrt Bosch Bedienungsanleitung...
-
Page 33: Powertube Akku
OBJ_BUCH-2032-006.book Page 3 Thursday, May 4, 2017 3:28 PM Bosch Bedienungsanleitung Vor jeder Fahrt 4.1.3. PowerTube Akku Bosch eBike Systems 0 275 007 XPX | (4.5.17) - Page 34 OBJ_BUCH-2032-006.book Page 5 Thursday, May 4, 2017 3:28 PM Vor jeder Fahrt Bosch Bedienungsanleitung Bosch eBike Systems 0 275 007 XPX | (4.5.17)
- Page 35 Bosch Bedienungsanleitung...
- Page 36 Bosch Bedienungsanleitung...
- Page 37 Bosch Bedienungsanleitung...
- Page 38 Instandhaltung Bosch Bedienungsanleitung...
- Page 39 Bosch Bedienungsanleitung Vor jeder Fahrt...
-
Page 40: Ladegerät
Vor jeder Fahrt Bosch Bedienungsanleitung OBJ_BUCH-2031-006.book Page 2 Wednesday, April 19, 2017 9:54 AM 4.1.4. Ladegerät Standard Charger eBike Battery Charger 36-4/230 Standard Charger 0 275 007 907 Input: 230V 50Hz 1.5A Li-Ion Output: 36V Use ONLY with BOSCH Li-Ion batteries Made in PRC Robert Bosch GmbH, Reutlingen eBike Battery Charger 36-4/100-230... - Page 41 Bosch Bedienungsanleitung Vor jeder Fahrt...
- Page 42 Vor jeder Fahrt Bosch Bedienungsanleitung...
- Page 43 Bosch Bedienungsanleitung Vor jeder Fahrt...
-
Page 44: Enviolo Nabenschaltung
Vor jeder Fahrt Bedienung 4.2. Enviolo Nabenschaltung Mit dem Enviolo-Schaltsystem können Sie über einen Drehgriff die Übersetzung stufenlos anpas- sen. Drehen Sie den Drehgriff vom Körper weg, um die Übersetzung zu verringern, z. B. fürs Anfahren oder für Bergauffahrten. Drehen Sie den Drehgriff zum Körper hin, um die Übersetzung zu erhöhen und mit schnelleren Geschwindigkeiten zu fahren. -
Page 45: Bremsanlage
Hebel aufziehen 4.4. Bremsanlage Ihr SD3 Urban ist mit hydraulischen Scheibenbremsen ausgestattet. Benutzen Sie beide Bremsen gleichzeitig für zum sicheren Abbremsen. Der linke Bremshebel wirkt auf die Vorderradbremse, der rechte Bremshebel auf die Hinterradbremse. Die Bremsanlage verfügt über einen automatischen Ausgleich des Verschleißes der Bremsbeläge. -
Page 46: Seitenständer
Vor jeder Fahrt Bedienung 4.5. Seitenständer Bitte beachten Sie im Umgang mit Ihrem Seitenständer folgende Punkte: Fahren mit ausgeklapptem Seitenständer kann zum Sturz führen. Rück- wärtsschieben des Fahrzeugs mit ausgeklapptem Seitenständer kann zu einem Verklemmen des Ständers an der Kurbel führen. ->... -
Page 47: Ergonomieeinstellung
Ergonomieeinstellung Vor jeder Fahrt Ergonomieeinstellung 5.1. Sattelposition und -neigung einstellen Die optimale horizontale Sattelposition kann per Knielot ermittelt werden. Das Knielot ist die senk- rechte Linie von der Knievorderseite nach unten und sollte im Optimalfall durch die Pedalachse oder leicht davor verlaufen. Sie können das Knielot mittels einer Schnur mit Gewicht sowie einem Helfer bestimmen. -
Page 48: Winkel Der Bremshebel
Vor jeder Fahrt Instandhaltung Durch das Lösen der beiden T25-Schrauben an der Lenkerschelle kann der Bremsgriff auf dem Lenker verschoben werden. Eventuell müssen Sie zuerst mit einem passen- den Innensechskantschlüssel auch die Bosch-Bedieneinheit lösen und verschieben. Wenn Sie die richtige Position gefunden haben, ziehen Sie die Griffe zunächst nur so weit fest, dass sie noch verdrehbar sind. -
Page 49: Liste Der Verschleißteile
Instandhaltung Vor jeder Fahrt Bei Wartungsarbeiten besteht ein Klemm- und Quetschrisiko. Ihre Finger könnten zwischen sich bewegende Teile geraten. -> Achten Sie auf Ihre Hände und arbeiten Sie vorsichtig. Verletzungsgefahr bei Wartungsarbeiten am eingeschaltetem Antriebssystem! Ihre Hände können bei anlaufendem An- trieb z.B. -
Page 50: Nach Einem Unfall
Vor jeder Fahrt Instandhaltung Als Anhaltspunkt schlagen wir Ihnen die folgenden Wartungsintervalle vor: einmalig nach 100 - 300 km • Anzugsmomente von Griffen, Bremshebeln, Sattel, Sattelstütze, Vorbau, und Lenker kontrollieren • Speichenspannung kontrollieren, ggf. nachzentrieren lassen • ggf. enviolo-Schaltzug-Spiel nachjusti eren alle 500 km •... -
Page 51: Reifen
Instandhaltung Vor jeder Fahrt Während der Lagerung/Nichtnutzung sind folgende Faktoren relevant für die Le- bensdauer: • Lagerungstemperatur. Optimal: 0-20 °C. Temperaturen über 30 °C bzw. das Abstellen des Bikes mit Akku in der prallen Sonne reduzieren die Lebensdauer des Akkus. •... -
Page 52: Hinterrad Ausbauen
Vor jeder Fahrt Instandhaltung 6.6.2. Hinterrad ausbauen Der Hinterbau ist so konstruiert, dass zum Ausbau des Hinterrads kein vorheriges Entspannen des Riemens notwendig ist. • Schalten Sie mit dem Drehgriff in eine Posi- tion, die leichten Zugang zu den Seilzugenden am Nabeninterface ermöglicht. -
Page 53: Reifen/Schlauch Wechseln
Instandhaltung Vor jeder Fahrt 6.6.3. Reifen/Schlauch wechseln • Schrauben Sie Ventilkappe und große Rändelmutter vom Ventil ab. • Lassen Sie die Luft durch Druck auf den Ventilstift in der Mitte des Ventils voll- ständig ab. • Lösen Sie mit Reifenhebern den Reifen auf einer Seite von der Felge. -
Page 54: Hinterrad Einbauen
Vor jeder Fahrt Instandhaltung Wenn die Vorspannung des Schnellspanners zu gering ist, kann sich das Laufrad während der Fahrt lösen. Es besteht Unfallgefahr! -> Ziehen Sie den Schnellspanner immer so fest an, dass der Spannhebel beim Hochklappen einen kraftbedingten Abdruck in Ihrer Handfläche hin- terlässt 6.6.5. -
Page 55: Bremsen
Instandhaltung Vor jeder Fahrt • Das Schaltzug-Spiel können Sie fühlen, indem Sie vorsichtig an den Endkappen der Schalt- züge ziehen, die in den Drehgriff hineinlaufen. • Ein Spiel von 0,5 mm je Zug ist ideal. Mehr als 2 mm Spiel kann die Schaltqualität des Sys- tems und die Lebensdauer des Schaltzugs ne- gativ beeinflussen. -
Page 56: Bremsscheiben Überprüfen
Vor jeder Fahrt Instandhaltung • Ziehen Sie den Bremshebel und stecken Sie dabei die Rückseite der Transportsicherung zwischen die Trägerplatten der entsprechen- den Bremszange. Wenn die Transportsiche- rung noch zwischen die Beläge passt, sind diese nicht verschlissen. • Alternativ können Sie die ausgebauten Beläge in die kleine Kerbe in der Transportsicherung stecken. -
Page 57: Transport Mit Dem Auto
Um Schäden durch den Transport des Fahrzeugs mit dem Auto zu vermeiden, beach- ten Sie die folgenden Hinweise: Wenn Sie das SD3 Urban bei Regen und hohen Geschwindigkeiten außer- halb am Auto transportieren, kann Wasser in die Enviolo-Nabe, den Bosch- Motor, den Akku sowie in das Display gelangen. -
Page 58: Technische Daten
Vor jeder Fahrt Technische Daten Technische Daten 9.1. Komponentenliste Rahmen HNF-NICOLAI SD3 Urban, S/M oder L/XL Chassis Gabel RockShox Paragon Silver, 65 mm Motor Bosch Active Line Plus Antriebs- Batterie Bosch PowerTube 500 Wh vertikal system Bordcomputer Bosch Purion Schaltung... -
Page 59: Gewichte
Technische Daten Vor jeder Fahrt 9.2. Gewichte Akku einzeln 2,8 kg Leergewicht Pedelec inkl. Akku bei Originalausstattung 25,8-26 kg Zulässige Zuladung gesamt (Fahrer+Ausrüstung+Packtaschen) 125 kg Zulässige Zuladung Gepäckträger 16 kg 9.3. Anzugsdrehmoment der Schrauben Teil Moment/Nm Bosch Purion Bordcomputer an Lenker Bremsbelag-Sicherungsschraube max. -
Page 60: Sachmängelhaftung
Vor jeder Fahrt Sachmängelhaftung Sachmängelhaftung Gesetzlich ist eine 24-monatige Sachmängelhaftung festgelegt, die mit dem Tag des Kaufs beginnt. Für die Inanspruchnahme der Sachmängelhaftung sind die Original- rechnung vorzulegen und bestmöglich durchgeführte Inspektionen nachzuweisen. Sie haben Anspruch auf die Gewährleistung unter folgenden Voraussetzungen: •... -
Page 61: Eg-Konformitätserklärung
HNF GmbH Bahnhofstraße 14 16359 Biesenthal Wir, die HNF GmbH, erklären, dass die Maschine HNF-NICOLAI SD3 Urban in der Ausführung als Pedelec allen einschlägigen Bestimmungen der Maschinenrichtlinie 2006/42/EG entspricht. Weiterhin entspricht die Maschine den folgenden Richtlinien: Richtlinie der elektromagnetischen Verträglichkeit 2014/30/EU •... -
Page 62: Entsorgung
Verpackungsmaterialien sammeln Sie nach Sorten getrennt und entsorgen diese gemäß den örtlichen Bestimmungen. Den Akku können Sie gegebenenfalls bei einem E-Bike-Händler abgeben oder im mitgelieferten Gefahrgutkarton zur Entsor- gung an HNF-NICOLAI senden: HNF Works GmbH -Entsorgung- Sonnenallee 13-30... - Page 63 SD3 Urban Pedelec Manual (Translation)
- Page 64 Content Inhalt Your vehicle 1.1. Intended use 1.2. Vehicle overview 1.3. Scope of delivery 1.4. Use of a trailer or child seat Commissioning 2.1. Mounting the pedals 2.2. Straighten the handlebar 2.3. Adjusting the saddle height 2.4. Charging the battery 2.5.
- Page 65 Ergonomic setting 5.1. Adjusting the saddle position and tilt 5.2. Brake lever 5.2.1. Adjusting the brake lever position 5.2.2. Brake lever angle 5.2.3. Adjusting the brake lever distance Maintenance 6.1. List of wear parts 6.2. Recommended maintenance intervals 6.3. After an accident 6.4.
- Page 66 This indicates useful information regarding the handling of the product. Important information! The manual for your SD3 Urban is regularly checked to ensure it is up to date. This manual reflects the state of knowledge at the time of going to press.
-
Page 67: Your Vehicle
SD3 Urban for many years to come. The SD3 Urban is a bike that assists the cyclist with an electric motor. This assistance is adjusted via a control, which evaluates the data from three sensors (speed, cadence and torque) and regulates the motor based on the selected level of assistance. - Page 68 People who cannot operate the vehicle safely due to their height Increasing the maximum support speed (= tuning) to more than 25 km/h on your SD3 Urban pedelec turns the vehicle into a moped. There are serious consequences in case of a vehicle inspection or an accident, as it...
-
Page 69: Vehicle Overview
3 Type label 4 Charge socket of battery 5 Serial Number 6 Battery 7 Purion on-board computer ‡ Please write the serial number of your SD3 Urban here:______________________ 1.3. Scope of delivery • Bosch charger • 2 keys for battery lock •... -
Page 70: Use Of A Trailer Or Child Seat
This chapter explains how to get your SD3 Urban ready for the road. First, you should inflate the tyres. The recommended air pressure can be found in section 3.1. If your SD3 Urban has been delivered fully assembled, sections 2.1 and 2.2 do not apply. 2.1. -
Page 71: Straighten The Handlebar
Commissioning 2.2. Straighten the handlebar • Loosen the side screws (1) on the stem with a suitable Allen key. • Turn the stem into the desired position. • Tighten the side screws (1) with 5-6 Nm. • Lift the vehicle at the front of the frame so that the front wheel is no longer on the ground. -
Page 72: Charging The Battery
Commissioning • Loosen the screw of the seatpost clamp with an Allen key until you can adjust the saddle height. • Then retighten the screw to a torque of 10-15 Nm. The screw of the seatpost clamp is tightened enough when the seatpost cannot be turned or when it no longer slides down into the seat tube under your weight. -
Page 73: Switching The Drive On/Off
Comissioning Removal: • Turn the key in the battery lock clockwise all the way. The upper part of battery will lift from the downtube. • Grip with your forefinger into the hole below the battery. • Press on the safety restraint from above. •... -
Page 74: Switching The Light On/Off
Commissioning 2.7. Switching the light on/off The light is controlled by pressing the "+"-button. Turn on: Press the "+" button for a medium-long time (1 to 2.5 seconds). Turn off: Press the "+" button for a long time (longer than 2.5 seconds). 2.8. Push-assistance ... -
Page 75: Before Every Ride
Before every ride Before every ride 3.1. Checking the tyres The tyre manufacturer Continental allows 3,0-4,0 bar of pressure for the Contact 47- 622 tyre. The following applies: • The greater your weight, the higher the air pressure you should choose. •... -
Page 76: Checking The Belt
Before every ride The pressure point is defined as the position of the lever stroke at which the brake responds. If the brake works perfectly – i.e. there are no air bubbles in the hydraulic line – the pressure point will be the same lever position for each braking process. -
Page 77: Checking The Screw Fittings
Before every ride 3.6. Checking the screw fittings Before each ride, check that the axles on front- and rearwheel are tightened firmly. Also, check that the following parts do not twist • saddle • seatpost • handlebar • stem Lift the vehicle slightly and let it fall to the ground on the tyres. A rattle can have its origin in loose parts. -
Page 78: Use
Bosch manual OBJ_BUCH-2819-002.book Page 2 Monday, May 22, 2017 11:27 AM 4.1. Bosch drive system 4.1.1. Purion on-board computer L L K L K K K K K K K K W W A W W W W W W A A A 1 270 020 XBP | (22.5.17) Bosch eBike Systems... - Page 79 Bosch manual L L K L K K K K K K K K W W A W W W W W W W A A A Bosch eBike Systems 1 270 020 XBP | (22.5.17)
- Page 80 Bosch manual English – 1 Safety instructions Display elements of on-board computer (a) Speedometer Read all the safety information and in- (b) km/h unit indicator structions. Failure to observe the safety in- (c) mph unit indicator formation and follow instructions may result in electric shock, fire and/or serious injury.
- Page 81 Bosch manual English – 2 Operation Energy supply of the on-board computer The on-board computer is supplied with voltage by two CR2016 button cells. Symbols and their Meaning Changing the batteries (see figure A) Symbol Explanation If the on-board computer shows LOW BAT on the display, Short button press (less than 1 second) remove the on-board computer from the handlebars by un- screwing the fastening screw (3) of the on-board computer.
- Page 82 Bosch manual English – 3 – ECO: Effective assistance with maximum efficiency, for maximum range – TOUR: Steady assistance, long range for touring – SPORT/eMTB: SPORT: Powerful assistance, for mountain biking and cycling in urban traffic eMTB: Optimum assistance whatever the terrain, rapid acceleration when starting from a standstill, improved dy- namics and top performance (eMTB only available in combination with the drive units BDU250P CX, BDU365,...
- Page 83 Bosch manual English – 4 Displays and configurations of the Action Buttons Duration on-board computer Decrease assistance – Display TRIP, TOTAL, RANGE, – Battery charge indicator assistance modes Switch on bike lights The battery charge indicator (g) displays the eBike battery's state of charge.
- Page 84 Bosch manual English – 5 Error code display will always be able to do so without assistance from the drive. Before undertaking any other journeys, the eBike The eBike system's components are continuously and auto- should be checked. matically monitored. If an error is detected, the correspond- Have all repairs performed only by an authorised bike ing error code is displayed on the on-board computer.
- Page 85 Bosch manual English – 6 Code Cause Corrective measures Temperature error The eBike is outside of the permissible temperature range. Switch off the eBike system and allow the drive unit to either cool down or heat up to the permissible temperature range. Restart the system. If the problem persists, contact your Bosch eBike dealer.
- Page 86 Bosch manual English – 7 Code Cause Corrective measures situation, e.g. riding solely on the rear wheel Fault in the wire to the rear wheel speed Contact your Bosch eBike dealer. sensor Implausible signals from the rear wheel Restart the system and carry out a test ride lasting at least two 833 to 835 speed sensor minutes.
-
Page 87: Drive Unit Active Line Plus
OBJ_BUCH-3139-001.book Page 2 Wednesday, May 31, 2017 12:10 PM Bosch manual 4.1.2. Drive Unit Active Line Plus 0 275 007 AD5 | (31.5.17) Bosch eBike Systems... - Page 88 Bosch manual English – 1 Safety instructions On sections of the drive, temperatures >60 °C may occur in extreme conditions, Read all the safety information and in- e.g. when carrying consistently high loads at structions. Failure to observe the safety in- low speed when riding up hills or transport- formation and follow instructions may result ing loads.
- Page 89 Bosch manual English – 2 Product description and The numbering of the components shown refers to the illus- trations on the graphics pages at the beginning of the specifications manual. (1) Drive unit Intended use (2) Speed sensor The drive unit is intended exclusively for driving your eBike (3) Speed sensor spoke magnet and must not be used for any other purpose.
- Page 90 Bosch manual English – 3 If any structural changes are made, the correct distance ally connected to the drive unit by the manufacturer. The between the magnet and the sensor must be complied with separate operating instructions describe how to operate the (see figure A).
- Page 91 Bosch manual English – 4 Assistance level Assistance factor Active Line Active Line Plus Performance Line (BDU310) (BDU350) (BDU365) 40 % 40 % 55 % TOUR 100 % 100 % 120 % SPORT/eMTB 150 % 180 % 200 %/dynamic TURBO 250 % 270 % 300 % The assistance factor may vary in some models. The assistance level between TOUR and TURBO mode is dynamically progressive Switching the push assistance on/off If you apply less force, you will receive less assistance than if...
- Page 92 Bosch manual English – 5 For this reason, it is not possible to predict the range accur- separately and recycled in an environmentally ately before and during a trip. However, as a general rule: friendly manner. – With the same assistance level on the eBike drive: The Please return Bosch eBike components that are no longer less energy you need to exert in order to reach a certain usable to an authorised bicycle dealer.
-
Page 93: Powertube Battery
OBJ_BUCH-2032-006.book Page 3 Thursday, May 4, 2017 3:28 PM Bosch manual 4.1.3 PowerTube battery Bosch eBike Systems 0 275 007 XPX | (4.5.17) - Page 94 OBJ_BUCH-2032-006.book Page 5 Thursday, May 4, 2017 3:28 PM Bosch manual Bosch eBike Systems 0 275 007 XPX | (4.5.17)
- Page 95 Bosch manual English – 1 Safety instructions ence any adverse effects. The fumes may irritate the respiratory system. Read all the safety and Only charge the battery using original Bosch chargers. general instructions. Fail- When using chargers that are not made by Bosch, the risk ure to observe the safety of fire cannot be excluded.
- Page 96 Bosch manual English – 2 In addition to the functions shown here, changes to software (8) Standard battery relating to troubleshooting and functional modifications may (9) Lower standard battery holder be introduced at any time. (10) Cover (supplied only on eBikes with two battery (1) Rack-mounted battery holder packs) (2) Rack-mounted battery...
- Page 97 Bosch manual English – 3 If at least one (but not all) of the LEDs on the battery charge If you want to use an eBike that is designed for two batteries indicator (3) lights up, the battery will need to be fully with only one battery, cover the contacts of the unused charged before using it for the first time.
- Page 98 Bosch manual English – 4 from being removed by unauthorised third parties when the Whether the eBike system is switched on is only visible on eBike is not in use. the on-board computer. To remove the rack-mounted battery (2), switch it off and To switch off the battery, press the on/off button (4) again.
- Page 99 Bosch manual English – 5 Store the batteries at temperatures between 10 °C Do not ship batteries if the housing is damaged or the re- and 20 °C. Never store them at temperatures below –10 °C chargeable battery is not fully functional. Use only the ori- ginal Bosch packaging for transport.
-
Page 100: Charger
OBJ_BUCH-2031-006.book Page 2 Wednesday, April 19, 2017 9:54 AM Bosch manual 4.1.4. Charger OBJ_BUCH-2031-006.book Page 6 Wednesday, April 19, 2017 9:54 AM Standard Charger eBike Battery Charger 36-4/230 Standard Charger 0 275 007 907 Input: 230V 50Hz 1.5A Li-Ion Output: 36V Use ONLY with BOSCH Li-Ion batteries Made in PRC Robert Bosch GmbH, Reutlingen... - Page 101 Bosch manual English – 1 Safety instructions Product description and specifications Read all the safety and general instructions. Fail- Intended Use ure to observe the safety and general instructions In addition to the functions shown here, changes to software may result in electric shock, relating to troubleshooting and functional modifications may fire and/or serious injury.
- Page 102 Bosch manual English – 2 Technical data Charger Standard charger Compact charger Fast charger (36–4/230) (36–2/100-230) (36–6/230) Product code BCS220 BCS230 BCS250 Rated voltage 207 to 264 90 to 264 207 to 264 Frequency 47 to 63 47 to 63 47 to 63 Battery charging voltage Charging current (max.) Charging time – PowerPack 300, approx. –...
- Page 103 Bosch manual English – 3 proximately 20 % of the charging capacity. The flashing LED When the battery is disconnected from the charger, the bat- indicates the next 20 % currently charging. tery is automatically switched off. Once the eBike battery is fully charged, the LEDs go out im- Note: If you have charged the battery on the bike, carefully mediately and the on-board computer is switched off.
-
Page 104: Enviolo Gear Hub
4.2. Enviolo gear hub With the enviolo gear hub transmission system, you can adjust the transmission ratio infinitely via a twist grip. Turn the twist grip away from the body to reduce the transmission ratio, e.g. for starting up or for uphill riding. Turn the twist grip towards the body to increase the transmission ratio and ride at faster speeds. -
Page 105: Brake System
4.4. Brake system Your SD3 Urban is equipped with hydraulic disc brakes that will stop you quickly and safely when needed. Use both brakes simultaneously for safe braking. The left brake lever acts on the front brake, the right brake lever on the rear brake. -
Page 106: Side Stand
4.5. Side stand Please note the following points when handling your side stand: Riding with the side stand folded out may result in a fall. Pushing the vehicle backwards with the side stand folded out can cause the stand to jam on the crank. -
Page 107: Ergonomic Setting
Ergonomic setting Ergonomic setting 5.1. Adjusting the saddle position and tilt The optimal horizontal position of the saddle can be determined by the knee plumb line. The knee plumb line is the vertical line from the front of the knee down and should ideally pass through the pedal axle or just in front of it. -
Page 108: Brake Lever Angle
Maintenance By loosening the two T25 screws on the handlebar clamp, the brake lever on the handlebar can be moved. You may also first have to loosen and move the Bosch control unit with a suitable Allen key. Once you have found the right position, first tighten the grips ensuring that they can still be twisted. -
Page 109: List Of Wear Parts
Maintenance Risk of injury when carrying out maintenance work on a drive system that is switched on! Your hands may get stuck, for example between the belt and the pulley, when the drive starts up. -> Remove the battery before carrying out any maintenance work. -
Page 110: After An Accident
Maintenance every 500 km Check the wear condition of the brake pads (initially after 1,000 km) every 2,000 km (or once a year) • Check the bearing clearance of the headset, hubs, pedals • Check that the crank is firmly in place •... -
Page 111: Tyres
Maintenance 6.5. Tyres The tyres are subject to inevitable wear due to friction. You can reduce the tyre wear by ensuring the air pressure is high enough (section 3.1) and refraining from locking the tyres when braking. You will need to replace your tyres if the rubber tread is so worn down that the braid underneath becomes visible, or if the tyres have become porous due to ageing and frequent exposure to the sun. -
Page 112: Changing The Tyre/Tube
Maintenance • Lever the control cable end provided with the silver bolt off the hub interface, e.g. with a small screwdriver. • Loosen the axle nuts and external tab washers on both sides of the hub. • Pull the rear wheel out of the frame by giving it a gentle shake. -
Page 113: Fitting The Front Wheel
Maintenance 6.6.4. Fitting the front wheel • Remove (when inserted) the yellow transport lock from between the brake pads. • Carefully thread the front wheel into the fork. Make sure that the brake disc slides between the brake pads. • Turn the quick-release axle nut a few turns while holding the quick release lever •... -
Page 114: Brakes
Maintenance • You can feel the shift cable clearance by gently pulling on the end caps of the gear cables that run into the twist grip. • A clearance of 0.5 mm per pull is ideal. More than 2 mm clearance can adversely affect the gear shift quality of the system and the service life of the shift cable. -
Page 115: Checking The Brake Discs
Cleaning • Pull the brake lever and insert the rear side of the transport lock between the carrier plates of the corresponding brake calliper. If the transport lock still fits between the pads, they are not worn out. • Alternatively, you can put the removed pads into the small notch in the transport lock. -
Page 116: Transporting On A Car
To avoid damage caused by transporting the vehicle on the outside of a car, observe the following instructions: If you transport the SD3 Urban on a car in the rain and at high speeds, water can get into the enviolo hub, the Bosch motor, the battery and the display. -
Page 117: Technical Specifications
Technical specifications Technical specifications 9.1. Component list Frame HNF-NICOLAI SD3 Urban - size S/M or L/XL Chassis Fork RockShox Paragon Silver, 65 mm Motor Bosch Active Line Plus Drive system Battery Bosch PowerTube 500 Wh vertical Display Bosch Purion Gear shifting Enviolo CT-gear hub... -
Page 118: Weights
Technical Specifications 9.2. Weights Battery weight 2.8 kg Curb weight incl. battery in original equipment 25,8-26 kg Total permissible load (cyclist+equipment+panniers) 125 kg Permissible load on luggage carrier 16 kg 9.3. Tightening torque of the screws Part Torque/Nm Bosch Purion on-board computer on handlebar Brake pad locking screw max. -
Page 119: Liability For Defects
Liability for defects Liability for defects In most European countries a 24-month warranty is stipulated by law, beginning on the day of purchase. For the defect liability claim, the original invoice must be submitted and ideally, any inspections performed must be verified. You are entitled to the warranty under the following conditions: •... -
Page 120: Ec Declaration Of Conformity
HNF GmbH Bahnhofstraße 14 16359 Biesenthal We, HNF GmbH, declare that the machine HNF-NICOLAI SD3 Urban an EPAC, meets all relevant provisions of Machinery Directive 2006/42/EC. Furthermore, the machine complies with the following directives: Directive of Electromagnetic compatibility 2014/30/EC •... -
Page 121: Disposal
Please take the vehicle to a local collection point at the end of its service life. Packaging materials must be separated by type and disposed of according to local regulations. You may return the battery to an e-bike retailer or send it to HNF-NICOLAI for disposal in the supplied hazardous goods box:... - Page 122 Notes...
- Page 123 Notes...
Need help?
Do you have a question about the SD3 Urban and is the answer not in the manual?
Questions and answers
Jaki typ bateria jest w towrze hnf nikolai sd3 urban ? Pozioma czy pionowa