Table of Contents
Advertisement
Quick Links
Advertisement
Table of Contents

Subscribe to Our Youtube Channel
Related Manuals for Hatz Diesel H50 Series


Summary of Contents for Hatz Diesel H50 Series
- Page 1 ASSEMBLY INSTRUCTIONS...
-
Page 2: Table Of Contents
General information ............................6 1. Safety ............................8 1.1 General information ..........................8 1.1.1 Intended use ............................ 8 1.1.2 Machine user or machine manufacturer obligations ............... 9 1.1.3 Representation of safety notes ....................... 9 1.1.4 Meaning of safety symbols ......................11 1.2 Safety notes............................ - Page 3 4.5.1.2 Cooling water hoses ........................41 4.5.1.3 Installation in combination with a cab heater ................42 4.5.1.4 The thermostat ........................... 42 4.5.2 Coolant ............................43 4.5.3 Engine radiator ..........................43 4.5.3.1 Water circuit piping ........................44 4.5.3.2 Expansion tank ........................... 44 4.5.3.2.1 Positioning of the expansion tank ...................
- Page 4 6.1 Engine control ............................83 6.1.1 Control unit ............................ 84 6.1.2 Control unit setup .......................... 85 6.1.3 Connections ..........................86 6.1.4 Control unit installation ........................86 6.1.5 Diagnostics tool ..........................88 6.1.5.1 Flash codes EDC17 CV54 ......................88 6.1.5.2 CAN message list ........................88 6.2 Engine monitoring (engine control and sensor system) ................
- Page 5 9. Contact protection for machine safety ..................121 9.1 Hot surfaces and rotating parts ......................121 9.2 Contact protection ..........................124 10. Maintenance .......................... 125 10.1 Accessibility of service points ......................125 10.2 Maintenance intervals ........................126 11. Engine preservation ....................... 127 12.
- Page 6 This symbol stands for important safety instructions. Please heed carefully to prevent dangers to persons and material. In addition, the general statutory safety regulations and those of the responsible professional trade associations apply. If you have any questions, please contact your nearest Hatz service station before commissioning the machine.
-
Page 7: General Information
(EN ISO 9001). Proper functioning of all engines is checked prior to leaving the factory. HATZ diesel engines are efficient, robust, and have a long service life. Therefore, they are usually installed in machines that are used for commercial purposes. - Page 8 Depending on the use and installation of the engine, it may be necessary for the machine manufacturer and machine user to install safety equipment to prevent inappropriate use, such Parts of the exhaust gas system and the engine surface naturally become hot and must not be touched during operation or until they cool down after the engine is switched off.
-
Page 9: Safety
1. Safety 1.1 General information Introduction This chapter contains the information you need to work safely with this machine. To prevent accidents and damage to the machine, it is imperative to follow all specified safety instructions. Read this chapter carefully before beginning work. 1.1.1 Intended use Intended use The machine described in these Assembly Instructions fulfills the following functions:... -
Page 10: Machine User Or Machine Manufacturer Obligations
Residual risks Residual risks result during daily use and in association with maintenance work. Reference is made to these residual risks in chapter 1.2.2 Machine-specific safety instructions for operation, page 14 and in chapter 1.2.3 Machine-specific safety instructions for maintenance work, page 15 as well as in other chapters of these instructions and in the manual for diesel engine directly before the relevant descriptions or handling instructions. - Page 11 Structure of the safety notes The safety notes consist of: Danger symbol Signal word Description of the danger Possible consequences Preventative measures SIGNAL WORD Type and source of the danger. Consequences of non-compliance Action for avoiding/averting the danger General danger symbol The general danger symbol is used to identify the danger of personal injury.
-
Page 12: Meaning Of Safety Symbols
1.1.4 Meaning of safety symbols Explanation of symbols The following table describes the meanings of the safety symbols used in these Assembly Instructions. Symbol Meaning Smoking, fire, and open flames are prohibited! Warning of personal injury! Warning of hot surfaces! Warning of flammable substances! Warning of explosive substances! Warning of toxic engine exhaust! -
Page 13: Safety Notes
1.2 Safety notes 1.2.1 Operational safety Introduction This chapter contains all of the important safety instructions for personal protection and for safe and reliable operation. Additional, task-related safety instructions can be found at the beginning of each chapter. DANGER Danger to life, danger of injury or danger of property damage due to failure to comply with the assembly instructions, manual for diesel engine and the safety instructions contained therein. - Page 14 Personal protective Pictogram Function equipment Safety gloves protect the hands against Safety gloves injury, e.g. from battery acid. Safety goggles protect the eyes from flying Safety goggles objects (e.g. dust particles, spraying (with side protection) liquids, spraying acid). Wear close-fitting clothing. It must not Working clothes restrict the wearer's freedom of movement, however.
-
Page 15: Machine-Specific Safety Instructions For Operation
WARNING Danger of injury due to non-compliance with the handling instructions and due to unauthorized activities. Follow all instructions. Do not perform activities for which no qualification is available. Contact properly trained personnel if necessary. CAUTION Danger of injury from overloading the body. Lifting the machine to transport it or to move it to another location can lead to injury (of the back, for example). -
Page 16: Machine-Specific Safety Instructions For Maintenance Work
Safety instructions for operation DANGER Danger to life from inhaling exhaust gases. Toxic engine exhaust gases can lead to loss of consciousness, and even death, in closed-off and poorly ventilated rooms. Never operate the machines in closed-off or poorly ventilated rooms. - Page 17 Safety instructions for maintenance work DANGER Danger of explosion from flammable cleaning agents. Cleaning with benzene is an explosion hazard. It is highly flammable, can become electrostatically charged, and can generate an explosive gas/air mixture. Use halogen-free, cold cleaners with a high flash point for cleaning.
-
Page 18: Electrical Equipment
1.2.4 Electrical equipment Safety notes DANGER Danger to life, danger of injury or danger of property damage due to incorrect use of batteries. Do not place tools on the battery. Before performing work on the electrical equipment, always disconnect the negative battery terminal. -
Page 19: Labels
NOTE The necessary wiring diagrams are included with the machine if it is equipped with electrical equipment. Additional wiring diagrams can be requested when needed. We cannot be held liable for electrical equipment that is not designed according to HATZ wiring diagrams. ... -
Page 20: General Information About The H50 Engine
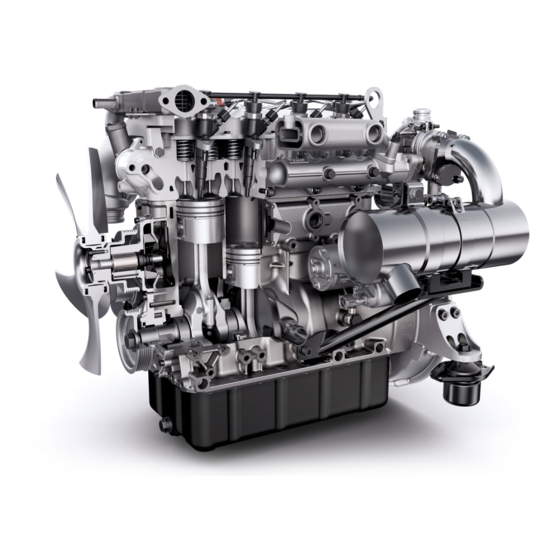
2. General information about the H50 engine The H-series Beginning with the water-cooled 4-cylinder 4H50TIC model, the new generation from Hatz focuses on common rail technology, exhaust gas turbocharger with charge air cooling, external exhaust gas recirculation (EGR) and diesel oxidation catalyst (DOC) or diesel particulate filter (DPF) with diesel oxidation catalyst. -
Page 21: Technical Data
2.1 Technical data 2.1.1 Engine information and filling quantities Type 3H50 4H50 Type Liquid-cooled four stroke diesel engine Combustion system Direct injection Injection system Bosch common rail Number of cylinders Bore/stroke 84 / 88 84 / 88 Displacement 1,464 1,952 Approx Engine oil capacity . -
Page 22: Weights (Without Operating Fluids)
2.1.3 Weights (without operating fluids) Model Fan2Flywheel (F2F) OpenPowerUnit (OPU) Silent Pack Type Weight in kg – 3H50 TI – 3H50 TIC – 3H50 TICD 4H50 Ti 4H50 TIC – 4H50 TICD 2.1.4 Engine type plate The engine type plate is affixed to the crankcase and includes the following engine information: Model designation of the engine Engine serial number... -
Page 23: Power Data H50
2.2 Power data H50 Speed application - constant speed / variable speed (P-degree 0, 3, 5, 10 %) Definition of constant speed / variable speed Constant speed applications are machines where the operating speed is between the nominal speed and the upper idle speed. In contrast, variable speed applications are used in the entire speed range (e.g. -
Page 24: Engine Design
2.3 Engine design 2.3.1 Fan2Flywheel (F2F) TIC Intake side Drain plug with integrated water level Crankcase ventilation sensor Intake opening for combustion air Electric fuel pump Lifting eyes Engine type plate Oil filter Starter (low mounting position) Main fuel filter Dipstick Side oil drain screw Oil filler plug, bottom... - Page 25 Exhaust side Oil filler plug, top Turbocharger Engine foot Diesel oxidation catalyst (DOC) Exhaust outlet Starter (high mounting position) Three phase alternator Oil drain screw, front Poly-V belt...
-
Page 26: Fan2Flywheel Ticd
2.3.2 Fan2Flywheel TICD Diesel particulate filter (DPF) Intake opening for combustion air Exhaust outlet Throttle valve Air mass gauge... -
Page 27: Openpowerunit (Opu) Tic
2.3.3 OpenPowerUnit (OPU) TIC Intake side Intake opening for combustion air Fuel prefilter Drain plug with integrated water level Rain cap sensor Air filter (optional) Electric fuel pump Dust discharge valve Engine type plate Lifting eyes Starter (low mounting position) Engine control unit Dipstick Plug holder with integrated relay, glow... - Page 28 Exhaust side Radiator with integrated expansion tank Sealing cap for coolant Oil filler plug, top Turbocharger Diesel oxidation catalyst (DOC) Exhaust outlet Starter (high mounting position) Three phase alternator Belt guard Oil drain screw, front...
-
Page 29: Silentpack Ti/Tic
2.3.4 SilentPack TI/TIC Intake opening for combustion air Rain cap Air filter (optional) Top maintenance cover Clamp-type fastener Side maintenance cover HATZ instrument box Speed adjustment Engine type plate Drain plug with integrated water level sensor Fuel prefilter... -
Page 30: Transport
3. Transport WARNING Danger of injury from improper lifting and transport. Danger of crushing from the engine falling or tipping. Only use the lifting eyes already mounted on the machine for lifting. Before lifting the engine, check the lifting eyes for deformation. Lifting with deformed lifting eyes is forbidden. -
Page 31: Transport Conditions
Lifting eyes F2F Lifting eyes OPU Maximum weight 185kg 270kg 3.1 Transport conditions Only lift the engine at the lifting eyes fitted as standard. Use existing lifting eyes (Hatz condition when delivered). When transporting the machine, follow the safety instructions. ... -
Page 32: Temporary Stoppage
3.4 Temporary stoppage Take the following stoppage measures if you intend to take the machine out of service for a lengthy period (3-12 months): Step Measures for stoppage Drain the fuel tank until it is nearly empty and fill with FAME*-free fuel. Operate the engine for a few minutes so that only FAME-free fuel is still in the fuel system. -
Page 33: Assembly Instructions
Co. KG and responsibility shall be transferred to the machine manufacturer/user. 4.1 Assembly notes – general information HATZ diesel engines are efficient, robust, and have a long service life. Therefore, they are usually installed in machines that are used for commercial purposes. The machine manufacturer must follow the applicable regulations regarding machine safety –... -
Page 34: Engine Brackets
4.2.1 Engine brackets 4.2.1.1 Standard 4.2.1.2 for hydraulic power take off 4.2.1.3 OpenPowerUnit (OPU) -
Page 35: Rigid Engine Suspension
4.2.2 Rigid engine suspension NOTICE Danger of injury With a rigid engine mounting, the engine brackets/base plate must be installed free of tension (flatness tolerance of the bearing surface 0.2 mm must be observed). The engine is not permitted to be mounted on painted surfaces. - Page 36 For flexible mounting, basically the installation base B should be as wide as possible because the vibration amplitudes and thus the forces can also be kept small. In the case of hydro mounts, the max. load on the engine mount must be 4 g. For cylindrical rubber buffers the load on the engine mount must be 2 g in the push direction and 0.5 g in the thrust direction, where the total weight must be evenly distributed over the 4 cylindrical rubber buffers and must not exceed the total weight of max.
- Page 37 Special case: Due to the open, non-flange-mounted construction, a HIGHLY FLEXIBLE coupling must be used as the shaft connection between the flexibly mounted engine and rigidly mounted pump. In contrast, the two variants in the picture below are not permitted because the engine and machine form separate vibration systems which work against each other and damage the flexible coupling or belt.
-
Page 38: Vibration Damper
4.2.3.1 Vibration damper The support surface for the fixing of the engine must comply with a flatness tolerance of max. 1 mm. The engine is not permitted to be mounted on painted surfaces. Hardness Max. perm. skew to load Vibration damper Ø... - Page 39 For the optional mounting options of a vertical oil filter, A/C compressor or hydraulic pump, the clamping position must be corrected using spacers as otherwise there will be a component collision. The following overview shows how many spacers are needed. Number of spacers Not permitted 10/11...
-
Page 40: Uniform Bearing Load
4.2.3.2 uniform bearing load When using bearing elements, ensure the bearing load is uniform. Of the total weight, no more than 60 % must be on A or B. Determination of bearing forces (if centers of gravity of the engine, attachments such as hydraulic pump, alternator, and their intrinsic weights are known) Engine Attachment... -
Page 41: Energy Balance
4.3 Energy balance The energy balance looks something like this: Approx. 33 % of the engine power available for effective work Approx. 25 % contained in the exhaust gas Approx. 35 % contained in the cooling air or cooling water The remainder (approx.7%) is radiated via the engine surface 4.4 Installation of engines under a cowling To successfully enclose a system, it is necessary to dissipate the radiated heat of the engine,... -
Page 42: Installation Under A Cowling
The engine radiator should be protected against external soiling. In addition, during installation ensure that accessibility for maintenance work is not restricted. 4.5.1.1 Installation under a cowling Extractor fan example Air flow Air flow Separation Cooling air duct The connections of the separator plates to the radiator must be flexible in design (e.g. rubber sealing lip). -
Page 43: Installation In Combination With A Cab Heater
4.5.1.3 Installation in combination with a cab heater Closing valve Cab heater return Cab heater Cab heater supply Thermostat Cab heater variants Variant Additional measures when filling No additional measures required when filling. Attach breather plug, or use vacuum filling. Vacuum filling necessary. -
Page 44: Coolant
4.5.2 Coolant See the "Coolant" chapter in the manual for diesel engine. 4.5.3 Engine radiator WARNING Danger of injury from rotating parts A protective guard for the fan and the poly-V belt is mandatory for exposed structures. Attach Hatz protective devices. Maximum coolant temperature T is 105 C. -
Page 45: Water Circuit Piping
4.5.3.1 Water circuit piping Transfer point Diameter -1.5 Cooler Ø 32 -1.5 Crankcase Ø 32 -1.5 Thermostat Ø 32 -1.5 Cooler Ø 32 4.5.3.2 Expansion tank The size of the expansion tank should be 2.4 ± 0.2 liters at a cooling water amount of 13.2 liters and a coolant filling of 50 %. -
Page 46: Overview Of Expansion Tanks
4.5.3.2.2 Overview of expansion tanks Expansion tank for coolant Sealing cap MAX - Maximum coolant level MIN - Minimum coolant level 4.5.3.2.3 Expansion tank tubing Description Transfer point Diameter at transfer point EGR – radiator > -1.5 Ø 8 Radiator bleed pipe -1.5 Expansion tank Ø... -
Page 47: Piping Of The Cab Heater
4.5.3.2.4 Piping of the cab heater -1.5 Cab heater return, insertion with T-piece Ø 32 -1.5 Supply for cab heater Ø 22 Control of the cab heater using closing valves is preferable (here no bypass when not used), no restrictions on the temperature range. If the cab heater is circulated constantly, a flow rate of maximum 10 l/min must not be exceeded or undercut at a pressure difference of at least 100 mbar. -
Page 48: Fuel System
4.6 Fuel system 4.6.1 Fuel DANGER Fire hazard from fuel Leaked or spilled fuel can ignite on hot engine parts and cause serious burn injuries. Only refuel when the engine is switched off. Never refuel in the vicinity of open flames or sparks that can cause ignition. -
Page 49: Fuel Specifications
4.6.2 Fuel specifications The following diesel fuels may be used: Fuel type EN 590 Europe BS2869 A1/A2 Great Britain ASTM D 975-09a 1-D S15 or 2-D S15 JIS K 2204 with a maximum HFRR value Japan of 520 μm) Engines without DOC and without DPF ASTM D 975-09a 1-D or 2-D These fuels can be used without restriction and without deviation from the manual for diesel engine. -
Page 50: Fuel Schematic With Prefilter, Water Separator And Feed Pump
4.6.3 Fuel schematic with prefilter, water separator and feed pump Injector return HP pump return Return to tank Return to prefilter Supply from tank Measurement point for negative intake pressure Rail return Measurement point for feed pressure Measurement point for return pressure to tank Fuel line DIN 73379 - 8x3 –... -
Page 51: Electrical Fuel Feed Pump
4.6.3.1 Electrical fuel feed pump Supply/return length with Max. 5 m Ø 8 mm Perm. negative pressure on feed 0.3 bar (tank level + flow resistance line & pump loaded prefilter) pos. 6 Feed pressure 4.5 bar (can be read via diagnostics) pos. 8 ≤... - Page 52 Position on chassis 3H50 Line length 1.5 meters Fuel feed line Main fuel filter...
-
Page 53: Fuel Prefilter
4.6.4.2 Fuel prefilter Due to the different ways of storing fuel in the various fields of application, the fuel cleanliness cannot always be guaranteed. Condensation and deposits can therefore occur. It is therefore necessary to install a fuel prefilter with water separator (and water level sensor). The filter lifetime is significantly prolonged by this measure. - Page 54 CAUTION Danger of environmental damage from spilled fuel. Do not overfill the fuel tank and do not spill fuel. Collect any escaping fuel and do not spill the fuel. When a fuel tank is installed, make sure that it does not have any processing residues, impurities, water etc.
-
Page 55: Exhaust Gas System
4.7 Exhaust gas system WARNING Danger of burns from hot exhaust gas system. Hot surfaces on the entire exhaust system! Keep explosives and flammable materials away from the engine. Attach safety devices. Wear safety gloves. IMPORTANT NOTE It is the duty of machine manufacturer to ensure that all safety precautions (e.g. -
Page 56: Permissible Exhaust Gas Back Pressure
4.7.2 Permissible exhaust gas back pressure If additional silencers are used, but also if the exhaust gas is transferred from the engine compartment through pipe bends or flexible lines, pay attention to the permissible exhaust back pressure. The measuring point of the exhaust back pressure is located directly behind the exhaust gas turbocharger. -
Page 57: Recommended Dimensioning Of The Exhaust Gas System
4.7.3 Recommended dimensioning of the exhaust gas system The design of the exhaust gas system is based on the exhaust gas back pressures specified in chapter 4.7.2 Permissible exhaust gas back pressure, page 55. The recommended pipe diameters for the continuation of the exhaust gas line corresponds to the outside diameter of the DOC (Ø... - Page 58 Exhaust piping without compensator, approved by Hatz Exhaust pipe support on engine + Hatz exhaust pipe Exhaust pipe support on engine + 300 mm pipe + pipe elbow...
-
Page 59: Silencer Ti
These parts can be obtained from HATZ for the pipeline path. Pipe adapter slit on one side Inside Ø 52 x 80 mm x 1.5 mm with suitable frame clamp Inside Ø variant 1: 55 x 90 mm Pipe connector Inside Ø... -
Page 60: Doc Mounted On The Engine Side
4.7.6 DOC mounted on the engine side CAUTION Danger of burns from hot exhaust gas system. Hot surfaces on the entire exhaust system! Keep explosives and flammable materials away from the engine. Attach safety devices. Wear safety gloves. - view from the back - Outlet port can be freely rotated The outlet port of the diesel oxidation catalytic converter can be freely rotated, the angle of... -
Page 61: Doc Separated
4.7.7 DOC separated CAUTION Danger of burns from hot exhaust gas system. Hot surfaces on the entire exhaust system! Keep explosives and flammable materials away from the engine. Attach safety devices. Wear safety gloves. With separated DOCs, this retaining plate is available for mounting on the chassis side. -
Page 62: Silencer Tic/Ticd
4.7.8 Silencer TIC/TICD The HATZ rear silencer can also be mounted firmly to the chassis after the DOC. 4.7.9 Diesel particulate filter (DPF) CAUTION Cutting hazard! Sharp edges on the diesel particulate filter. Wear cut-proof gloves. DANGER Danger of fire from hot exhaust gas system. The exhaust gas system and, in particular, the diesel particulate filter can become very hot. - Page 63 The V-Band clamp is NOT permitted to be opened to correct the position. The V-Band clamp is permitted to be opened to correct the position. Engine-mounted diesel particulate filter (with possible exhaust outlet positions) Exhaust outlet rotates by 180°...
- Page 64 Removed diesel particulate filter (chassis) Active Dimensions Exhaust inlet Inside Ø 55.60 mm Exhaust outlet Outside Ø 55 mm Exhaust inlet/exhaust outlet can be rotated in any direction. Mountable horizontally, vertically or in any direction. Removed diesel particulate filter (chassis) Active Premium Dimensions Exhaust inlet Inside Ø...
-
Page 65: Intake And Combustion Air System
4.8 Intake and combustion air system 4.8.1 Schematic Air filter Compressor Turbine EGR valve EGR precooler Silencer Pre-separation through tangential inlet Dust discharge valve Crankcase ventilation insertion Measurement point for negative intake pressure Exhaust gas recirculation insertion... -
Page 66: Air Filter Selection, Dimensioning And Intake Section
4.8.2 Air filter selection, dimensioning and intake section The most important dimensions of the HATZ air filter system including fastening material and rain cap. Europiclon 200 The Europiclon 200 can be used for low-dust applications. However, it is not part of the Hatz sales program. - Page 67 Europiclon 300 Secondary filter Primary filter Dust discharge valve...
-
Page 68: Air Filter Installation Above The Engine Ti/Tic/Ticd
4.8.2.1 Air filter installation above the engine TI/TIC/TICD 4.8.2.2 Tilted positions of the air filter Permissible tilted positions of the air filter... - Page 69 The spacing between the sealing lips should be max. 2 mm. Sealing lips The air filters from our product range are matched to HATZ diesel engines. When using third party air filters, the HATZ specification must be adhered to.
-
Page 70: Intake Section
4.8.2.3 Intake section NOTICE Note the following regarding hoses with spiral wire inserts: In very dusty and dirty environments, the hose needs to be checked regularly for leaks. The hose is very thin between the spirals (1.5 – 2 mm). Do not touch with sharp or pointed objects. -
Page 71: Design Of The Combustion Air Line/Intake Negative Pressure
Recommended variant Possible alternative In order to increase the filter life the inlet opening for the intake air must be located in the least dusty zone of the machine and must also be protected against splashing water and rain (e.g. by means of a rain cap). 4.8.3 Design of the combustion air line/intake negative pressure 4H50 Constant speed... - Page 72 Here, the maximum permissible intake negative pressures are specified with full load and unloaded filter, the maximum loading of the filter is reached when the intake negative pressure at 2800 rpm and full load is 30 mbar above the value of the unloaded filter. When designing the line for the intake system, a hose with a Ø...
-
Page 73: Possible Connection Options
4.8.4 Possible connection options Vertical intake hose Intake hose, horizontal Lateral intake hose (360° rotatable) 4.9 Lubricating oil For operating the engine, it is important that the dipstick, oil filler, oil drain and oil filter are all easily accessible. If necessary, extensions are required for the oil filler and oil drain. Please request suggestions for this. -
Page 74: Filling Quantities
4.9.1 Filling quantities Filling quantity Delta min/max 5.0 l Approx. 0.8 l 3H50 7.0 l Approx. 1.0 l 4H50 IMPORTANT NOTE The filling capacities only apply to the standard oil sumps. 4.9.2 Lubricating oil system Oil suction pipe Oil overpressure valve Oil pump Oil cooler Oil filter... - Page 75 Oil filler, bottom Dipstick (raised option) Oil drain screw Oil filter Oil drain valve (option) Oil filler, top (4H50 option, 3H50 standard) Oil filler behind the high-pressure pump Oil drain screw (side) Oil drain screw (front) Seal ring...
-
Page 76: Oil Filter Mounting Options
4.9.4 Oil filter mounting options Horizontal mounting position (standard) Vertical mounting position (with the vertical oil cooler, lowering of the mounting position is required, see chapter 4.2.3.1 Vibration damper, page 37) Oil filter cartridge Oil cooler 4.9.5 Continuous skewed positions 4.9.5.1 Continuous skewed positions F2F *Maximum 7 hours, 30°... -
Page 77: Continuous Skewed Positions Opu
4.9.5.2 Continuous skewed positions OPU *Maximum 7 hours, 30° without time-related restrictions 4.9.5.3 55° tilting positions, special package Filling quantity Delta min/max 5.85l Approx. 1l 3H50... -
Page 78: Installation Of Crankcase Ventilation (Provent) 55° Tilt Positions
4.9.5.3.1 Installation of crankcase ventilation (ProVent) 55° tilt positions Delivery status Air intake, vertical Air intake, lateral NOTE The crankcase tubing must always be routed in a descending direction. - Page 79 Minimum height of crankcase ventilation – Position above cylinder head cover (green area) Top view: Front view:...
- Page 80 Minimum height of crankcase ventilation – Position outside of cylinder head cover, within crankcase (green area) Top view: Front view:...
- Page 81 The cover is permitted to be rotated relative to the crankcase ventilation by means of 4 hexagon socket screws in 90° steps. The expansion dimension of 70 mm must also be taken into consideration when installing in the machine. NOTE After the crankcase ventilation is installed, the tubing must be checked for possible chafing and kinks and, if present, these must be eliminated.
-
Page 82: Engine Specifications
5. Engine specifications 5.1 Fan-To-Flywheel (F2F) Scope of delivery of Fan-To-Flywheel (F2F) Basic engine with EGR Pulley Main fuel filter Poly v belt Exhaust gas turbocharger Water pump Exhaust manifold EDC17CV54 control unit ... -
Page 83: Open Power Unit (Opu)
5.2 Open Power Unit (OPU) Combination cooler (engine radiator/charge air cooler with integrated expansion tank) 3rd lifting eye Air filter (mounting optional) EDC 17CV54 control unit Holder for plugs Engine mounting on bracket 5.3 Combination cooler with integrated expansion tank Opening for coolant EGR radiator venting From the integrated... -
Page 84: Electrical System
6. Electrical system 6.1 Engine control Engine control – without CAN bus CV54 Simple instrument panel Machine basic control Oil pressure lamp Gas pedal Cooling water temperature warning Brake pedal lamp Hand throttle Maintenance lamp ... -
Page 85: Control Unit
Engine control with CAN bus C81 optional A/D control+CAN display or full CAN bus check Completely optional CAN control panel Machine basic control Torque check Gas pedal Torque limiting Brake pedal Speed check Hand throttle ... -
Page 86: Control Unit Setup
6.1.2 Control unit setup EDC 17CV54 EDC 17C81 Wiring harness connector plugged in / wiring harness connector not plugged in... -
Page 87: Connections
6.1.3 Connections EDC 17CV54 Outputs: - Digital Diagnostics lamp (flashing code) Maintenance indicator lamp Overtemperature lamp … Inputs: - Analog Gas pedal (dual potentiometer) Multistate switch - Digital Remote start/stop Diagnostics request ... - Page 88 The control unit is mounted on the four locations (3) (4 x M6, 8 Nm) available. The installation in a vehicle must be executed in such a way that the control unit cannot collide with other vehicle parts or additional fasteners. EDC 17CV54 DAE sealing area (ambient pressure sensor)
-
Page 89: Diagnostics Tool
EDC 17CV54 12V EDC 17CV54 24V EDC C81 12V EDC C81 24V with DC/DC converter IMPORTANT NOTE If using a battery master switch, the power supply of the control unit must be tapped downstream of the main switch. This ensures the full de-energization of all components. -
Page 90: Engine Monitoring (Engine Control And Sensor System)
6.2 Engine monitoring (engine control and sensor system) 6.2.1 Actuators (speed adjustment), display instruments Between the control unit interface and the (instrument box, CAN multifunction touchscreen, CAN multifunction key display, …) control module, the maximum cable length is 10m with a cable cross section of 1mm². - Page 91 IP degree of Display instruments protection Hatz instrument IP65 box (TTCAN) Hatz instrument IP65 (tmCAN) CAN "IFM" IP65 display...
-
Page 92: Resetting The Service Interval
6.2.2 Resetting the service interval 6.2.2.1 ttCAN NOTE See the manual for diesel engine. 6.2.2.2 tmCAN NOTE The service interval can only be reset as of control unit version V710 and instrument box tmCAN 02487901. Step Description Turn the starting key to position 1 (I). Press the "... -
Page 93: Ifm Panel
6.2.2.3 IFM panel NOTE The service interval can only be reset as of control unit version V710. Step Description Press the two outer buttons (1) and (4) simultaneously for at least 2 seconds. Select "Service reminders" with the arrow buttons and open with "OK". Open "Reset service"... -
Page 94: Can Command
Enter the password "2354" and confirm with "OK". Confirm resetting of service with "OK". Return to the main menu with the left arrow button. 6.2.2.4 CAN command NOTE All values are hexadecimal. CAN ID Data 18FFCD6E... -
Page 95: Start/Stop Control By Means Of Ecu - Danger Avoidance
6.2.3 Start/stop control by means of ECU – danger avoidance DANGER Risk of death, risk of injury or danger of property damage due to unintended/unexpected starting up of the device. As the operator of the machine, you must ensure that all people working on/with the machine are familiar with the content of these manuals. -
Page 96: Battery Sizes
6.3 Battery sizes DANGER Danger to life, danger of injury or danger of property damage due to incorrect use of batteries. Do not place tools on the battery. Before performing work on the electrical equipment, always disconnect the negative battery terminal. ... -
Page 97: Battery Recommendations
Battery capacity Max. 110Ah/450A DIN Max. 66Ah/300A DIN If a larger battery capacity is placed inside the machine than permitted by the general release, additional measures are essential. An example of this is the use of the starter batteries of a much larger main engine when the HATZ engine within the application is used as an auxiliary unit. -
Page 98: Installation Location
6.3.2 Installation location The positioning of the battery installation in the engine space must be verified by temperature measurements. NOTE The max. ambient temperature of the batteries is +60°C Installation of the battery easily accessible for maintenance work ... -
Page 99: Dimensioning Of The Cables Between The Starter And Battery
6.4.2 Dimensioning of the cables between the starter and battery 160,0 140,0 120,0 100,0 80,0 60,0 40,0 20,0 Single length of the starter main cable (+ or - cable) [m]... -
Page 100: Alternator
6.5 Alternator Type Air cooled compact alternator with internal fan Belt drive V belt profile 6PK 768 (6 grooves, Ø 49 mm) Translation with crankshaft = 2.08 * [rpm] altenator engine pulley Ø 103 mm Type 12 V 110 A 12 V 150 A (option) 24 V Max. -
Page 101: Hatz Terminal Designation Cv54
6.6 Hatz terminal designation CV54 Customer plug connector assignment Designation Bosch-Hatz ID Label B+15 A customer supply voltage 1 - from fuse block UB2 2 A switched B+ K29 V8 0 - from ground point B+ 1 A voltage supply T15/50 From fuse block Ignition on terminal 15 I_S_T15 - K88... -
Page 102: Cabling
6.7 Cabling IMPORTANT NOTE All wiring harnesses and lines behind stationary plug connections must be feature a tension relief mechanism after a maximum distance of 100mm. IMPORTANT NOTE For leaktight plug connections, it must be ensured that the lines pass straight out of the plug for approx. 50mm and the single conductor seals have a suitable diameter, as the tightness of the plug connection otherwise cannot be ensured. - Page 103 OpenPowerUnit (OPU) C81...
-
Page 104: Cabling Of "Fan 2 Flywheel (F2F)" Cv54
Circuit diagram Fuse designation Dashboard/customer control: ITT Cannon Plug 28+4 192900-0549 Receptacle 28+4 192900-0035 2 Glow control unit (GCU) 3 Main relay, control unit on 4 Relay exhaust heater 1 + fuse (TICD Active Premium) 2K7 / 2F7 5 Relay exhaust heater 2 + fuse (TICD Active Premium) 2K8 / 2F8 6 Fuse, starter 50 7 Engine control unit EDC 17C81 (ECU) -
Page 105: Cabling Of "Fan 2 Flywheel (F2F)" C81
6.7.2 Cabling of "Fan 2 Flywheel (F2F)" C81 Data cable Battery cable/power cable Wiring by customer Length 1m Length 1m Wiring harness transfer point Alternator Plug Battery Instrument panel Starter solenoid voltage supply Starter Starter relay Feed pump relay Fuel feed pump Heater, DPF relay Diesel particulate filter... -
Page 106: Cabling Of "Open Power Unit (Opu)" C81
6.7.4 Cabling of "Open Power Unit (OPU)" C81 Data cable Battery cable/power cable Wiring by customer Plug retaining plate Wiring harness transfer point Alternator Plug Battery Instrument panel Starter Starter relay Feed pump relay Fuel feed pump Heater, DPF relay Diesel particulate filter Fuel feed pump Heater, DPF... -
Page 107: Power Take Off
7. Power take off 7.1 Main take off (flywheel side) NOTE Before installing further add-on parts, the preservation wax must be removed from the screw-on surfaces and the surfaces must be cleaned. Axial (F1) 3000 N, direction dependent radial (F2) See diagram Max. -
Page 108: Combined Flywheel 6.5"/8" With Connecting Housing/10 Inch Flywheel
7.1.1 Combined flywheel 6.5"/8" with connecting housing/10 inch flywheel 6.5 inch 8 inch Coupling diameter Indentation For the manufacture of a combined flywheel required deviation from the SAE standard inch inch inch inch inch 184.2 7 ¼ 215.90 8 ½ 263.52 12.9 20.1... - Page 109 Connecting housing SAE 4 with 10" flywheel 72 mm 28.4 mm 276.4 mm 14.3 mm 314.32 mm 8.3 mm 357 mm 53.8 mm 361.95 mm 8 mm...
-
Page 110: Connecting Housing With Outside Bearing
Connecting housing SAE 3 with 10" flywheel 72 mm 28.4 mm 276.4 mm 14.3 mm 314.32 mm 8.3 mm 406 mm 53.8 mm 409.575 mm 12 mm 7.1.2 Connecting housing with outside bearing Permissible transverse forces on outside bearing Distance to flange Permissible level [mm] tensile force [N]... -
Page 111: Power Take Off
7.1.3 Power take off 7.1.3.1 not separable The drive elements offered may only be used in accordance with the instructions in the dimension sheets and these Assembly Instructions. The permissible axial offset of flexible couplings must not be exceeded. The capacity of the power take offs on the engine can be found in this chapter. The overload of power take offs, particularly by uncontrollable belt tensioning devices, can cause damage to the bearings and shaft fractures. - Page 112 Conclusion: HATZ recommends the use of controllable belt tensioners to limit the bearing forces and avoid premature wear. Two further recommendations for belt drives: 1. Mount the pulley as close as possible to the bearing mount to keep the bearing load low (see chapter 7.1.2 Connecting housing with outside bearing, page 109).
-
Page 113: Hydraulic Pumps On The Main Take Off
7.1.3.3 Hydraulic pumps on the main take off CAUTION Risk of injury or danger of engine or hydraulic pump damage caused by failure to comply with the installation instructions/Operator's Manual of your hydraulic pump. As the operator of the machine, you must ensure that all people working on the machine are familiar with the content of these manuals. -
Page 114: Couplings
7.1.4 Couplings Couplings are available in 6.5 inch and 8 inch, both can be combined with SAE5 and SAE4 connections SAE 6.5 inch SAE 8 inch... - Page 115 SAE 5 inch connection SAE 4 inch connection Bore Ø101.6 Bore Ø101.6 M14 – 2-hole flange M14 - 4-hole flange Bolt circle Ø146 Bolt circle Ø162 Coupling hubs Hubs are available in the following sizes: Prebored Ø18.9mm 7/8 inch, 13 teeth as per ANSI B92.1a/1976 ...
- Page 116 7.2 Governor side main take-off (crankshaft/fan) Standard crankshaft 7.2.1 Without lateral force 42 Nm With air conditioning compressor 12.5 Nm Tapered crankshaft 7.2.2 Without lateral force 200 Nm With lateral force (see figure below) 50 Nm (maximum lateral force FQ 2 kN may be tapped from 4 – 8 o'clock)
-
Page 117: Power Take Off
7.3 Power take off 7.3.1 Hydraulic power take off NOTE The sum of the torques of all power take-offs must not exceed 100 Nm. 7.3.1.1 Hydraulic pump power take-off A maximum of four hydraulic pumps must be flangeable on the two power take-offs. = 100 Nm = 1.1 x n hydr. -
Page 118: A/C Compressor
7.3.2 A/C compressor NOTE Air conditioning compressor add-on only possible with 12V and 1.116 ratio. Length: 218mm Width: 125mm = 0.86 x a/c compressor engine Height: 142.5mm... -
Page 119: General Limits Of Use
8. General limits of use There is no power reduction up to 1460m above sea level. Only above 1460 m is the engine power correspondingly reduced by the ambient air pressure. The engine has an ambient pressure sensor in the control unit (ECU). 8.1 Cold start capability Cold start with 12 V equipment -25°C... -
Page 120: Maximum Permissible Speed In Coasting Overrun
Engine protection function: delayed speed acceptance after cold start Because the establishment of the oil pressure is delayed at cold temperatures due to the high oil viscosity, the engine does not accept the engine speed until after the time indicated in the diagram. -
Page 121: Block Heater
8.3 Block heater DANGER Danger of serious engine damage and fire The heating element may burn off if the cooling water circuit is insufficiently filled or not filled at all. V = 230V P = 400W Recommended switched-on period -20°C -10°C -5°C +10°C... -
Page 122: Contact Protection For Machine Safety
9. Contact protection for machine safety It is the responsibility of the manufacturer to heed and comply with the safety rules that apply to an engine in a finished machine. The following chapter shows which contact protective devices are available from HATZ. An overview that shows the hot surfaces (diesel oxidation catalytic converter, exhaust gas turbocharger (ETC), ...) and rotating parts (flywheel, fan, poly v belt, ...) appears below. - Page 123 Rotating parts: Pos. Designation Function V-belt drive (fan, V-ribbed belt for alternator) A/C compressor Flywheel...
- Page 124 Hot surfaces: Pos. Designation Charge air pipe Diesel oxidation catalytic converter (DOC)/flange for turbocharger Diesel particulate filter (DPF) Exhaust gas turbocharger (ETC) EGR precooler Exhaust manifold...
-
Page 125: Contact Protection
9.2 Contact protection Diesel oxidation catalytic converter/exhaust gas turbocharger The outlet from the DOC can also be rotated with the contact protection in all directions. Contact guard for fan (optional) Contact guard for poly-V belt (optional) -
Page 126: Maintenance
10. Maintenance 10.1 Accessibility of service points When installing the engine, make sure that all service points are easily accessible and the service label on the engine and/or machine is legible. If there is no easy access, there is a risk that the necessary maintenance work is not carried out at all or not carried out at the right time. -
Page 127: Maintenance Intervals
10.2 Maintenance intervals Detailed information on carrying out maintenance intervals can be found in the manual for diesel engine. Every 8–15 operating hours or every day before starting Check the oil level Check the intake area of the combustion air Check the radiator fins for dirt accumulation Check the cooling system Annually... -
Page 128: Engine Preservation
11. Engine preservation For engine preservation >12 months, please follow the preservation guideline 043 450 XX. -
Page 129: Test Of The Engine Installation (Checklist)
We recommend proceeding as follows: 12.1 Assembly note HATZ diesel engines are efficient, robust, and have a long service life. Therefore, they are usually installed in machines that are used for commercial purposes. The machine manufacturer must follow the applicable regulations regarding machine safety – the engine is a part of a machine. - Page 130 CAUTION Health hazard due to inhalation of flue gas. To protect exposed metal parts against corrosion, the parts concerned are coated with a protective wax. When the engine is started for the first time, this protective wax evaporates on hot components.
- Page 131 Overview – HATZ instrument boxes Starting key Pre-glow display Operating indicator Charge control Oil pressure display Ignition lock Operation Start NOTE Further details on the instrument boxes can be found in the "HATZ – instrument boxes" chapter in the manual for diesel engine. Procedure NOTE ...
-
Page 132: Testing Of Engine Choice And Engine Environment
Leave the starting key at position "I" until you hear the electrical fuel feed pump switch off (approx. 30 seconds). Turn the starting key back to position "0". Note: Carry out steps 2 and 3 several times to press the air out of the fuel system. Starting the engine Turn the starting key to position "I"... -
Page 133: Testing Of Accessibility To Operating And Service Points
Where present, are the supply and return air lines flexible, laid with the correct dimension, and in the right place? Were the lines laid without chafing and are they free of collision? Was the correct fault compensation response option chosen? ... -
Page 134: The Installation Approval
Radiator (fins) Air filter Crankcase housing venting filter (ProVent) Belts (fan, alternator) Cooling air passages Battery Main fuel filter Fuel prefilter with water separator. Is the engine easy to remove for repair work? ... -
Page 135: Fault Compensation Reactions
13.2 Fault compensation reactions There are 3 different engine settings for the fault compensation responses: 1) Emergency running (standard with variable speed) WARNING Danger of injury during emergency operation due to engine damage and faults. The engine fault indicator lights up or flashes. ...
Need help?
Do you have a question about the H50 Series and is the answer not in the manual?
Questions and answers