Chapters
Table of Contents

Related Manuals for Smalvic FI-64


Summary of Contents for Smalvic FI-64
- Page 1 FORNI A GAS DA INCASSO ISTRUZIONI D’INSTALLAZIONE USO E MANUTENZIONE BUILT-IN GAS OVENS INSTALLATION, USE AND MAINTENANCE INSTRUCTIONS أف ر ان غاز مدمجة إرشادات ال� ت كيب واالستعمال والصيانة...
- Page 3 FORNI A GAS DA INCASSO ISTRUZIONI D’INSTALLAZIONE USO E MANUTENZIONE ETICHETTA PRODOTTO...
-
Page 4: Table Of Contents
INDICE PAGINA Avvertenze Generali Descrizione del prodotto Pannello comandi Guida all’uso del forno Funzioni del forno Manutenzione e Pulizia Rimozione / Montaggio Della Porta Del Forno Rimozione del vetro all’interno del porta forno Rimozione/montaggio delle guide laterali Rimozione/Montaggio delle guide di scorrimento (se presenti) Sostituzione della lampada forno Istruzione per l’installazione Inserimento del forno nel mobile... - Page 5 FORNI A GAS DA INCASSO ISTRUZIONI D’INSTALLAZIONE USO E MANUTENZIONE MODELLI FI-64 – FI-74 (GE) Grill elettrico (GG) Grill gas (GEV) Grill elettrico ventilato (GGV) Grill gas ventilato TIPOLOGIA DI PROGRAMMAZIONE (CM) Contaminuti meccanico (OE) Orologio elettronico (OR-OE) Orologio elettronico...
-
Page 6: Avvertenze Generali
Avvertenze Generali • Direttiva bassa tensione 2014/35/UE Avvertenze • Direttiva gas 2009/142/CE Questo apparecchio è contrassegnato in • Direttiva compatibilità elettromagnetica conformità alla Direttiva europea 2012/19/EU. 2014/30/UE • Regolamento UE 65-66/2014 L’elettrodomestico è classificato come prodotto di Classe 3 e come tale deve essere installato ad incasso. - Page 7 FORNI A GAS DA INCASSO ISTRUZIONI D’INSTALLAZIONE USO E MANUTENZIONE Avvertenze sul corretto utilizzo del forno • Non sollevare o tirare il forno per la maniglia. • L’apparecchio può essere installato funzionare solo in locali ventilati secondo le norme locali. •...
- Page 8 • Prima della manutenzione o della pulizia • Prima dell’installazione, verificare che le spegnere e scollegare elettricamente il forno condizioni locali di distribuzione (natura e e, se appena utilizzato, attendere che si pressione del gas) e lo stato di regolazione raffreddi.
-
Page 9: Descrizione Del Prodotto
FORNI A GAS DA INCASSO ISTRUZIONI D’INSTALLAZIONE USO E MANUTENZIONE Descrizione del prodotto Pannello comandi Pannello copriventola Guide ad estrazione totale (dove previste) Griglie appoggio Teglia raccogli sugo Resistenza cottura grill... -
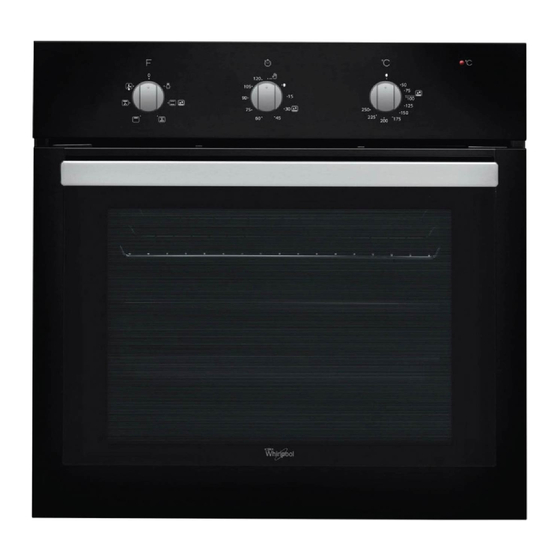
Page 10: Pannello Comandi
Pannello comandi Termostato Selettore programmi Contaminuti CM Orologio OE Spia potenza Orologio OR-OE elettronico Le posizioni possono variare a seconda dei modelli... -
Page 11: Guida All'uso Del Forno
FORNI A GAS DA INCASSO ISTRUZIONI D’INSTALLAZIONE USO E MANUTENZIONE Guida all’uso del forno Contaminuti meccanico CM (nei Primo utilizzo modelli predisposti) Scollegare l’apparecchio dalla rete elettrica e togliere tutti gli accessori dall’apparecchio. Pulirli Il contaminuti permette di avere un segnale accuratamente con acqua tiepida e detergente e acustico dopo... - Page 12 Il massimo tempo impostabile è di 10 ore. fino ad ottenere il lampeggio dell’icona “ALARM” Dopo aver raggiunto i 99 minuti e 50 secondi, (campana). Per incrementare o decrementare il tempo di allarme, ruotare la manopola in senso l’impostazione dell’ora cambia in 1h e 40’. orario o antiorario e la lancetta dei minuti si Il simbolo della campanella indicherà...
-
Page 13: Funzioni Del Forno
(mod-GEV) Questa funzione permette Nei modelli FI-64/74 dove predisposto, il grigliare in maniera più soffice girarrosto è posizionato in senso longitudinale grazie all’utilizzo di aria forzata. ed il suo innesto si trova centralmente nella A seconda dei modelli è possibile schiena del forno. - Page 14 Utilizzo del grill mantenere premuta la manopola per 3/5 secondi; si dà modo così alla termocoppia di scaldarsi e Con il grill è possibile cuocere pesce, verdure, quindi di tenere aperta la valvola di sicurezza. piccoli spiedini e vari tipi di carne soprattutto Rilasciare la manopola.
-
Page 15: Manutenzione E Pulizia
FORNI A GAS DA INCASSO ISTRUZIONI D’INSTALLAZIONE USO E MANUTENZIONE non è attivabile il bruciatore Grill. ATTENZIONE Il bruciatore è dotato di una valvola di sicurezza che blocca l’erogazione del gas in caso di spegnimento accidentale della fiamma. In nessun caso usare il forno per riscaldare l’abitazione o l’ambiente dove si trova. -
Page 16: Rimozione / Montaggio Della Porta Del Forno
I residui di sporco vanno eliminati subito senza ATTENZIONE utilizzare prodotti specifici per l’acciaio o altri troppo abrasivi, i simboli potrebbero sbiadirsi. Controllare periodicamente stato della Il termostato a gas necessita di una guarnizione gomma collocata attorno lubrificazione periodica che deve essere all’apertura del forno. -
Page 17: Rimozione Del Vetro All'interno Del Porta Forno
FORNI A GAS DA INCASSO ISTRUZIONI D’INSTALLAZIONE USO E MANUTENZIONE Rimozione del vetro all’interno del porta forno Eseguire gli stessi passi in ordine inverso per Questo modello di porta permette l’estrazione e rimontare i cristalli. Tenere la massima cura la pulizia dei vetri interni senza dover smontare per assicurare che siano nel giusto ordine e nel la porta del forno. -
Page 18: Rimozione/Montaggio Delle Guide Laterali
Rimozione/montaggio delle guide laterali Prima di procedere assicurarsi che il forno si sia Per rimontare le guide, effettuare i passaggi in sufficientemente raffreddato. ordine inverso. Afferrare saldamente la guida verso la parte Assicurarsi sempre di non danneggiare lo smalto frontale, sollevarla fino a quando si blocca e sulle pareti del forno. -
Page 19: Rimozione/Montaggio Delle Guide Di Scorrimento (Se Presenti)
FORNI A GAS DA INCASSO ISTRUZIONI D’INSTALLAZIONE USO E MANUTENZIONE Rimozione/Montaggio delle guide di scorrimento (se presenti) Se in dotazione, troverete installate delle guide scorrevoli. Per rimuoverle, sganciare le guide laterali di supporto come descritto nel paragrafo “RIMOZIONE MONTAGGIO DELLE GUIDE LATERALI”. -
Page 20: Istruzione Per L'installazione
ATTENZIONE Per una corretta installazione ed utilizzo di questo apparecchio, occorre riferirsi ai dati tecnici riportati nell’etichetta matricola del prodotto. L’etichetta prodotto si trova sul bordo della facciata interna del forno.Una seconda etichetta è posizionata sulla copertina del libretto d’istruzione. Istruzione per l’installazione e uso del forno possono causare gravi danni a L’installazione e l’assistenza tecnica devono... -
Page 21: Ventilazione Locali D'uso
30 kG. Per l’apertura nel mobile seguire le rispettive dimensioni indicate in fig.01, fig.02 per FI-64, FI-74. Nel fondo del mobile o nel ripiano di supporto del forno ci deve essere un’apertura per permettere una sufficiente entrata d’aria e quindi il riciclo della stessa per il raffreddamento del forno durante il funzionamento. -
Page 22: Allacciamento Elettrico Del Forno
Allacciamento elettrico del forno In caso di collegamento permanente alla rete Assicurarsi che la corrente elettrica sia stata elettrica, occorre applicare un interruttore tolta prima di proseguire con l’allacciamento bipolare dimensionato al carico corrispondente del forno alla rete elettrica. con apertura per ogni contatto di almeno 3 mm. Il funzionamento avviene in corrente alternata Nei modelli dove presente, il cavo flessibile viene monofase... -
Page 23: Allacciamento Alla Rete Gas
FORNI A GAS DA INCASSO ISTRUZIONI D’INSTALLAZIONE USO E MANUTENZIONE Usare solo cavi flessibili: ATTENZIONE • per forno GGV o GGVT cavo tipo H05RR-FH 3 x 0.75 SCOLLEGARE L’ALIMENTAZIONE ELETTRI- CA PRIMA DI PRESTARE ASSISTENZA TEC- • per forno GET o GEVT NICA O MANUTENZIONE AL PRODOTTO. -
Page 24: Adattamento Ai Diversi Tipi Di Gas
per verificarne la buona tenuta. E’ possibile ora riaccendere le fiamme pilota delle altre apparecchiature a gas. • aprire valvola sfera monte dell’apparecchiatura a gas e, in caso di Nel caso si debba procedere all’installazione presenza di bolle d’aria stringere leggermente di un piano cottura abbinato ad un forno a ancora il componente di collegamento fino a gas, il collegamento alla rete gas non può... -
Page 25: Regolazione Del Minimo Del Termostato
FORNI A GAS DA INCASSO ISTRUZIONI D’INSTALLAZIONE USO E MANUTENZIONE Regolazione del minimo del termostato Eseguire questa operazione con il forno già minimo. inserito nel mobile e con i collegamenti elettrici e gas già effettuati come da istruzioni precedenti E’ necessario eseguire la regolazione del minimo ogni qualvolta si passi da un tipo di gas ad un altro in modo da garantire il buon funzionamento dei bruciatori... -
Page 26: Anomalie Di Funzionamento
Anomalie di funzionamento Controllare regolarmente corretto In caso di funzionamento anomalo bisogna funzionamento dei rubinetti-termostati e dei immediatamente mettersi in contatto con il più commutatori vicino centro di assistenza tecnica qualificato ed autorizzato. Il verificarsi di una qualsiasi delle sottoelencate situazioni sono da considerarsi anomalie di funzionamento e di conseguenza hanno bisogno dell’intervento di un tecnico:... - Page 27 POTENZA MOD. BRUC. But-Prop But-Prop But-Prop Nat. G20 Nat. G20 Nat. G20 G30/31 G30/31 G30/31 forno 30/37 1,15 0,75 reg. 0,40 FI-64 grill 30/37 1,00 0,67 forno 30/37 1,15 0,75 reg. 0.40 FI-74 grill 30/37 1,00 0,67 DIMENSIONI ESTERNE MODELLO...
- Page 28 ACCESSORI MODELLO FI-64 FI-74 leccarda forno griglie interne...
- Page 29 FORNI A GAS DA INCASSO ISTRUZIONI D’INSTALLAZIONE USO E MANUTENZIONE SIMBOLOGIA FORNI Ventilazione Grigliatura normale statica Grigliatura normale ventilata Illuminazione interna Cottura inferiore ventilata...
- Page 31 BUILT-IN GAS OVENS INSTALLATION, USE AND MAINTENANCE INSTRUCTIONS PRODUCT LABEL...
- Page 32 CONTENTS PAGE General Warnings Product description Control panel Oven use guide Oven functions Maintenance and Cleaning Removal / Installation Of the Oven Door Removal / Installation Of the Oven Door Maintenance and Cleaning Removal/installation of the side guides Removal/Assembly of the guide rails (if any) Replacement of the oven lamp Instructions for installation Positioning of the oven in the unit...
- Page 33 BUILT-IN GAS OVENS INSTALLATION, USE AND MAINTENANCE INSTRUCTIONS MODELS FI-64 – FI-74 (GE) Electric grill (GG) Grill gas (GEV) Ventilated electric grill (GGV) Ventilated gas grill TYPE OF PROGRAMMING (CM) Mechanical timer (OE) Electronic clock (OR-OE) Electronic clock...
-
Page 34: General Warnings
General Warnings • Low voltage Directive 2014/35/EU • Gas Directive 2009/142/EC Warnings • Electromagnetic compatibility Directive This appliance is marked in compliance with the 2014/30/EU European Directive 2012/19/EU. • EU Regulation -66/2014 The household appliance is classified as a Class 3 product and, as such, it should be installed built-in. - Page 35 BUILT-IN GAS OVENS INSTALLATION, USE AND MAINTENANCE INSTRUCTIONS Warnings regarding correct use of the oven • Do not lift or pull the oven with your hands. • The appliance can also be installed and run in ventilated rooms according to the local regulations in force.
- Page 36 • Before maintenance or cleaning, switch the • In the presence of a smell of gas in the oven off and, if just used, wait for it to cool. room, open a window and wait for complete air exchange before switching on the burner •...
-
Page 37: Product Description
BUILT-IN GAS OVENS INSTALLATION, USE AND MAINTENANCE INSTRUCTIONS Product description Control panel Fan-cover panel Total extraction guides (where envisioned) Support grids Sauce collection tray Grill cooking resistance;... -
Page 38: Control Panel
Control panel Thermostat Programme selector CM Timer OE clock Power indicator light OR-OE electronic clock The positions can vary depending on the models... -
Page 39: Oven Use Guide
BUILT-IN GAS OVENS INSTALLATION, USE AND MAINTENANCE INSTRUCTIONS Oven use guide Mechanical timer CM (on models Commissioning where provided) Disconnect the appliance from the mains electricity and remove the accessories from the The timer allows an acoustic signal after a pre- appliance. - Page 40 The alarm issues an acoustic signal when the set press the button . The daily time appears for 6 minutes elapsed. seconds, afterwards, it returns to the countdown. At the end of the timer, the “ALARM” icon flashes In order to reset the timer, press and hold the and the appliance emits acoustic signals.
-
Page 41: Oven Functions
Electric ventilated grill with spit In the models FI-64/74 where provided, the (mod-GEV) rotating grill is placed lengthwise and its joint This function permits grilling in a is placed at the centre in the back of the oven. - Page 42 USING THE GRILL minutes. During the use of this function, it is not possible to use the oven burner. With the grill it is possible to cook fish, vegetables, Upon the first use, it is normal to try the switch small spits and various types of meat, especially on several times due to the presence of air in the of average/small thickness, with the exception of...
-
Page 43: Maintenance And Cleaning
BUILT-IN GAS OVENS INSTALLATION, USE AND MAINTENANCE INSTRUCTIONS ATTENTION: Never use the oven to heat the premises or the room you are in. Tangential fan (for pre-set models) For the pre-set models, a tangential fan is fitted for cooling the control panel and the oven door handle. -
Page 44: Removal / Installation Of The Oven Door
Dirt residue must be removed immediately but ATTENTION: use products specifically for steel as other overly abrasive ones could cause the symbols to fade. Regularly check the state of the rubber gasket The gas thermostat requires periodic located around the oven opening. If gasket lubrication, which must be done only by damage is noted, contact the nearest technical qualified personnel. -
Page 45: Removal / Installation Of The Oven Door Maintenance And Cleaning
BUILT-IN GAS OVENS INSTALLATION, USE AND MAINTENANCE INSTRUCTIONS Removal / Installation Of the Oven Door Maintenance and Cleaning Grasp the door with both hands on the sides This door model allows for extraction and cleaning down. Lift the door slightly and remove the hinges of interior glasses without having to remove the from 2 locations. -
Page 46: Removal/Installation Of The Side Guides
Removal/installation of the side guides To place back the guides, carry out the steps in Before proceeding, make sure the oven has cooled off sufficiently. reverse order. Firmly grasp the guide towards the front part, lift Always make sure you do not damage the enamel it until it locks and pull the front door towards on the oven walls. -
Page 47: Removal/Assembly Of The Guide Rails (If Any)
BUILT-IN GAS OVENS INSTALLATION, USE AND MAINTENANCE INSTRUCTIONS Removal/Assembly of the guide rails (if any) If supplied, you will find running guides installed. To remove them, release the lateral support guides as described in the "REMOVAL AND MOUNTING THE LATERAL GUIDES" paragraph. Holding the lateral guides vertically on a flat surface, release the lower part of the runner, making it turn as indicated in figure 1. -
Page 48: Instructions For Installation
ATTENTION: for correct installation and use of this appliance, refer to the technical data given on the serial label of the product. The product label is located on the edge of the inside of the oven. A second label is placed on the cover of the instruction manual. -
Page 49: Ventilation Of Premises
30 kg. For the aperture in the cabinet, follow the respective dimensions indicated in fig.01, fig.02 for FI-64, FI-74. In the bottom of the cabinet or in the oven support shelf, to allow sufficient air to circulate for the cooling of the oven during functioning. -
Page 50: Electrical Connection Of Oven
Electrical connection of oven In case of permanent connection to the electric Ensure electric current been mains, apply a bipolar switch dimensioned to disconnected before connecting the oven to the the corresponding load, with opening for each electric mains. contact of at least 3 mm. The oven requires single-phase alternate current In models where present, the flexible cable is 220-230-240 V~ 50-60 Hz, using flexible cable. -
Page 51: Connection To The Gas Mains
BUILT-IN GAS OVENS INSTALLATION, USE AND MAINTENANCE INSTRUCTIONS according to the standards in force and suitable ATTENTION: to the technical features of the product. Use only flexible cables: DISCONNECT THE ELECTRIC POWER SUP- PLY BEFORE PERFORMING TECHNICAL • for oven GGV or GGVT ASSISTANCE OR MAINTENANCE ON THE cable type H05RR-FH 3 x 0.75 PRODUCT. -
Page 52: Adjustment To The Different Types Of Gas
• open the ball valve upstream of the gas Now, it is possible to switch on the pilot flames of appliance: in the presence of air bubbles, other gas appliances. tighten slightly even further the connection If you want to install a hob connected to a gas component to stop the leak, check if it is oven, the connection to the gas mains cannot correctly tighten. -
Page 53: Adjustment Of The Thermostat Minimum
BUILT-IN GAS OVENS INSTALLATION, USE AND MAINTENANCE INSTRUCTIONS Adjustment of the thermostat minimum Perform this operation with the oven already positioned in the unit and with the electric and gas connections already performed as per previous instructions Perform the minimum adjustments whenever changing from one type of gas to another in order to ensure correct operation of the burners. -
Page 54: Operation Anomalies
Operation anomalies Regularly check the correct functioning of the In case of abnormal operation immediately taps, thermostats and switches. contact the nearest qualified and authorised technical service centre. The occurrence of any of the below listed situations are considered operating anomalies and would therefore require the intervention of a technician: •... - Page 55 Burn. Power Kw But-Prop But-Prop But-Prop Nat. G20 Nat. G20 Nat. G20 G30/31 G30/31 G30/31 oven 30/37 1.15 0.75 adjust. 0.40 FI-64 grill 30/37 1.00 0.67 oven 30/37 1.15 0.75 adjust. 0.40 FI-74 grill 30/37 1.00 0.67 EXTERNAL DIMENSIONS MODEL...
- Page 56 ACCESSORIES MODEL FI-64 FI-74 oven dripping pan internal grids...
- Page 57 BUILT-IN GAS OVENS INSTALLATION, USE AND MAINTENANCE INSTRUCTIONS OVEN SYMBOLS Ventilation Normal static grilling Normal ventilated grilling Interior lighting Bottom ventilated cooking...
- Page 60 أف ر ان غاز مدمجة إرشادات ال� ت كيب واالستعمال والصيانة رموز ال أ ف ر ان التهوية الشوي العادي الستاتيك ي الشوي العادي المهوى ال إ ضاءة الداخلية الطهي السفىل ي المهوى...
- Page 61 الملحقات FI-74 FI-64 الموديل نعم نعم صينية قط ر ات الفرن شبكات داخلية نعم نعم...
- Page 62 بوتان- بروبان بوتان- بروبان بوتان- بروبان كيلوواط G20 طبيعي G20 طبيعي G20 طبيعي 31/G30 31/G30 31/G30 0.40 ضبط 0.75 1.15 37/30 فرن FI-64 0.67 1.00 37/30 شواية 0.40 ضبط 0.75 1.15 37/30 فرن FI-74 0.67 1.00 37/30 شواية ال أ بعاد الخارجية...
- Page 63 أعطال التشغيل � ز ي حالة حدوث أعطال � ز ي تشغيل الجهاز ينبغي التصال بأحد م ر اكز الخدمة .الفنية المعتمدة � ز ي حالة حدوث أي ٍ من المواقف الواردة أدناه فإنه يجب اعتبارها أعطال تشغيل : وبالتاىل ي تحتاج إىل تدخل شخص ف� ز ي .شعل...
- Page 64 أف ر ان غاز مدمجة إرشادات ال� ت كيب واالستعمال والصيانة ضبط ال� ت موستات عىل الحد ال أ د� ف نفذ هذه العملية بعد إدخال الفرن � ز ي ال أ ثاث وبتوصيالت الغاز والكهرباء بعد .تمامها بالطريقة السابق ذكرها من...
- Page 65 تهيئة الجهاز عىل أنواع مختلفة من الغاز /جميع موديالت الفرن لها ملحقات عبارة عن أطقم محاقن غيار للغاز المسال و أو الطبيعي. افحص الملصق التعريفي للجهاز للحصول عىل نوعية الغاز ال� ت ي ,تم معايرة الجهاز عليها لحظة إنتاجه. لستبدال الفوهات ولضبط السعة الدنيا "...
- Page 66 أف ر ان غاز مدمجة إرشادات ال� ت كيب واالستعمال والصيانة .استخدم كابالت مرنة فقط انتبه GGVT أوGGV لفرن • H05RR-FH 3 x 0.75 استخدم كابل من نوع ً قبل القيام بأي عملية صيانة أو تدخل مركز الخدمة الفنية، ينبغي أو ل .فصل...
- Page 67 التوصيالت الكهربية للفرن تأكد من فصل التيار الكهربا� أ ي قبل القيام بتوصيل الفرن بمصدر التيار ينبغي عىل ف� ز ي ال� ت كيب التأكد من أن قسم الكابالت الخاص بمصدر التيار مناسب للطاقة المستهلكة والالزمة لتشغيل الفرن كما هو موضح � ز الكهربا�...
- Page 68 02 � ز ي دولب المطبخ اتبع ال أ بعاد المخصصة الموضحة � ز ي الشكل 10, شكل . � ز ي قاعدة دولب المطبخ أو � ز ي رف إسناد الفرن يجب وجودFI-64, FI-74 بالنسبة فتحة تهوية للسماح بدخول كمية كافية من الهواء وبالتاىل ي تدوير الهواء من أجل...
- Page 69 انتبه ينبغي الرجوع إىل البيانات الفنية الواردة � ز ي ملصق الجهاز التسلسىل ي من أجل أفضل عملية تركيب واستخدام لهذا الجهاز. توجد بطاقة الجهاز الالصقة عىل حافة .واجهة الفرن الداخلية. توجد بطاقة لصقة ثانية عىل غالف دليل التعليمات :تعليمات ال� ت كيب واستعماله...
- Page 70 أف ر ان غاز مدمجة إرشادات ال� ت كيب واالستعمال والصيانة )إزالة\ تركيب الدلئل الم� ف ف لقة (إن توافرت ل إ ز التها, قمzإذا تم توريدها, فإنكم سوف تجدوا الدلئل الم� ز ز لقة م ُ ركبة بفك دلئل التدعيم الجانبية كما هو موصوف � ز ي الفقرة "إ ز الة وتركيب الدلئل ."الجانبية...
- Page 71 إزالة / تركيب الدلئل الجانبية . قبل الب ِ دء � ز ي ذلك تح ق َّق من أن َّ الفرن قد بردت بالقدر الكا� ز ي أمسك بقوة الدليل باتجاه الجزء ال أ مامي, ارفعه ارفعه ح� ت يثبت و اسحب الجزء...
- Page 72 أف ر ان غاز مدمجة إرشادات ال� ت كيب واالستعمال والصيانة إزالة الزجاج من داخل باب الفرن يسمح هذا الموديل بإخ ر اج الزجاج الداخىل ي وتنظيفه دون الحاجة إىل فكِّ باب : الفرن. اتب َ ع الخطوات التاىل ي ل إ خ ر اج الزجاج الداخىل ي .اف...
- Page 73 إزالة / تركيب باب الفرن انتبه �تنبيه: ل تستخدمأي نوع من ال أ دوات المحفوفة أو الحادة ال� ت ي قد تك .الزجاج أو تتلف الباب انتبه إىل اتجاه إدخال الزجاج، حيث أنها قد يكون مقلوب ا ً أو ملفوف ا ً . إن كان...
- Page 74 أف ر ان غاز مدمجة إرشادات ال� ت كيب واالستعمال والصيانة الصيانة والتنظيف يتم إ ز الة بقايا ال أ وساخ مبا� ش ة ً بعد عملية الطهي دون استعمال المنتجات المخصصة للصلب المقاوم للصدأ أو الستعانة بأي منتجات حادة أخرى، ل أ نها انتبه...
- Page 75 أثناء استخدام هذه الوظيفة ل يكون من الممكن استخدام شعلة الفرن (يمنع جهاز ال أ مان تشغيل المقاومة الكهربائية إذا كان مقبض ال� ت موستات ل يتواجد � ز ي الموضع مشعل الشواية افتح باب الفرن بشكل تام، يمنع جهاز ال أ مان إشعال المشعل والباب مغلق،،...
- Page 76 إرشادات ال� ت كيب واالستعمال والصيانة وظائف الفرن حيثما توجد، فإن دوار الشواء يكون موضوع ا ً � ز ي اتجاهFI-64/74 � ز ي موديالت مصباح الفرن طوىل ي وتوجد وصلته � ز ي وسط خلف الفرن. أدخل الطعام المثبت بواسطة...
- Page 77 عرض ال� ب نامج المضبوط .يسمح الم� ب مج بعرض ال� ب نامج المضبوط ،من أجل عرض ال� ب نامج المضبوط اضغط ضغط ا ً قص� ي ا ً عىل المقبض وأعد تركه � ز ي نفس اللحظة يعرض الم� ب مج ال� ب نامج المضبوط مع تحريك المؤ� ش ات عىل .ال...
- Page 78 أف ر ان غاز مدمجة إرشادات ال� ت كيب واالستعمال والصيانة دليل استخدام الفرن ) (� ف ي موديالت مضبوطة مسبقاCM عد ّ اد دقائق ميكانيك ي الستخدام ال أ ول يسمح عد ّ اد الدقائق بالحصول عىل إشارة صوتية بعد وقت محدد مسبق ا ً بغض افصل...
- Page 79 لوحة التحكم ترموستات مفتاح اختيار ال� ب امج CM عد ّ اد الدقائق OE ساعة إلك� ت ونية مؤ� ش الطاقة OR-OE الساعة ال إ لك� ت ونية يمكن أن تتغ� ي وضعية ال� ت كيب حسب الموديل...
- Page 80 أف ر ان غاز مدمجة إرشادات ال� ت كيب واالستعمال والصيانة وصف المنتج لوحة التحكم اللوح المغطي للمروحة )� ش ائح التمديد الكامل (عند القتضاء شبكة الرص وعاء تجميع الصلصة ,تسخ� ي ز شواية الطهي...
- Page 81 ً قبل الصيانة أو النظافة أطفئ وافصل الفرن كهربائي ا ً ، إن كان مستخدم ا • .للتو، انتظر ح� ت ي� ب د من أجل تجنب الصدمات الكهربائية المحتملة، يجب أن يتم إطفاء الجهاز • .قبل استبدال المصباح .ل تستخدم آلت التنظيف ال� ت ي تعمل بالبخار � ز ي تنظيف الجهاز •...
- Page 82 أف ر ان غاز مدمجة إرشادات ال� ت كيب واالستعمال والصيانة .تحذي ر ات بشأن الستخدام الصحيح للفرن .عدم رفع الفرن أو سحبه من المقبض • يمكن تركيبه وتشغيله فقط � ز ي أماكن جيدة التهوية وبما يتوافق مع القواعد •...
- Page 83 تنبيهات عامة انتبه تنبيهات .EU/19/2012 هذا الجهاز يحمل عالمة المطابقة للتوجيه ال أ ورو� ب ي ل ت� ز ز ع اللوحة المثبتة � ز ي الواجهة الداخلية. يمكن رؤيتها عند فتح باب .الفرن وتحمل البيانات التعريفية للمنتج انتبه ينبغي توصيل هذا الجهاز بطرف أر� ز ي بما يتوافق مع القواعد المحلية المعمول...
- Page 84 أف ر ان غاز مدمجة إرشادات ال� ت كيب واالستعمال والصيانة FI-64 – FI-74 الموديالت شواية كهربية )GE( شواية الغاز )GG( شواية كهربائية مزودة بمروحة )GEV( شواية غاز مزودة بمروحة )GGV( نوع ال� ب مجة عداد دقائق ميكانيك ي سم...
- Page 85 صفحة الفهرس تنبيهات عامة وصف المنتج لوحة التحكم دليل استخدام الفرن EO عد ّ اد الدقائق الميكانيك ي /الساعة ال إ لك� ت ونية وظائف الفرن الصيانة والتنظيف إ ز الة / تركيب باب الفرن الصيانة والنظافة إ ز الة الزجاج من داخل باب الفرن إ...
- Page 86 أف ر ان غاز مدمجة إرشادات ال� ت كيب واالستعمال والصيانة بطاقة مواصفات المنتج...
- Page 88 Cod. 9880035005...
Need help?
Do you have a question about the FI-64 and is the answer not in the manual?
Questions and answers