Allworx Verge Series Quick Start Manual
Hide thumbs
Also See for Verge Series:
- Quick start manual (8 pages) ,
- Faq (4 pages) ,
- Function card (2 pages)
Advertisement
Quick Links
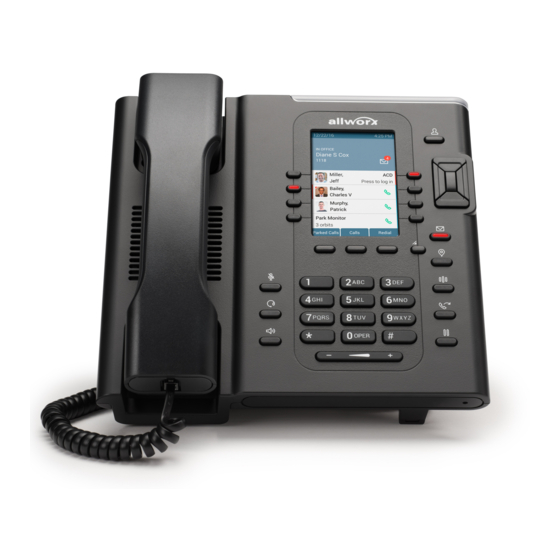
The Allworx Verge IP phone series has a high-resolution, color LCD that provides information about the call, identifies the programmable buttons
and soft key names, and displays instructions to perform features or update configurations. Additionally, the Verge IP phone series uses:
•
function buttons - physical buttons to control call management such as Presence, Headset, Transfer, etc. Icons identify each button:
Contacts
Speakerphone
•
soft keys - located under the Verge IP phone screen. The soft keys are specialized actions that change depending on the current screen.
•
programmable buttons - display on the Verge IP phone screen and are a short cut to features available on the phone.
Setting up the Verge IP Phone
The Verge IP phone series requires the following minimum software versions:
Product/Resource
Allworx System Software
Interact Professional
1.
Unpack the Verge IP phone and accessories, and inspect for missing items.
Included:
• Verge IP phone and stand
• Handset with cord
2.
Determine the Verge IP phone location: Desktop or Wall Mount.Verify all Verge IP phone connections are unplugged, and remove the
handset from the hook.
3.
(Wall Mount only) Attach the wall mounting plate (not included - must meet TIA-570-B, Section 5, standard. Available from a local telephone
company or local retailer) to the wall and attach the Verge IP phone wall mount unit (catalog number 8400146) to the mounting plate.
If using a standard telephone wall mount plate, DO NOT connect to the RJ-11 jack. This connection is for analog phones and may cause
Caution:
Caution:
damage to the Verge IP phone, which voids the warranty.
The wall mount supports a Verge IP phone and one Verge 9318Ex.
Caution:
Caution:
4.
Connect the cables to the jacks on the back of the Verge IP phone using one of the options below:
Do not connect the Verge IP phone to an analog phone line. This may cause damage to the Verge IP phone, which voids the warranty.
Caution:
Caution:
Unit is to be connected only to Ethernet networks without routing to the outside plant.
Caution:
Caution:
•
Desktop - thread all cables through the phone stand to the phone jack to connect.
•
Wall Mount - use the wall mount cable guide to thread the network cables.
Cable
Optional:
Power Supply:
rated 24VDC,
400 mA or higher
Ethernet cable
Optional:
Ethernet cable
5.
Finish mounting the Verge IP phone.
a.
Desktop - align the Verge IP phone with one of the three available positions to connect the phone stand to the Verge IP phone and
slide the phone stand to the right to secure.
b.
Wall Mount - align the Verge IP phone back to the wall mount unit and slide it to the right. All power and RJ-45 cable connections exit
between the Verge IP phone and the wall, and then route to the network connection and/or a power connection.
6.
Peel off all protective strips, i.e. LCD, handset, etc. If necessary, adjust the handset retainer clip to prevent the handset from slipping out of
the cradle. Insert a coin in the retainer clip slot and turn the coin 180 degrees to adjust the retainer clip to the up or down position.
7.
View the initialization progress on the Verge IP phone screen. A normal sequence takes approximately 2 minutes to complete and includes:
Allworx
Black
Logo
Screen
Verge IP phones with early versions of software will fail to boot if using an external DHCP server. This issue only affects phones on the LAN. Remote
Note:
phones will boot successfully because the Verge IP phone requires the boot server IP and Plug and Play key for booting. Follow one of the options
below as a work around, if this occurs:
Option 1: Manually configure the boot server IP on all the phones under Settings > Admin > Network Settings.
Option 2: Use the Allworx server as the DHCP server for the phones to boot and upgrade software, and then revert to the external DHCP server.
Refer to the Allworx System Software Administrator Guide for more information about configuring the DHCP server.
If the Verge IP phone does not follow this sequence or displays an error, contact the Allworx Server Administrator. After the first initialization
process, the Verge IP phone may suggest assigning the handset to a user. If this occurs, follow the on screen directions. Otherwise, the
Verge IP phone displays a combination of the date, time, user presence, user name, extension, and programmable buttons.
866.ALLWORX * +1 585 421 3850
www.allworx.com
©2017 Allworx Corp, a Windstream Company
®
Allworx
Quick Start Guide
Mute
More soft keys
available
Version (or later)
8.2
3.0
Not
included:
Connections
Position
Phone DC jack. Allworx recommends using a surge
protector.
Only required if the Ethernet cable does not provide PoE
Network jack and Wall Ethernet jack
Network
Power over Ethernet (PoE): provides power to the Verge IP
phone after connecting the Ethernet cable.
Computer Computer jack and the computer
Initializing
Starting VLAN
Network
Discovery
Verge™ IP Phone Series
Audio Route -
Headset
Presence
Product/Resource
Reach for Android
Reach for iOS
• Ethernet Cable
• (Optional) Headset with cord
• (Optional) Verge 9318Ex
Startup
Hardware/Phone
DHCP
Software Versions
Models: Allworx Verge 9308
Allworx Verge 9312
Intercom
Messages -
Voicemail
®
• (Optional) Bluetooth
Headset (Verge 9312 only)
• (Optional) Wall Mount Kit (catalog number 8400146)
• (Optional) Power Supply (catalog number 8400006)
Cable
Position
Handset cord
Optional:
Headset cord
Loading
Configuration Files
Revised: February 17, 2017
Transfer
Hold
Version (or later)
3.0
3.0
Connections
Handset jack
Headset jack
Initialization
Complete
P/N 5000416 Rev. 04
Advertisement

Related Manuals for Allworx Verge Series


Summary of Contents for Allworx Verge Series
- Page 1 Option 1: Manually configure the boot server IP on all the phones under Settings > Admin > Network Settings. Option 2: Use the Allworx server as the DHCP server for the phones to boot and upgrade software, and then revert to the external DHCP server.
- Page 2 (e.g. Internet Explorer) and navigate to the server IP web page (http://ServerLANAddress). Enter the Allworx log in username and password. Click Login, and the My Allworx Manager home page displays. ServerLANAddress is the IP address or domain name of the Allworx server.
Need help?
Do you have a question about the Verge Series and is the answer not in the manual?
Questions and answers