Graco A Series Instructions-Parts List Manual
Pistol-grip mastic flo-gun for spraying heavy mastic sealants
Hide thumbs
Also See for A Series:
- Instructions - parts manual (52 pages) ,
- Instructions-parts list manual (48 pages) ,
- Manual (36 pages)
Table of Contents
Advertisement
Quick Links
Instructions - Parts List
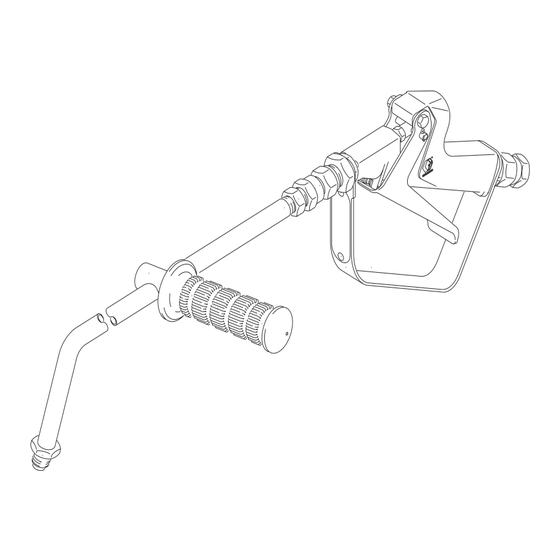
Pistol-Grip Mastic Flo-Gun
For spraying heavy mastic sealants.
Model 224526, Series A
Basic Gun
Model 224472
Complete Gun with Wand
5000 psi (27.6 MPa, 276 bar) Maximum Working Pressure
Important Safety Instructions
Read all warnings and instructions in this manual.
Save these instructions.
This gun is factory set to close at 1500 psi (10.2
MPa, 102 bar). If you are using this gun with a sys-
tem that produces more than 1500 psi (10.2 MPa,
102 bar), adjust the spring pressure according to the
stall pressure of your pump, but do not exceed gun
maximum working pressure of 4050 psi (27.6 MPa,
276 bar). See procedure on page 7.
308124H
EN
ti12203a
Advertisement
Table of Contents

Related Manuals for Graco A Series


Summary of Contents for Graco A Series
- Page 1 Instructions - Parts List 308124H Pistol-Grip Mastic Flo-Gun For spraying heavy mastic sealants. Model 224526, Series A Basic Gun Model 224472 Complete Gun with Wand 5000 psi (27.6 MPa, 276 bar) Maximum Working Pressure Important Safety Instructions Read all warnings and instructions in this manual. Save these instructions.
-
Page 2: Fire And Explosion Hazard
Warnings Warnings The following warnings are for the setup, use, grounding, maintenance, and repair of this equipment. The exclama- tion point symbol alerts you to a general warning and the hazard symbol refers to procedure-specific risk. Refer back to these warnings. Additional, product-specific warnings may be found throughout the body of this manual where applicable. - Page 3 Warnings WARNING MOVING PARTS HAZARD Moving parts can pinch or amputate fingers and other body parts. • Keep clear of moving parts. • Do not operate equipment with protective guards or covers removed. • Pressurized equipment can start without warning. Before checking, moving, or servicing equipment, follow the Pressure Relief Procedure in this manual.
-
Page 4: Installation
Reference numbers and letters in parentheses in according to local code and manufacturer’s recom- text refer to call-outs in figures and parts drawing. mendations. Always use genuine Graco parts and accessories, • Fluid hoses: Use only grounded hoses with a maxi- available from your Graco distributor. -
Page 5: Operation
Operation Operation Pressure Relief Procedure 3. Hold metal part of gun firmly to side of a grounded metal waste container. Disengage the safety latch by pushing latch in while gun is triggered to relieve fluid pressure. INJECTION HAZARD Fluid under high pressure can be injected through 4. - Page 6 Operation Operation Check for proper spring tension 1. See Adjusting Spring Tension, page 7. To reduce risk of serious injury, including fluid injec- To engage gun safety latch tion, splashing in eyes or on skin, or injury from mov- ing parts, always follow Pressure Relief Procedure 1.
- Page 7 Service Service Note: The numbers in parentheses in text refer to refer- 1. Connect hose to gun. Prime pump with material ence number in parts drawing and list. being sprayed. Set pump at normal operating pres- sure. Adjusting Spring Tension a.
- Page 8 Service Service Torque to 100 in-lb (11 NSm) ti12207a Valve Seat and Needle Replacement 6. Repeat procedure, turning adjustment nut (18) as needed until correct free travel is obtained. If fluid continues to flow after trigger is released, gun valve may be obstructed or need adjustment. Valve Inspecting for Obstruction or Damage.
- Page 9 Service Service Valve Needle and Packing Replacement 2. If gun still leaks, relieve pressure. 3. Disconnect hose from gun. Disassemble gun and replace v-block packing (4) and copper gasket (9). To reduce risk of serious injury when relieving pres- CAUTION sure, always follow Pressure Relief Procedure, When tightening bushing (19), be sure to grip gun page 5.
- Page 10 Parts Parts Model 224526 (Basic Gun) INLET 1/2 npt(m) OUTLET 1/2 npt(m) ti12209a Ref. Part Description Qty. Ref. Part Description Qty. 100975 NUT, hex; no. 540 168686 TUBE, insert 101421 PIN, cotter; 0.062 in. (1.59 mm) x 168687 NUT, adjusting 187255 NIPPLE, adapter, 1/2 npt(m) 0.375 in.
-
Page 11: Technical Data
Parts Model 224472 (Complete Gun with Wand) OUTLET 1/2 npsm(f) ti12210a Ref. Part Description Qty. Ref. Part Description Qty. 158212 BUSHING, 1/2 npt(m) x 3/8 npt(f) 187177 ADAPTER, valve seat 155865 UNION ADAPTER, 1/2 npt(f) x 1/2 168845 GASKET, copper npsm(f) swivel 111346 HANDLE, adjustable 224526 MASTIC FLOW GUN... -
Page 12: Graco Standard Warranty
With the exception of any special, extended, or limited warranty published by Graco, Graco will, for a period of twelve months from the date of sale, repair or replace any part of the equipment determined by Graco to be defective.
Need help?
Do you have a question about the A Series and is the answer not in the manual?
Questions and answers