Table of Contents
Advertisement
Quick Links
Advertisement
Table of Contents

Subscribe to Our Youtube Channel
Related Manuals for ESP DVR-EZ


Summary of Contents for ESP DVR-EZ
- Page 1 Installation And User Guide DVR-EZ Channel igital ideo ecorder...
- Page 2 Regulatory FCC Certification This equipment has been tested and found to comply with the limits for a class A digital device, pursuant to Part 15 of the FCC rules. These limits are designed to provide reasonable protection against harmful interference when the equipment is operated in a commercial environment.
-
Page 3: Table Of Contents
CONTENTS Introduction to Digital Video Recorder ------------------------------------------ 3 Specifications ------------------------------------------------------------------------- 4 Video Record Time ----------------------------------------------------------------- 5 Features ------------------------------------------------------------------------------ 6 DVR Front Panel Buttons -------------------------------------------------------- 7 DVR Back Panel Buttons ------------------------------------------------------- 8 DVR Installation: Video Input & Output Connection ---------------------- 9 DVR Installation: Sensor Installation ----------------------------------------- 10 DVR Installation: Alarm Installation ------------------------------------------- 11 Switch On the DVR --------------------------------------------------------------- 12... - Page 4 Operation Guide: Overwrite -------------------------------------------- 21 Operation Guide: HDD Size & HDD Used -------------------------- 21 Operation Guide: HDD Format ---------------------------------------- 21 Sensor Set up ------------------------------------------------------------- 22 Motion Set up ------------------------------------------------------------- 23 USB to PC ----------------------------------------------------------------- 24 Print Event -----------------------------------------------------------------26...
-
Page 5: Introduction To Digital Video Recorder
Introduction to Digital Video Recorder This digital video recorder (DVR) records and retrieves real-time video streams from up to 4-channels simultaneously. Advanced M-JPEG digital video image compression technology is used to compress the input video streams for storage onto an internal hard disk drive (HDD). The following operation guide explains how to operate and manage the DVR. -
Page 6: Specifications
Specification Image Compression Advanced M-JPEG Video Signal NTSC Image Resolution 720 X 480 720 X 576 Display Rate 120 fps (4 x 100 fps (4 x 25) Display Rate 30) fps) Each Mode 320 x 112 320 x 136 Video Record Quad Mode 640 x 224... -
Page 7: Video Record Time
Video Record Time NTSC Format 30 fps 15 fps 7 fps Display Video Video Signal Format Quality High 60 Hours 120 Hours 240 Hours Quad Normal 90 Hours 180 Hours 360 Hours Screen 224 Hours 448 Hours Hours NTSC High 228 Hours 456 Hours Hours... -
Page 8: Features
Features Motion Detection on all four channels. Five levels of sensitivity on motion detection. Two adjustable motion detection fields per channel. Audio input on all four channels, single audio recording. Three levels of video quality. Four alarm inputs (either NO or NC). Single alarm output. Watchdog, recording automatically resumes after power loss. -
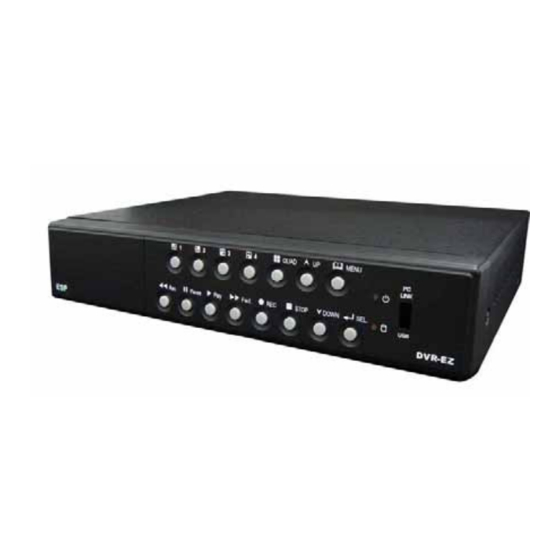
Page 9: Dvr Front Panel Buttons
DVR Front Panel Operation Guide Menu button Press to display Operation menu option 2. Up button used in menu All channels button Press to display all channels Channel 4 button Press to display channel 4 Channel 3 button Press to display channel 3 Channel 2 button Press to display channel 2 Channel 1 button Press to display channel 1 Reverse : Press to rewind playback... -
Page 10: Dvr Back Panel Buttons
DVR Back Panel functions 1. VIDEO Output (BNC ONE) 2. VIDEO Output (BNC TWO) 3. S-Video Output 4. Camera Power Supply 5. Video Input 6. Sensor / Alarm Input 7. Video Format Switch (NTSC / PAL) 8. DVR Power In (DC- in, 12 volts, 4.0A) 9. -
Page 11: Dvr Installation: Video Input & Output Connection
DVD Installation Video Output & Video Input Connections... -
Page 12: Dvr Installation: Sensor Installation
Sensor Installation The DVR has 4 sensor inputs, one for each channel. The sensor Installation Procedure is as follows: I. Connect the sensor signal line to the unit. The sensor signal terminal is on the DVR rear panel. II.Connect the sensor adaptor jack into the sensor, and plug in the power adaptor. CH1 CH2 CH3 Alarm out Signal Line... -
Page 13: Dvr Installation: Alarm Installation
Alarm installation The DVR includes one internal switch for sounding an alarm when any of the sensor inputs is activated. The switch is normally open and closed upon activation. The circuitry is shown in the above figure. The alarm is installed as follows: I.The alarm requires a power supply, which is normally supplied with the alarm. -
Page 14: Switch On The Dvr
Switch On the DVR Before turn on the power, please make sure Video Format is in right position NTSC Area : North America, Japan, Philippines, Taiwan & etc. PAL Area : Europe, South America, Australia, Mid-East & Africa Asian Countries most use PAL like Indonesia, Thailand, Malaysia and etc. Once the DVR has been properly installed (please refer to pages 9 ~11 for further details on DVR installation) the unit is ready to record and display. -
Page 15: Record
“1”. Refer to “Operation Guide: Sub Menu” in order to reset password. ESP-EZ DVR provides independent functions of recording and displaying. This DVR unit is capable of recording selected channel images without displaying them on the monitor or displaying non-selected images. -
Page 16: Play Menu
Play Menu Press (play button) to open the playback menu as shown below. HARD DRIVE MASTER 05/06/18 17:26:47-05/06/25 17:28:23 01 TIME 2005/06/18 17:26:47 02 TIME 2005/06/19 17:25:47 03 TIME 2005/06/19 20:03:50 PRESS THEN SELECT PRESS MENU TO EXIT List of events triggered by installed sensors or motion detection. Available recordings in the HDD can be played. -
Page 17: Main Menu
MAIN MENU Press the button to display the main menu. CAMERA SELECT 1234 RECORD SELECT 1234 RECORD MODE EACH RECORD FRAMERATE VIDEO QUALITY HIGH RECORD SCHEDULE =SUB MENU= HARD DRIVE SETUP SENSOR SETUP NETWORK SETUP PRESS THEN SELECT PRESS MENU TO EXIT Use the buttons to move the cursor up and down. -
Page 18: Operation Guide Record Select
Operation Guide: RECORD SELECT Used to select the cameras whose video input will be recorded on the HDD. Desired cameras must be pre-selected in the “Camera Menu” in order to perform record properly. to cycle through the options. Press to make the selection and return to the main directory. NOTE: Desired channels cannot be recorded properly if the corresponding cameras are not pre-selected in the “Camera Menu.”... -
Page 19: Operation Guide: Record Schedule
Operation Guide: SCHEDULE RECORD MAIN MENU Select this option to change a CAMERA SELECT 1234 recording schedule during the day RECORD SELECT 1234 (24-hour period) RECORD MODE RECORD FRAMERATE 30 VIDEO QUALITY RECORD SCHEDULE SUB MENU HARD DRIVE SETUP SENSOR SETUP Numbers below indicate the time duration in 24 hour format. -
Page 20: Operation Guide: Sub Manual
Operation Guide: SUB MENU Sub Menu allows users to change SUB MENU system password, system date and time, PASSWORD CHANGE as well as various audio functions and TIME SET auto record. Use ( ) to move cursor BUZZER SOUND [OFF] and select. -
Page 21: Operation Guide: Time Setup
Operation Guide: TIME SETUP -- Position Year, Month, TIME Day, Hour, 2004/03/21 03:23:21 Minute or Seconds. -- Cycle through options (0,1,2 …9) PRESS ( ), THEN (SELECT ) PRESS(MENU) TO EXIT -- Exit Operation Guide: BUZZER SETUP Use the to select buzzer options Press to choose ON/OFF. -
Page 22: Operation Guide: Audio Mute
Operation Guide: AUDIO MUTE AUDIO OUT MUTE :ON to select audio out mute. Press to choose ON/OFF. Press to return to the main menu. Operation Guide: AUDIO CHANNEL SELECT to select audio channel. Press to cycle through options. (Channel 1,2,3,4) AUDIO CHANNEL : 1 Press to return to the main menu. -
Page 23: Operation Guide: Hard Disk Drive Setup Menu
Hard Disk Drive Setup Menu HARD DRIVE SETUP OVERWRITE ENABLED MASTER HDD SIZE 160000MB MASTER HDD USED 0MB 0% MASTER HDD FORMAT SLAVE HDD SIZE SLAVE HDD USED SLAVE HDD FORMAT PRESS (<,>) THEN (SELECT) PRESS (MENU) TO EXIT Operation Guide: OVER WRITE “YES”. -
Page 24: Sensor Setup
SENSOR SETUP MENU SENSOR SETUP SENSOR RECORD TIME: SENSOR RECORD TIME Recording duration once sensor ALARM ON TIME Being triggered. SENSOR SET UP Selects record time from 0 ~180 seconds. MOTION SETUP ALARM OUT TIME: PRESS (<,>) THEN (SELECT) It controls how long ( in second) PRESS (MENU) TO EXIT the alarm sounds after being triggered. -
Page 25: Motion Set Up
MOTION SETUP MENU MOTION DETECTION CHANNEL-1 SENSITIV 0 (OFF) MOTION SET UP AREA SETUP CHANNEL-2 SENSITIV 1 SENSITIVITY: Sets the sensitivity level for AREA SETUP Motion Detection. 0 (OFF) to 5 (maximum sensitivity). CHANNEL-3 SENSITIV 5 AREA SETUP buttons to select the sensitivity for CHANNEL-4 SENSITIV 2 each Channel AREA SETUP... -
Page 26: Usb To Pc
How to Backup through USB port to PC Backup through USB port The unit provides one USB port to simple backup over the connection with PC. Please mind the following steps to successful link. Step 1. Connect the USB cable between the unit and PC Step 2. - Page 27 Hints When PC detects USB storage setup, PC has connected DVR host already. Switch on PC LINK play program for 20~30 seconds, you can see following footage. 1. Fast rewind 9. Channel selection 2. Play next frame 10. BMP picture file 3.
-
Page 28: Print Event
PRINT EVENT Move the mouse to 8 ( Event search), and select the event you want.Then, click OK to play the event recorded. The menu is shown below. Copy the images and record the images DVR host play program offers dynamic and static image output. You can easily copy the static image, and store it in BMP file, or store a certain part of record in AVI file. - Page 29 Technical Support 0121 7861881...
Need help?
Do you have a question about the DVR-EZ and is the answer not in the manual?
Questions and answers