Table of Contents
Advertisement
Quick Links
INSTRUCTIONS AND MAINTENANCE
Read the directions carefully before operating.
Don't use the machine differently from following description.
SPECIFICATIONS
1.
MODEL:
POWER SUPPLY:
TOTAL INSTALLED POWER:
IRON POWER:
BOILER POWER:
BOILER CAPACITY:
IRONING ENDURANCE:
OPERATING STEAM PRESSURE:
MAXIMUM PRESSURE:
WEIGHT:
OVERALL DIMENSIONS:
MADE IN ITALY
IMPORTANT
2.
Before installing MINI 5
the following facilities:
1. a grounded socket suitable to MINI 5 power;
2. a steady and plane surface where to put the
machine.
For the transport and the displacement, seize the
generator only by the handle, never pull its electric
cables (fig. 1).
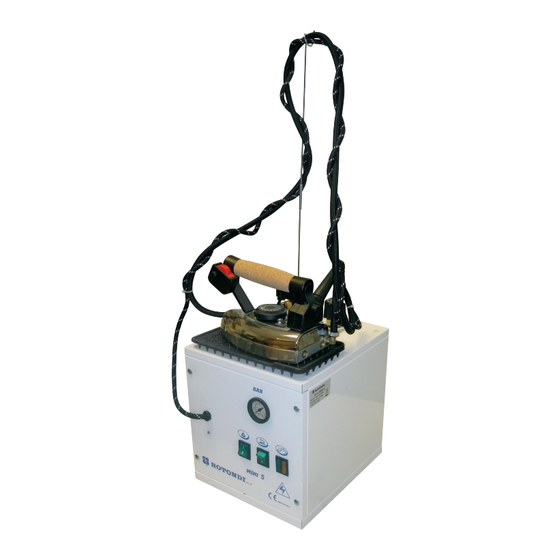
OPENING OF PACKAGE
3.
1. Open the box containing MINI 5, take out the
instructions handbook and read it carefully.
2. Remove MINI 5 from the box, mount the two
pieces of the cable support and insert it deep
into the special support holder (fig. 1) placed on the back side of the generator.
3. Fix the iron cable to the support hook (avoid twining).
4. Place the iron rest on the ironing table and put the iron on its rubber iron rest (fig. 1).
5. Check that the iron plug is connected to the socket (fig. 2 G)
CONNECTION AND STARTING
4.
With MINI 5 switched off and disconnected plug:
1. Unscrew the security valve plug (fig. 4), fill the boiler with water till overflow or at pleasure.
2. Take the plug by the plastic part and screw it again: do not tighten too much or its gasket
might get spoilt.
3. Insert the plug into a 230 V 16 A socket.
MINI 5
MINI 5 MODEL
MINI 5
230 V / 50Hz
W 2800
W 800
W 1000 + W 1000
3,8 l.
about 4 hours
2,8 BAR
5 BAR
KG. 13,5
cm 25x29x37 h.
it is necessary to set up
p. 1
SPRING
ELECTRIC WIRE
STEAM
TUBE
IRON
IRON REST
CABLE
SUPPORT
STEAM
TUBE
Fig. 1
MARCH 2011
Advertisement
Table of Contents

Related Manuals for ROTONDI Mini 5


Summary of Contents for ROTONDI Mini 5
- Page 1 (fig. 1). TUBE IRON OPENING OF PACKAGE 1. Open the box containing MINI 5, take out the instructions handbook and read it carefully. IRON REST 2. Remove MINI 5 from the box, mount the two pieces of the cable support and insert it deep into the special support holder (fig.
- Page 2 5. Connect MINI 5 to suitable protected socket. 6. Always keep children away from MINI 5, both when it is on and off. Fig. 4 7. Do not iron garments directly on persons or things.
- Page 3 WATER FILLING When the water in the boiler is over, the lamp “no water” switches on (fig. 2 E). So MINI 5 has to be switched off by disconnecting the plug; rotate the valve plug (fig. 3) of 360° and wait for steam to go out completely.
- Page 4 PACKING, STORAGE AND TRANSPORT MINI 5 may be packed with cellophane, on a pallet or in cardboard boxes which cannot be turned upside down. As this is not a stiff package it is not shock-resistant. We therefore advise you to handle the box with utmost care.
- Page 5 (included, without any limitation, consequential damages due to loss or no profit, cutback or any other economical loss) deriving form the use of a ROTONDI GROUP machine, even in case the Company had been previously informed of such possibility.
Need help?
Do you have a question about the Mini 5 and is the answer not in the manual?
Questions and answers