Table of Contents
Advertisement
Advertisement
Table of Contents

Related Manuals for Logik LCDBM12


Summary of Contents for Logik LCDBM12
- Page 1 Instruction Manual CD Stereo LCDBM12 / LCDBMP12...
-
Page 2: Table Of Contents
Content Safety Warnings ......................3 Unpacking ........................5 Product Overview ......................6 Front View ..............................6 Top View ..............................6 Rear View ...............................6 Power Source ........................7 Mains Power ............................7 Battery Power ............................7 USB Connection ......................8 Using Earphones ......................8 Radio Operation ......................9 General Operation ..........................9 Audio Mode ............................9 For Better Reception ..........................9 Presetting Stations ..........................9 Recalling a Preset Stations .......................9... -
Page 3: Safety Warnings
Safety Warnings Ventilation • Read all the instructions carefully before using the unit and keep them for future reference. • To prevent the risk of electric shock or fire hazard • Retain the manual. If you pass the unit onto a due to overheating, ensure that curtains and third party make sure to include this manual. - Page 4 Batteries Service • Batteries used in the unit are easily swallowed by • To reduce the risk of electric shock, do not young children and this is dangerous. remove screws. The unit does not contain any user-serviceable parts. Please leave all •...
-
Page 5: Unpacking
Thank you for purchasing your new Logik CD Stereo. These operating instructions will help you use it properly and safely. We recommend that you spend some time reading this instruction manual so that you fully understand all the operational features it offers. -
Page 6: Product Overview
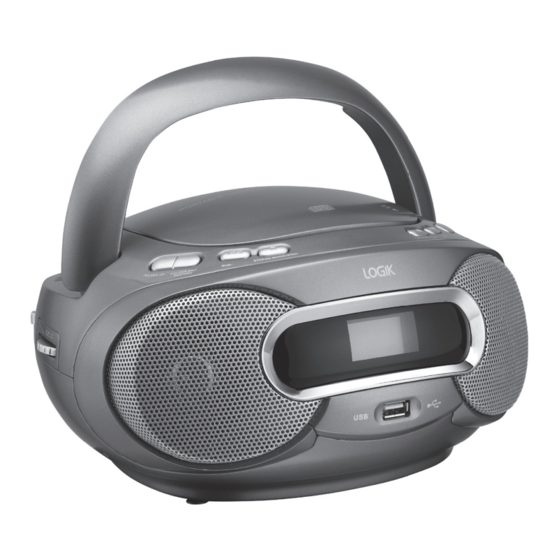
Product Overview Front View LCD Display Speakers USB Port Top View FM Aerial FUNCTION Selector Handle VOLUME Control CD Cover FOLDER UP Button 10. FOLDER DN. / RESTART Button 11. SKIP - Button 12. STOP / FM MONO / FM STEREO Button 13. -
Page 7: Power Source
Power Source To the mains socket Insert 8 x UM-2 size batteries into the battery Bottom view compartment Mains Power Check that the voltage marked on the rating label matches your mains voltage. Connect the mains cable to the back of the unit then plug into a mains socket. Battery Power Alternatively, insert 8 x UM-2 size batteries (not included) correctly by following the polarity (+ and –) indications in the battery compartment. -
Page 8: Usb Connection
USB Connection The USB port are located on the front of the unit. Use a USB device to insert into the slot. Using Earphones Turn down the volume before connecting the earphones. Slowly raise the volume with the earphones on until you reach your desired volume. When earphones are connected, the speaker is automatically disabled. -
Page 9: General Operation
Manual Scan Press SKIP+/SKIP– repeatedly until your desired frequency is reached. With FM radio it may be necessary to fine tune each station by pressing SKIP+/SKIP– repeatedly. Each press will adjust the frequency by 0.05MHz. If reception is still poor adjust the position of the aerial or try moving the radio to another location. -
Page 10: Cd/Mp3 Operation
CD/MP3 Operation Playback 1. Set the FUNCTION selector to CD/MP3/USB mode. 2. Open the CD cover by pressing the right bottom corner and place a CD with the label side facing up. 3. Close the CD cover and press the cover’s bottom right corner till you hear a click. -
Page 11: Repeat
Repeat 1. Press the MODE button repeatedly to select a play mode: • repeat: repeat the single track. • repeat all: repeat the whole disc. • album: repeat the selected folder • random: play tracks randomly. 2. To return to normal play, press the MODE button repeatedly until play mode icons are no longer displayed. -
Page 12: Programme
Programme • Up to 20 tracks (in CD mode) or 99 tracks (in MP3 or USB mode) can be programmed for disc play in any order. • Be sure to press the STOP button before use. 1. Press the MEMORY button, The “MEMORY“ and “P01“ indicator will flash on the display. -
Page 13: Maintenance
Maintenance Cleaning the Unit Ensure the unit is fully unplugged from the mains socket before cleaning. • To clean the unit, wipe the case with a slightly moist, lint-free cloth. • Do not use any cleaning fluids containing alcohol, ammonia or abrasives. •... -
Page 14: Hints And Tips
Hints and Tips If a problem does occur, it may often be due to something very minor. The following table contains various tips. Problem Cause / Solution No power supply. Check that the mains cable is correctly connected to the mains socket and the unit. No sound from the speakers. -
Page 15: Specifications
Specifications LCDBM12 / LCDBMP12 Model Power Power Supply 230V ~ 50Hz (mains operated) DC 2 x 6V (8 x “UM-2” size batteries) Power Consumption Output Power 2 x 1.2W Feature Decoding Format CD, CD-R, CD-RW, MP3 Connectivity CD Tray x 1, USB 2.0 x 1... - Page 16 For general information about this appliance and handy hints and tips, please visit www.knowhow.com/knowledgebank or call 0344 5611234. Visit Partmaster.co.uk today for the easiest way to buy electrical spares and accessories. With over 1 million spares and accessories available we can deliver direct to your door the very next day.
Need help?
Do you have a question about the LCDBM12 and is the answer not in the manual?
Questions and answers