Advertisement
Quick Links
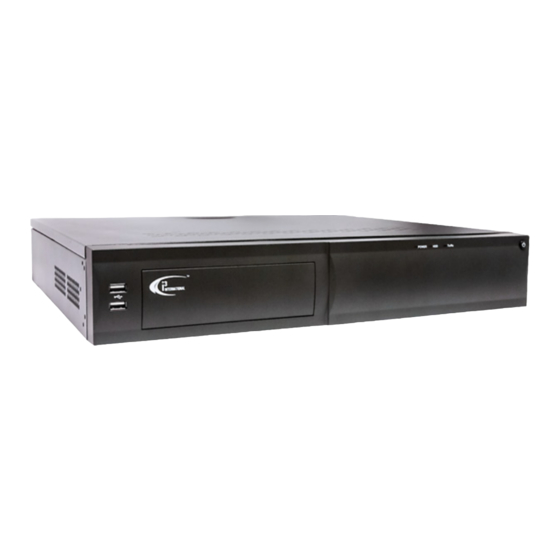
SRX-Pro NVR series
SAFETY
When installing your U1 NVR be sure to avoid:
•
Excessive heat, such as direct sunlight or heating appliances
•
Contaminants such as dust and smoke
•
Strong magnetic fields
•
Sources of powerful electromagnetic radiation such as radios or TV transmitters
•
Moisture and humidity
•
Areas with mechanical vibrations
•
Fluorescent lamps or objects that reflect light
•
Unstable light sources as this may cause flickering
•
Temperatures below 0° C (32° F) or above 45° C (113° F).
POWER SUPPLY
U1 Power consumption requirements: AC 100~ 240VAC.
PACKAGE CONTENTS
Ensure that the items received match the following. In addition to this Quick Guide and the
U1 NVR, the packing box includes:
1. USB keyboard
2. USB mouse
3. Power cable
4. SRX-Pro Software and Utilities
DVD
DVR PARTS AND DEFINITIONS
No. Item
Description
1
PoE VIDEO IN
16 x 100Mbps RJ45 PoE ports for Ax47R2 or R4
cameras
2
USB
1 USB 3.0 interface / 2 USB 2 interfaces on front
panel
3
Serial Interface
1 × RS-232 (not supported reserved for future use)
4
Network Port
RJ45 10/100/1000 Mbps Ethernet interface
5
AUDIO IN
Audio Input 1 RCA (2.0Vp-p, 1kΩ)
6
AUDIO OUT
Audio Output 1 RCA (2.0Vp-p, 1kΩ)
7
HDMI Output
One HDMI video Output
8
VGA Output
One VGA video output
9
Sensor Inputs
16 sensor inputs
10
Sensor Outputs
4 sensor outputs (with ground connections)
11
Power Switch
Power ON/OFF
12
AC Power In
AC Power in Port.
Please Note: It is recommended for optimum system performance the pre-set
standard resolution settings be kept at the defalt settings. These are:
•
Sub stream: CIF at 10 frames per second
•
Main stream: 1.3MP at 3 frames per second
i3 INTERNATIONAL INC.
i3-TRNG-DVR-U1-QIG.indd
5. Motherboard CDs
6. Security labels (x2)
7. Rackmount bracket (ear x2) +
bracket screws (x6)
1.866.840.0004
www.i3international.com
Quick Installation Guide
INSTALLATION
Important: Please use the installation guides that came with your IP cameras
to install the cameras as needed.
The U1 is built in a 1.5U chassis for convenient Rackmount installation.
Follow safety precautions when selecting an installation location for your U1
NVR.
1. Using supplied screws to secure the provided rack brackets to the U1 unit,
then install the U1 NVR into the server rack.
2. Make sure the Power Switch is in the OFF position.
3. Ensure the power source is located within 1 meter (3 feet) from the UPS.
4. Ensure the system and its connecting cables have sufficient space and
that the system is placed on an even surface (shelf or Rackmount).
5. Wait until the system is at room temperature before switching it on.
6. Plug the supplied USB mouse and the USB Keyboard into the USB ports on
the front panel of the machine.
7. Plug in the monitor. Depending on the monitor model, use either the HDMI
(#7) or the VGA (#8) port on the back panel of the machine.
8. Connect all IP cameras into the RJ45 PoE ports (#1).
9. Connect your Sensor Inputs signal cables (where applicable) to RS-485
block (#10) on the rear panel of the machine. Using a pointed object, press
and hold the orange toggle portion of the D+ and D- RS-485 terminals
and insert the correct Sensor signal cables into the slots below. Release
the orange toggle to secure the cables in place. Ensure a secure and tight
cable connection.
10. Connect your Audio IN (#5) and OUT (#6) devices, if using, to the
corresponding RCA connectors on the rear panel.
11. To connect the NVR to your network plug the Network cable into the
Network Port (#4) on the rear panel of the NVR and then plug the other
end into the Network.
12. Connect the provided power cable to the DC Power Supply connector
(#12) and then plug it into the UPS unit.
13. Plug the UPS unit into the wall Power supply. Use of the UPS
(Uninterrupted Power Supply) is highly recommended by i3 for added
reliability and longevity of your NVR.
14. Flip Power Switch (#11) into the ON position. The DVR will power on and
the front panel LEDs light up.
Time Zone Adjustment
All NVR units sold by i3 international are pre-set to Eastern Time zone (GMT
-5:00). It is imperative that you configure the time zone setting on the first
system start up. If the NVR is later re-located to a different time zone, this
setting must be changed once again. All previously-recorded data must be
formatted after each time zone change. Failure to do so may result in system
malfunction.
Once the SRX-Pro Server starts for the first time, the message bellow will be
displayed. Click Yes if the NVR is installed in the Eastern Time zone (GMT -5:00)
Click No if the NVR is installed in a different time zone - this will halt the SRX-
Pro software startup and allow you an opportunity to set the time zone.
If the NVR is being installed in a different time zone, follow the instructions below:
1.
On Windows Desktop, click on the System Time in the bottom right-hand corner.
In the calendar window, click Change date and time settings.
2.
In Date and Time tab, click on Change time zone button and select the correct
3.
time zone in the drop down list.
4.
Click OK. Click OK again to close Date and Time window.
5.
Launch SRX-Pro Server software by clicking on Start > All programs . SRX-Pro
Server.
U.S.A
4450 Witmer Industrial Estates Unit 4
Niagara Falls, NY 14305
U1 Integrated DVMS
Canada 780 Birchmount Road, Unit 16,
Rev.
Scarborough, ON, M1K 5H4
160812
Advertisement

Related Manuals for i3 International SRX-Pro Series


Summary of Contents for i3 International SRX-Pro Series
- Page 1 Time Zone Adjustment No. Item Description All NVR units sold by i3 international are pre-set to Eastern Time zone (GMT PoE VIDEO IN 16 x 100Mbps RJ45 PoE ports for Ax47R2 or R4 -5:00). It is imperative that you configure the time zone setting on the first cameras system start up.
- Page 2 10. Click OK in the Allocation window to close it. The Login window will open on the screen. See Login Information below. Video Pilot Client (VPC Remote Connection) Video Pilot Client (VPC) is i3 International’s remote software solution that allows LOGIN INFORMATION for simple and efficient video surveillance from a remote location by connect- 3 users will have been created with different levels of access to the ing directly to your U1 DVMS.
Need help?
Do you have a question about the SRX-Pro Series and is the answer not in the manual?
Questions and answers