ELTEX NTU-RG-5402G-W User Manual
Optical network terminals
Hide thumbs
Also See for NTU-RG-5402G-W:
- Operational manual (44 pages) ,
- User manual (47 pages) ,
- User manual (69 pages)

Related Manuals for ELTEX NTU-RG-5402G-W


Summary of Contents for ELTEX NTU-RG-5402G-W
- Page 1 Optical network terminals NTU-RG-5402G-W NTU-RG-5421G-Wac NTU-RG5421GC-Wac NTU-RG-5421G-WZ User manual Firmware version 1.2.1 IP address: 192.168.1.1 Username: user Password: user...
-
Page 2: Table Of Contents
NTU-RG-54xx. User manual (user) Contents Introduction ............................4 Product Description ..........................5 Purpose ..............................5 Models ..............................6 Device Specification ..........................6 Key Specifications ..........................9 Design ..............................12 Light Indication ............................15 Indication of LAN Interfaces .......................18 Reboot and Reset to Factory Settings ....................19 Delivery Package..........................19 NTU-RG architecture ..........................20 Device configuration via Web interface. - Page 3 NTU-RG-54xx. User manual (user) 4.5.1 The 'ARP Table' menu. View ARP cache ....................43 4.5.2 The 'Bridging' submenu. Bridging parameters configuration............44 4.5.3 The 'Routing' submenu. Routing configuration..................45 4.5.4 The 'Bridging grouping' submenu. Interface grouping ..............46 4.5.5 The 'Link mode' submenu. LAN ports configuration .................46 4.5.6 The 'IPv6' submenu.
-
Page 4: Introduction
ONT device is designed to connect user terminal equipment to broadband access services. It can be used in residential areas and office buildings. The range of ONT NTU equipment produced by ELTEX comprises of terminals with four UNI interfaces of interfaces : 10/100/1000Base-T and supports for FXS, Wi-Fi, USB, Z-Wave... -
Page 5: Product Description
This makes dialling and call pick-up user friendly. USB ports can be used for USB-enabled devices (USB flash drives, external HDD). Network router NTU-RG-5402G-W provides the connection via b/g/n Wi-Fi standard and ensures 2.4 GHz operation of the device. NTU-RG-5421G-Wac, NTU-RG-5421G-WZ, NTU-RG-5421GC-Wac network routers allow Wi-Fi clients to be connected using IEEE 802.11a/b/g/n/ac standard. -
Page 6: Models
2.3 Device Specification Device is equipped with the following interfaces: • RJ-11 ports to connect network devices (FXS): • 2 ports in NTU-RG-5402G-W; • 1 port in NTU-RG-5421G-Wac, NTU-RG-5421G-WZ, NTU-RG-5421GC-Wac. • 1xPON SC/APC port for connection to provider's network (WAN); •... - Page 7 NTU-RG-54xx. User manual (user) • static IP address and DHCP (DHCP client on WAN side, DHCP server on LAN side); • Multicast traffic transmission via Wi-Fi; • DNS (Domain Name System); • DynDNS (Dynamic DNS); • UPnP (Universal Plug and Play); •...
- Page 8 NTU-RG-54xx. User manual (user) • OMCI; • CaTV Only for NTU-RG-5421GC-Wac The figures below illustrate applications schemes of NTU-RG. Figure 1 – NTU-RG-5402G-W application diagram...
-
Page 9: Key Specifications
NTU-RG-54xx. User manual (user) Figure 2 – NTU-RG-5421G-Wac and NTU-RG-5421G-WZ application diagram 2.4 Key Specifications Table 2 shows main specifications of the terminals: Table 2 — Main Specifications VoIP Supported protocols Audio codecs: G.729, annex A Codecs G.711(A/µ) G.723.1 (5,3 Kbps) Fax transmission: G.711, T.38 Ethernet LAN interface parameters Number of interfaces... - Page 10 NTU-RG-54xx. User manual (user) RJ-45 Socket Auto-negotiation, 10/100/1000 Mbps, Data transfer rate duplex/half-duplex IEEE 802.3i 10Base-T Ethernet Standards IEEE 802.3u 100Base-TX Fast Ethernet IEEE 802.3ab 1000Base-T Gigabit Ethernet IEEE 802.3x Flow Control IEEE 802.3 NWay auto-negotiation PON interface parameters Number of interfaces ITU-T G.984.x Gigabit-capable passive optical networks Standards...
- Page 11 NTU-RG-54xx. User manual (user) Subscriber analogue ports parameters NTU-RG-5402G-W NTU-RG-5421G-Wac Number of ports NTU-RG-5421GC-Wac NTU-RG-5421G-WZ Up to 2 kΩ Loop resistance Pulse/frequency (DTMF) Call reception Caller ID display Wi-Fi interface parameters NTU-RG-5402G-W NTU-RG-5421G-Wac Model NTU-RG-5421GC-Wac NTU-RG-5421G-WZ 802.11 b/g/n 802.11 a/b/g/n/ac Standard 2400 ~ 2483.5 MHz...
-
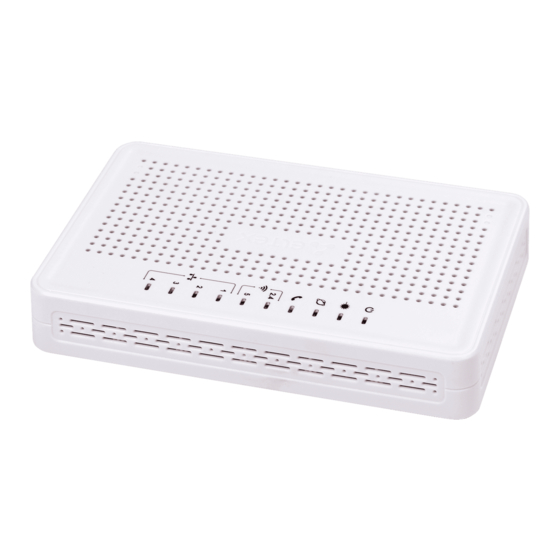
Page 12: Design
220x120x50 mm Dimensions 0.3 kg 0.450 kg Weight 2.5 Design Subscriber terminal is designed as desktop device in plastic housing. The rear panel layout of the device is depicted in Fig. 3, 4, 5. Figure 3 – NTU-RG-5402G-W-Wac rear panel layout... - Page 13 NTU-RG-54xx. User manual (user) Figure 4 – NTU-RG-5421G-Wac and NTU-RG-5421G-WZ rear panel layout The connectors and controls located on the NTU-RG-5402G-W, NTU-RG-5421G-Wac and NTU-RG-5421G-WZ rear panel are listed in Table Table 3 – Description of the connectors and controls on the rear panel...
- Page 14 Figure 6 – NTU-RG-5402G-W, NTU-RG-5421G-Wac and NTU-RG-5421G-WZ side panel layout Table 5 for detailed information about buttons located on the side panel of the device. Table 5 – NTU-RG-5402G-W, NTU-RG-5421G-Wac and NTU-RG-5421G-WZ side panel buttons description Side panel element Description...
-
Page 15: Light Indication
NTU-RG-5402G-W, NTU-RG-5421G-Wac and NTU-RG-5421G-WZ top panel layout. Figure 7 – NTU-RG-5402G-W (on the left) and NTU-RG-5421G-Wac, NTU-RG-5421G-WZ (on the right) top panel layout Current status of the device is represented by means of indicators paced on the top panel. - Page 16 NTU-RG-54xx. User manual (user) Top panel element LED Status Description orange device startup is completed, the default configuration is device booting – optical interface activity indicator green connection between optical line terminal and the device has been established flashes green connection between optical line terminal and the device has been established (the device is not activated) flashes red...
- Page 17 NTU-RG-54xx. User manual (user) The front panel of NTU-RG-5421GC-Wac is shown in Fig. Figure 8 – NTU-RG-5421GC-Wac front panel layout Current status of the device is represented by means of indicators paced on the top panel. Table 7 provides possible statuses of the LEDs.
-
Page 18: Indication Of Lan Interfaces
NTU-RG-54xx. User manual (user) Front panel element LED status Description Phone – FXS port activity SIP agent is not configured/not registered/off indicator SIP agent is successfully registered flashes off hook/phone call TV – TV operation status RF port is disabled indicator TV signal is not available orange signal level is not normal (more than +2 dBm) Power – power and operation... -
Page 19: Reboot And Reset To Factory Settings
2.8 Reboot and Reset to Factory Settings For device reboot, press the 'Reset' button once • on the device side panel for NTU-RG-5402G-W, NTU-RG-5421G-Wac and NTU-RG-5421G-WZ; • the 'F' button on the device rear panel for NTU-RG-5421GС-Wac. In order to reset the device to the factory settings, press the "Reset" button and hold it for 7-10 seconds until the indicator glows red and all other LEDs go out. -
Page 20: Ntu-Rg Architecture
NTU-RG-54xx. User manual (user) 3 NTU-RG architecture Figure 9 – Logical Architecture of a Device with Factory Settings Main Components of the Device: • Optical receiver/transmitter (SFF module) for conversion of an optical signal into an electric one; • Processor (PON chip) which converts Ethernet and GPON interfaces;... -
Page 21: Device Configuration Via Web Interface. Administrator Access
NTU-RG-54xx. User manual (user) 4 Device configuration via Web interface. Administrator Access Getting Started To configure the device, it is necessary to connect to it through Web browser: 1. Open the Web browser (program for viewing hypertext documents), for example, Firefox, Google Chrome and etc. - Page 22 NTU-RG-54xx. User manual (user) Main elements of the web interface General view of the device configuration window is depicted below. The user interface window can be divided into 3 parts: The navigation tree on the device settings menu. The main settings window for the selected section. User change button.
-
Page 23: The 'Status' Menu. Device Information
NTU-RG-54xx. User manual (user) 4.1 The 'Status' menu. Device Information 4.1.1 The 'Device status' submenu. Device General Information This section displays general information about the device, the main parameters of the LAN and WAN interfaces. Status → Device status System •... -
Page 24: The 'Ipv6 Status' Submenu. Information About Ipv6 System
NTU-RG-54xx. User manual (user) • IPv4 Default Gateway – IPv4 default gateway; • IPv6 Default Gateway – IPv6 default gateway. LAN Configuration • IP Address – device IP address; • Subnet Mask – device subnet mask; • DHCP Server – DHCP server state; •... -
Page 25: The 'Pon' Submenu. Optical Module Status Information
NTU-RG-54xx. User manual (user) • Protocol – protocol used; • IP Address – interface IP address; • Status – interface status. Click the 'Refresh' button to update the page. 4.1.3 The 'PON' submenu. Optical module status information The tab displays the current status of PON interface system. Status →... -
Page 26: The 'Lan' Menu Lan Interface Configuration
NTU-RG-54xx. User manual (user) 4.2 The 'LAN' menu LAN interface configuration You can configure main parameters of wired and wireless LAN interfaces in this menu. • Interface name – interface name; • IP Address – interface IP address; • Subnet Mask – interface subnet mask; •... -
Page 27: The 'Wireless' Menu. Wireless Network Configuration
NTU-RG-54xx. User manual (user) 4.3 The 'Wireless' menu. Wireless network configuration This section contains individual settings for each of the operating bands – 2.4 GHz (wlan0) and 5 GHz (wlan1). 4.3.1 The 'Status' submenu. Current WLAN status This submenu displays the current status of the WLAN. Wireless →... -
Page 28: The 'Basic Settings' Submenu. Basic Settings
NTU-RG-54xx. User manual (user) 4.3.2 The 'Basic settings' submenu. Basic settings This submenu is used for general setup of the WLAN wireless interface parameters and allows users to specify up to three virtual wireless access points. Wireless → wlan0 (2.4GHz) / wlan1 (5GHz) → Basic settings •... -
Page 29: The 'Advanced Settings' Submenu. Advanced Settings
NTU-RG-54xx. User manual (user) The 'Show Active WLAN Client' button outputs the table of active WLAN clients. Wireless → wlan0 (2.4GHz) / wlan1 (5GHz) → Basic settings → Show Active WLAN Client • MAC Address – MAC address of the client; • Tx Packets – amount of packets transmitted to the client; •... -
Page 30: The 'Security' Submenu. Security Settings
NTU-RG-54xx. User manual (user) • Preamble Type – select the preamble - long (Long Preamble)/short (Short Preamble); • Relay Blocking(Enable/Disabled) – enable/disable client blocking; • Protection (Enable/Disabled) – enable/disable 802.11n protection; • Aggregation (Enable/Disabled) – enable/disable frames aggregation to increase the bandwidth; • Short GI(Enable/Disabled) – enable/disable a short guard interval; •... -
Page 31: The 'Access Control' Submenu. Access Settings
NTU-RG-54xx. User manual (user) When selecting WPA/WPA2/WPA2 Mixed encryption mode, the following settings will be available: • Authentication Mode – Enterpris (RADIUS) or Personal (Pre-Shared Key) authentication mode: In the Enterprise (RADIUS) mode perform next settings: • RADIUS Server IP Address – RADIUS server IP address; •... -
Page 32: The 'Wi-Fi Radar' Submenu. Wireless Network Scanning
NTU-RG-54xx. User manual (user) 4.3.6 The 'Wi-Fi radar' submenu. Wireless network scanning Use this menu to scan a wireless network and to detect nearby access points or IBSS. Wireless → wlan0 (2.4GHz) / wlan1 (5GHz) → WiFi radar The table displays the following information: •... -
Page 33: The Services Menu. Service Configuration
NTU-RG-54xx. User manual (user) 4.4 The Services menu. Service configuration 4.4.1 The 'DHCP Setting' submenu. DHCP configuration The menu allows DHCP server and DHCP repeater configuration. Services → DHCP (Server) • DHCP Mode – select operation mode: • NONE – DHCP disabled; •... -
Page 34: The 'Dynamic Dns' Submenu. Dynamic Dns Configuration
NTU-RG-54xx. User manual (user) • DHCP Server IP Address – IP address of the remote DHCP server. To save the changes, click the 'Apply Changes' button. 'Port-Based Filter' and 'MAC-Based Assignment' buttons allow configuring port-based and MAC-based filtering, respectively. 4.4.2 The 'Dynamic DNS' submenu. Dynamic DNS Configuration Dynamic DNS (domain name system) allows information to be updated on DNS server in real time and (optionally) automatically. -
Page 35: The 'Firewall' Submenu. Firewall Configuration
NTU-RG-54xx. User manual (user) DynDns/No-IP Settings: • UserName – user name; • Password – authorization password on the service selected for operation with D-DNS. 'Dynamic DNS Table' table with the list of available DNS displayed in this section. To add a record, click the 'Add' button. - Page 36 NTU-RG-54xx. User manual (user) 4.4.3.2 The 'IP/Port Filtering' submenu. Address Filtering Settings This section is used to configure address filtering. The IP Filtering function filters router traffic by IP addresses and ports.Using these filters can be useful to protect or restrict the local network. Services →...
- Page 37 NTU-RG-54xx. User manual (user) 4.4.3.3 The 'MAC Filtering' submenu. Filtering Settings for MAC Addresses MAC filtration allows traffic to be forwarded or blocked depending on source and destination MAC addresses. To change the mode click the 'Apply Changes' button. Services →...
- Page 38 NTU-RG-54xx. User manual (user) 4.4.3.4 The 'Port Forwarding' submenu. Port forwarding configuration 'Current Port Forwarding Table' with port forwarding information is displayed in this section. Entries in this table allow you to automatically redirect common network services to a specific machine behind the NAT firewall. These settings are only necessary if you wish to host some sort of server like a web server or mail server on the private local network behind your router's NAT firewall.
- Page 39 NTU-RG-54xx. User manual (user) 4.4.3.5 The 'URL Blocking' submenu. Internet access restriction configuration URL filter performs complete analysis and provides access control to specific Internet resources. This section sets and displays a list of forbidden/allowed URLs to visit. Here you can add the forbidden/allowed FQDN (Fully Qualified Domain Name) with the 'Add' button, filtering by keywords is also possible.
- Page 40 NTU-RG-54xx. User manual (user) To save the changes, click the 'Apply Changes' button. All blocked domains are listed in the 'Domain BlockingConfiguration' table, to remove a blocking for one domain, select it and click the 'Delete Selected' button, to remove all restrictions, click the 'Delete All' button. 4.4.3.7 The 'Port Triggering' submenu.
-
Page 41: The 'Upnp' Submenu. Automated Setup Of Network Devices
NTU-RG-54xx. User manual (user) 4.4.4 The 'UPnP' submenu. Automated Setup of Network Devices In this section you can configure Universal Plug and Play (UPnP™) function. UPnP ensures compatibility with network equipment, software and peripheral devices. Services → UPnP The use of UPnP requires NAT setup on an active WAN interface. •... -
Page 42: The 'Samba' Submenu. Configuration Of Samba Users
NTU-RG-54xx. User manual (user) Interfaces with the support for RIP are displayed in the 'RIP Config Table'. To delete all entries in the table click the 'Delete All' button; to delete one position from the list select it and click 'Delete Selected'. 4.4.6 The 'Samba' submenu. -
Page 43: The 'Advance' Menu. Advanced Settings
NTU-RG-54xx. User manual (user) The 'Shares' section is used to add Samba library. Services → Samba → Shares • Share name – library name; • Path – path to library; • Read only – read only; • Write list – list of accounts who can change files in the library; •... -
Page 44: The 'Bridging' Submenu. Bridging Parameters Configuration
NTU-RG-54xx. User manual (user) 4.5.2 The 'Bridging' submenu. Bridging parameters configuration In this section you can configure bridge parameters. Here you can configure aging time of addresses in MAC table as well as to enable/disable 802.1d Spanning Tree. Advance → Bridging •... -
Page 45: The 'Routing' Submenu. Routing Configuration
NTU-RG-54xx. User manual (user) 4.5.3 The 'Routing' submenu. Routing configuration This submenu is used to configure static routing. Advance → Routing To add the static route check 'Enable', fill the corresponding fields and click 'Add Route'. • Enable – flag for route adding; •... -
Page 46: The 'Bridging Grouping' Submenu. Interface Grouping
NTU-RG-54xx. User manual (user) 4.5.4 The 'Bridging grouping' submenu. Interface grouping In this section you can group the interfaces. By default all interfaces are in the same group. To place an interface to a new group, you should: Select a new group from the list below; Select interfaces from the 'Available Interface' list;... -
Page 47: The 'Ipv6' Submenu. Ipv6 Configuration
NTU-RG-54xx. User manual (user) 4.5.6 The 'IPv6' submenu. IPv6 configuration In this section you can enable/disable IPv6 operation. For this you should check 'Enable/Disable'. Advance → IPv6 To save the changes, click the 'Apply Changes' button. 4.5.6.1 The 'RADVD' submenu. RADVD configuration In this submenu you can configure RADVD (Router Advertisement Daemon). - Page 48 NTU-RG-54xx. User manual (user) • DHCPv6 Mode – select mode: • NONE – operation without DHCP server; • DHCPRelay – DHCP repeater operation mode; • DHCPServer (Manual) – manual configuration of DHCP server; • DHCPServer (Auto) – DHCP server autoprovisioning. To save the changes, click the 'Apply Changes' button. After clicking on the 'Show Client' button, a table of active DHCPv6 server IP addresses will be displayed.
- Page 49 NTU-RG-54xx. User manual (user) 4.5.6.5 The 'IPv6 routing' routing. IPv6 routes configuration This section configures static IPv6 routes. Advance → IPv6 → IPv6 routing • Enable – flag for route adding; • Destination – destination address; • Next Hop – next host; • Metric –...
- Page 50 NTU-RG-54xx. User manual (user) • Metric – metric; • Ref – route source; • Use – route usage; • Interface – interface through which the specified route is available. To update the table click 'Refresh'; to close it click 'Close'. 4.5.6.6 The 'IPv6 IP/Port filtering' submenu.
-
Page 51: The 'Diagnostics' Submenu
NTU-RG-54xx. User manual (user) 4.6 The 'Diagnostics' submenu Diagnostics section of access to various network nodes. 4.6.1 The 'Ping' submenu. Checking the Availability of Network Devices Use this menu to test the availability of network devices with Ping utility. Diagnostics →... -
Page 52: The 'Admin' Submenu
NTU-RG-54xx. User manual (user) 4.7 The 'Admin' submenu Device management section. In this menu, you can configure passwords, time, configurations, etc. 4.7.1 The 'Settings' submenu. Configuration restore and reset Admin → Settings → Backup Settings In this section, you can copy the current settings to a file (Backup Settings) by clicking on the 'Backup Settings to File' button. -
Page 53: The 'Gpon Setting' Submenu. Gpon Access Configuration
NTU-RG-54xx. User manual (user) 4.7.2 The 'GPON Setting' submenu. GPON access configuration In this section you can specify the password for activating the terminal on OLT. Admin → GPON Setting • PLOAM Password – password to activate the terminal on OLT. To save the changes, click the 'Apply Changes' button. -
Page 54: The 'Password' Submenu. Access Control Configuration (Setting Passwords)
NTU-RG-54xx. User manual (user) 4.7.5 The 'Password' submenu. Access control configuration (setting passwords) In this section you can change a password to access the device. Admin → Password To change the password, you must enter the existing password in the 'Old Password' field, then the new password in 'New Password' and confirm it with 'Confirmed Password'. ... -
Page 55: The 'Remote Access' Submenu. Remote Access Rules Configuration
NTU-RG-54xx. User manual (user) 4.7.7 The 'Remote Access' submenu. Remote access rules configuration In this section you can configure remote access rules via HTTP/Telnet/ICMP protocols. Admin → Remote Access • Enable – enabling the rule to add; • Service – selection of the protocol used; •... -
Page 56: The 'Time Zone' Submenu. System Time Configuration
NTU-RG-54xx. User manual (user) 4.7.8 The 'Time zone' submenu. System time configuration In this section you can configure the device system time. Synchronization with accurate online time-servers is available. Admin → Time zone • Current time – current time; • Time Zone Select –... -
Page 57: Th 'Pon' Submenu
NTU-RG-54xx. User manual (user) • RX err – errors on receive; • Rx drop – rejected on receive; • Tx pkt – packets sent; • Tx err – transmission error; • Tx drop – rejected on transmission. 4.8.2 Th 'PON' submenu This section displays timers for the optical interface: Statistics →... -
Page 58: The 'Z-Wave' Menu. For Ntu-Rg-5421G-Wz
NTU-RG-54xx. User manual (user) 4.9 The 'Z-Wave' menu. For NTU-RG-5421G-WZ Here you can configure 'Smart Home' parameters. • Zway – enable/disable the 'Smart Home' controller; • Hostname – specify the remote 'Smart Home' platform address; • Destination port – specify the platform port to which the 'Smart Home' controller connects; •... -
Page 59: The List Of Changes
NTU-RG-54xx. User manual (user) 5 The list of changes Document version Suitable firmware version Issue date Revisions Version 1.2 1.2.1 01.2020 Third issue Version 1.1 1.1.0 04.2019 Second issue Version 1.0 1.0.1 11.2018 First issue...
Need help?
Do you have a question about the NTU-RG-5402G-W and is the answer not in the manual?
Questions and answers