Bose 3-2-1 Series II Owner's Manual
Bose owner's guide dvd home entertainment systems 321 series ii, 321gs series ii
Hide thumbs
Also See for 3-2-1 Series II:
- Owner's manual (79 pages) ,
- Service manual (94 pages) ,
- Quick setup manual (2 pages)

Subscribe to Our Youtube Channel
Related Manuals for Bose 3-2-1 Series II


Summary of Contents for Bose 3-2-1 Series II
- Page 1 • • Series II • • Series II D V D H O M E E N T E R T A I N M E N T S Y S T E M S...
- Page 2 EN 60825-1:1994+A1+A2, IEC60825-1:1993+A1+A2. CAUTION: Use of controls or adjustments or performance of procedures other than those specified herein may result in hazardous radiation exposure. The DVD player should not be adjusted or repaired by anyone except properly qualified service personnel.
-
Page 3: Table Of Contents
English Dansk Deutsch Español Français Italiano NTRODUCTION Before you begin ................System features . - Page 4 PERATION Turning your system on and off ..............Playing video DVDs .
-
Page 5: Introduction
Thank you for purchasing the Bose entertainment system, which offers superb sound, elegance, and simplicity in an advanced home audio setup. Using Bose proprietary signal processing technology, the 3•2•1 Series II systems provide improved spaciousness from stereo recordings, and bold movie effects from surround-encoded materials. -
Page 6: Checking For Region Code Compatibility
NTRODUCTION Checking for region code compatibility For a DVD player and DVD disc to be compatible, their region code numbers must match. These numbers are allocated according to where the player and disc are sold. The 3•2•1 Series II DVD home entertainment systems have a region code which must also match the DVD discs. -
Page 7: Limited Warranty
We suggest you keep your sales receipt and product registration together with this owner’s guide. ©2005 Bose Corporation. No part of this work may be reproduced, modified, distributed or otherwise used without prior written permission. Dolby and the double-D symbol are trademarks of Dolby Laboratories. Manufactured under license from Dolby Laboratories. Confidential unpublished works. -
Page 8: Setup
Carefully unpack your system. Save all packing materials, which provide the safest way to transport your system. Check to be sure your system includes the parts shown in Figure 1. If any part of the system appears damaged, do not attempt to use it. Notify Bose or your authorized Bose sheet included in the carton. -
Page 9: Selecting Locations For Your 3•2•1 Series Ii System Components
English Dansk Deutsch Español Français Italiano Selecting locations for your 3•2•1 Series II system components Use the following guidelines and Figure 2 to choose locations and positions for the compo- nents of your 3•2•1 home entertainment system. Note: While these guidelines are offered to help provide great system performance, you may find other placement choices that are more convenient and provide the sound you enjoy. -
Page 10: Placing The Speakers
You may obtain additional rubber feet (part number 178321) from Bose product carton. Note: The speakers can be mounted on Bose brackets, table stands, or floor stands. For order- ing information, refer to “Accessories” on page 54. Additional or longer cables may also be ordered. -
Page 11: Placing The Acoustimass Module
English Dansk Deutsch Español Français Italiano Placing the Acoustimass • Place the Acoustimass (mains) power outlet. • Place the module at the same end of the room as the TV and the speakers (Figure 4). • Keep the module at least 3 feet (1 meter) away from the TV to prevent the module from interfering with the TV screen. -
Page 12: Making System Connections
Note: If additional audio cables or longer cables are needed to make these connections, contact Bose Customer Service. Refer to the list of offices included in the product carton. Connecting the Acoustimass module to the media center Plug one end of the Acoustimass module cable into the Acoustimass Module jack on the rear of the media center (Figure 6). - Page 13 English Dansk Deutsch Español Français Italiano 2. At the other end of the speaker cable, separate the left and right speaker cords as much as necessary to reach each speaker (Figure 8). Figure 8 Separating left and right speaker cords 3.
-
Page 14: Connecting The Supplied Antennas
YSTEM ETUP Connecting the supplied antennas The rear panel of the media center provides jacks for the AM and FM antennas included with your system (Figure 10). Unwind the wires for each antenna to provide the best reception. Figure 10 Antenna connections FM dipole antenna... -
Page 15: Connecting Your Tv To The Media Center
English Dansk Deutsch Español Français Italiano Connecting your TV to the media center Note: If you will be using the 3•2•1 system with both a TV and a VCR, skip this section and go to “Connecting your TV and VCR to the media center” on page 16. Making audio connections Note: If your TV does not have audio output jacks, see “If your TV does not have audio output jacks”... -
Page 16: Connecting Your Tv And Vcr To The Media Center
YSTEM ETUP Connecting your TV and VCR to the media center Note: There are two options for connecting your TV and VCR to the media center. Before you proceed, you must determine if your TV has audio output jacks. Consult your TV owner’s guide if you need assistance. -
Page 17: If Your Tv Does Not Have Audio Output Jacks
English Dansk Deutsch Español Français Italiano If your TV does not have audio output jacks If your TV does not have audio output jacks, you will need to feed audio to the 3•2•1 home entertainment system through a secondary source, such as a VCR. To do this, you will need one additional video cable, which can be purchased at your local electronics store. -
Page 18: Vcr Considerations
Figure 11. For this connection you will need an S-video cable which can be purchased from your Bose dealer or a local electronics retailer. • Insert one end of the S-video cable into the S-Video OUT jack on the media center (Figure 14). -
Page 19: Making Component Video Connections (Highest Quality Video)
TV video input used for that device. To view the onscreen menus of the 3•2•1 system, you will need to switch back to the TV’s component video input. Note: For more information, or to purchase the video cables, contact your local electronics store or authorized Bose dealer. Nederlands Svenska... -
Page 20: Connecting Digital Audio Devices
YSTEM ETUP Connecting digital audio devices Some audio devices may feature a digital audio output for optimum sound performance. Use an optical digital cable or a coaxial digital cable, as appropriate, to connect this output to the digital input on the media center. You can purchase the required cables at a local electronics store. -
Page 21: Media Center Rear Panel
English Dansk Deutsch Español Français Italiano Figure 17 Advanced setup: TV, VCR and cable satellite box CBL SAT S-video output CBL SAT analog audio VCR analog audio Note: For more information on advanced connections, refer to the DVD setup disc that came with your 3•2•1 Series II home entertainment system. -
Page 22: Connecting A Game Console
YSTEM ETUP Connecting a game console Connect the audio output of a game console to the AUX Left and Right input jacks. Con- nect the video output of the game console to the C (composite) Video IN jack. Figure 18 Game console connections Game console connection panel... -
Page 23: Installing The Remote Control Batteries
English Dansk Deutsch Español Français Italiano Installing the remote control batteries 1. On the back of the remote, slide open the battery compartment (Figure 19). 2. Insert the two supplied AA (IEC-R6) 1.5V batteries, or their equivalent, as shown. Match the plus (+) and minus (–) marked on the batteries with the plus (+) and minus (–) inside the battery compartment. -
Page 24: Connecting The Power Cord
Figure 20 Connecting to power Note: Bose recommends using a safety agency-approved surge protector on all electronic equipment. Voltage variations and spikes can damage electronic components in any system. A quality suppressor can eliminate the vast majority of failures attributed to surges and may be purchased at electronics stores. -
Page 25: Checking Your System Setup
English Dansk Deutsch Español Français Italiano Checking your system setup Follow these steps when turning on your system for the first time. Be sure to perform step 4 and play the setup DVD. The setup DVD can help you verify that you set up your system cor- rectly for proper sound performance. -
Page 26: Ontrols And Indicators
• Silences or restores the sound from the current source. • Selects the built-in CD/DVD player and turns the system on. • Selects the built-in tuner and turns the system on to the previously selected FM/ AM station. - Page 27 English Dansk Deutsch Español Français Italiano Remote control – cont. Requires special remote settings. See “Setting up your remote to control other audio/video devices” on page 30. Nederlands Svenska • Puts the Settings menu for the current source on your TV screen or media center display.
- Page 28 YSTEM ONTROLS AND NDICATORS Remote control – cont. Requires special remote settings. See “Setting up your remote to control other audio/video devices” on page 30. Svenska Nederlands Français Italiano • Raises or lowers the volume of the current source. • Pressing + restores muted sound from the current source. •...
- Page 29 English Dansk Deutsch Español Français Italiano Remote control – cont. Aspect ratio or Teletext On/Off control You will see one of two symbols below this button on your remote control. The symbol defines the function. Symbol Recording/Cable or Teletext controls These four buttons will be marked in one of two ways on your remote.The markings define how the buttons are used.
-
Page 30: Setting Up Your Remote To Control Other Audio/Video Devices
YSTEM ONTROLS AND NDICATORS Setting up your remote to control other audio/video devices Your remote can be set up to control other audio devices such as a TV, VCR, DVR or cable/satellite box by entering a device code while in the setup mode. •... -
Page 31: Searching For A Device Code
English Dansk Deutsch Español Français Italiano To set up the remote to control your cable/satellite box 1. Turn on both the 3•2•1 system and your cable/satellite box. 2. Press and hold the CBL SAT button until the remote LED is lit (about five seconds). 3. - Page 32 YSTEM ONTROLS AND NDICATORS To set up the remote to control your cable/satellite box 1. Turn on both the 3•2•1 system and your cable/satellite box. 2. Press and hold CBL SAT until the remote LED is lit (about five seconds). 3.
-
Page 33: Verifying An Entered Device Code
English Dansk Deutsch Español Français Italiano Verifying an entered device code In case you need to check to see what code the remote is using for a particular audio device, do the following: 1. Press and hold a source key (TV, CBL SAT, or AUX) until the remote LED lights (about five seconds) 2. -
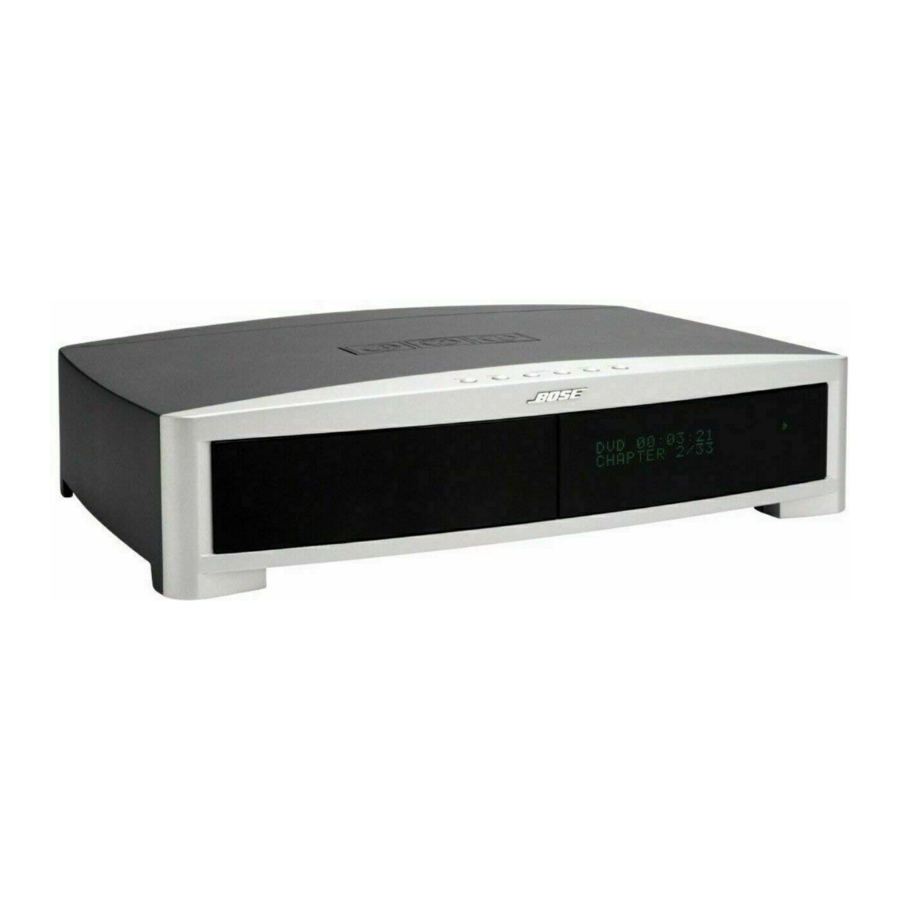
Page 34: The Media Center
YSTEM ONTROLS AND NDICATORS The media center The media center has a control panel on the top, a display area to show the current status of the system, and a disc tray that opens on the front of the console. Control panel The media center has six buttons located on the top control panel. -
Page 35: Operation
English Dansk Deutsch Español Français Italiano Turning your system on and off To turn power on or off: • Point the 3•2•1 remote at the media center and press On/Off. • Press On-Off on top of the media center. To turn the system on to a source: •... -
Page 36: Basic Dvd Operations
PERATION While a DVD video is playing, elapsed play time and chapter number are displayed on the media center front panel. Figure 23 D V D 0 : 0 6 : 1 1 Sample display for a DVD video CHAPTER 1/12 Basic DVD operations •... -
Page 37: Playing Audio Cds
English Dansk Deutsch Español Français Italiano Playing audio CDs On the 3•2•1 remote, press CD/DVD to turn the 3•2•1 system on to the CD/DVD source. Eject 2. On the media center control panel, press Eject to open the disc tray. 3. -
Page 38: Listening To Fm/Am Radio
PERATION Listening to FM/AM radio On the 3•2•1 remote, press FM-AM. If the system is off, the radio will turn on to the most recently selected station. Tuning to a station You can tune to a radio station in any of the following ways: •... -
Page 39: Erasing A Preset
English Dansk Deutsch Español Français Italiano Erasing a preset 1. Tune to the preset station. 2. Press and hold the 0 button on the remote until the media center display tells you that the preset is erased. Playing other sources Turn on any component connected to the media center by using the remote for that compo- nent or controls on the component front panel. -
Page 40: Changing Source Settings
HANGING OURCE Using the settings menus While watching a video or listening to music on your system, you can make quick adjust- ments that will increase your enjoyment of the program. For that purpose, each source you use with this system has its own Settings menu with features appropriate to that source. To view the settings menus You can see the Settings menu for each source on your TV screen (Figure 24) and on the display panel of your media center (Figure 25). -
Page 41: To Make Changes In The Settings Menus
English Dansk Deutsch Español Français Italiano To make changes in the settings menus Whether you use your TV screen or the media center display to change settings, the same instructions apply. You can use the actions above to change back to the original (default) settings, too. Do that if you do not like the effect of a change you have made, or accidentally made a change you did not intend. -
Page 42: Fm/Am Settings Menu
HANGING OURCE ETTINGS FM/AM settings menu To see the FM/AM Settings menu, press FM-AM on the remote. Then press Settings. Press Exit to remove the menu from the screen. Item CD settings menu To see the CD Settings menu, press CD-DVD on the remote while playing an audio CD. Then press Settings. -
Page 43: Dvd Settings Menu
English Dansk Deutsch Español Français Italiano DVD settings menu To see the DVD Settings menu, press CD-DVD on the remote while playing a DVD video disc. Then press Settings. Press Exit to remove the menu from the screen. Item Name Movie EQ* Range Compression* On, Off Mono Decoding*... -
Page 44: Tv, Cbl Sat, And Aux Settings Menu
HANGING OURCE ETTINGS TV, CBL SAT, and AUX settings menu The settings below affect programs on the TV, even when the source of the program is VCR, CBL SAT or AUX. There are no separate setting menus for these sources. Movie EQ, Range Compression and Mono Decoding appear in the menu only if Audio Processing is set to User Adjustable. -
Page 45: Changing System Options
English Dansk Deutsch Español Français Italiano Using the System menu Changes to system options are typically made only once. If your system operates as you want it to, there may be no need for any changes. In some cases, however, changes are required to make the system fully compatible with the installation options you have chosen. -
Page 46: To Change System Options
HANGING YSTEM PTIONS To change system options Changing system options in this menu is similar to changing the settings for a source. 1. Turn on your TV and select the correct TV input to view your 3•2•1 system. 2. Press the System button on your 3•2•1 remote control. 3. -
Page 47: Audio Options
Decreased (–) or increased (+) low-frequency reproduction. 0 [default] Normal high-frequency reproduction. –14 to +14 Decreased (–) or increased (+) high-frequency reproduction. Automatic [default] Standard Bose ® User Adjustable Processing options (Movie EQ, Range Compression, Mono Decoding) available in Source Settings menus. Normal [default] Standard signal level (loudness). -
Page 48: Video Options
HANGING YSTEM PTIONS Video options The video options affect the way the picture looks on your TV. Figure 29 Video system options navigate System Option Settings TV Aspect Ratio Normal [default] Widescreen Widescreen DVDs Modified [default] Unmodified Video Connector Composite + S-Video [default] Component Video Black Level Normal [default]... -
Page 49: Media Center Options
Bose link Room B [default], C, D, E, F, G, H, I, J, K, Code* L, M, N, or O Restore Settings Appears only when a Bose link source is connected. Nederlands Svenska select navigate Description Media center display lights with a mid-range brightness. -
Page 50: Remote Control Options
HANGING YSTEM PTIONS Remote control options The Remote Control options help you set up your remote to control other audio devices that are connected to your system. Figure 31 Remote Control system options navigate System Option Settings TV Brand Brand name TV Device Code Code number CBL SAT Device... -
Page 51: Dvd Lock Options
English Dansk Deutsch Español Français Italiano DVD Lock options The DVD Lock options allow you to restrict viewing of DVD videos with certain ratings. To activate this feature, you need to set a level of restriction and establish a password in the DVD Lock section of the System menu. -
Page 52: Motion Picture Association Of America (Mpaa) Rating System
HANGING YSTEM PTIONS 5. Enter your four-digit password. 6. Using the down ( ) button, scroll down to Lock Discs Rated Above. 7. Press the right arrow ( ) button to see the available settings. 8. Press the up ( ) or down ( ) arrow button to find the rating you want. 9. -
Page 53: Maintaining Your System
English Dansk Deutsch Español Français Italiano Cleaning Cleaning the media center • Use only a soft, dry cloth to clean the outside surfaces of the media center. • Do not use any sprays near the system. Do not use any solvents, chemicals, or cleaning solutions containing alcohol, ammonia, or abrasives. -
Page 54: Replacing The Remote Control Batteries
The Bose Bose mounting accessories, including the UB-20 wall brackets, UFS-20 floor stands and UTS-20 table stands (Figure 35). Bose also offers cable adapters for use in running speaker cable through walls. For further information or to order the mounting brackets, stands, or cable adapters, contact your Bose dealer or Bose Corporation directly. -
Page 55: Troubleshooting
• Unplug the Acoustimass module power cord from the outlet for one minute, then recon- nect it. This allows the unit to reset itself. After reconnecting the power cord, wait for the message, “BOSE 3•2•1” to appear on the media center display. Disc won’t eject •... -
Page 56: Customer Service
See “Video options” on page 47. You forgot your • Enter the password 2673 to access the parental controls and create a new password. password Customer service For additional help in solving problems, contact Bose address list included in the carton. Svenska Nederlands Français Italiano ®... -
Page 57: Technical
Power rating USA/Canada: 120V 60Hz 300W International: 220-240V 50/60Hz 300W Dual voltage: 115/230V 50/60Hz 300W Audio inputs AUX – Left, Right (analog); D (digital) CBL SAT – L, R (analog); D (digital) TV – L, R (analog); D (digital) Optical – SPDIF digital, mapped to input Audio outputs Acoustimass ®... -
Page 58: Device Codes
EVICE ODES Finding the right device codes Using the right device codes, you can set up your new universal remote to control the video devices you want to use with your speaker system. For the remote setup procedure, see your owner’s guide. To find available codes for a device, search the listing under the appropriate device type heading. - Page 59 Television A-Mark ... 0003 Abex ... 0032 Addison ... 0092, 0108, 0653, 1150 Admiral ... 0093, 0463 Advent ... 0761, 0783, 0815, 0817, 0842 Adventura... 0046 Adyson ... 0032, 0217 AEA ... 0037 AEG ... 0606 Agashi ... 0217 Aiko ... 0037, 0092, 0217 Aim ...
- Page 60 EVICE ODES Conrowa... 0145, 0156, 0698, 1156 Contec... 0037, 0157, 0180, 0185, 0698 Cosmel ... 0037 Craig... 0180 Crosley ... 0054 Crown... 0037, 0039, 0053, 0180, 0208, 0370, 0486, 0606, 0672, 0714 Crown Mustang... 0672 Curtis Mathes... 1347, 1147, 0702, 0466, 0451, 0166, 0154, 0145, 0093, 0060, 0056, 0054, 0051, 0047, 0039, 0030,...
- Page 61 Harley Davidson ... 0179 Harman/Kardon... 0054 Harsper... 0865 Harvard... 0180 Harwood... 0032, 0037 Havermy ... 0093 HCM ... 0037, 0217, 0282, 0606 Helios ... 0865 Hello Kitty... 0451 Hema... 0217 Hher... 0714 Himitsu ... 0180, 0628 Hinari ... 0037, 0179 Hisawa...
- Page 62 EVICE ODES Materin ... 0208 Matsui... 0037, 0177, 0195, 0208, 0217, 0335, 0443, 0556, 0629, 0714, 1037 Matsushita... 0051, 0250, 0650 Matsuviama... 0587 Maxent ... 1755 Mediator ... 0037 Medion ... 0037, 0512, 0556, 0698, 0714, 0808, 0880, 1037, 1248 Megapower ...
- Page 63 Pye ... 0037, 0556 Qingdao... 0051, 0208, 0226, 0817 Qualcraft... 0039 Quasar... 0051, 0055, 0165, 0250, 0650, 0865 Quelle ... 0037, 0512, 1037 Questa... 0032 R-Line... 0037 Radiola ... 0037, 0217, 0556 Radiomarelli ... 0037 RadioShack... 0019, 0030, 0032, 0037, 0039, 0047, 0056, 0154, 0165, 0178, 0180 Radiotone...
- Page 64 EVICE ODES Synco ... 0000, 0060, 0092, 0093, 0178, 0451 Sysline... 0037 T+A... 0447 Tacico ... 0092, 0178, 0179, 1150 Tai Yi ... 1150 Taishan ... 0817 Tandy... 0039, 0093, 0217 Targa... 0702 Tashiko ... 0032, 0092, 0146, 0217, 0650, 1150 Tatung...
- Page 65 Cable box ABC ... 0001, 0003, 0007, 0008, 0011, 0013, 0014, 0017, 0237 ADB ... 1063, 1230, 1269 Aichi Denshi ... 1512 Alcatel ... 0896 Allegro ... 0153, 0315 Americast ... 0899 Amstrad... 1222 Antronix ... 0022, 0207 Archer... 0022, 0153, 0207, 0797 Auna ...
- Page 66 EVICE ODES Timeless ... 0040 Tocom... 0012, 0013 Torx... 0003 Toshiba ... 0000, 1509 Trans PX ... 0153, 0276, 0315 TransACT... 1106 Tri-Vision... 1257 Tristar... 0883 TS ... 0003 Tusa... 0015 TV86 ... 0063 Unika ... 0022, 0153, 0207 United Artists... 0007 United Cable ...
- Page 67 Hauppauge... 1294 HB ... 1214 HDT ... 1159 Hirschmann ... 0173, 0299, 1111 Hisense ... 1535 Hitachi ... 0819, 1250, 1284, 1518, 1523, 1525 Homecast ... 1214 HTS ... 0775, 1775 Hughes ... 0749, 0819, 1442, 1749 Hughes Network ... 0749, 1142, 1442, 1443, Systems 1444, 1749...
- Page 68 EVICE ODES Sedea Electronique ... 1105, 1206, 1283 SEG ... 1075, 1251 Serino ... 0610 Servi Sat... 0713 ServiSat... 1251 Sharp... 1489, 1517 Siemens ... 0173, 1657 Silva... 0299 Skantin ... 0713 SKR ... 0713 SKT... 1449 SKY ... 0099, 0847, 0856, 1175, 1847, 1848, 1856 SKY Italia...
- Page 69 Brandt ... 0503, 0551, 0651 Broksonic ... 0695, 0868 Bush ... 1695, 1165, 1128, 1051, 1021, 0884, 0879, 0833, 0831, 0778, 0758, 0730, 0717, 0713, 0699, 0695, 0690, 0676, 0672, 0516 C-Tech... 0798 California ... 0490 Audio Labs Cambridge Audio ... 1109 Cambridge ...
- Page 70 EVICE ODES ISP... 0695 Jaton ... 0665, 1078 JBL ... 0702 JDV... 1367 Jeken... 0699 Jensen... 1016 Jindian... 0799 JMB... 0695 JNC ... 0672 JSI ... 1423 JVC... 0503, 0539, 0558, 0623, 0867, 1164, 1241, 1275 jWin ... 1049, 1051 Karcher...
- Page 71 Princeton ... 0674 Prinz ... 0831 Prism ... 0705 Proceed... 0672 Proline ... 0651, 0672, 0833, 1004 Proscan ... 0522 Proson ... 0713 Prosonic ... 0752 ProVision ... 0699, 0778 Qwestar... 0651 Radionette... 0741, 0869 Raite ... 0665 RCA ... 0522, 0571, 0717, 0769, 0790, 0822, 1022, 1132, 1193 REALmagic...
- Page 72 EVICE ODES Voxson... 0690, 0730, 0831 Walkvision ... 0717 Welkin... 0831 Wellington... 0713 Wesder ... 0699 Wharfedale ... 0698, 0752, 0768, 0790 Wilson... 0831 Windsor ... 0713 Windy Sam ... 0573 WIZE... 1115 Woxter ... 1005, 1224 Xbox ... 0522 Xenius...
- Page 73 Emerson ... 1593, 1479, 1278, 0637, 0593, 0561, 0479, 0348, 0343, 0278, 0240, 0209, 0208, 0184, 0121, 0072, 0061, 0045, 0043, 0037, 0035, 0002, 0000 ESC ... 0020, 0240, 0278 Europhon... 0020 Fenner ... 0020 Ferguson ... 0000, 0041, 0278, 0320 Fidelity...
- Page 74 EVICE ODES Melectronic... 0000, 0037, 0038 Memorex ... 1262, 1237, 1162, 1048, 1037, 0579, 0479, 0348, 0307, 0240, 0209, 0162, 0104, 0048, 0047, 0046, 0039, 0037, 0035, 0000 Memphis ... 0072 Mercury ... 0020 Metronic ... 0081 Metz ... 0037, 0081, 0162, 0226, 0347, 0836, 1162, 1562 MGA ...
- Page 75 Seleco ... 0020, 0037, 0041 Semp... 0045 Sentra... 0020, 0072 Serie Dorada ... 0037 Sharp... 0037, 0048, 0062, 0209, 0807, 0848, 1048, 1285, 1400 Shinco ... 0000 Shintom ... 0072, 0104 Shivaki... 0037 Shogun... 0240 Siemens ... 0037, 0046, 0081, 0104, 0320, 0347 Siera ...
- Page 76 EVICE ODES Mind ... 1972 Niveus Media ... 1972 Northgate ... 1972 Panasonic... 0616, 1244, 1807 Philips... 0618, 0739, 1340 RCA ... 0880 ReplayTV ... 0614, 0616 Sonic Blue ... 0614, 0616 Sony ... 0636, 1447, 1972 Stack 9 ... 1972 Systemax ...
- Page 77 Combination TV/VCR TV/VCR combination Aiwa... 0000, 0468, 0479, 0680, 0687, 0742, 1336, 1468 America Action... 0278 Audiovox ... 0278 Broksonic ... 0002, 0479, 1479 Citizen ... 1278 Colt... 0072 Curtis Mathes ... 1035 Daewoo ... 0637, 0844, 1278 Dick Smith ... 0579 Electronics Digitor...
- Page 78 EVICE ODES Teac... 0833, 1483 Toshiba ... 0503 Zenith ... 0741, 0869 CBL/DVR Cable/DVR combination Americast ... 0899 Digeo ... 1187 Freebox ... 1482 General Instrument... 0476, 0810 Jerrold ... 0476, 0810 Motorola ... 0476, 0810, 1106, 1187, 1376 Nokia ... 1569 Noos...
Need help?
Do you have a question about the 3-2-1 Series II and is the answer not in the manual?
Questions and answers
I am missing parts from a PS3-2-1 II system specifically the remote an fm antenna/cord, and a module cable. Are these available from Bose or must I find them on a secondary market?