Chiayo SM-6100 IrDA Quick Start Manual
Uhf belt-pack transmitter
Hide thumbs
Also See for SM-6100 IrDA:
- Operation manual (8 pages) ,
- Operation manual (4 pages) ,
- Operation manual (12 pages)
Advertisement
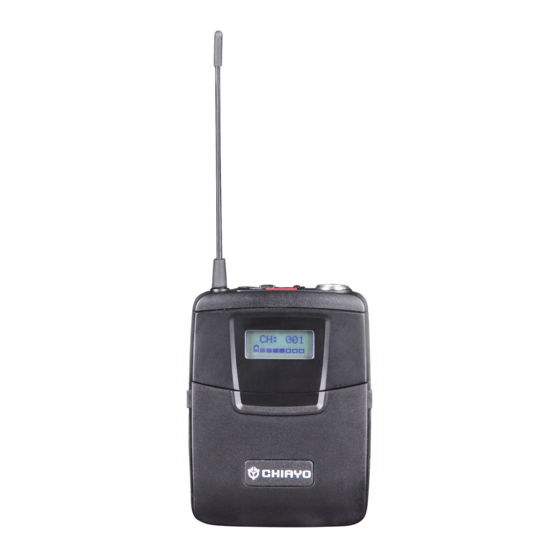
UHF belt-pack transmitter SM-6100 IrDA
Parts and functions
1. Antenna
2. LCD
3. Cover release button
4. IrDA synchronizing button
5. Menu button
6. Setting button
7. High-impedance gain control (GT)
8. Low-impedance gain control (MT)
9. Battery compartment
10. Power switch
11. Battery power LED
12. IrDA sensor area
13. Audio input connector
14. Charging contacts
Battery installation & indicator
This belt-pack requires 2 x AA batteries to operate.
To install, open the battery cover using the cover release buttons and insert the batteries into
the battery compartment.
Note: Batteries contain a corrosive acid that may leak and damage the belt-pack when stored
for a long period. Batteries should be removed from the belt-pack before storing without use for
more than 4 weeks.
When the transmitter is switched ON, the battery power LED (red) will blink once to denote the
batteries installed are in good condition. If the LED remains illuminated the batteries have
expired and require replacement.
GAIN setting (GT|MT)
Gain control enables the user to set different output levels.
GT ⑧ is for the use of instrument with high impedance, such as guitar.
MT ⑨ is for the use of low impedance such as lapel or headset
microphones.
1
3
-1-
C H : 0 0 1
2
3
12
5
6
7
8
4
9
10 11
13
14
Advertisement
Table of Contents

Related Manuals for Chiayo SM-6100 IrDA


Summary of Contents for Chiayo SM-6100 IrDA
- Page 1 UHF belt-pack transmitter SM-6100 IrDA C H : 0 0 1 Parts and functions 1. Antenna 2. LCD 3. Cover release button 4. IrDA synchronizing button 5. Menu button 6. Setting button 7. High-impedance gain control (GT) 8. Low-impedance gain control (MT) 10 11 9.
- Page 2 Channel synchronizing of the receiver and transmitter Align infrared areas of the receiver and transmitter within 30cm. < 30cm A. Changing the receiver’s channel B. Changing the transmitter’s channel 1. Press the synchronizing button of the 1. Press the synchronizing button of the receiver transmitter.
- Page 3 Channel setting 1. Use MENU button⑥ to go to the 2. Press and hold the SET button⑦ for 3 CHANNEL|FREQUENCY page. seconds, then the upper-right channel number will flash to allow changes to be made. C H : 0 0 1 C H : 0 0 1 ►...
Need help?
Do you have a question about the SM-6100 IrDA and is the answer not in the manual?
Questions and answers