Table of Contents
Advertisement
Table of Contents
. . . . . . . . . . . . . . . . . . . . . . . . . . . . . . . . . . . . . . . . . . . .
. . . . . . . . . . . . . . . . . . . . . . . . . . . . . . . . . . . . . . . . . . . . . . . . . . .
. . . . . . . . . . . . . . . . . . . . . . . . . . . . . . . . . . . . . . . . . . . . . . . .
. . . . . . . . . . . . . . . . . . . . . . . . . . . . . . . . . . . .
. . . . . . . . . . . . . . . . . . . . . . . . . . . . . . . . . . . . . . . . . . . . .
. . . . . . . . . . . . . . . . . . . . . . . . . . . . . . . . . . . . . . . . . . . . . .
. . . . . . . . . . . . . . . . . . . . . . . . . . . . . . . . . . . . . . . . . . . . .
. . . . . . . . . . . . . . . . . . . . . . . . . . . . . . . . . . . . . . . . . .
. . . . . . . . . . . . . . . . . . . . . . . . . . . . . . . . . . . . . . . . . . . . . . . . . .
lci1.com
. . . . . . . . . . . . . . . . . . . . . . . . . . .
. . . . . . . . . . . . . . . . . . . . . . . . . . . . . . . . . . .
574-537-8900
JT's Strong Arm
Installation and Owner's Manual
(For Aftermarket Applications)
JT's Strong Arm
Installation and
Owner's Manual
(For Aftermarket Applications)
JT Strong Arm Aftermarket Kits
2
Part #
Description
2
Jack Stabilizer, 5th Wheel - 58" or more between
191023
front jacks
3
Jack Stabilizer, 5th Wheel, Short - Less than 58"
191024
between front jacks
3
3
4
4
4
11
11
11
1
CCD-0001455
™
TM
Rev: 10.23.19
Advertisement
Table of Contents

Related Manuals for Lippert Components JT’s Strong Arm 191023


Summary of Contents for Lippert Components JT’s Strong Arm 191023
-
Page 1: Table Of Contents
JT’s Strong Arm ™ Installation and Owner’s Manual (For Aftermarket Applications) JT’s Strong Arm Installation and Owner’s Manual (For Aftermarket Applications) Table of Contents JT Strong Arm Aftermarket Kits Introduction Part # Description ..........Safety Jack Stabilizer, 5th Wheel - 58”... -
Page 2: Introduction
JT’s Strong Arm ™ Installation and Owner’s Manual (For Aftermarket Applications) Introduction The JT Strong Arm Stabilizer System is a locking bracket ® system used to stabilize and eliminate chassis movement WHEN USED WITH AN AUTOMATIC LEVELING in travel trailers and 5th Wheels using a triangulation SYSTEM, STRONG ARMS MUST BE UNLOCKED system attached to the coach’s landing gear or jacks and BEFORE RETRACTING THE JACKS. -
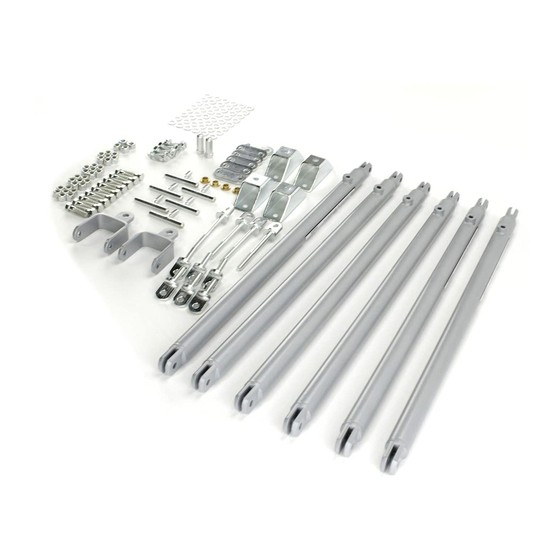
Page 3: Parts List
JT’s Strong Arm ™ Installation and Owner’s Manual (For Aftermarket Applications) Parts List P/N 191024 - Jack Stabilizer, 5th Wheel, Short - P/N 191023 - Jack Stabilizer, 5th Wheel - 58” or Less than 58” between front jacks more between front jacks Letter Part# Description Letter Part#... -
Page 4: Resources Required
JT’s Strong Arm ™ Installation and Owner’s Manual (For Aftermarket Applications) Resources Required Preparation • Tape measure 1. Make sure to park the trailer on solid, level ground. • Felt-tip black marker 2. Clear all jack landing locations of debris and •... - Page 5 JT’s Strong Arm ™ Installation and Owner’s Manual (For Aftermarket Applications) 3. At the front of the chassis, measure the inside distance C. To prevent accidental damage to personal property, between the front electric leveling jacks just below the clear the center compartment of any valuables. frame of the chassis.
- Page 6 JT’s Strong Arm ™ Installation and Owner’s Manual (For Aftermarket Applications) 5. Mark the bottom of the cross-member centered between pad 1/4” from the front edge of the compartment. the front electric jacks. Mark the center of one of the C.
- Page 7 JT’s Strong Arm ™ Installation and Owner’s Manual (For Aftermarket Applications) E. Remove tap or bolt and secure spacer mount with a II. Apply a thin layer of grease to a 3/8” washer and 3/8” - 16 x 1” self-tapping bolt, taking care to keep the place on outside of clevis, over the swing bolt.
- Page 8 JT’s Strong Arm ™ Installation and Owner’s Manual (For Aftermarket Applications) C. Secure a stiffening pad to the bottom of the main rail D. Tap the 5/16” holes with either a 3/8” - 16 tap or a 3/8” - flange using a 3/8” - 16 x 1 1/4” swing bolt, a 3/8” washer 16 x 1”...
- Page 9 JT’s Strong Arm ™ Installation and Owner’s Manual (For Aftermarket Applications) B. Reassemble stabilizer tubes with the inner tube C. Tighten nut until the stabilizer tubes swing to the sticking out past the end of the outer tube by 5”. Tighten ground with resistance.
- Page 10 JT’s Strong Arm ™ Installation and Owner’s Manual (For Aftermarket Applications) II. Insert a 3/8” - 16 x 1 1/4” swing bolt with the tab 18. Prepare spacer mounts as described in step 8. Rotate pointing to the rear of the chassis. Secure with a 3/8” stabilizer tubes toward center of chassis and upward to washer and 3/8”...
-
Page 11: Operation
JT’s Strong Arm ™ Installation and Owner’s Manual (For Aftermarket Applications) Operation Notes 1. Level your trailer side-to-side. 2. Lower the front of the trailer 3/4” lower than the rear. 3. Lower and set rear jacks evenly. 4. Tighten the T-Bolts on the two rear Strong Arm Jack Stabilizers. - Page 12 (For Aftermarket Applications) Notes Manual information may be distributed as a complete document only, unless Lippert Components provides explicit consent to distribute individual parts. All manual information is subject to change without notice. Revised editions will be available for free download at lci1.com.
Need help?
Do you have a question about the JT’s Strong Arm 191023 and is the answer not in the manual?
Questions and answers