Advertisement
Quick Links
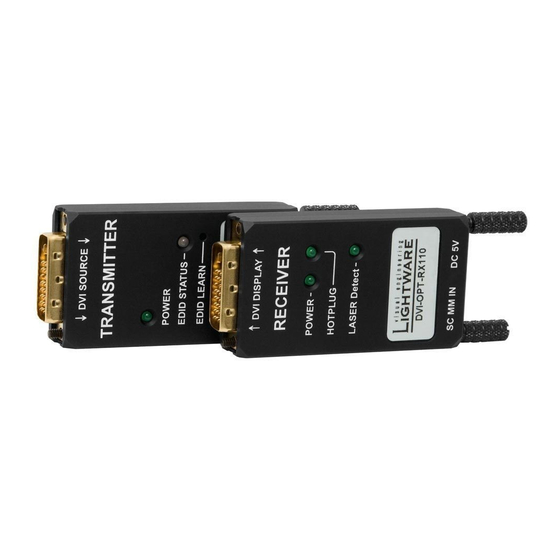
Installation
1. Connect a multimode SC fiber cable to the SC MM IN connector on the RX110 unit.
2. Supply the RX110 unit with +5V DC either of the following options:
a. Plug in the power adaptor to an electrical outlet, and then connect the DC cable to the
receiver unit (RX 110) or
b. Connect the receiver unit to the USB connector with the enclosed USB power cable.
3. Connect the receiver unit to a DVI display (e.g. monitor).
4. Power on the display device (monitor).
5. Connect the other end of the multimode SC fiber cable to the SC MM OUT connector on the
transmitter (TX110) unit.
6. Connect the transmitter to a DVI source (e.g. computer).
7. Power on the DVI source (computer). It reads the EDID from the transmitter, and outputs the
video signal according to the set resolution.
8. Check the LEDs on the transmitter
a. If both the power LED and the EDID status LEDs are green, the transmitter is ready to
use.
b. If the power LED does not light up, the DVI source does not send enough power through
the DVI connector, so the external power adaptor or the special USB power cable needs
to be connected to the transmitter.
c. If the EDID state LED lights red, an EDID has to be learned.
Using the LEARN button (TX110)
▪ When the button is pressed the EDID state LED turns off to indicate the button press.
▪ If the button is released sooner than 2 seconds, the press will be ignored.
▪ If the button is pressed for more than 2 seconds, the EDID learn mode gets activated for a
period of 10 seconds.
▪ If the button is pressed for more than 10 seconds and the unit is not connected to a display
device, the factory default EDID will be restored.
EDID status LED legend (TX110)
LED light
GREEN continuous
RED continuous
ORANGE continuous
GREEN blinking
RED blinking
ORANGE blinking
ORANGE slow blink
www.lightware.eu
For technical support contact support@lightware.eu
Meaning
EDID valid
EDID invalid
EDID learn mode active
EDID learn success
EDID learn failed
Reloading factory EDID
Laser module failure
Learning an EDID (TX110)
1. Plug in the power adaptor to an electrical outlet, or plug in the enclosed USB power cable to
an USB connector, and then connect the DC cable to the transmitter.
2. The power and the EDID state LEDs light up.
3. Press and hold down the LEARN button for two seconds. The EDID state LED goes dark, and
then lights up orange to indicate that learn mode is activated.
4. Connect the transmitter to a display device.
5. (The learn mode is active for 10 seconds).
6. The transmitter reads the EDID from the display device. Do not disconnect the device while it
lights orange (approximately 10 seconds).
7. Check if the learning succeeded:
a. If the learning process was successful, the EDID state LED blinks slowly green for 8
seconds. The stored EDID is changed.
b. If the learning process failed, the EDID state LED blinks slowly red for 8 seconds. The
previously stored EDID remains in memory.
c. The EDID state LED changes continuous green or red depending on the validity of the
stored EDID.
8. Disconnect the transmitter (if still connected) and the power supply. The stored EDID
remains in memory until it is overwritten. The unit is ready to be use for DVI signal extension.
Restoring the factory default EDID (TX110)
1. Power up the transmitter by
a. using one of the external power supply
b. connecting it to a DVI source.
2. Press and keep the LEARN button pressed. The EDID state LED goes dark for two seconds,
and then turns continuous orange to indicate that learn mode is activated. (Do not connect
the unit to a display device.)
3. Keep the button pressed until the LED starts to blink orange (after approximately 10
seconds). Five blinks indicate the EDID restore process.
4. After the restore process is finished, the LED blinks slowly green for 8 seconds. The stored
EDID is changed back to factory default.
5. The unit is ready to be used for DVI signal extension.
Troubleshooting
▪ After powering on the TX110 unit shows its three-digit firmware version with red, green and
orange blinks (FW 1.1.5 is: 1x red, 1x green, 5x orange)
▪ Some DVI sources may not supply enough power to the transmitter. Use one of the external
power supply methods in this case.
▪ If the image is noisy make sure that the fiber cable plugs are clean.
DVI-OPT-TX110 and DVI-OPT-RX110
Quick Start Guide
DVI-OPT-TX110 firmware version: 1.1.6
Document revision: 1.0
Advertisement

Related Manuals for Lightware DVI-OPT-TX110


Summary of Contents for Lightware DVI-OPT-TX110
- Page 1 ORANGE slow blink Laser module failure ▪ If the image is noisy make sure that the fiber cable plugs are clean. www.lightware.eu DVI-OPT-TX110 firmware version: 1.1.6 For technical support contact support@lightware.eu Document revision: 1.0...
- Page 2 SC type receptacle for multimode fiber output. Thumb-screw Recessed, slotted thumbscrew for easy mounting by Thumb-screw Recessed, slotted thumbscrew for easy mounting by hand or by screwdriver. hand or by screwdriver. www.lightware.eu DVI-OPT-TX110 firmware version: 1.1.6 For technical support contact support@lightware.eu Document revision: 1.0...
Need help?
Do you have a question about the DVI-OPT-TX110 and is the answer not in the manual?
Questions and answers