Advertisement
Table of Contents
Can-am
2014-2016 can-am
Installation Instructions
Important
Thank you for purchasing Rigid Industries® products for your Can-Am®. Installation is fairly simple
with the right tools and good mechanical abilities. If you are not confident in your mechanical skills,
please seek the help of a professional to perform the installation. Please read through all of these
instructions and tips before proceeding with the installation.
It is strongly recommended that this product be installed by a professional.
Always disconnect any power sources connected to your
vehicle before servicing fuses or electrical systems.
step 1
Draw a line on all three hood tabs, flush to
the hood brace (use the hood brace as a
guide) before removing the hood.
See Figure 1.
maverick
®
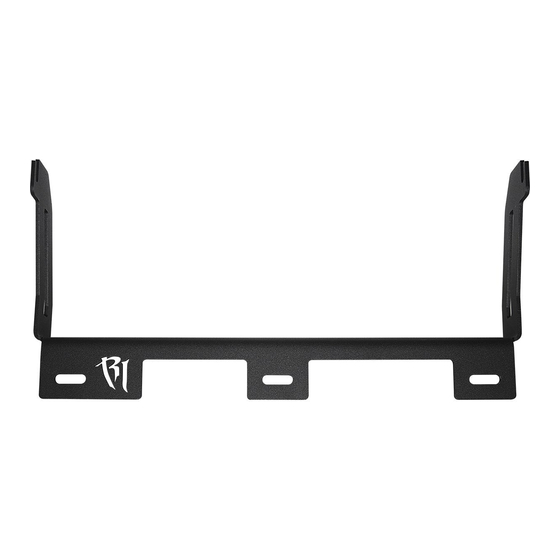
HOOD MOUNT
Fits (1) 10" SR-Series
*Light sold separately
maverick
®
®
kit includes
(1) Single-Piece Mount #46549
(3) 1/4-20 x 5/8" Hex Head Self Drilling Screw
Figure 1
Figure 7.
X
DS
®
®
X
DS
®
®
Advertisement
Table of Contents

Subscribe to Our Youtube Channel
Related Manuals for Rigid Industries HOOD MOUNT 46549


Summary of Contents for Rigid Industries HOOD MOUNT 46549
- Page 1 (3) 1/4-20 x 5/8” Hex Head Self Drilling Screw Important Thank you for purchasing Rigid Industries® products for your Can-Am®. Installation is fairly simple with the right tools and good mechanical abilities. If you are not confident in your mechanical skills, please seek the help of a professional to perform the installation.
- Page 2 step 2 Figure 7. Figure 2 Remove hood then tape off the three marked tabs. Use tape as guide to cut tabs off. Remove tabs. See Figure 2. Figure 2.1 Figure 7. Figure 2.2 step 3 Cut factory zip tie holding vent tubes on the square bar under the hood. See Figure 3.
- Page 3 Center Rigid Industries mount and mark (3) 1/8” holes to be drilled. See Figure 4. Figure 4.1 Figure 7. Figure 4.2 step 5 Install Rigid Industries mount with (3) 1/4-20 X 5/8” Hex Head Self-Drilling Screw. See Figure 5. Figure 5...
- Page 4 Follow us on facebook at Facebook.com/RigidIndustries 779 N Colorado St, Gilbert, AZ 85233 • 855-760-5337 • www.rigidindustries.com PKG-IS-184-A Rigid Industries, Rigid, SR-Series, are registered and/or common law marks owned by JST Performance, LLC, a Delaware limited liability company d/b/a Rigid Industries.
Need help?
Do you have a question about the HOOD MOUNT 46549 and is the answer not in the manual?
Questions and answers