Advertisement
Quick Links
Advertisement

Subscribe to Our Youtube Channel
Related Manuals for Addvent AVX100WLED


Summary of Contents for Addvent AVX100WLED
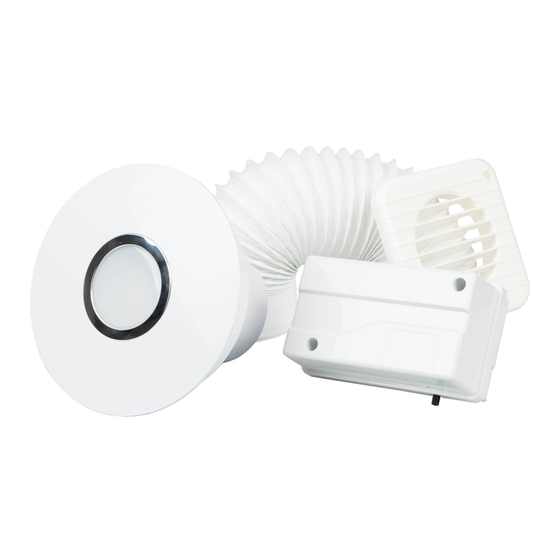
- Page 1 Addvent AVX100WLED Whisper Silent Shower Light Fan INSTALLATION AND MAINTENANCE...
-
Page 3: Installation And Maintenance Instructions
Installation and Maintenance Instructions AVX100WLED • Do read the entire instruction leaflet before commencing installation. • Do check that the electrical rating shown on the unit matches the mains supply. Rating label is located inside the back-plate. • This appliance is intended for connection to fixed wiring only, WITH A MAXIMUM FUSE RATING 5A. • Do install the product with a means for disconnection in all poles in the fixed wiring. • Do ensure the mains supply is switched off before attempting to make electrical connections or carry out any maintenance or cleaning. • All installations must be supervised by a qualified electrician. Installations and wiring must conform to current IEE Regulations (UK), local or appropriate regulations (other countries). • Please leave this leaflet with the product for the benefit of the user. - Page 4 Cleaning and Before you start, you will also need maintenance of the appliance • A 100mm diameter prepared hole for the unit. shall not be made by children. • A 100mm diameter prepared hole for the external vent. Ideally positioned to allow condensation to run away from the first bend The Addvent AVX100WLED has in the duct toward the external vent. Refer to the following features: Figure 5. • A planned route for the duct, please consider • Single speed extraction the following: • 12 V (ac) fan operation - The duct is 3m in length.
- Page 5 FIGURE 1 - Unit Dimensions (mm) FIGURE 2 - SELV Transformer Dimensions (mm)
- Page 6 FIGURE 3 – Opening the unit FIGURE 4 - Fixing positions (mm)
- Page 7 FIGURE 5 - Ducting DOs and DON’Ts GOOD – Any condensation build-up will run towards external vent. BAD – Any condensation build-up will run back into the room. BAD – Any condensation will be trapped, causing collected water to stagnate, constrict or even block the air flow through the duct.
- Page 8 FIGURE 6 - Electrical Connections LAMP INPUT (FROM TRANSFORMER) TO LAMP TO MOTOR MOTOR INPUT (FROM TRANSFORMER) MOTOR OUTPUT MAINS INPUT (FIXED WIRING) LAMP OUTPUT TRANSFORMER OPERATING TERMINALS SWITCH FUSE* ISOLATING SWITCH (FOR ALL POLES) If the connection to the “T” terminal is more than 2.5m long, then a separate single core wire MUST be used.
-
Page 9: Installation
INSTALLATION the desired orientation. Orientate so that the cover latch release slot is easily accessible. • Note: Installation assumes the unit and grille 3. Mark the centres of the screw holes and components can be installed before the cable entry. Refer to Figure 4. ducting. If the ducting will be inaccessible 4. Remove back-plate and drill holes to the after either of these are in place, the opening appropriate sizes. for that component should be increased to 5. -
Page 10: Installing The Transformer
Installing the Transformer Using Whisper Silent Shower Light • The transformer can be fixed directly to the wall or on a horizontal surface. • Operate the unit using an on/off switch IF FIXING TO A WALL, THE (not supplied). When the switch has been TRANSFORMER MUST BE ORIENTATED operated, the light switches on immediately, AS SHOWN IN FIGURE 2 TO FULFIL however, the fan may take up to 10 seconds INGRESS PROTECTION REQUIREMENTS. to turn on. When the switch is turned off, the 1. Remove the screws securing the cover, light will switch off immediately, but the fan remove the cover. - Page 11 Cleaning (recommended once a month) • DO NOT USE STRONG DETERGENTS, SOLVENTS OR CHEMICAL CLEANERS. • DO NOT IMMERSE THE UNIT IN, OR SPRAY DIRECTLY WITH, WATER OR ANY OTHER LIQUIDS. • BEFORE CLEANING, FULLY ISOLATE ELECTRICAL SUPPLY TO THE UNIT • The unit should be periodically wiped clean in position with a damp cloth and mild detergent. • No other maintenance is required. Disposal This product should not be disposed of with household waste. Please recycle where facilities exist. Check with your local authority for recycling advice.
- Page 13 Please recycle where facilities exist. Check with your local authority or YEAR retailer for recycling advice. EXCHANGE WARRANTY Telephone: 0117 923 5375 Fax: 0117 923 5374 Unit 12, Access 18, Bristol BS11 8HT www.addvent.co.uk 08/100025/0 ISSUE 1/0418...
Need help?
Do you have a question about the AVX100WLED and is the answer not in the manual?
Questions and answers