
Related Manuals for SteelMax SM-BM-21S


Summary of Contents for SteelMax SM-BM-21S
- Page 1 OPERATOR’S MANUAL BEVELING MACHINE 15335 E. Freemont Drive, Centennial, CO 80112 1– 87STEELMAX, FAX 303 – 690 – 9172 www.steelmax.com sales@steelmax.com...
-
Page 2: Table Of Contents
Contents 1. GENERAL INFORMATION ....................3 1.1. Application ......................... 3 1.2. Technical data......................3 1.3. Equipment included ....................4 2. SAFETY PRECAUTIONS ....................5 3. STARTUP AND OPERATION ................... 7 3.1. Preparing ........................7 3.1.1. Adjusting the bevel width and angle..............7 3.1.2. -
Page 3: General Information
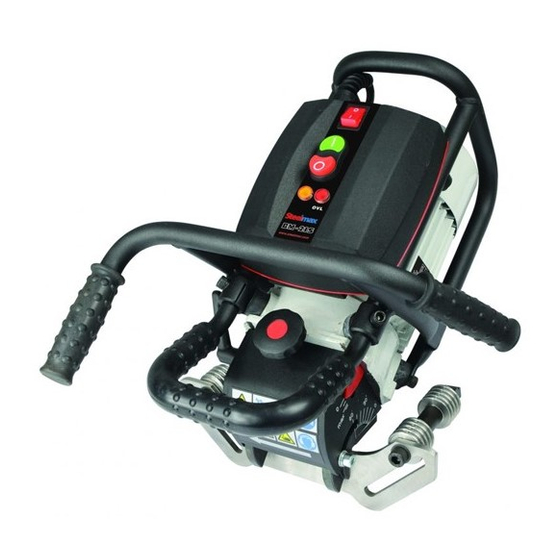
SM-BM-21S 1. GENERAL INFORMATION 1.1. Application The BM-21S Beveling Machine is designed to mill edges of plates and pipes made of stainless steel. The machine allows beveling sheet edges and edges of pipes with diameters from 150 mm (6’’) to 300 mm (12’’) at the angle of 0 to 60° and with the maximum bevel width of 21 mm (13/16’’). -
Page 4: Equipment Included
SM-BM-21S 441 mm (17.4’’) 1.3. Equipment included The BM-21S Beveling Machine is supplied in a metal box with complete standard equipment. The included equipment consists of: Beveling machine with 1 unit a set of cutting inserts Metal box 1 unit... -
Page 5: Safety Precautions
SM-BM-21S 2. SAFETY PRECAUTIONS 1. Before beginning, read this Operator’s Manual and complete proper occupational safety and health training. 2. The machine must be used only in applications specified in this Operator’s Manual. 3. The machine must be complete and all parts must be genuine and fully operational. - Page 6 SM-BM-21S 20. Maintain the machine and tools with care. Cover steel parts with a thin grease layer to protect them against rust when not in use for any extended period. 21. Maintain the machine and replace parts and tools only with the power cord unplugged from the power outlet.
-
Page 7: Startup And Operation
SM-BM-21S 3. STARTUP AND OPERATION All safety precautions must be closely observed. 3.1. Preparing 3.1.1. Adjusting the bevel width and angle Before starting, set required bevel width and angle. First, with power cord unplugged from the power outlet, set the milling head penetration to zero. To do this, loosen the lever (Fig. -
Page 8: Using Cutting Fluid
SM-BM-21S To change the angle of the bevel, use the supplied 6 mm hex wrench to loosen two side screws. Then, turn the guide in a way to set the required angle on the angle pitch and tighten the screws afterward. -
Page 9: Operating
SM-BM-21S 3.2. Operating After setting the bevel width and angle, plug the machine into a properly grounded power outlet. Then, place the machine vertically on the right side of the workpiece as shown in Fig. 4 in a way that the milling head does not touch the working edge. - Page 10 SM-BM-21S power switch motor ON switch motor OFF switch lamp indicating motor overload lamp operation Fig. 5. View of the control panel The feed rate will depend on the profile and composition of the workpiece. You can bevel the majority of steels capable of being welded in just one pass.
-
Page 11: Beveling Pipes
SM-BM-21S Once the work is finished, press the motor OFF switch to stop the motor, and toggle the power switch to position ‘0’ to turn off the power. Use petroleum ether to clean the oil remainder from the workpiece. Clean the machine with a cotton cloth without using any agents. - Page 12 SM-BM-21S screw securing the roller Fig. 7. Moving the rollers from the opening to the slot Use the adjusting knob to set the indication ‘0’ on the width pitch. Move the rollers away from each other and place the machine as shown in Fig. 8, with the guide touching the pipe.
-
Page 13: Beveling Larger Pipes (Only For Optional Equipment)
SM-BM-21S 3.4. Beveling larger pipes (only for optional equipment) An optional guide allows beveling larger pipes with diameters from 260 mm to 600 mm (10–24’’). To prepare the machine for work on larger pipes, disassemble the guide set as shown in Fig. 6. Use the supplied 4 mm hex wrench to unscrew the standard guide and mount the guide for larger pipes (Fig. - Page 14 SM-BM-21S Fig. 10. Dismantling the milling head cover Use the supplied screwdriver to unscrew the set screw (Fig. 11), then remove the external insert, and clean the socket. Next, place the rotated insert again or replace with a new one if all four edges are worn out. To replace an insert from the internal ring, remove the external insert first.
-
Page 15: Replacing The Milling Head
SM-BM-21S worn out corners Fig. 12. Changing the cutting inserts between rings 3.6. Replacing the milling head To replace the milling head, remove its cover in the manner shown in Fig. 10. Then, place the 32 mm flat wrench on the driving ring (Fig. 13) to lock the spindle rotation, use the supplied 8 mm hex wrench to unscrew the screw, and remove the milling head. -
Page 16: Wiring Diagram
SM-BM-21S 4. WIRING DIAGRAM SM-BM-21 Operator’s Manual... -
Page 17: Spare And Wearing Parts
SM-BM-21S 5. SPARE AND WEARING PARTS Name Number Milling head (including mounting screws, GLW-0461-03-00-00-0 screwdriver, and grease) Cutting insert PLY-000282 Mounting screw for inserts SRB-000311 T15 torx screwdriver for mounting screws WKT-000004 Grease for screws (5 g, 0.17 oz) SMR-000005 Oil for stainless steel (0.5 kg, 1.1 lbs) -
Page 18: Exploded Drawings And Parts List
SM-BM-21S 6. EXPLODED DRAWINGS AND PARTS LIST SM-BM-21 Operator’s Manual... - Page 19 SM-BM-21S ITEM PART NUMBER DESCRIPTION PWD-0461-17-00-00-0 POWER CORD 230V PWD-0461-17-00-00-1 POWER CORD 115V PWD-0461-17-00-00-2 POWER CORD 230V (AU) SLN-0505-01-00-00-2 MOTOR ASSY 230V SLN-0505-01-00-00-3 MOTOR ASSY 115V ZBI-0461-02-00-00-0 DRIVING RING PKT-0461-04-00-00-0 KNOB OSL-0461-05-00-00-0 MILLING HEAD COVER PRW-0505-02-01-00-0 VERTICAL GUIDE PRW-0505-02-02-00-0 HORIZONTAL GUIDE...
- Page 20 SM-BM-21S ITEM PART NUMBER DESCRIPTION LCZ-000007 MOTOR ON/OFF SWITCH SRB-000075 HEX SOCKET HEAD CAP SCREW M5x10 SRB-000124 HEX SOCKET HEAD CAP SCREW M6x40 SRB-000141 HEX SOCKET HEAD CAP SCREW M8x14 SRB-000156 HEX SOCKET HEAD CAP SCREW M8x35 SRB-000046 HEX SOCKET HEAD CAP SCREW M10x25...
- Page 21 SM-BM-21S SLN-0505-01-00-00-2 MOTOR ASSY 230V SLN-0505-01-00-00-3 MOTOR ASSY 115V ITEM PART NUMBER DESCRIPTION TRC-0461-01-02-00-2 BEARING DISK N TRC-000024 BEARING DISK P KDL-000003 STATOR BODY 230V KDL-000004 STATOR BODY 110V WRN-000051 ROTOR PDK-000195 CLEARANCE REMOVAL SPRING WASHER OSL-000193 FAN COVER WNT-000008...
-
Page 22: Declaration Of Conformity
SM-BM-21S 7. DECLARATION OF CONFORMITY EC Declaration of Conformity PROMOTECH sp. z o.o. ul. Elewatorska 23/1 15-620 Bialystok Poland declare with full responsibility that product: BM-21S BEVELING MACHINE which the declaration applies to is in accordance with the following standard: •... -
Page 23: Quality Certificate
SM-BM-21S 8. QUALITY CERTIFICATE Machine control card BM-21S BEVELING MACHINE Serial number ................Electric test Type of test Result Name of tester Test with sinusoidal voltage ........(voltage 1000 V, frequency 50 Hz) Date Ω Resistance of the protective circuit ........ -
Page 24: Warranty Card
SM-BM-21S 9. WARRANTY CARD WARRANTY CARD No..................in the name of Manufacturer warrants the BM-21S Beveling Machine to be free of defects in material and workmanship under normal use for a period of 12 months from the date of sale.
Need help?
Do you have a question about the SM-BM-21S and is the answer not in the manual?
Questions and answers