Yamaha YZ450F Owner's Service Manual
Hide thumbs
Also See for YZ450F:
- Owner's service manual (362 pages) ,
- Owner's manual (224 pages) ,
- Parts catalogue (67 pages)

Related Manuals for Yamaha YZ450F


Summary of Contents for Yamaha YZ450F
- Page 1 2010 2010 Read this manual carefully before operating this vehicle. Read this manual carefully before operating this vehicle. OWNER’S SERVICE MANUAL OWNER’S SERVICE MANUAL YZ450F(Z) YZ450F(Z) 33D-28199-80-E0 33D-28199-80-E0...
- Page 2 ORDER. Congratulations on your purchase of distinguished in this manual by the For safety and reliability, the ma- a Yamaha YZ series. This model is following notations. chine must be properly maintained. the culmination of Yamaha's vast ex- Always perform the pre-operation perience in the production of paceset- checks indicated in this manual.
- Page 3 F.I.M. MACHINE WEIGHTS Weights of machines without fuel The minimum weights for motocross machines are: for the class 125 cc: minimum 88 kg (194 lb) for the class 250 cc: minimum 98 kg (216 lb) for the class 500 cc: minimum 102 kg (225 lb) In modifying your machine (e.g., for weight reduction), take note of the...
- Page 4 2. Numbers "2" are given in the or- 4. A job instruction chart "4" accom- HOW TO READ DESCRIPTIONS der of the jobs in the exploded di- panies the exploded diagram, To help identify parts and clarify pro- agram. A number that is enclosed providing the order of jobs, names cedure steps, there are exploded dia- by a circle indicates a disassem-...
- Page 5 TABLE OF CONTENTS GENERAL INFORMATION SPECIFICATIONS REGULAR INSPECTION AND ADJUSTMENTS ENGINE CHASSIS FUEL SYSTEM ELECTRICAL TUNING...
- Page 6 CONTENTS CHAPTER 1 CHAPTER 3 CHAPTER 5 GENERAL REGULAR CHASSIS INFORMATION INSPECTION AND ADJUSTMENTS FRONT WHEEL AND REAR WHEEL ..5-1 LOCATION OF FRONT BRAKE IMPORTANT LABELS ..1-1 MAINTENANCE AND REAR BRAKE..5-6 DESCRIPTION ....1-5 INTERVALS...... 3-1 FRONT FORK....5-16 CONSUMER PRE-OPERATION HANDLEBAR....5-24 INFORMATION....
- Page 7 LOCATION OF IMPORTANT LABELS GENERAL INFORMATION LOCATION OF IMPORTANT LABELS Please read the following important labels carefully before operating this vehicle. CANADA...
- Page 8 LOCATION OF IMPORTANT LABELS EUROPE...
- Page 9 LOCATION OF IMPORTANT LABELS AUS, NZ, ZA...
- Page 10 LOCATION OF IMPORTANT LABELS Familiarize yourself with the following pictograms and read the explanatory text. Read Owner's service manual. This unit contains high-pressure nitrogen gas. Mishandling can cause explosion. Do not incinerate, puncture or open. Turn off the main switch after riding to avoid draining the battery. Use unleaded gasoline only.
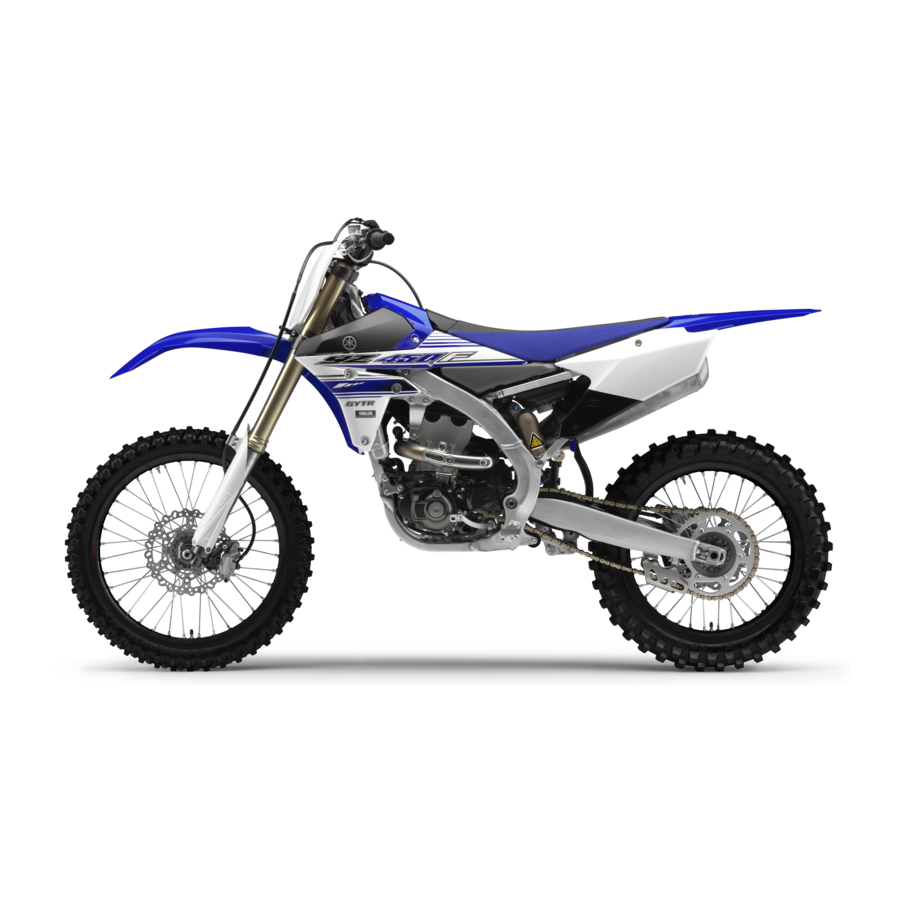
- Page 11 DESCRIPTION DESCRIPTION Clutch lever 10. Coolant drain bolt Front brake lever 11. Rear brake pedal Throttle grip 12. Valve joint Radiator cap 13. Air cleaner Fuel tank cap 14. Drive chain Engine stop switch 15. Shift pedal Kickstarter crank 16. Oil level check window Fuel tank 17.
- Page 12 There are two significant reasons for knowing the serial number of your machine: 1. When ordering parts, you can give the number to your Yamaha dealer for positive identification of the model you own. 2. If your machine is stolen, the au-...
- Page 13 FEATURES FEATURES OUTLINE OF THE FI SYSTEM The main function of a fuel supply system is to provide fuel to the combustion chamber at the optimum air-fuel ratio in ac- cordance with the engine operating conditions and the atmospheric temperature. In the conventional carburetor system, the air-fuel ratio of the mixture that is supplied to the combustionchamber is created by the volume of the intake air and the fuel that is metered by the jet used in the respective carburetor.
- Page 14 FEATURES FI SYSTEM The fuel pump delivers fuel to the fuel injector via the fuel filter. The pressure regulator maintains thefuel pressure that is applied to the fuel injector at only 324 kPa (3.24 kgf/cm ² , 47.0 psi). Accordingly,when the energizing signal from the ECU energizes the fuel injector, the fuel passage opens, causingthe fuel to be injected into the intake manifold only during the time the passage remains open.
- Page 15 INCLUDED PARTS INCLUDED PARTS IMPORTANT INFORMATION HANDLEBAR PROTECTOR Install the handlebar protector "1" so DETACHABLE SIDESTAND PREPARATION FOR REMOVAL that the mark "a" face forward. This sidestand "1" is used to support AND DISASSEMBLY only the machine when standing or 1.
- Page 16 • Do not touch and do not make them dirty. 5. Keep away from fire. ALL REPLACEMENT PARTS 1. We recommend to use Yamaha genuine parts for all replace- ments. Use oil and/or grease rec- ommended by Yamaha for CHECKING OF assembly and adjustment.
- Page 17 CHECKING OF CONNECTION If the contact seems not good, pull the terminal by hand and check its condition. Probe Coupler REMOVING THE QUICK FASTENER 4. Connect: • Lead Do not push the center pin with too • Coupler much force. Otherwise, the center •...
- Page 18 SPECIAL TOOLS SPECIAL TOOLS The proper special tools are necessary for complete and accurate tune-up and assembly. Using the correct special tool will help prevent damage caused by the use of improper tools or improvised techniques. The shape and part number used for the special tool differ by country, so two types are provided.
- Page 19 SPECIAL TOOLS Tool name/Part number How to use Illustration Cap bolt wrench This tool is used to loosen or tighten YM-01500, 90890-01500 the base valve. Cap bolt ring wrench This tool is used to loosen or tighten YM-01501, 90890-01501 the damper assembly. Fork seal driver This tool is used when install the fork YM-A0948, 90890-01502...
- Page 20 SPECIAL TOOLS Tool name/Part number How to use Illustration FI diagnostic tool This tool is used to check the fault YU-03182, 90890-03182 codes and diagnose any problems. Fuel pressure adapter This tool is used to attach the pres- YM-03186, 90890-03186 sure gauge.
- Page 21 Thank you very much for your reading. Please click here and go back to the website. Then, download the complete manual instantly. No waiting.
- Page 22 SPECIAL TOOLS Tool name/Part number How to use Illustration Valve guide remover This tool is needed to remove and 5.5 mm (0.22 in) install the valve guide. YM-01122 Valve guide installer This tool is needed to install the 5.5 mm (0.22 in) valve guide.
- Page 23 Tool name/Part number How to use Illustration Digital tachometer This tool is needed for observing en- YU-39951-B, 90890-06760 gine rpm. YAMAHA Bond No. 1215 (Three- This sealant (Bond) is used for ® Bond No. 1215) crankcase mating surface, etc. 90890-85505...
- Page 24 The clutch lever "1" is located on the left handlebar; it disengages or en- gages the clutch. Pull the clutch lever Your Yamaha engine has been de- to the handlebar to disengage the signed to use premium unleaded gas- clutch, and release the lever to en- oline with a pump octane number gage the clutch.
Need help?
Do you have a question about the YZ450F and is the answer not in the manual?
Questions and answers