Table of Contents
Advertisement
Quick Links
Advertisement
Table of Contents

Related Manuals for Haier HRF505VW


Summary of Contents for Haier HRF505VW
- Page 1 User Manual Upright Fridge HRF505VW HRF505VS...
- Page 2 Thank You Thank you for purchasing a Haier Product. Please read these instructions carefully before using this appliance. The instructions con tain important information which will help you get the best out of the appliance and ensure safe and proper installation, use and maintenance.
-
Page 3: Table Of Contents
Content 1 - Safety ..............................4 2 - Intended Use ..........................11 3 - Product Description ........................12 4 - Use ..............................5- Equipment ............................. 17 6 - Care and Cleaning ........................18 7 - Troubleshooting ........................... 20 8 - Installation ............................. 23 9 - Technical Data .......................... -
Page 4: Safety
1 - Safety ollowing safety hints! WARNING! Befor rst use Make sure there is no tr kaging and keep out of children´s reach. Wait at least 2 hours before installing the appliance in order to ens- ure the refrigerant circuit is full Handle the appliance always with at least two persons because it is Installation The appliance should be placed in a w... - Page 5 1 - Safety WARNING! WARNING: Do not p ace unsta e artica s ( ea y jects containers e ater) on top of t e fr to a oi persona injury cause y fa ctric s oc cause y contact it ater.
- Page 6 1 - Safety WARNING! Do not pull on the door shelves. The door may be pulled slant, the door shelves , may be pulled away, or the appliance may topple. Open and close the door only with the handles. The gap between the door and the cabinet is very narrow.
- Page 7 1 - Safety WARNING! Maintenance / cleaning Make sure children are supervised if they carry out cleaning and maintenance. Disconnect the appliance from the electrical supply before un dertaking any routine maintenance. Allow at least 7 minutes be fore restarting the appliance, as frequent starting may damage the compressor.
- Page 8 1 - Safety Refrigerant gas information WARNING! (R600a). Make sure the refrigerant circuit is not damaged during transportation or installation. Leaking refrigerant may cause eye sources, thoroughly ventilate the room, do not plug or unplug the power cords of the appliance or any other appliance. Inform the customer service.
-
Page 9: Intended Use
1 - Safety Intended use This appliance is intended to be used in household and similar app- plications such as ments; - farm houses and by clients in hotels, motels and other residen tial type environments; - bed and breakfast type environments; - catering and similar non-retail applications. - Page 10 1 - Safety - If the refrigerating appliance is left empty for long periods, Disposal symbol on the pr or on its packaging indicates that this pr may not be treated as wast Instead it shall be handed to the appliacable collection point for the recycling of electrical and electronic this pr disposed of correctly, y...
- Page 11 2-Intended use 2.1 Intended Use “This appliance is intended to be used in household and similar applications such as – farm houses and by clients in hotels, motels and other residential type environments; – bed and breakfast type environments; – catering and similar non-retail applications. This appliance is intended for storing fresh food.
-
Page 12: Product Description
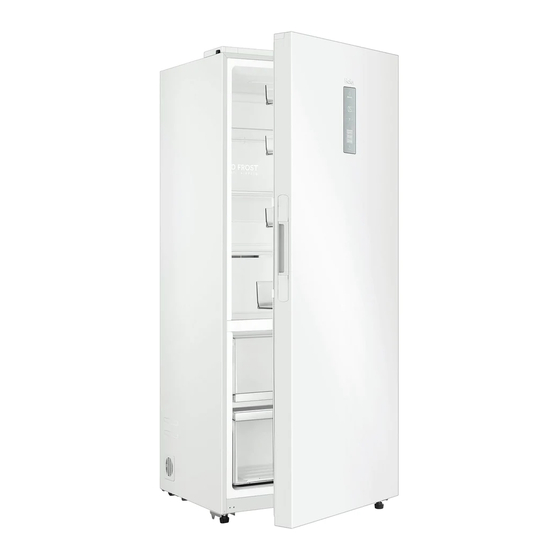
3-Product description 1 LED light 5 Adjustable feet 2 Air-duct cover 6 Adjustable door shelves Glass shelves 7 Rating plate 4 Fresh storage bins 8 Door handle... - Page 13 4-Use Remove all packaging materials, keep them out of children reach and dispose them in an environmentally friendly manner. Clean the inside and outside of the appliance with water and a mild detergent before putting any food in it. After the appliance has been levelled and cleaned, wait for at least 2 hours before connecting it to the power supply.
-
Page 14: Use
4 - Use Control panel (Fig. 4) Display description a Temperature display icon b Super Cool icon c Daily function icon d Holiday icon e Auto Set icon f Lock icon Key Description A Decreasing temperature setting key Press to decrease the temperature Super Cool key Press to enter the Super Cool mode Daily function key Press to enter Daily mode Holiday key Press to enter Holiday mode... - Page 15 4 - Use 4.6 Temperature setting ℃ ~ 8℃. nters ure display icon”(a) display” icon(a) will 4.7 Daily function (C) T e appliance is under t e Daily function as soon as it is connected to t e power supply for t - e rst time, and t e Daily icon (c) li ts up.
- Page 16 4 - Use Notice: Holiday function 1. In Holiday mode, temperature could not be adjusted. If you do so, Holiday icon will blink for 3 times to remind that the fridge is in Holiday mode. 2. In Holiday mode, if Auto Set, Daily or Super Cool function Holiday function automatically exits, and enters Auto Set, Daily or Super Cool function.
-
Page 17: 5-Equipment
4-Use 4.16 Energy saving tips Make sure the appliance is properly ventilated (see INSTALLATION). Do not install the appliance in direct sunlight or in the near of heat sources (e.g. stoves, heaters). Avoid unnecessarily low temperature in the appliance. The energy consumption in creases the lower the temperature in the appliance is set. -
Page 18: Care And Cleaning
4. In case some small part or component gets stucked inside of the fridge (bet- ween shelves or storage bins), use small soft brush to release it. If you could not reach the part, please contact Haier service. - Page 19 6-Care and Cleaning 6.2 Non-use for a longer period If the appliance is not used for an extended period of time: Take out the food. Unplug the power cord. Clean the appliance as described above. Keep the door and fridge storage bins open to prevent the creation of bad odours inside.
-
Page 20: Troubleshooting
7-Troubleshooting of a problem please check all shown possibilities and follow below instructions before you contact an after sales service. The acoustic alarm can be switched of by pressing any button. 7.1 Troubleshooting Problem Possible Cause Possible Solution The compressor Mains plug is not connected in the Connect the mains plug. - Page 21 7 - Troubleshooting Problem Possible Cause Possible Solution The appliance makes a The refrigeration unit has just motor sound turned itself on. This is normal It is not cold enough The temperature is set too high. Reset the temperature. inside th e appli Goods that are too warm have Always cool down goods be...
- Page 22 7-Troubleshooting 7.2 Power Interruption In the event of a power cut, food should remain safely cold for about 15 hours. Follow these tips during a prolonged power interruption, especially in summer: Open the door as few times as possible. Do not put additional food into the fridge during a power interruption. If prior notice of a power interruption is given and the interruption duration is longer than 15 hours, make some ice and put it in a container in the top of the fridge com partment.
-
Page 23: Installation
8 - Installation 8.1 Unpacking Take the appliance out of the packaging. Remove all packaging materials. 8.2 Environmental conditions the temperature inside the appliance and its energy consumption. Do not install the appli ance near other heat-emitting appliances (ovens, refrigerators) without isolation. 8.3 Space requirements Required space to open the door (Fig. - Page 24 8 - Installation 8.6 Using adjustable feet If the fridge is unstable, the feet can be adjusted: Ro tate the adjustable feet according to the direction of arrow (Fig. 8.4) to turn them up or down: Turning the feet clockwise raises the appliance. Turning the feet counterclockwise lowers it.
- Page 25 8 - Installation 8.9 Door Reversibility Before connecting the appliance to the power supply you should check, whether the door swing must changed from right (as delivered) to left, if this is required by the installation location and the usability. Assembly steps (Fig.
- Page 26 8- Installation 15. Take the left axe cover from the accessory bag. Fix it with screw . 16. Exchange position of caster plate and lower hinge after replacement. 17. Disassemble the right small hinge cover and hinge lid from the hinge cover. 18.
-
Page 27: Technical Data
9-Technical Data Trade mark Haier HRF505VW/HRF505VS Category of the model Fridge 3.5 star Product group Storage volume cooling (L) Storage volume freezing (L) **** not applicable Temperature of other compartments > 14 °C not applicable Frostfree system Construction type freestanding... - Page 28 0060530008A...
Need help?
Do you have a question about the HRF505VW and is the answer not in the manual?
Questions and answers
WHERE ARE THE GAS LINES IN MODEL NUMBER HRF505VW