
Related Manuals for Sena SMART HJC 10B


Summary of Contents for Sena SMART HJC 10B
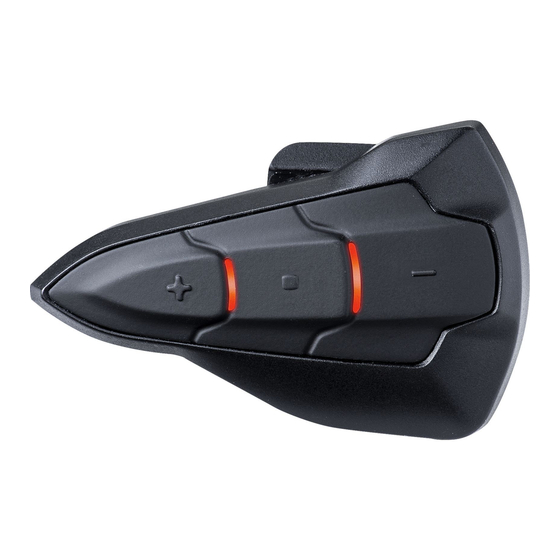
- Page 1 PMN: SMART HJC 10B Charging Red LED: Charging Blue LED: Fully charged Power On/Off (+) Button + Center Button for 1 sec Volume Adjustment...
- Page 2 1. Press the Center Button for 12 seconds. 2. Press the (+) Button to enter into Phone Pairing 3. Search for Bluetooth devices on your mobile phone. Select the SMART HJC 10B in the list of the devices detected on the mobile phone.
- Page 3 Intercom Pairing 1. Press and hold the Center Button of two headsets for 5 seconds until red LEDs of both units start to flash rapidly. 2. Simply tap the Center Button of any one of the two headsets. Intercom Start/End Tap the Center Button once.
- Page 4 Certification and Safety Approvals FCC Compliance Statement This device complies with part 15 of the FCC rules. Operation is subject to the following two conditions: (1) This device may not cause harmful interference, and (2) This device must accept any interference received, including interference that may cause undesired operation. This equipment has been tested and found to comply with the limits for a Class B digital device pursuant to part 15 of the FCC rules.
- Page 5 règles de la FCC. Ces limites sont conçues pour fournir une protection raisonnable contre les interférences nuisibles dans une installation résidentielle. Cet équipement génère et utilise de l’énergie radio fréquence et, s’il n’est pas installé et utilisé conformément. aux instructions, il peut occasionner des interférences nuisibles au niveau des communications radios. Cependant, il n’existe aucune garantie que ces interférences ne se produiront pas dans une installation particulière.
Need help?
Do you have a question about the SMART HJC 10B and is the answer not in the manual?
Questions and answers