Table of Contents
Advertisement
Advertisement
Table of Contents

Related Manuals for Netio PowerPDU 4C


Summary of Contents for Netio PowerPDU 4C
- Page 1 PowerPDU 4C & NETIO 4 NETIO 4All MANUAL FIRMWARE 3.4.0 and later 27.5.2020...
-
Page 2: Table Of Contents
Detecting and configuring the IP address ........... 10 4.1.1 Initial configuration over a LAN ..........10 4.1.2 Initial configuration over Wi-Fi - only NETIO 4 and NETIO 4All ....12 Login to device web ................13 Restoring factory defaults ..............13 Web interface .................... -
Page 4: Introduction
Introduction Thank you for purchasing this product of NETIO products a.s. Before using your product, please read this (MAN) and the included to avoid problems with User Manual Quick Installation Guide (QIG) incorrect installation or use. Caution: The product works with mains voltage. Mishandling may damage it or result in injury or death. -
Page 5: General Characteristics
Web interface, with our mobile app, using Lua scripts or over one of the available open M2M API protocols. To control the device over the Web, all you need is a web browser; NETIO 4x includes a built-in Web server. -
Page 6: Specification
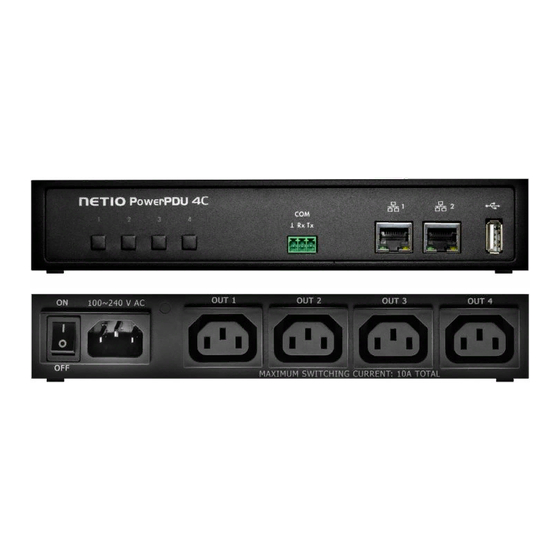
LAN interface: 100 Mbps (NETIO PowerPDU 4C includes an integrated 2-port switch) Robust design, metal housing 1.2m lead cable + power switch at the device (external cable for NETIO PowerPDU 4C) Built-in web server for controlling the device, HTTPs support ... -
Page 7: Netio Powerpdu 4C Specifications
NETIO PowerPDU 4C specifications Power 100–240 V; 50/60 Hz; 10 A Switched outputs NETIO PowerPDU 4C: 10 [8] A total per device / 8 A per output Internal consumption Max 4.1 W Micro-disconnection (µ) (resistive load) 1E5 switching cycles, max. 1.5 kV pulse voltage... -
Page 8: Drawings
Drawings Figure 2. NETIO PowerPDU 4C dimensions... -
Page 9: Netio 4 / 4All Specifications
NETIO 4 / 4All specifications Power 230 V; 50 Hz; max 15 A Switched outputs NETIO 4/4All: 15 [8] A total per device / 8 A per output Electrical load Resistance load only Fuse Built-in 15 A protection fuse Internal consumption Max 4.1 W... -
Page 10: Configuration And Control
2. Connect the power cable of your NETIO 4x to a mains electrical outlet. 3. Switch your NETIO 4x on with the rocker switch at the back or on the side. 4. Allow about a minute for your NETIO 4x to start up. - Page 11 If your network uses a DHCP server, simply click the IP address in NETIO Discover to open the web interface. Without a DHCP server in the network, NETIO 4x defaults to the following IP address at its wired Ethernet interface: 192.168.1.78 For the NETIO 4x device to be accessible, the controlling system must use an IP address in the same subnet, such as 192.168.1.77.
-
Page 12: Initial Configuration Over Wi-Fi - Only Netio 4 And Netio 4All
Initial configuration over Wi-Fi - only NETIO 4 and NETIO 4All By default, NETIO 4 and NETIO 4All act as a Wi-Fi access point. They can be connected to from a Wi- Fi client device without a wired network. The procedure depends on the operating system. For example, in Windows 10, go to Settings >... -
Page 13: Login To Device Web
NETIO 4x again beeps twice. Forgotten password The reset to factory defaults is most often used when the password has been forgotten. After restoring the factory defaults, the username and password to access NETIO 4x will be “admin” / “admin”. -
Page 14: Web Interface
Web interface Outputs Controlling the outputs In the left menu, choose Outputs. An overview of outputs appears. The four buttons next to each output control the respective output and its automated functions. The power button below the line at the bottom switches all outputs on/off at the same time. Figure 5. -
Page 15: General
Watchdog button indicates an active Watchdog function when lit (see below for details). When the button is green, the Timer / Watchdog function is active. When the button is grey, the function is inactive. Both functions can be configured for each output individually at the “Timer/Scheduler”... -
Page 16: Scheduler/Timer
5.1.2 Scheduler/Timer Scheduler/Timer function can be used to switch the output on and off at specified times. Select a schedule to specify when the output should be turned on. After selecting a schedule, the on-times for the output according to that schedule are shown graphically. Click Save Changes to confirm the schedule change. -
Page 17: Watchdog Function
5.1.3 Watchdog function Watchdog function monitors a device connected to an output and restarts it if necessary. The device needs to be accessible over the network using the ping command (it needs to have an IP address assigned). If the monitored device is inaccessible, the specified output is power-cycled. A device is considered inaccessible if it fails to respond to Ping requests within a specified interval. - Page 18 The other options how to use Watchdog are described in following application notes: AN09 IP WatchDog 1 of 2 - PING based failure detection for 1 or 2 devices (Lua script) AN24 IP WatchDog 1 to 1 – Device LAN connectivity detection and indication (Lua script)
- Page 19 AN25 IP WatchDog 2 from 10 – list of monitored devices, failure indication by power output (Lua script)
-
Page 20: Consumption Metering - Only Netio Powerpdu 4C And Netio 4All
By default, the cumulative energy consumption is counted from the time the NETIO PowerPDU 4C or NETIO 4All was first powered on. To reset the counters at all outputs, go to Settings > System and click Reset Energy Consumption Counters below the line. The energy consumption will be measured from this moment onwards. - Page 21 Other totals are calculated from the values measured at individual inputs. Figure 10. Resetting the energy consumption counters [Wh / kWh] for all outputs...
-
Page 22: M2M Api Protocols
M2M API Protocols All M2M protocols use the same values for the action parameter to control the outputs. Allowed values are: 0 – turns the output off 1 – turns the output on 2 – short OFF – turns the output off for a short time (if the output was off, it will be turned on) 3 –... -
Page 23: Snmp
5.2.1 SNMP Figure 11. SNMP configuration for version 1,2c... - Page 24 Also called the “community string” in SNMP. Similar to a username/password combination. Needed for reading information from v1,2c only NETIO 4x over SNMP. We recommend to use “pure” ASCII characters (that is, to avoid accented and special characters, such as @, & and so on, if possible).
- Page 25 [ AES / DES ] Download MIB file Allows downloading the Management Information Base file containing the variable names and data types for the SNMP implementation in NETIO 4x. For more information about the MIB, see the official SNMP website: http://www.net-snmp.org/...
- Page 26 > Download, and download the document titled: SNMP - description of NETIO M2M API interface - PDF For more information and a practical demonstration of using the SNMP protocol with NETIO 4x smart sockets, see the following Application Note: AN11...
-
Page 27: Telnet/Kshell
5.2.2 TELNET/KSHELL Figure 13. Configuring the TELNET/KSHELL protocol Enable Telnet/KSHELL Enables Telnet/KSHELL functions in the system kernel. Port Port where the device listens for Telnet/KSHELL M2M API commands. Range: 1 – 65535. The device warns you if you specify a port number that is already in use. - Page 28 API, see the Support > Download section of our website and the following document: TELNET - description of NETIO M2M API interface - PDF For more information and a practical demonstration of using the telnet protocol with NETIO 4x smart sockets, see the following Application Note: AN10 Telnet control of electrical power sockets (M2M API –...
-
Page 29: Mqtt
5.2.3 MQTT Figure 14. MQTT configuration in Generic mode... - Page 30 Enables MQTT functions in the system kernel. MQTT status Off – MQTT is disabled Connected – NETIO 4x is connected to the MQTT broker Error – error in communication with the MQTT broker MQTT mode Generic – generic MQTT broker MS Azure –...
- Page 31 For more information about the M2M MQTT API, visit the Support > Download section of our website and see the following document: MQTT - description of NETIO M2M API interface - PDF For more information and a practical demonstration of using the MQTT protocol with NETIO 4x smart sockets, see the following Application Notes: AN12 MQTT control of NETIO smart sockets using the HiveMQ broker –...
-
Page 32: Serial Console - Netio Powerpdu 4C Only
5.2.4 Serial console - NETIO PowerPDU 4C only Figure 16. Configuring the serial console Status Informative indication of the serial line communication status. Possible states: connected waiting for connection failed to send serial event to actions The function is turned off ... - Page 33 Port TCP port where NETIO PowerPDU 4C listens for data for the Serial Console M2M API. Speed Baudrate (must match the baudrate configured at the remote device). AN18 Lua access to RS-232 serial port...
-
Page 34: Json Api
5.2.5 JSON API Figure 17. Configuring the JSON API Enable JSON API Enables M2M JSON API functions in the system kernel. Use custom M2M HTTP(S) port Check to specify a specific port for M2M JSON API communication. Current M2M HTTP(S) port Read-only value. - Page 35 For more information about the M2M JSON API, visit the Support > Download section of our website and see the following document: JSON - description of NETIO M2M API interface - PDF For more information and a practical demonstration of using the JSON protocol with NETIO 4x smart sockets, see the following Application Note: AN21...
-
Page 36: Xml Api
5.2.6 XML API Figure 18. Configuring the XML API Enable XML API Enables M2M XML API functions in the system kernel. Use custom M2M HTTP(S) port Check to specify a specific port for M2M XML API communication. Current M2M HTTP(S) port Read-only value. - Page 37 For more information about the M2M XML API, visit the Support > Download section of our website and see the following document: XML - description of NETIO M2M API interface - PDF For more information and a practical demonstration of using the XML protocol with NETIO 4x smart sockets, see the following Application Note: AN20...
-
Page 38: Url Api
For an example of toggling output no. 1 using the M2M URL API, click the Test URL API link. This opens a new browser tab and invokes the following HTTP GET request: http(s)://<netio.ip.address.here>/netio.cgi?pass=&output1=4 Select http or https depending on whether you use... -
Page 39: Modbus/Tcp
AN19 URL API (http GET) protocol to control NETIO 4x power sockets/outlets 110 / 230V 5.2.8 Modbus/TCP Figure 20. Configuring the Modbus/TCP API... - Page 40 Modbus / TCP - description of NETIO M2M API interface - PDF For more information and a practical demonstration of using the XML protocol with NETIO 4x smart sockets, see the following Application Note:...
-
Page 41: Cloud
Cloud Netio Cloud is a service provided by NETIO Products a.s. and allow easy central remote control and monitoring of the NETIO devices. What can you do in NETIO Cloud? Output control On/Off switch. Reset button (Short Off for defined time). - Page 42 Date and time of the last update. Added to account Account name to what this device is assign. Device UID Unique device ID. Save Changes Saves the changes. Registration token Enter the registration token from NETIO Cloud web - shown when “ADD...
- Page 43 DEVICE” button used. Then press “Add device” button. Remove device If this device is connected to NETIO Cloud use this button to remove/disconnect it from NETIO Cloud. Account info Use “Reload” button tu refresh account information. Credit Value of the available credit for Cloud account.
-
Page 44: Users
Users When several users use the NETIO 4x device, it is advisable to assign them different user accounts with the necessary privileges. In the left menu, select Users. NETIO 4x distinguishes three basic user categories: Figure 23. Adding a user Administrator User with full privileges. - Page 45 Confirm by clicking Create user. In a similar way, existing user accounts can be edited. Custom privileges log in Allows logging in to the NETIO 4x web interface and the M2M Telnet/KSHELL API control outputs Allows controlling outputs over the web interface and the...
-
Page 46: Schedules
Schedules in the left menu. By default, NETIO 4x contains three schedules: Always, Weekend and Work days. To create a new schedule, click Create schedule. Specify the schedule name and set the intervals when the output should be switched on. - Page 47 Figure 26. Adding an interval with a precision to the second Deleting a schedule deleting schedule, timers with this schedule automatically disabled. The states of the respective outputs are unchanged; however, from that moment on, the outputs are under manual control.
-
Page 48: Actions (Lua Scripts)
Actions (Lua scripts) Actions are used to create rules that automate NETIO 4x functions. To manage actions, select Actions in the left menu. To add a new action, click Create Rule. In the top part, choose the Trigger to start the action, and the Schedule that determines when the trigger is active. To enable the action, check Enabled. - Page 49 Lua programming language. Syntax highlighting is supported to make writing Lua code simpler and more user-friendly. For a basic description of the Lua langauge and its syntax, see NETIO Lua Programming section at https://wiki.netio-products.com The pre-filled action periodically activates and deactivates 2 outputs.
- Page 50 = 1 ---------End of Config Section 1--------- local state = 0 output1 Select the first NETIO 4x output to switch (possible values: 1, 2, 3 or 4) output2 Select the second NETIO 4x output to switch (possible values:...
- Page 51 An active action cannot be terminated by simply unchecking Enabled; this only prevents future activations. If the action is already active and it is not programmed to stop by itself, NETIO 4x needs to be restarted, too. Figure 29. Event log containing information from the action...
-
Page 52: Settings
Network mode Does not apply to NETIO PowerPDU 4C. To configure the network interfaces of NETIO 4ALL and NETIO 4, first click Network Mode in the Settings menu. Four network modes are available, depending on the desired use of the Ethernet and/or Wi-Fi network interface. - Page 53 If you do not want to use the Wi-Fi interface of your NETIO 4/4All at all, choose the Cable mode. In this mode, NETIO 4/4All is connected via the Ethernet (as the primary network interface) and Wi-Fi is switched off.
- Page 54 Figure 32. Selecting a Wi-Fi network in the Wi-Fi Client mode In this mode, a dialog with Wi-Fi configuration appears. Select your network from the list of available networks and fill in the password. If your network is currently inactive (undetected), fill in the SSID, select the security and encryption mode and fill in the password.
- Page 55 Wi-Fi access point is configured with WPA2-personal security and AES or TKIP encryption. Caution After changing the network configuration, it may be necessary to re-discover NETIO 4/4All at its new address. The discovery procedure is described in the Detecting and configuring the IP address section.
- Page 56 In the Wi-Fi Access point mode, your NETIO 4/4All is connected via the Ethernet (primary network interface) just as in the Cable mode. However, it also serves as a Wi-Fi access point. Other devices can connect to your NETIO 4/4All over Wi-Fi (secondary network interface) and gain access to the Ethernet network (bridging between Ethernet and Wi-Fi takes place).
- Page 57 The NETIO Configuration mode is similar to the Wi-Fi Access Point mode; however, Ethernet and Wi-Fi networks are isolated (no routing or bridging between Ethernet and Wi-Fi). The Wi-Fi interface has a static IP 192.168.2.78 and an active DHCP server assigning addresses from the 192.168.2.0/24 range.
-
Page 58: Wi-Fi Settings
Inactive – in the Cable network mode. Access point – in the NETIO Configuration network mode (no bridging between Ethernet and Wi-Fi) and the Wi-Fi Access Point network mode (active bridging between Ethernet and Wi-Fi). Figure 36. Wi-Fi configuration in the Access Point mode Mode Shows the Wi-Fi mode. - Page 59 IP parameters of the interface are configured in the Settings/Network configuration menu. In the Wi-Fi Client network mode, NETIO 4/4All uses its Wi-Fi interface to connect to a Wi-Fi network access point. In this mode, Ethernet is a back-up connection, without bridging to Wi-Fi.
-
Page 60: Network Configuration
Complete configuration common to both interfaces is accessible, default IP 192.168.1.78 Wi-Fi Access Point Complete configuration Fixed IP 192.168.2.78 NETIO Configuration (default) accessible, + DHCP server active at the default IP 192.168.1.78 interface The simplest option is to Use DHCP — if a DHCP server is in your network, the device automatically sets its IP address and other parameters. - Page 61 When setting the static IP address, use an IP address and a network mask corresponding to the network to which NETIO 4x is connected. As the gateway, use the Ethernet port of your router. If your router provides DNS service, use it as the DNS server, too. If unsure, use a public DNS server such as 8.8.8.8.
-
Page 62: Security Settings
Caution After changing the network configuration, it may be necessary to re-discover NETIO 4x at its new address. The discovery procedure is described in section 2.1 Detecting and configuring the IP address. Click Save Changes to save the settings. 5.7.4... - Page 63 (HTTP). In the settings, it is also possible to change the default HTTPS port to a different one. In that case, the port needs to be specified together with the IP address when connecting to NETIO 4x, e.g. https://192.168.1.50:555 (where 555 is the new port).
-
Page 64: Date / Time
You can also use the option to synchronize the time with your local computer. Note If your NETIO 4x has Internet access when it is powered on for the first time, it automatically sets its clock to the current date and time in the GMT timezone. To display the correct time, this timezone needs to be changed to match your location. -
Page 65: E-Mail
Mail server for sending messages. When a different port than the default (25) is used, enter the server address followed by a colon and the port number, e.g. smtp.netio.eu:8025 Enable SMTP authentication Check this option if the SMTP server requires authentication. Then, fill in the Username and Password for logging in to the SMTP server. -
Page 66: Firmware Update
Figure 43. Details about the installed firmware NETIO 4x can be easily updated from the device web interface, as long as it is connected to the internet and its network interface is correctly configured. To display the list of available firmware versions, click Show all available firmwares. - Page 67 Browse to select the file with the new firmware and then click Install firmware to start the installation. Figure 44. Firmware update from a file Figure 45 – Firmware download link at the netio-products.com website Caution...
-
Page 68: System
Firmware installation causes the NETIO 4x to restart. Do not power off or restart the device during the process; otherwise, the firmware could be damaged, rendering the device inoperable. The progress of the installation is indicated. When the installation finishes, a message about a successful update appears and you will be taken back to the login screen. - Page 69 To reset the NETIO 4x to the factory settings, click Restore Factory Defaults. This erases all settings and restores the default values. The Keep network settings (to preserve the network...
-
Page 70: Log
In the left menu, select Log. Figure 47. Log The log contains information about the operation of the device. The most recent entries are shown at the top. To see older entries, scroll down. Click Refresh to reload the log to show the most recent entries. -
Page 71: Controlling The Outputs Manually
LED indicators for all outputs flash red Factory defaults are being restored The remaining two LEDs on the front panel show the Wi-Fi and Bluetooth status (NETIO 4 and NETIO 4All only). If the Wi-Fi LED is green, Wi-Fi is active. If the LED is off, Wi-Fi is inactive. The LED flashes in case of problems with Wi-Fi. -
Page 72: Acoustic Indication
The process of restoring factory defaults has finished. 3x beep The process of restoring factory defaults has started. NETIO Mobile2 for Android NETIO Mobile2 application is for control NETIO devices produced after 2016. Features: Switch On / Off each power socket on local network. -
Page 73: 10 Troubleshooting
10.3 Fuse reset - only NETIO 4 and NETIO 4All If the NETIO 4 / NETIO 4All device stops working and no LEDs light up, it may be the case that the maximum rated current was exceeded and the device has shut itself down. To prevent damage to the device, a resettable safety fuse interrupts the power. -
Page 74: Application Notes (Anxx)
11 Application Notes (ANxx) As a demonstration of practical uses of NETIO 4x, we have prepared examples of use for all technologies implemented in the current firmware, such as Lua scripts, M2M API protocols, methods of connecting NETIOx with other sensors, devices or cloud services, and more. -
Page 75: Conclusion
We trust that you will be satisfied with our product. If you have any questions or comments regarding NETIO 4x functions, please contact us. Your NETIO products team NETIO products a.s. U Pily 103/3 143 00 Praha 4 - Modrany Czech Republic info@netio.eu © 2020 NETIO products a.s. All rights reserved. -
Page 76: Declaration Of Conformity
Manufacturer/Importer:NETIO products a.s. U Pily 3/103 Address: 143 00 Praha 4, Czech Republic NETIO 4 DE, NETIO 4All DE, Product: NETIO 4 FR, NETIO 4All FR RTTED: We hereby declare that the above-mentioned product(s) comply with essential requirements of the Government Regulations No. - Page 77 Address: 143 00 Praha 4, Czech Republic Product: NETIO PowerPDU 4C RTTED: We hereby declare that the above-mentioned product(s) comply with essential requirements of the Government Regulations No. 483/2002 Sb. and No. 251/2003 Sb. (Directive 1999/5/EC) on radio equipment and telecommunications terminal equipment and the mutual recognition of their conformity.
Need help?
Do you have a question about the PowerPDU 4C and is the answer not in the manual?
Questions and answers