TemperZone TZT-100 User Manual
Multi-function thermostat
Hide thumbs
Also See for TZT-100:
- Installer manual (43 pages) ,
- Owner application & installation manual (24 pages)
Table of Contents
Advertisement
Advertisement
Table of Contents

Subscribe to Our Youtube Channel
Related Manuals for TemperZone TZT-100


Summary of Contents for TemperZone TZT-100
- Page 1 User Manual TZT-100 Multi-function Thermostat...
- Page 2 The TZT-100 thermostat has been designed and built by Smart Temp Australia P/L, to be an attractive, highly reliable and an easy to use thermostat. The TZT-100 model is a modified version of a standard Smart Temp product. It has been configured specifically to Oasis Heat Pumps requirements for use on Oasis Heat and Chill Heat Pumps Care has been taken in the preparation of this manual.
-
Page 3: Table Of Contents
Table of Contents Introduction Commercial Programmable mode On / Off and Mode Selection Setting the Clock Programming Your 2 Daily Events9 After Hours Rn Timer Manual model On / Off and Mode Selection Setting the Fan Function Setting the Clock Setting Your Desired Temperature Switching Between Day and Night Set Points To Review the Set Temperature... - Page 4 This TZT-100 thermostat is able to be used as a residential programmable thermostat, a commercial programmable thermostat or as a simple to use manual thermostat. Your installer will have set these modes to best suit your individual needs. For clarity, this user manual is broken into the following main sections.
-
Page 5: Commercial Programmable Mode
Commercial Programmable Mode On /Off and Mode Selection Tap the “MODE” button to cycle the thermostat through the available modes: “Heat” only, “Cool” only, Auto- changeover (Shown by both “Heat” & “Cool” in the LCD), Emergency Heat (if fitted), and “OFF”. If the fan mode is set to “Fan On”, when you select “OFF”... - Page 6 To set the clock, tap the “PROG” button. The LCD will show the hours digit flashing. Use the up ( ) or down ( ) button to adjust the hours to the correct time (note the AM / PM symbol). Tap the “PROG” button again and now the minutes digits will flash. Adjust this value using the up ( ) or down ( ) button to show the correct minute.
- Page 7 Tap the “PROG” button to advance to the next step, The LCD will show the word “START” with the hour’s digit flashes. Using the up ( ) or down ( ) buttons adjust the hours value to the time you wish the building Air Conditioning system to start.
- Page 8 You now have TWO options Option 1 - Continue programming as above. Simply continue to tap the “PROG” Button as you have been previously to advance to the next day, “Tuesday” in this example “START” then “STOP” times, then Wednesday, Thursday etc, following the same simple steps previously explained….
-
Page 9: After Hours Rn Timer
After Hours Run Timer For convenience, the installer may have set the after-hours run function. This function permits you to temporarily turn the thermostat back on for an installer pre-set period of time if the “Stop” program is running, at the conclusion of which the thermostat will automatically turn back off again. -
Page 10: Manual Model
Manual Mode ON / OFF and Mode Selection Tap the “MODE” button to cycle through all the available modes: “Heat”-only, “Cool”-only, Auto-changeover (Both “Heat” & “Cool” show in the LCD at the same time), Emergency Heat (if fitted), and “OFF”. If the fan mode is set to “Fan On”, when you select “OFF”... -
Page 11: Setting Your Desired Temperature
Tap the “PROG” button and now the week day flashes. Use the up ( ) or down ( button to set this value to the correct day of the week. Tap the “PROG” button again to exit the clock set function or simply wait 30 seconds to auto exit this screen and return to the main operating display. -
Page 12: Switching Between Day And Night Set Points
Switching Between Day and Night Set Points If the function is set by your installer, the thermostat will keep two sets of temperatures in its memory. Typically one set is for daytime set point temperatures, and the other for the night settings. The thermostat provides a quick and simple way to change between your day and night time set temperatures. -
Page 13: Common Functions
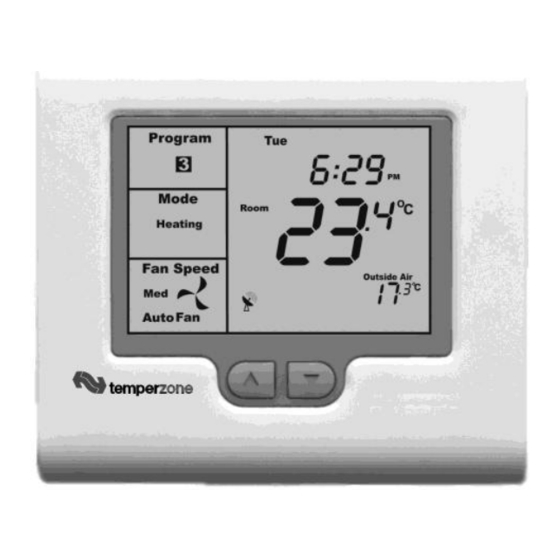
Common Functions The Buttons Explained – ON/Off and Mode Selection etc MODE Tap this button to cycle the thermostat through the available modes: “Heat” only, “Cool” only, Auto-changeover (Indicated by the words; “Heat” and “Cool” being visible on the display at the same time), Emergency Heat (if fitted), and “OFF”. When setting the thermostat to “OFF”... - Page 14 (Up) Use this button to increase the desired room temperature for “Heating” or “Cooling” modes, or to increase a “value” in programming modes. Also used to force an override of the pre-programmed temperatures and temporarily replace them with a new higher set temperature.
-
Page 15: Control Modes
Control Modes: Heat-only Mode - The thermostat will turn on the Heating when the room temperature falls below the Heat set point temperature. In Heat-only mode the thermostat will NOT bring on the Cooling regardless of the room temperature and the Cooling set point temperature. - Page 16 Auto-changeover Mode - The thermostat will turn on the Heating if the water temperature falls below the Heat Set point temperature. Likewise it will commence Cooling if the water temperature rises above the Cool Set point. This is the recommended mode as it provides automatic control of the heat pump system to maintain the desired water temperature.
- Page 17 Padlock Symbol. Whenever this symbol is shown, a control limit has been reached, or a button, or other function has been locked out. Spanner Symbol. If you see a spanner ICON flashing on your LCD, the installer has left your thermostat in “Commissioning mode”...
- Page 18 “unlock” once the outside air temperature becomes favourable. TEXT “FAULT” The TZT-100 has been “requested” to shut down the heating, cooling or heat pump system as a response from an external command. This request may have come from a sensor fitted to the heat pump system, a sensor monitoring supply power or a multitude of safety interlocks that can be used.
- Page 19 Troubleshooting Symptom Suspected Fault Suggested remedy Sensor location needs to be checked Make sure sensor is in correct position Temperature display seems inaccurate Position of sensor in titanium pocket Make sure sensor is at the bottom of the titanium pocket Sensor calibration may be incorrect Call your installer, Smart Temp or Oasis, for information on how to...
- Page 20 Contact the installer if you wish this function disabled (NOT recommended). Temperature display in The TZT-100 can operate in either Deg C or Contact your installer, Smart Temp or Oasis the wrong format – C or F. Deg F mode. This is set by your installer.
- Page 21 Specifications Input Voltage 24VAC 50/60 Hz +/- 15%. Relay rating 24VAC @ 1Amp maximum per relay. Operating Temperature 0-50°C (32 to 122°F). Operating RH 0-95% (non condensing). Storage Temperature 0-65°C (32 to 150°F). Size 113 x 103 x 23mm. Display Size 74 x 55mm.
- Page 22 Display resolution 0.1 deg C (0.2F). Control Range Off to 45c (113F). Outside Air temp display range -8 ~ +60c (17 ~ 140F). Security Pin protected Installer menu with key lock. Heat & Cool set control limits. Lithium backup battery for clock functions. Back light Blue EL.
- Page 23 Oasis Technologies Ltd www.oasisheatpumps.com Ph 09 5358891 Mobile 021 725651 Email: michael.ridenton@oasisheatpumps.com © Oasis – All rights reserved. Intellectual Rights apply...
Need help?
Do you have a question about the TZT-100 and is the answer not in the manual?
Questions and answers
I want to change temperature setting from degree farenight to Celsius