Table of Contents
Advertisement
Advertisement
Table of Contents

Related Manuals for LATNEX MG-2000T


Summary of Contents for LATNEX MG-2000T
- Page 1 Pro ELF Magnetic Field Meter (with Datalogger) MG-2000T / MG-2000TD HB4MG2000T00...
-
Page 2: Table Of Contents
Contents Introduction ..........1 Application ..........2 Features ............ 3 Identifying Parts ........4 Measurement Procedures ......5 Clock setup ..........7 Auto power off setup ......... 8 Continuity data logging setup ....9 Clear data logger memory ...... 10 Clear all data logger memory .... -
Page 3: Introduction
MG-2000T/MG-2000TD 1. Introduction Safety precautions should be taken against electric appliances in places including medical institutions, schools and residential districts, where people usually stay for a long time, to prevent patients, babies and senior citizens from exposure to high electromagnetic waves. -
Page 4: Application
MG-2000T/MG-2000TD 2. Application This meter is applied to measuring magnetic fields of extremely low frequency (ELF) of 30 to 2000Hz. It is capable of measuring the magnetic field radiation intensity that is produced from electric transmission equipment, power lines, microwave ovens, air conditioners, refrigerators, computer monitors, video/audio devices and so forth. -
Page 5: Features
MG-2000T/MG-2000TD 3. Features Uses three internal orthogonal sensors to test a wide range of ELF magnetic fields, independent of measurement angle. The tester is designed to provide a quick, reliable and easy way to measure magnetic field radiation levels around power lines, home appliances and industrial devices. -
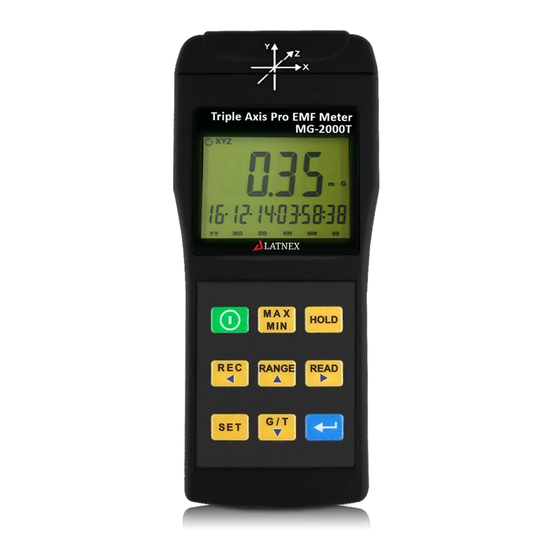
Page 6: Identifying Parts
MG-2000T/MG-2000TD 4. Identifying Parts 1. LCD display. 2. Power key. 3. maximum Hold and minimum Hold key. 4. Data Hold key. 5. Record data and Setup function left key. 6. Range and Setup function up key. 7. Reading and Setup function right key. -
Page 7: Measurement Procedures
MG-2000T/MG-2000TD 5. Measurement Procedures Press “ ” key turn on the meter, press “ ” key again to turn OFF the meter. Press “ ” key to select milli-gauss (mG) or micro-tesla (µT) unit. Position the front of the meter to measure the ... - Page 8 MG-2000T/MG-2000TD LCD, press “ ” or press “ ” again to unlock. To retain the maximum and minimum value, press “ ” key and the reading value displayed on the LCD will keep updating to the maximum value. Press again to ...
-
Page 9: Clock Setup
MG-2000T/MG-2000TD measurement, the reading of tester should return to zero, unless an electromagnetic field from other sources is detected. 6. Clock setup This meter clock uses 24 hour time. Press “ ” key to enter clock setting mode ... -
Page 10: Auto Power Off Setup
MG-2000T/MG-2000TD mode. 7. Auto power off setup Press “ ” key again to auto power off time setting mode (2.SET). Press “ ” or “ ” key to change the auto power off time. Press “ ” key to store the setup, exit the ... -
Page 11: Continuity Data Logging Setup
MG-2000T/MG-2000TD 8. Continuity data logging setup The data logging interval is the time between data records. To begin data logging, set the logging interval as per instructions below. To exit data logging, set logging interval back to 0. Press “... -
Page 12: Clear Data Logger Memory
MG-2000T/MG-2000TD Clear data logger memory (last data entry) Press “ ” key again to clear data logger memory for last record setting mode (4.CLA) Press “ ” key to clear data logger memory for last record and exit the mode. -
Page 13: Clear All Data Logger Memory
MG-2000T/MG-2000TD 10. Clear ALL data logger memory Press “ ” key again to clear data logger memory for all record setting mode. (5.CLA) Press “ ” key to clear data logger memory for all record. Press “ ” key to store the setup, exit the ... -
Page 14: Single Data Memory
MG-2000T/MG-2000TD 11. Single data memory record Press “ ” key each time to store the display reading and time stamp in memory. 12. Viewing logged reading control Press “ ” key to view logged readings. Press key to scroll through the readings, Press “... -
Page 15: Specifications
MG-2000T/MG-2000TD 13. Specifications Display : 4 digits Triple LCD display. Range : 20/200/2000 mG, 2/20/200µT. Resolution : 0.01/0.1/1 mG or 0.001/0.01/0.1 µT. Frequency response : 30Hz to 2000Hz. Sensor : Triple Axis (X, Y, Z). ... -
Page 16: Battery Replacement
MG-2000T/MG-2000TD 14. Battery replacement WARNING If the symbol “ ” appears on the LCD, please replace the battery immediately Turn off the instrument. Open the battery cover and remove the battery. Replace with four-9V NEDA 1604, IEC 6F22 or ... -
Page 17: Safety Precaution
MG-2000T/MG-2000TD 16. Safety Precaution For cleaning the instrument use a soft dry cloth. Never use a wet cloth, solvents or water, etc. Operation Altitude : Up to 2000M. Operating Environment : Indoors use. This instrument has been designed for being... -
Page 18: Software Installation (Mg-2000Td)
MG-2000T/MG-2000TD 17. Software installation (MG-2000TD) Insert the CD into the disk drive. Software installation procedure Click on the Software Installation to install the EMF Software. Click on the .NET 2.0 to load the Microsoft .NET Framework. Click on the PL2303 Driver Installation to install the usb Driver. -
Page 19: Note
MG-2000T/MG-2000TD Double click on the following icon to run the software. 18. Note Caution This symbol indicates that equipment and its accessories shall be subject to a separate collection and correct disposal... - Page 20 EMR Shielding Solutions Inc. 399 Four Valley Drive, Unit 13, Vaughan, Ontario, L4K 5Y7, Canada E-mail: info@emrshieldingsolutions.com www.emrshieldingsolutions.com...
Need help?
Do you have a question about the MG-2000T and is the answer not in the manual?
Questions and answers