Advertisement
Quick Links
JA-163A RB Wireless outdoor battery-powered siren
The JA-163A RB is a component of the JABLOTRON 100 system. It is
used for system alarm indication outside a building. It can also be used
for supplementary acoustic signalling (PG activation, arming, chirps). The
siren is powered by just one lithium battery with no other external power.
The JA-163A RB includes only the base with the JA-163A-BASE-RB
PCB, the BAT-100A lithium battery and always has to be completed with
a cover from the JA-1X1A-C-xx series (see following table). The siren
occupies one position in the system. The product should be installed by a
trained technician with a valid certificate issued by an authorized
distributor.
For combinations of colour and cover material, see the following table:
Cover type
Colour and cover
material
JA-1X1A-C-GR
Grey plastic
JA-1X1A-C-ST
Stainless steel sheet
JA-1X1A-C-WH
White plastic
JA-1X1A-C-GR-B
Grey plastic
JA-1X1A-C-ST-B
Stainless steel sheet
JA-1X1A-C-WH-B
White plastic
Installation
The whole enrollment procedure has to be done in service mode of
the control panel. There must be a JA-11xR radio module installed in
the control panel.
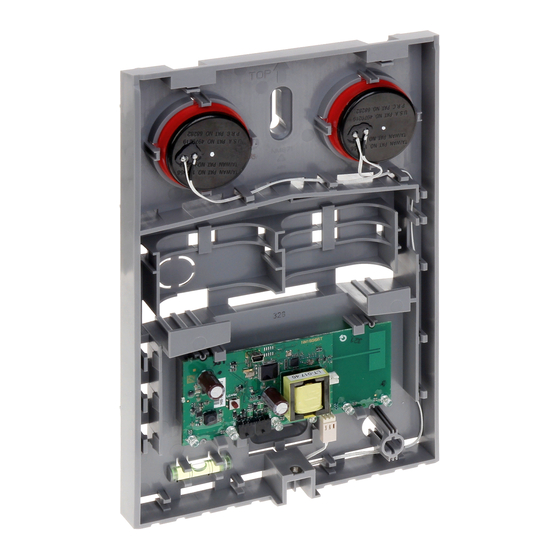
Figure 1: 1 – hole for installing; 2 – piezo sounders; 3 – BAT-100 lithium battery
with reusable battery strap (up to 2 batteries can be used); 4 – PCB;
5 – spirit level; 6 – hole for installation with tamper detection; 7 – front cover
screw; 8 – string with clip connecting the front cover for easy installation
The siren should be installed on a vertical wall,
with
the
flasher
installing the siren near the gutters and on other
places
where
there
accumulation.
1.
Attach the siren onto a suitable place using 2 screws through the
holes (1) and (6). The spirit level can be used for easy installation (5).
2.
Connect the BAT-100A lithium battery (3) to the connector (11).
JA-163A RB Wireless outdoor battery-powered siren
Strobe colour
Red
blue
facing
downwards.
Avoid
is
a
danger
of
ice
Figure 2: 9 – production code; 10 – LEARN (enrollment) button; 11 – battery
connector; 12 – yellow fault indicator; 13 – mini USB connector; 14 - piezo
siren connection (attention: high voltage); 15 – external antenna
connector; 16 - high intensity red LED flashers
3.
Proceed according to the control panel installation manual.
Basic procedure:
a.
When the battery is connected, the yellow LED (12) indicates by
a permanent light that the siren has not been enrolled into the
system yet.
b. Go to the F-Link software, select the required position in the
Devices tab and launch the enrollment mode by clicking on the
Enroll option.
c.
Press the button marked LEARN (10) – the siren is thus enrolled
and the yellow LED indicator goes off.
4.
Put back the siren cover and attach it using the screw (7).
5.
Perform siren properties setting, see the following chapter: Internal
settings of the siren.
Notes:
-
The siren can also be enrolled into the system by entering its
production code (9) in the F-Link software. You can find the
production code on the sticker, glued on the PCB. All numbers
under the bar code shall be entered (1400-00-0000-0001).
-
The siren can be powered by up to two BAT-100A batteries and we
recommend this when longer siren operation time is required. There
is a place prepared for second battery use see Figure 1. Connect the
battery to the other connector (11). The battery connection order
doesn´t matter.
Erasing the siren from system / RESET
Use this procedure when the siren has to be erased from one
system and enrolled to another one. Proceed this way:
1.
The control panel has to be in Service mode.
2.
Open the siren cover and disconnect the BAT-100A battery from
its connector.
3.
Go to the F-Link software, „Devices" tab, and erase the siren
from the control panel and leave service mode.
4.
Connect the BAT-100A battery. Then press and hold the LEARN
button (10) for approximately 8 sec until the yellow LED (12)
starts flashing. Then release the button.
5.
When flashing expires (2 x 7 flashes) the yellow LED goes on.
It indicates that the siren is enrolled nowhere.
Notes:
-
When a reset is done the yellow LED goes off and it means that
there is some control panel in the siren's radio range with an
open service mode and the enrollment procedure has been
performed again and the siren is assigned to that control panel.
1.
A FW update can be performed by the F-Link software in service
mode, but only by a user with Service authorisation.
2.
Start the F-Link software and enter service mode.
3.
Open the siren cover.
4.
Connect a PC to the siren using a mini USB cable.
5.
FW update mode is indicated by permanent lighting of the
yellow LED.
6.
Continue as with updating the control panel using F-Link
software; F-Link: Control panel
device options select the USB option (typically at the first
position).
7.
Press the OK button to perform an update of the selected
device.
8.
Disconnect the mini USB cable.
9.
Close the siren cover.
10. Check the siren settings via F-Link SW, Devices / Internal
settings.
11.
Test the siren functions.
1 / 1
FW update
Update firmware. In the
MNM51101
Advertisement

Related Manuals for jablotron JA-163A Series


Summary of Contents for jablotron JA-163A Series
- Page 1 JA-163A RB Wireless outdoor battery-powered siren The JA-163A RB is a component of the JABLOTRON 100 system. It is used for system alarm indication outside a building. It can also be used for supplementary acoustic signalling (PG activation, arming, chirps). The siren is powered by just one lithium battery with no other external power.
- Page 2 ERC REC 70-03 maximum postponed reaction of the siren to an alarm. When the option JABLOTRON ALARMS a.s. hereby declares that the JA-163A RB is 8 s has been selected, then it is not possible to enable set / unset in compliance with the essential requirements and other relevant indication.