Table of Contents
Advertisement
Quick Links
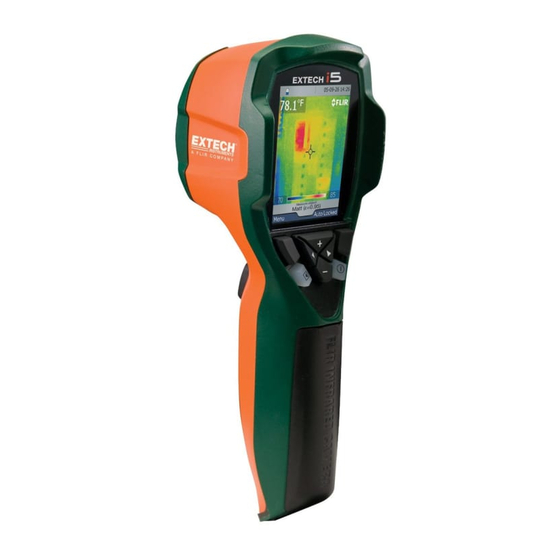
LCD
Battery
Access
Cover
1.
MEMORY:
Insert a miniSD card into the slot under the rubber Memory/Charge/Data
cover on the side of the handle (Fig.1).
2.
POWER:
Slide the battery access cover down to open, connect the battery's cable
connector to the camera's internal connector, insert the battery and replace
cover.
The battery must be charged inside the camera by connecting the power supply to the center port under the
Memory/Charge/Data cover (Fig.1).
Once plugged in the battery charging indicator LED will change from orange to green when the battery
is fully charged.
3.
START:
Press the On/Off button to power the camera on or off.
4.
FOCUS:
The i-series is a fixed focus camera with no adjustment needed. IMPORTANT NOTE: Minimum focus
distance = 24 inches.
5.
AUTO ADJUST:
Level and Span (Brightness and Contrast.
To switch between Auto mode and Manual (or Locked) mode, press the
Right Selection Button.
No padlock icons (Fig.2) will appear on the lower portion of the LCD when the camera is in Auto Adjust
mode.
6.
MANUAL ADJUST:
Span are locked at their current settings.
If in Auto mode press the Right Selection Button to switch to Manual
(Locked) mode.
Padlock icons will now be displayed on the LCD (Fig.3).
© 2011 The Snell Group / 322 N. Main Street / Suite 8 / Barre, VT 05641 / 800-636-9820
Trigger
Memory,
Charge & Data
Cover
In Auto mode the i-series will continuously auto adjust both
When entering into manual (Locked) mode, Level and
QuickStart:
FLIR/EXTECH i3, i5, i7
Fixed Focus
Lens
Lens Cap
Lever
Left Selection
Function
Left Selection
Button
Archive Button
+
-
Navigation Pad
( up[+]/down[-]/left/right)
Memory
Power
Charge Indicator
/
www.thesnellgroup.com
FLIR/EXTECH i3, i5, 17 Page 1
Spot Temp.
Right Selection
Function
Right Selection
Button
On/Off
Data
Fig.1
Fig.2
Fig.3
Advertisement
Table of Contents

Related Manuals for FLIR EXTECH i3


Summary of Contents for FLIR EXTECH i3
- Page 1 (Locked) mode. Fig.3 Padlock icons will now be displayed on the LCD (Fig.3). © 2011 The Snell Group / 322 N. Main Street / Suite 8 / Barre, VT 05641 / 800-636-9820 www.thesnellgroup.com FLIR/EXTECH i3, i5, 17 Page 1...
- Page 2 IFOV =3.73 mRad (Theoretical with 80x80 Detector and standard 17˚x17˚ lens) Detect 1in. target @ 22ft. © 2011 The Snell Group / 322 N. Main Street / Suite 8 / Barre, VT 05641 / 800-636-9820 www.thesnellgroup.com FLIR/EXTECH i3, i5, 17 Page 2...
Need help?
Do you have a question about the EXTECH i3 and is the answer not in the manual?
Questions and answers