Advertisement
Advertisement
Table of Contents

Related Manuals for BH FITNESS H674U


Summary of Contents for BH FITNESS H674U
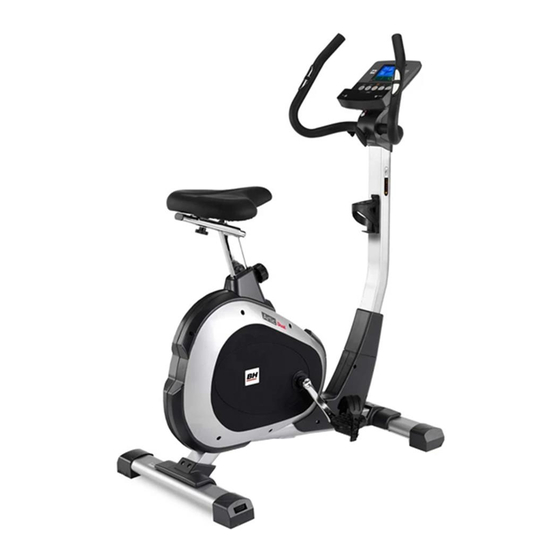
- Page 1 H674U Upright Bike...
- Page 2 Fig.1 Fig.2...
- Page 3 Fig.3 Fig.4 Fig.5 Fig.6...
- Page 4 Fig.7 Fig.8 Fig.9 Fig.10...
- Page 5 IMPORTANT SAFETY ADVICE.-PRECAUTIONS. This bicycle has been designed and constructed to provide maximum safety. Nevertheless, certain precautions should be taken when using exercise equipment. Read the whole manual before assembling and using the bicycle. The following safety precautions should also be observed: 1.
-
Page 6: General Instructions
GENERAL INSTRUCTIONS.- Carefully read through the instructions contained in this manual. It provides you with important information about assembly, safety and use of the machine. 1. This appliance has been tested and it complies with standard EN957, suitable for home use. User maximum weight 90kg. Braking is independent of speed. - Page 7 Right and left refer to the position that the user adopts when sitting on the saddle to do the exercises. The right-hand pedal, marked with the letter (R), screws onto the right-hand crank, also marked with an (R), in a clockwise direction. Tighten securely,Fig.3.
-
Page 8: Mains Connection
Fix the cover (31). Set the handlebar in a comfortable position and tighten the handle (29) turning clockwise, Fig.6. 7. FITTING THE ELECTRONIC MONITOR.- Remove the screws (55) from the base of the monitor, connect the terminals (59) (60) to those on the monitor (34), Fig.7, then slide the front of the monitor down onto the plate on the main post (59), making sure not to snag any of the wires, fit the screws (55) and tighten. - Page 9 H674U...
- Page 10 To order replacement parts: State the part code and Quantity...
-
Page 11: Electronic Monitor
ELECTRONIC MONITOR... - Page 12 Fig.11 Fig.12 Fig.13 Fig.14 110V Fig.15 Fig.16...
-
Page 13: Monitor Functions
STARTING.- To switch the monitor on first plug the adapter, supplied with the machine, into the mains socket (110 V – 120 V) and the jack on the adapter into the socket at the bottom of the machine. (Fig. 14) If at any time during exercise you press the START/STOP button then all of the unit’s functions will stop. - Page 14 MANUAL FUNCTION.- Use the UP / DOWN keys to select the manual function and press ENTER. Press the START/STOP key to start exercising and use the UP / DOWN keys to increase or decrease the exertion level. There are 24 exertion levels. If you press the START/STOP key while at the start screen, exercise will begin directly in manual mode.
-
Page 15: User Program
you wish to use and then press the ENTER key. Press START/STOP to start the exercise. The duration of the program graph is 10 minutes, divided into 10 minutes stages. To program time, distance and/or calories, go through the following procedure: Once the program has been selected and before pressing the START/STOP key, press the ENTER key to program the time using the UP / DOWN keys. -
Page 16: Random Function
the UP/DOWN keys to select the desired option (60%, 70% 85% or Tag) and press the ENTER key. The first three represent the percentage with respect to maximum heart rate (220-age) and the fourth is used to specify the target heart rate manually. -
Page 17: Body Fat Program
On this model the pulse rate is measured by placing both hands on the sensors (R), located on the handlebar, as shown in Fig.12. When both hands are placed on the sensors the heart symbol on the right hand side of the screen, marked PULSE, will begin to flash and after a few seconds a heart rate reading will be displayed. -
Page 18: Troubleshooting Guide
pair. Open the Pafers app to run it. ANDROID OPERATION (compatible Android devices) Download a Pafers App from Google Play. Then connect the USB Bluetooth module (purchased separately) into the USB port on the back of the monitor (Fig. 16.) Turn Bluetooth to “ON” in settings on the Android device.
Need help?
Do you have a question about the H674U and is the answer not in the manual?
Questions and answers