Table of Contents
Advertisement
Advertisement
Table of Contents

Related Manuals for Uberhaus MPS2-10CRN1-BH9


Summary of Contents for Uberhaus MPS2-10CRN1-BH9
- Page 1 87795040 MPS2-10CRN1-BH9...
-
Page 3: Table Of Contents
TABLE OF CONTENTS SAFETY PRECAUTIONS Safety rules ............................2 Electrical information ..........................2 Operating conditions ........................3 IDENTIFICATION OF PARTS Accessories ............................3 Names of parts..........................4 AIR CONDITIONER FEATURES Electronic control operating instructions ..................5 OPERATING INSTRUCTIONS Operating instructions ........................6 INSTALLATION INSTRUCTIONS Location ............................8 Window kit installation ........................8 Exhaust hose installation ........................ -
Page 4: Safety Precautions
SAFETY PRECAUTIONS Safet y rules To prevent injury to the user or other people and property damage, these instructions must be followed. Incorrect operation due to ignoring of instructions may cause harm or damage. Always do this Never do this Do not operate your air conditioner in a wet room such as a bathroom or laundry room. -
Page 5: Operating Conditions
IDENTIFICATION OF PARTS Operating conditions The air conditioner must be operated within the temperature range indicated below: MODE OOM TEMPERATURE COOL Note: Perform ance may be reduc ed outside of these o perating t emperatu res. Accessories PARTS Exhaust hose , adapter (flat mouth) 1 set Window slider kit and bolt (The bolt is in the poly bag containing... -
Page 6: Names Of Parts
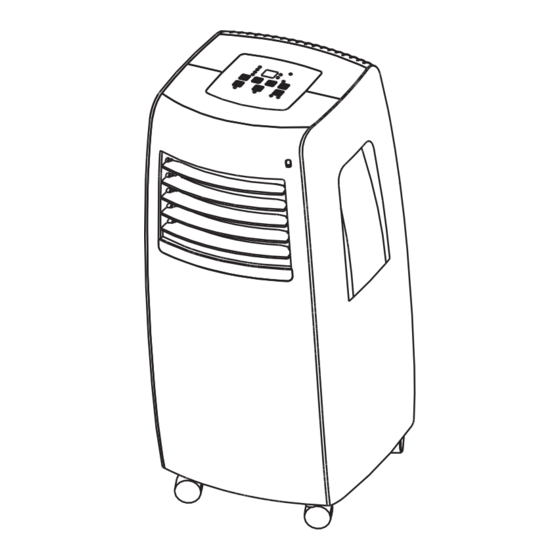
IDENTIFICATION OF PARTS NAMES OF PARTS Front Control Panel Horizontal Louver Control Lever (adjust manually) Carrying Handle (both sides) Remote Signal Receptor Panel Fig. 1 Rear Upper Air Filter (Behind the grille) Air Outlet Wheel Air Intake Drain Outlet Air Intake Lower Air Filter (Behind the grille) Bottom Tray Drain Outlet... -
Page 7: Electronic Control Operating Instructions
AIR CONDITIONER FEATURES ELECTRONIC CONTROL OPERATING INSTRUCTIONS Befo re you begin, th oroughly familia rize yourself wit h the control panel and re mote control and all its functions, then locate the symbol for the fu nctions desired. Th e uni t can be co n tr o ll ed b y the u ni t contr o l pan el alo ne or w i th the r em ote control. CONTROL PA NEL OF THE AIR CONDITIONER Fig.3 MODE se le c t... -
Page 8: Operating Instructions
OPERATING INSTRUCTIONS Pro tection code: AUTO operation P1- Bottom tray is full - Connect the When you set the air conditioner in drain h ose and drain t he colle cted AUTO mode, it will automatically select water a way. If error re peats, call cooling,or fan only operation depending for ser vice. - Page 9 OPERATING INSTRUCTIONS When the unit is on, press the Timer button to start the Auto-off program. The indicator light illuminates. Press the UP or DOWN button to select the desired time. Press the TIMER button again within 5 seconds, the Auto-on program is initiated and the indicator light illuminates.
-
Page 10: Installation Instructions Location
INSTALLATION INSTRUCTIONS (optional) INSTALLATION INSTRUCTIONS LOCATION The air conditioner should be placed on a firm and level surface to minimize noise and vibration. For safe and secu re positioning, place the unit on a smooth, level flo or strong enough to support the unit. The unit has casters for easier placement, but it should only be rolled on smooth, flat surfaces. - Page 11 INSTALLATION INSTRUCTIONS (optional) Installation in a double-hung sash Foam seal A window (adhesive type) 1. Cut the foam seal (adhesive type) to the proper length and attach it to the windowsill. See Fig.8 Fig. 8 2. Attach the window slider kit to the windowsill. Adjust the length of the window slider kit according to the width of window, shorten the adjustable window kit if the width of window is less than 26.6 inches.
- Page 12 INSTALLATION INSTRUCTIONS (optional) Installation in a sliding sash window Foam seal A (adhesive type) 1. Cut the foam seal A (adhesive type) to the proper length and attach it to the window frame. See Fig.12. Fig.12 2. Attach the window slider kit to the windowsill. Adjust the length of the window slider kit according to the height of window, shorten the adjustable window Window...
-
Page 13: Exhaust Hose Installation
INSTALLATION INSTRUCTIONS (optional) Ex ha ust h os e inst a llat ion: The exhaust hose and adaptor must be installed or removed in accordance with the installation of the unit. Fig.16 COOL or AUTO mode Install Remove DEHUMIDIFY mode 1. -
Page 14: Water Drainage
INSTALLATION INSTRUCTIONS Water drainage: During dehumidifying mode,remove the drain R emove the plug from the back of the unit. You can also connect drain plug a 3/4''(1.9cm) garden hose (sold separately) onto the drain connector (5/8''(1.6 m) universal female For models without mender already on the unit). -
Page 15: Care And Maintenance
CARE AND MAINTENANCE CARE AND MAINTENANCE IMPORTANT: 1) Be sure to unplug the unit before cleaning or servicing. 2) Do not use gasoline, thinner or other chemicals to clean the unit. Upper filter 3) Do not wash the unit directly under a tap or using a hose. (take out) It may cause electrical shock. - Page 16 TROUBLESHOOTING TIPS T R O U B L E S H O O T I N G PROBLEMS POSSIBLE CAUSES SUGGESTED REMEDIES 1. Uni t does not - P1 appears in the display window Drain the water in the bottom tray. start when pressing on/of f - Room temperature is lower than...
- Page 17 CONTROL INSTRUCTIONS control getting powered AAA batteries back of the remote, containers to protect the environment Do not recharge batteries or dispose of them in fire.
- Page 18 INSTRUCTIONS Control RG51B30/CE (2 AAA batteries) increments up to increments up to following sequence: remote Model: RG51B30/CE th r ree speeds:...
- Page 19 INSTRUCTIONS TEMP.( C) AUTO for when you are sleeping TEMP NOTE: While the unit is running under SLEEP mode, the mode will be MODE SLEEP or MODE button is pressed. cancelled if ON/OFF, FAN SPEED, Model: RG51B30/CE any other settings. s c r e e n SET TEMPERATURE the LOCK button has been pressed.
- Page 20 INSTRUCTIONS M o d e TEMP.( C) AUTO MODE TEMP TEMP MODE NOTE runs in either COOL, DRY or DRY modes cannot select set. M o d e TEMP.( C) AUTO MODE TEMP TEMP 17°C~30°C MODE NOTE M o d e TEMP.( C) AUTO MODE...
- Page 21 INSTRUCTIONS When this button is pressed, in the first 30 control sends control displays control sends...
- Page 22 INSTRUCTIONS 3. Wait for about 3 seconds and the digital display area will show the temperature again. Now this function is activated.
- Page 23 INSTRUCTIONS home. Example: setting. Start Stop Example: Start Stop CAUTION...
-
Page 24: Warranty
WARRANTY Thank you for purchasing this UBERHAUS product. These products have been made to meet high standards of quality and are guaranteed for domestic use against manufacturing faults for a period of 36 months from the date of purchase. This warranty does not affect your statutory rights.
Need help?
Do you have a question about the MPS2-10CRN1-BH9 and is the answer not in the manual?
Questions and answers
What does code p1 mean and what can I do about it