Witt GP 41 Installation And Operating Instructions Manual
Open refrigerant pumps
Hide thumbs
Also See for GP 41:
Table of Contents
Advertisement
Advertisement
Table of Contents

Subscribe to Our Youtube Channel
Related Manuals for Witt GP 41


Summary of Contents for Witt GP 41
-
Page 3: Table Of Contents
Content INTRODUCTION ......................4 Intended use ..........................4 Safety Requirements ....................... 4 Safety advice ........................... 5 Disclaimer ..........................5 TERMS OF WARRENTY ....................6 TECHNICAL INFORMATION..................7 Description of types ......................... 7 Scope of delivery ........................7 Order information ........................8 Codes / certificates / approvals .................... - Page 4 TH. WITT Kältemaschinenfabrik GmbH Lukasstrasse 32, D-52070 Aachen Tel. +49-241-18208-0, Fax. +49-241-18208-490 https://www.th-witt.com, sales@th-witt.com State of ducumentation: April 2019 2161-601_E_2019_04...
-
Page 5: Introduction
1.1 INTENDED USE The WITT refrigerant pump with flanged motor type GP is designed to deliver exclusively refrig- erant liquid at its boiling point. The pump is labelled with model and design limitation for pressure and temperature. Pump performance details are specified in chapter Fehler! Verweisquelle konnte nicht gefunden werden. -
Page 6: Safety Advice
1.3 SAFETY ADVICE The pump is designed for use in industrial refrigeration systems using primary refrigerants. It is very important that everybody responsible for the safe operation and maintenance of the plant reads this manual. The coupling protection must be in place at all times! (see chapter 8.2.2) If you have any problems please do not hesitate to call our service department, who will be glad to assist you. -
Page 7: Terms Of Warrenty
TERMS OF WARRENTY In order to avoid accidents and ensure optimum performance, no modifications or conversions may be carried out to the refrigerant pump without the explicit written approval by TH. WITT KÄLTEMASCHINENFABRIK GMBH. These instructions are based on internationally standardised SI units of measurements. -
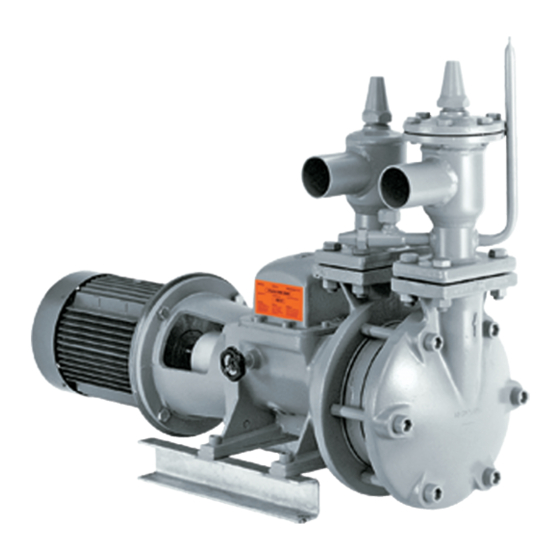
Page 8: Technical Information
GP 41, GP 42, GP 51, GP 51a, GP 52 and GP82. Pumps can be delivered with or without standard flange-motor. To select your model please see table below. 3.2 SCOPE OF DELIVERY GP… model 1... -
Page 9: Order Information
Please specify the following data when ordering a pump: refrigerant type GP 41, GP 42, GP 51, GP 51a, GP 52 or GP82 For models 2 the required coupling size (or motor size of the motor to be fitted later) ... -
Page 10: Technical Data
TECHNICAL DATA 4.1 GENERAL INFORMATION DESCRIPTION GP 41 GP 42 GP 51 GP 51a GP 52 GP 82 Volume refrigerant side [ltr.] 1,75 1,85 4,10 4,10 5,25 7,72 Reservoir oil content [ltr.] 1,70 1,70 2,00 2,00 2,00 2,00 Flange connection [DN]... - Page 11 Weight Motor size Remark [kg/dm [kW] [kg] Δ < 0,7 (NH3) < 1,4 GP 41 0,37 220 - 240 380 - 420 < 1,6 < 1,8 < 0,7 (NH3) 0,37 < 1,4 GP 42 220 - 240 380 - 420 <...
-
Page 12: Materias
Motor size Remark [kg/dm [kW] [kg] Δ < 0,7 (NH3) 0,44 < 1,4 GP 41 254 - 280 440 - 480 < 1,6 0,66 < 1,8 < 0,7 (NH3) 0,66 < 1,4 GP 42 254 - 280 440 - 480 <... -
Page 13: Dimensions
4.5 DIMENSIONS 4.5.1 Dimensions GP 41 / GP 42 All dimensions in mm (inch) - Technical data -... - Page 14 4.5.2 Dimensions GP 51 / GP 51a / GP 52 All dimensions in mm (inch) - Technical data -...
- Page 15 4.5.3 Dimensions GP 82 All dimensions in mm (inch) - Technical data -...
-
Page 16: Sectional Views
4.6 SECTIONAL VIEWS Figure 3a: GP 82 shown (Model GP 41 – GP 52 similar) - Technical data -... - Page 17 Figure 3b: Details of bearing Figure 3c: Detail of coupling and motor connection - Technical data -...
- Page 18 Figure 3d: Details of shaft seal - Technical data -...
- Page 19 Figure 3e: Details of strainer KS 40-P / KS 50-P Figure 3f: Details of strainer KS 80-P - Technical data -...
-
Page 20: Parts List
M16 x 55 5111.AHA1BI M16 x 65 5111.AHA1BS hex nut 5151.AHA100 5151.AHA100 5151.AHA100 hexagon socket screw (GP 41 & 51) M16 x 100 5112.BHA1CR M16 x 150 5112.BHA1E5 hexagon socket screw (GP 42, 52 & 82) M16 x 140 5112.BHA1DV M16 x 220 5112.BHA1G3... - Page 21 4.7.2 parts list for pump (part 2 of 2) GP 41/ GP 42 GP 51/ GP 51a/ GP 52 GP82 weight weight weight part Dimension Article-No. Dimension Article-No. Dimension Article-No. [gr] [gr] [gr] oil MR 520 1 ltr. 9831.100001 1 ltr.
- Page 22 4.7.3 parts list for strainers KS 40-P KS 50-P KS 80-P weight weight weight part Dimension Article-No. Dimension Article-No. Dimension Article-No. [gr] [gr] [gr] o-ring 40 x 6 5642.ABDB01 50 x 6 5642.ABDV01 10x18x2 5642.A12A90 gasket 70/84 x 2 5632.1BXCBK 80/94 x 2 5632.1C7CLK 84/96x1...
-
Page 23: Spare Part Sets
4.397 2161.002405 4702 2161.002605 4730 1 x part no. E19.1, E19.2, E30, 47 1 x part no. 48 (GP 41 & 51) 1 x part no. 49 (GP 42, 52 & 82) shaft seal single (formerly 10) 2161.002201 2161.002201 2161.002401 2161.002401... -
Page 24: Description Of Operation
The WITT stop/return valve ERA is provided with a purge connection pipe DN 10 and a hand regulating valve EE6, supplied loose. The EE6 should be fitted so that any gas may be purged to the surge drum. -
Page 25: Applications
The principle of a pump re-circulation system is shown in fig. 4. Fig. 4 principle of pump recirculation system WITT refrigerant pumps differ from conventional centrifu-gal pump designs due to the fact that large volumes of entrained vapour (gas bubbles) do not completely stop delivery of the refrig- erant liquid. -
Page 26: Determination Of The Delivery Head
OPERATIONAL LIMITATIONS GP refrigerant pumps are suitable for operation with all refrigerants. GP 52 can be operated with ammonia up to 1450 RPM. GP 52 is only permitted for operation with higher density refrigerants (ρ > 800 kg/m³) below 1200 RPM! 5.2 DETERMINATION OF THE DELIVERY HEAD The required delivery head is the resistance the pump needs to overcome to supply the evap- orator with the high-est pressure loss with sufficient liquid refrigerant (in most cases this will... -
Page 27: Adaptation To Plant Requirements
RECIRCULATION RATES AND PUMP CAPACITY Recirculation factor Recirculation flow in m³/hr per 100 kW* Refrigerant 3 - 4 2 - 3 1,4 – 2,4 1,3 – 1,8 2,8 – 4,3 Air Cooler 1,2 – 2,0 5 - 10 7 - 10 5 - 10 6 - 12 3 –... -
Page 28: Installation Requirements
The vortext breaker shall consist of crossed plates with a baffle plate on top to avoid any vor- texing. Vortex breakers are available from TH. WITT. Above the baffle plate of the vortex breaker there should be at least 15mm refrigerant level (in systems a minimum coverage of 50mm is required). -
Page 29: Downleg Design
Do not connect two or more pumps in operation by a single common pump suction line liquid header. Fig.6 Application with two pumps in operation 6.3 DOWNLEG DESIGN The pump shall be connected using a vertical pipeline to the separator. To prevent interaction between pumps it is advised that each pump be connected individually to the separator, see fig. - Page 30 Required diameter of the downleg to the pumps GP 41 GP 42 GP 51 / GP 51a...
-
Page 31: Pump Discharge Line
6.4 PUMP DISCHARGE LINE The sizing of the discharge line is less critical to the sys-tem operation. A liquid velocity of 1.5 m/s is normally recommended. A non-return valve (this is usually a combined stop/check valve type ERA) in the discharge line is required when a backwards flow from the discharge to the suction side is possible. - Page 32 The flow switch control in the pump discharge shall stop the flow as the flow drops below 0,2 m/s. See also WITT information sheet W 4652-0.01 - Installation requirements -...
-
Page 33: Electrical Information
6.6 ELECTRICAL INFORMATION Folgende Vorkehrungen im Steuerstromkreis sind zu berücksichtigen: 6.6.1 Overload protection An overload protection switch shall protect the pump against too high current (amps) consump- tion. Maximum setting must be less than max. allowable current I shown on the type plate. 6.6.2 Hand switch It is recommended the control panel incorporates a H–0-A switch for use during commission- ing and maintenance operations. -
Page 34: Installation And Application
(see installation instructions for fitting pumps to a piping system, available on the WITT website). Special attention must be paid to the expected pipe contraction at low temperatures. When welding to WITT stop valves, the valves should be in a half open position with wet cloths around the valve packing. -
Page 35: Preparation Of Commissioning
8.2.1 Flange allignment GP pumps are designed with a grooved (female) flange on the suction side and a tongue (male) flange on the delivery side. It is important to ensure the pump connection flanges are properly aligned before tightening. Do not use the flange bolts to align or "stretch" the pipe. Using flange bolts to pull together a too large gap will cause undue stress in the pipework or distort the pump or the flange. -
Page 36: Commissioning
8.4 COMMISSIONING Check and record the pressures in the system. If the pressure difference is smaller than expected, the pump may be rotating in the wrong direction. The pump should rotate clockwise in the direction of the arrow indicated on the pump housing. -
Page 37: Pump Standstill (Stand-By)
8.6 PUMP STANDSTILL (STAND-BY) During periods of pump standstill, only one shut-off valve may be closed, preferably the discharge valve. When the suction and discharge valves are closed at the same time, the pressure of the trapped cold liquid in the pump will increase rapidly. As the liquid warms up to an unacceptable high value, it can very quickly damage the pump. -
Page 38: Service And Maintenance
SERVICE AND MAINTENANCE 9.1 REMOVING A PUMP Follow all national and local safety requirements when re-moving the pump. Particular care must be taken of the following: Check the plant room layout and exit doors so you can evacuate the area quickly in case of an emergency. - Page 39 Only when filling oil the hand wheel (85) has to be turned close! To fill oil carefully open the slotted screw (57) by hand ¼ turn. The surrounding of the screw shall be covered with a wet cloth to dind any escaping refrigerant gas. (see first photo chapter 0).
-
Page 40: Oil Exchange
9.3 OIL EXCHANGE When exchanging oil the same procedure as described in Chapter 9.2 has to be adhered to. If there is no significant oil consumption, the oil should be exchanged every 5 years. 9.4 CHANGING THE SHAFT SEALS 2. The oil fill plug (57) is slotted to avoid a 1. - Page 41 6. Removing the outer seal at the motor side 5. Dismanteling pump parts and inner seal at the pump side. If bearings or shaft have to be replaced please proceed with Chapter 9.5 “Chang- ing the bearing”. For details of the shaft seal see also chapter 4.6 8.
- Page 42 10. Insert the gasket (34) and slide on the 9. Inner Sealing: Use the same procedure housing. Always carefully tighten the as described in the two photos before. screws crosswise. 11. Fit for GP 50 pumps 1 felt ring respec- 12.
-
Page 43: Changing The Bearings
15. Assemble the intermediate rings and gas- 16. Tighten the screws crosswise. kets (33) in such a way that the marks align. 9.5 CHANGING THE BEARINGS 2. You can only remove the snap (Seeger) 1. Loosen screws (21) in the tightening ring ring, if the screws in the tightening ring while holding against with the coupling. - Page 44 3. Push out shaft and inner bearing with a 4. Replace the bearing. plastic hammer trough the housing. GP40 GP50 5. Replace the inner bearing in vice. 6. The bearing in GP 50 pumps is supported with only 1 snap ring. GP 40 pumps re- quire 2 snap rings to fit the bearing.
- Page 45 You can only install the snap (Seeger) ring if the screws of the tightening ring are loose! The following Torques shall apply for assembly of the pump: Hexagon socket screw DIN912, Size Torque [Nm] Torque [Ft.lb] part ball bearing M5 x 25 spring washer M6 x 16 bearing cover...
-
Page 46: Oil In The Pump
Oil can be removed through a WITT EA 10 GÜ/GB stop valve, which can be installed in place of the lower 1/4"-screw plug in the discharge chamber. In addition, a quick closing action valve must be installed be-hind the drain valve. -
Page 47: Warnings
9.8 WARNINGS WITT pumps are for refrigeration systems only. Read these instructions completely before selecting, using, or servicing these pumps. Only knowledgeable, trained refrigeration mechanics should install, operate, or service these pumps. Stated temperature and pressure limits should not be exceeded. -
Page 48: Trouble Shooting
TROUBLE SHOOTING No. symptom possible causes No power connectiom Pump does not run Differential pressure switch has been activated Damaged coupling valve in the vent line not open Pump does not prime vent line not individually piped to the low pressure side foreign material in pump lack of refrigerant conical filter is blocked... - Page 49 Lukasstraße 32, 52070 Aachen, Germany Tel. +49 241 18208-0 sales@th-witt.com...
Need help?
Do you have a question about the GP 41 and is the answer not in the manual?
Questions and answers