Table of Contents
Advertisement
Available languages
Available languages
Quick Links
►
ELECTRIC CLEANER
►
LIMPIAFONDOS ELÉCTRICO
►
NETTOYEUR DE FOND ÉLECTRIQUE
►
ELEKTROBECKENREINIGER
►
PULITORE ELETTRICO
►
ELEKTRISCHE ZWEMBADREINIGER
►
LIMPAFUNDOS ELÉCTRICO
Ref. CSPA
Manuale delle instruzioni - Handleiding met instructies
Nos reservamos el derecho de cambiar total o parcialmente las características de nuestros artículos o contenido de este documento sin previo aviso.
Nous nous réservons le droit de modifier totalement oru en partie les caracteristiques de nos articles ou le contenu de ce document san pré avis.
Wir behalten uns das recht vor die eigenschaften unserer produkte oder den inhalt diese prospektes teilweise oder wollstanding, ohne vorherige benachichtigung su andern.
Ci riservamo il diritto di cambiare totalemente o parzialmente le caratteristiche tecniche dei nostri prodotti ed il contenuto di questo documento senza nessum preavviso.
Wij behouden ons het recht voor geheel of gedeeltelijk de kenmerken van onze artikelen of de inhouk van deze handleiding zonder voorafgaand bericht te wijzigen.
Reservamo-nos no dereito de alterar, total ou parcialmente as características os nossos artigas ou o conteúdo deste documento sem aviso prévio.
DISTRIBUTED BY -DISTRIBUIDO POR-DISTRIBUÉ PAR /VERTRIEB DURCH -DISTRIBUITO DA-GEDISTRIBUEERD DOOR - DISTRIBU[DO POR:
MANUFACTURAS GRE, S.A. ARITZ BIDEA N' 57 BEIAKO INDUSTRIALDEA. APARTADO 69 -48100 MUNGUIA (VIZCAYA) ESPAÑA N' Reg. lnd. 48-116762
MADE IN CHINA/ FABRICADO EN CHINA/ FABRIQUÉ AU CHINE/ HERGESTELLT IN CHINA/ PRODOTTO IN CHINA/ GEPRODUCEERD IN CHINA/ FABRICADO NA RPC
lnstruction Manual - Manual de Instrucciones
Manuel d'instructions - Bedienungsanleitung
Manual de instru�oes
We reserve to change all of part of the articles ar contents of this document, without prior notice.
•
www.gre.es
HIMCSPA.19
Advertisement
Table of Contents

Related Manuals for GRE CSPA


Summary of Contents for GRE CSPA
- Page 1 DISTRIBUTED BY -DISTRIBUIDO POR-DISTRIBUÉ PAR /VERTRIEB DURCH -DISTRIBUITO DA-GEDISTRIBUEERD DOOR - DISTRIBU[DO POR: MANUFACTURAS GRE, S.A. ARITZ BIDEA N' 57 BEIAKO INDUSTRIALDEA. APARTADO 69 -48100 MUNGUIA (VIZCAYA) ESPAÑA N' Reg. lnd. 48-116762 MADE IN CHINA/ FABRICADO EN CHINA/ FABRIQUÉ AU CHINE/ HERGESTELLT IN CHINA/ PRODOTTO IN CHINA/ GEPRODUCEERD IN CHINA/ FABRICADO NA RPC...
-
Page 2: Safety Warning$ & Instructions
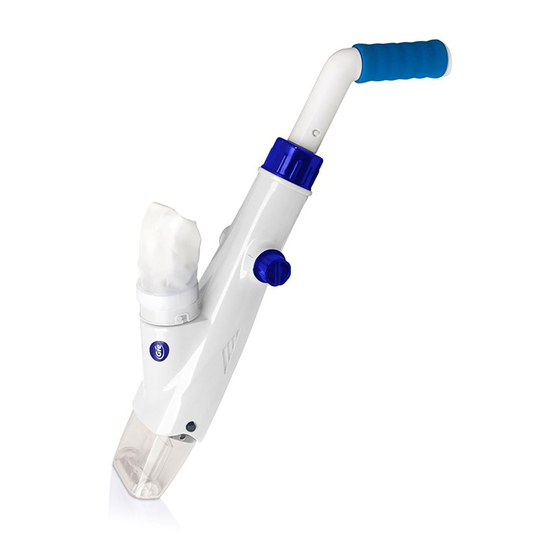
Electrical Vacumm Cleaner Battery: 8*1.2V DC, 1400MA Charging voltage: 11.5V DC, 500 mAh Motor Voltage: 12V DC 9 10 1. Transparent suction head part 6. Clip 2. Cleaner body 7. Handle 3. Filter bag 8. Battery 4.Button 9. Charger 5. Connector 10. -
Page 3: Getting Started
GETTING STARTED 1. Suction head assembly lnsert suction head into the body until two buttons of body sides popping from holes of suction head. Please keep the notch facing up. 2. Battery assembly and replacement (1) Push the button "a" forward along the arrow direction, until it not stuck the slot of the connector.(as picture A shown) (2) Holding the body while reversing the connector , and removing the battery mounting from the body.( as "b"... - Page 4 (1)Plug one end of the charger into the socket, and the charger is green. (2)Then, plug one end of charger to P1113, the charger is red, the charger is working now. Note:When the battery power completely exhausted, it is normal that the charging indicator will be flashing for 20-50 seconds.Then the indicator will turn into red and the battery will be charging correctly.
- Page 5 (1 ). Handle assembly (optional) (a). lnstall V-shape clip into connector as Picture A. (b). lnsert the handle as shown behind big department, according to needs, � • A looking for what kind of convenient way to clean the wall,ground,step and seat of the POOL/SPA.
- Page 6 How to clean the dirt on the impeller? (1 ). Turn off cleaner and remove suction par! from cleaner body, as Picture A. (2). Hold the body, pinch the hand-protection part(Picture B, as "a" shows), turn it clockwise until the end, then drag it out; (3).
- Page 7 attempt Never in any way to disassemble your cleaner on your own. attempt Under no circumstances should you to disassemble the cleaner and replace impeller, by yourself. motor Charger: use only. charger For indoor should be used outdoor and not exposed rain, humidity, liquid...
-
Page 8: Operation
OPERATION Warning damage Do not the cleaner if any is faund. liquid leakage Pollution of the could occur due to of lubricants. operate peopla/pets Do not this cleaner when are in the water. sure is fully operating. Make the cleaner immersed in the water befare aparate will... -
Page 9: Truble Shooting
TRUBLE SHOOTING Problem Possible Cause Remedy Charge lhe battery again. Battery is running out Normally cleaner can operate 45-60 minutes after fully charged. lmpeller is jammed Power off the cleaner and visually check the gap in middle of the cleaner to see if the impeller is jammed. - Page 10 Problem Possible Cause Remedy Contact dealer for proper The charger is out of transformar. arder WARNING! Using wrong will charger result in damaging the cleaner / battery and void the warranty. CAUTIONI How to judge whether the battery is destroyed or the impeller is jammed? 1.
- Page 11 Limpiafondos eléctrico 9 10 1. Cabezal transparente de succión 6. Presilla 2. Cuerpo de limpieza 7. Mango 3. Filtro 8. Batería 4. Botón 9. Cargador 5. Conector 1 O. Punto de carga Imágenes no vinculantes. Sugerencia de instalación. • Antes de utilizar este producto, lea detenidamente las advertencias y las instrucciones adjuntas y siga sus indicaciones.
-
Page 12: Para Empezar
PARA EMPEZAR 1. Montaje del cabezal de succión Inserte el cabezal en el cuerpo hasta que los dos botones del lateral salgan por los orificios del cabezal. Mantenga la muesca hacia arriba. 2. Montaje y sustitución de las baterías. (1) Presione el botón "a" hacia adelante, en la dirección de la flecha, hasta que deje de tapar la ranura del conector (ver ilustración A). - Page 13 limpiafondos (1) Enchufe un extremo del cargador en el zócalo y el cargador está en verde. (2) A continuación, conecte un extremo del cargador al limpiafondos, la carga es roja, el cargador está funcionando ahora. Nota: Cuando la carga de la batería está completamente agotada, es normal que el indicador de carga parpadee durante 20-50 segundos.
- Page 14 4. Montaje del mango (1 ). Montaje del mango (opcional) (a). Coloque la presilla en V en el conector como indica la ilustración A (b). Introduzca el mango como se muestra, detrás del compartimiento � grande y según sus necesidades, para que se adapte mejor a la •...
- Page 15 ¡PRECAUCIÓN! Asegúrese de que el dispositivo no está enchufado cuando lo limpie. Limpieza de la suciedad de la turbina (1 ). Apague el limpiafondos y quite la pieza de succión del cuerpo de limpieza, como muestra la ilustración A. (2). Sujete el cuerpo, agarre la pieza de protección (como muestra "a" en la ilustración B), gírela en el sentido de las agujas del reloj y arrástrela.
- Page 16 riesgo de aspiración. Este limpiafondos genera aspiración. Evite • Grave pelo, partes prendas el cuerpo o las sueltas de sus entren contacto aspirado dispositivo orificio de en funcionamiento. partes prendas objetos • Nunca introduzca del cuerpo, u otros en las aberturas piezas limpiafondos.
- Page 17 dañado , • caso de que el cable de alimentación esté la sustitución debe fabricante, agente realizarla el de mantenimiento u otra persona cualificada riesgos. para evitar todos los Cerciórese de limpiafondos el cargador están • que tanto el como completamente secos antes recargar aparato.
-
Page 18: Problemas Y Soluciones
Problemas y soluciones Problema Posible causa Soluciones Recargar Tiempo la batería normal Batería baja batería vez cargada com pleto: 45-60 min. Retire aparato compruebe la tensión del el espacio limpiafondos visualmente en el está bloqueado para ver si el rotor. Con su puede hacer girar limpiafondos El está... - Page 19 ¡PRECAUCIÓN! ¿Cómo se sabe si la batería está estropeada o si el impulsor está atascado? El propulsor se obstruye repentina rápidamente después Apague el limpiafondos a funcionamiento. el botón y conecte la corriente cargador. quiere eléctrica mediante el enciente el verde decir que está...
- Page 21 POUR COMMNENCER 1. Montage de la tete de succion lnsérer la tete dans le corps jusqu'a ce que les deux boutons du coté ressortent par les orífices de la tete. Maintenir l'encoche vers le haut. 2. Montage et remplacement des batteries. (1) Appuyer sur le bouton «...
- Page 22 (1) Branchez une extrémité du chargeur dans la prise, et le chargeur est vert. (2) Ensuite, branchez une extrémité du chargeur sur P1113, la charge est rouge, le chargeur fonctionne maintenant. Remarque: Lorsque la batterie est complètement épuisée, il est normal que l'indicateur de charge clignote pendant 20 à...
- Page 23 Ne jamais utiliser le chargeur s'il est abimé. Utiliser exclusivement le chargeur fourni. Assurez-vous que le chargeur et le nettoyeur de fond soient propres et secs avant de les configurer. A NOTER : Charger le nettoyeur pendant 3 heures avant sa premiere utilisation.
- Page 24 (1) Résidus dans la tete : Appuyer sur les deux boutons des cótés du corps et séparer la tete. Nettoyer la tete et l'insérer a nouveau dans le corps jusqu'a ce que les boutons ressortent par les orifices. Encache PRÉCAUTIONS PRENDRE ! S'assurer que l'appareil ne soit pas branché...
- Page 25 l'aspirateur complétement immergé • Veillez ce que soir dans l'eau avant l'opération. l'appareil NE PAS utiliser en dehors de l'eau. Cela pourrait endommager systéme/moteur garantie. et annulerait la d'usage • Profondeur maximum en eau : 3 métres • Température d'usage l'appareil: º...
- Page 27 aspirateur toxiques, • Ne pas utiliser cet pour ramasser des substances liquides l'essence, inflammables ou combustibles comme ou fonctionneren présence explosives infflamables.que cheveux, de vapeurs le corps ou piéces vetements, toutes les détachées de vos entrent en contact avec l'orifice d'aspiration l'aspirateur en marche.
- Page 28 En cas de problema Cause possible Probléme Solutions Recharger Temps d'usage la batterie. Batterie faible normale de la batterie une fois complétement chargée : 45-60 min. l'appareil Mettre hors tension et vérifier l'espace visuellement au milieu l'aspirateur pour voir si le rotor est bloqué.
- Page 29 ATTENTION ! Comment savoir si la batterie est endommagée ou bien si le dispositif d'entrainement et bloqué ? propulseur rapidement bloqué aprés 1. Le reste soudainement Éteignez nettoyeur fonctionnement. le bouton connectez le au courant électrique chargeur. indique avec le Si le témoin vert s'allume cela que la est endommagée (pour...
- Page 30 Akku-Sauger 9 10 1. Transparentes Saugkopfteil 6. Befestiger 2. Reinigungskéirper 7. Handgriff 3. Filter 8. Akku 4. Taste 9. Ladegerat 5. Stecker 10. Ladepunkt Unverbindliche Abbildungen. Montagevorschlag. • Bitte lesen Sie vor Nutzung des Gerats die beiliegende Anleitung sorgfaltig durch und befolgen Sie deren Hinweise und Warnungen.
- Page 31 (6) Es ist wirklich wichtig, dass diese Zone gut geschlossen ist...
- Page 32 (1) Stecken Sie ein Ende des Ladegeräts in die Steckdose und das Ladegerät ist grün. (2) Dann stecke ein Ende des Ladegeräts auf P1113, die Ladung ist rot, das Ladegerät arbeitet jetzt. Hinweis: Wenn die Batteriespannung vollständig erschöpft ist, ist es normal, dass die Ladeanzeige für 20-50 Sekunden blinkt.
- Page 33 VORSICHT! Verwenden Sie das Ladegerat nicht, wenn Sie feststellen, dass es beschadigt ist. Verwenden Sie ausschlier..lich das mitgelieferte Ladegerat. Stellen Sie sicher, dass sowohl das Ladegerat als auch das Bodenreinigungsgerat vor der Konfigurierung sauber und trocken sind. ANMERKUNG: Laden Sie das Reinigungsgerat 3 Stunden vor dem ersten Gebrauch.
- Page 34 5. Reinigung des Gerats nach dem Gebrauch: (1) Reste im Kopfteil: Drücken Sie die beiden Knopfe der Seitenteile des Korpers und trennen Sie das Kopfteil. Saubern Sie das Kopfteil und setzen Sie es erneut in den Korper ein, bis die lasten durch die óffnungen austreten. VORSICHT! Achten Sie darauf, dass das Gerat nicht angeschlossen ist, wenn sie es saubern.
- Page 35 Sicherheitshinweise Sauger korperlich, • Der ist nicht für den Gebrauch durch sensorisch oder geistig Personen Umgang behinderte bzw. im damit unerfahrene oder unkundige Personen ausgelegt einschlagiger und sollte von diesen nur nach Anleitung durch eine für ihre Sicherheit verantwortliche Person verwendet werden.
- Page 36 Sauger langeren genutzt werden, • Soll der für einen Zeitraum nicht trennen Sie Ladegerat. Sauger ihn vom Reiben Sie und Zubehor mit einem trockenen Tuch unzuganglich gut gelüfteten ab und bewahren diese für Kinder an einem Sonneneinstrahlung, Hitzequellen, Zündquellen Ort fern von und Chemikalien Lassen Sie das Gerat bei langerer Aufbewahrung angeschlossen...
- Page 37 mitgelieferte Originalzubehor. • Veiwenden Sie das Sauger Sto(l,behandlung • Setzen Sie den nicht unmittelbar nach einer im Pool empfiehlt sich, ein. Es das Wasser mindestens 24-48 Stunden umlaufen zu lassen. Sauger gleichzeitig Ger�Hen. • Veiwenden nicht mit anderen Lassen Sie Nichtgebrauch •...
- Page 38 Problema und Abhilfen Mogliche Problem Abhilfen Ursache Akku laden. Normale Akkulaufzeit nach Akku schwach vollstandiger Aufladung: 45-60 Min. Spannung des Gerats unterbrechen und Sichtprüfung Saugerbereich durch feststellen, ob der Rotor blockiert ist. Die lassen beiden Kreise des Rotors sich Sauger Rotor blockiert zwecks erhohter Flexibilitat mit der Hand saugt...
- Page 39 ÁCHTUNG! Woran erkennt man, ob der Akku defekt oder der Antrieb blockiert ist? plotzlich 1. Der Antrieb ist nach dem Betrieb und rasch blockiert. Schalten sie den Reiniger Ladegerat aus und schlieBen Sie ihn mit dem an das Stromnetz an. grüne aufleuchtet, (siehe...
- Page 40 Aspiratore elettrico ricaricabile 9 10 1. Testina di aspirazione trasparente 6. Elemento di fissaggio 2. Corpo di pulizia 7. Manico 3. Filtro 8. Batteria 4. Pulsante 9. Caricatore 5. Connettore 10. Dispositivo di caricatore lmmagini non vincolanti al prodotto. Consigli per il montaggio. •...
- Page 41 (6) È molto importante che questa zona sia ben chiusa...
- Page 42 (1) Inserire un'estremità del caricabatterie nella presa e il caricabatterie è verde. (2) Quindi, collegare un'estremità del caricatore a P1113, la carica è rossa, il caricabatterie sta funzionando. Nota: quando l'alimentazione della batteria è completamente esaurita, è normale che l'indicatore di carica lampeggia per 20-50 secondi. Allora l'indicatore diventa rosso e la batteria ricarica correttamente.
- Page 43 (a). Posizionare !'elemento di fissaggio a V sul connettore, come mostrato in � figura A. � (b). lntrodurre il manico, come viene indicato, dietro all'alloggio grande e in base alle necessita, affinché si adatti al meglio alla pulizia delle pareti, del �...
- Page 44 Rimozione della sporcizia dalla turbina (1 ). Spegnere l'apparecchio e rimuovere !'elemento di aspirazione, come indicato in figura (2). Sollevare il corpo, afferrare !'elemento di protezione (come viene indicato con "a" in figura B), ruotarlo in senso orario ed estrarlo. (3).
- Page 45 aspirazione. pulitrice genera un'aspirazione. Prestare • Grave rischio di Questa capelli, parti attenzione affinché del corpo o dei vestiti non entrino in contatto aspirazione dell'apparecchio con il foro di mentre é in funzione. parti oggetti apertura parti • Non introdurre del corpo, vestiti o altri nelle e nelle...
-
Page 46: Problemi E Soluzioni
lntervallo di temperatura dell'acqua per l'utilizzo della pulitrice: 4 ºC (39,2 ºF) - 35 ºC (95 ºF) l'aspiratore • Non utilizzare in assenza di un sacchetto filtrante intatto e con il posteriore posizionato. serbatoio del filtro correttamente L'utilizzo dell'aspiratore garanzia. in assenza di suddette condizioni annullera la aspirazione. - Page 47 Possibile Problema Soluzioni causa provvedere Contattare il rivenditore per 11 rotare é rotto alla sostituzione. filtro(i) 11/i é Pulire i due filtri. (sono) pieno(i) 1 rifiuti 11 sacchetto del fuoriescono dal filtro é Sostituire il sacchetto. danneggiato. filtro L'impugnatura / chiusure il manico non laterali sono...
- Page 49 Oplaadbare elektrische zuigapparaat 9 10 1. Transparante zuigmond 6. Lus 2. Body reinigingsapparaat 7. Handvat 3. Filter 8. Batterij 4.Knop 9. Oplader 5. Aansluiting 1 O. Oplaadcontact Afbeeldingen zijn niet bindend. Gesuggereerd installatie. • Voor u dit product gebruikt, eerst aandachtig de bijgeleverde waarschuwingen en instructies doorlezen en de aanwijzingen opvolgen.
- Page 50 (6) Het is echt belangrijk dat deze zone goed gesloten is...
- Page 51 (1) Steek het ene uiteinde van de lader in het stopcontact en de lader is groen. (2) Steek vervolgens het ene uiteinde van de lader op P1113, de lader is rood, de lader werkt nu. Opmerking: als de batterij volledig leeg is, is het normaal dat de laadindicator gedurende 20-50 seconden knippert.
- Page 52 OPGELET: Voor het eerste gebruik de stofzuiger gedurende 3 uur apiaden. Na volledig apiaden, werkt het reinigingsapparaat normaal tussen de 45 en 60 minuten. 4. Handvat montaren (1 ). Handvat monteren (optioneel) (a). Plaats de lus en V in de aansluiting zoals aangegeven op 171_ �...
- Page 53 VOORZICHTIG! Verzeker u ervan dat het apparaat niet is aangesloten op de stroom als u het reinigt. (2) Vuilresten in het filter: Om het filter los te halen, de body met een hand vasthouden en met de andere het filter met de klok mee losdraaien. Reinigen en terugplaatsen waarna u hem in tegengestelde richting dichtdraait.
-
Page 54: Het Apparaat
Gebruikstemperatuur apparaat: • van het tussen 4 ºC en 35 ºC apparaat gebruiken beschadiging • Nooit het als u een heeft ontdekt. assemblages beschadigd zijn mogelijk te • Onderdelen of moeten snel vervangen. Gebruik uitsluitend door de fabrikant of de distributeur gecertificeerde vervangingsonderdelen. - Page 55 Oplader gebruiken. apiadar Uitsluitend binnenshuis mag niet in de open lucht gebruikt blootgesteld worden en ook mag niet worden aan regen, vochtigheid, type geen enkel vloeibaar materiaal en evenmin aan hitte. apiadar • Houd de buiten het bereik van kinderen. apiadar beschadiging •...
-
Page 56: Van Het Apparaat
stofzuiger • Gebruik deze nooit om toxische of brandbare substanties mee op te zuigen benzine, noch vloeibare brandstoffen zoals en zet hem nooit aan explosieve dampen zijn. wanneer er ontvlambare of haar, gedeeltes kleding • Voorkom dat uw lichaam of losse van uw in contact zuiggat... -
Page 57: Het Gebruik
Mogelijke Probleem Oplossingen oorzaak Zorg dat het goed gesloten is.Neem contact op met uw distributeur om de accu te De accu is reinigingsapparaat vervangen. Waarschuwi ng: Wanneer de defect. laadt niet op. accu moet worden vervangen, neem contact op met uw lokale distributeur om een originele N I-MH-accu te kopen zodat u het apparaat niet beschadigd. - Page 59 PARA COMECAR Entalhe 1. Montagem da cabe�a de suc�ao lnsira a cabega no carpo até que os dais botoes do lateral saiam pelos orificios da cabega. Mantenha o entalhe para cima. 2. Montagem e substitui�ao das baterias. (1) Puxe o botáo "a" para a frente, na diregáo da seta, até que deixe de tapar a ranhura do conector (ver imagem A).
- Page 60 (1) Conecte uma extremidade do carregador ao soquete e o carregador é verde. (2) Em seguida, conecte uma extremidade do carregador à P1113, a carga está vermelha, o carregador está funcionando agora. Nota: Quando a energia da bateria estiver completamente esgotada, é normal que o indicador de carga esteja piscando por 20-50 segundos.
- Page 61 NOTA: Carregue o limpador durante 3 horas antes da primeira utilizagao. Habitualmente, o limpador pode ser utilizado entre 45 e 60 minutos após um carregamento completo. 4. Montagem do cabo (1 ). Montagem do cabo (opcional) (a). Coloque o grampa em V no conector como indicado na imagem � �...
- Page 62 ADVERTENCIA! Assegure-se de que o dispositivo nao está ligado corrente quando o limpar. (2) Resíduos no filtro: Para libertar o filtro, segure o carpo com urna mao enquanto roda o filtro com a outra, no sentido dos ponteiros do relógio. Limpe-o e coloque-o novamente fazendo rodar no sentido contrário.
- Page 64 as situar;oes Os proprietários contenham todas de risco ou de lesoes graves. piscina prudencia e do devem atuar com máxima e com sensatez quando aspirador. utilizarem o Funcionamento ATENCAO: limpador qualquer Nunca utilize o se detetou dano. Pode ocorrer contaminar;ao água fuga urna...
- Page 65 ADVERTENCIA os objetos pessoais anéis, pulseiras, relógios • Retire todos como colares e pulseira, quando desligar limpador. o cabo entre batería e o pode importante poderia • A batería provocar um curto-circuito fundir um (ou qualquer metálico) queimaduras anel outro elemento e causar graves.
- Page 66 causa Solw;:oes Problema Possível partido substituí-lo. O(s) filtro(s) está(ao) Limpe os dois filtros. cheio(s) O saco do filtro Os residuos está Substitua o saco. saem do filtro danificado. punho cabo para o Os fechas mastro nao laterais estao Substitua os fechas laterais. fecha partidos.
- Page 67 Ligue carregador prima o impulsor botao para verificar se o funciona com Desligue piloto normalidade. o botao e, se o verde estiver aceso, deverá retirar carregador limpador Ligue-o elétrico P1113. novamente. No caso de o impulsor funcionar, continuar sem indicará que a bateria está avariada. voltímetro, verifique c .
- Page 68 EN -GIJIIIIANm (EIITlfl(fü 1 GENElllll UIIMS 1.1 In accordance with these provisions, the seller guarantees that the product corresponding to this guarantee ("the Product") is in perfect condition at the time of delivery. 1.2 The Guarantee Term for the Product is two (2) years from the time it is delivered to the purchaser. 1.3 In the event of any defect in the Product that is notifled by the purchaser to the seller during the Guarantee Term, the seller will be obliged to repair or replace the Product, at his own cost and wherever he deems suitable, unless this is impossible or unreasonable.
- Page 69 3.2 No se otorga ninguna garantía respecto del normal desgaste por uso del producto. En relación con las piezas, componentes y/o materiales fungibles o consumibles como pilas, bombillas etc., se estará a lo dispuesto en la documentación que acompañe al Producto, en su caso. 3.3 La garantía no cubre aquellos casos en que el Producto: (1) haya sido objeto de un trato incorrecto;...
- Page 70 2. 1 Die vorliegende Garantie gilt für die Produkte, auf die sich dieses Handbuch bezieht. 2. 2 Das vorliegende Garantiezertiflkat ist nur in den Landern der Europaischen Gemeinschaft anwendbar. 2. 3 Diese Garantie gilt nur, wenn der Kaufer alle Anweisungen des Herstellers, die in der produktbegleitenden Dokumentation enthalten und für die jeweilige Produktlinie und Modell anwendbar ist, streng einhalt.
- Page 71 1.5 Die delen van het Produkt die onder deze Garantie vervangen of gerepareerd zijn, kunnen de duur van de Garantieperiode voor het oorspronkelijke Produkt niet verlengen, maar zullen beschikken over een eigen garantie. 1.6 Voor de toepassing van deze garantie moet de koper de aankoopdatum en de levering van het Produkt kunnen aantonen. 1.7 lndien er meer dan zes maanden verlopen zijn sinds de levering van het Produkt aan de koper, en deze plotseling aangeeft dat he! Produkt niet aan de eisen voldoet, dan zal de koper de oorsprong en het bestaan van de volgens hem bestaande defekten moeten kunnen aantonen.
- Page 72 EN - CROSSED-OUT WASTE CONTAINER 1.1 In arder to reduce the amount of waste of electric and electronic apparatus, to reduce the danger of components, to encourage the reuse of apparatus, to assess waste and to set up a suitable waste treatment system, with the aim of improving the efficiency of environmental protection, a set of rules has - been established applicable to the manufacture of the product and other rules regarding the corred environmental treatment when these products beco me waste.
- Page 73 � erhohen, werden eine Reihe von Normen festgelegt, die auf die Herstellung des Produktes angewandt werden, und Normen, die sich auf die korrekte und umweltbewusste Entsorgung beziehen, wenn diese Produkte zu Abfall werden. 1.2 Ebenso soll das Umweltbewusstsein aller Beteiligten verbessert werden, die mil den elektrischen und elektronischen Apparaten wahrend deren - gesamtem Nutzungszyklus in Kontakt kommen, das sind zum Beispiel die Hersteller, die Vertreiber, die Benutzer und insbesondere diejenigen, die direkt mil der Entsorgung der Rückstande zu tun haben, die durch diese Apparate entstehen.
- Page 74 � 1.2 Do mesmo modo, pretende-se melhorar o comportamento ambiental de todos os agentes que intervem no ciclo de vida dos equipamentos eléctricos e electrónicos, como sao os produtores, os distribuidores, os utilizadores e, em particular, o dos agentes directamente implicados na gestao dos residuos derivados destes equipamentos.
- Page 75 NINGBO, CHINA, 10/10/2017 GRACE WU Commercial Director...
- Page 76 Belgie +34 946 741 844 EM CASO DE PROBLEMA, ¡CONSULTAR-NOS! Portugal DISTRIBUIDO POR: MANUFACTURAS GRE. S.A. ARITZ BIDEA N ° 57, BELAKO INDUSTRIALDEA 48100 MUNGIA (BIZKAIA)· ESPAÑA TEL. +34 946 74 11 16 · FAX. 34 946 74 17 08 http://www.gre.es...
Need help?
Do you have a question about the CSPA and is the answer not in the manual?
Questions and answers