Table of Contents
Advertisement
Available languages
Available languages
Quick Links
IMPORTANT SAFETY INSTRUCTIONS
READ AND FOLLOW ALL INSTRUCTIONS
SAVE THESE INSTRUCTIONS
P-INSB-XF (Rev. 08-2012)
Installation and
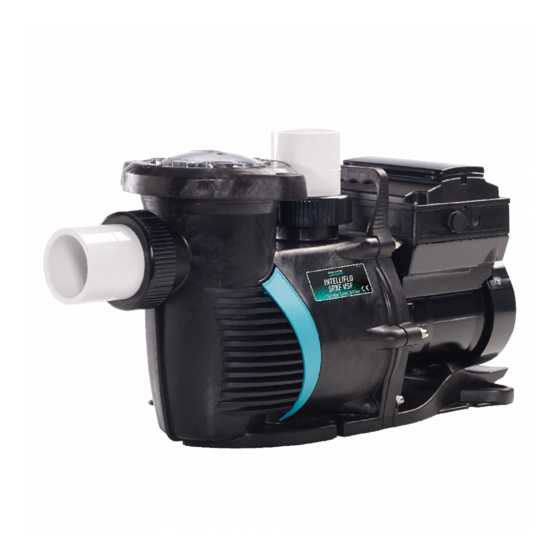
5PXF
High Performance Pump
www.pentairpooleurope.com
User's Guide
Pentair Aquatic Systems
Industriepark Wolfstee
Toekomstlaan 30
B-2200 Herentals - Belgium
2
™
8
14
20
26
32
Advertisement
Table of Contents

Related Manuals for Pentair sta-rite 5PXF


Summary of Contents for Pentair sta-rite 5PXF
- Page 1 Installation and User’s Guide ™ 5PXF High Performance Pump IMPORTANT SAFETY INSTRUCTIONS Pentair Aquatic Systems READ AND FOLLOW ALL INSTRUCTIONS Industriepark Wolfstee SAVE THESE INSTRUCTIONS Toekomstlaan 30 B-2200 Herentals - Belgium www.pentairpooleurope.com P-INSB-XF (Rev. 08-2012)
- Page 2 • EN60335-2-41 e manufacturer, Pentair, has the right to modify the products without previous notice for as far as their characteristics are not really changed by this. © 2012 Pentair. All rights reserved. This document is subject to change without notice.
-
Page 3: Section 1 General Information
TO MINIMIZE THE RISK OF INJURY DUE TO SUCTION ENTRAPMENT HAZARD: • Pools and spas should utilize a minimum of two drains per pump. • Each suction cover must be installed at least one (1m) meter apart, as measured from the nearest point to nearest point. -
Page 4: Section 4 Union Adapter Installation
Section 3 Installation • Install the pump as near to the pool as practical. • Use a direct and short suction line with continuous slope in order to avoid long priming times. • The pump should be placed on a flat, solid foundation, high enough to prevent flooding of the motor. •... -
Page 5: Section 6 Start / Operation
Make sure that you turn off the power supply when connecting the cables of the pump Please check the turning direction of three-phase motors following each connection. If this does not correspond to the arrow on the motor two connections in the junction must be reversed. Every motor must be permanently grounded. Connections which are not conform to the above mentioned safety instruction are not covered by the warranty. -
Page 6: Pump Disassembly
Pump Disassembly 1. All moving parts are located in the rear subassembly of this pump. 2. To remove and repair the motor subassembly perform the following procedures: a. Turn off the pump circuit breaker at the main panel. b. Drain the pump by removing the drain plugs. c. -
Page 7: Section 6 Troubleshooting
Priming the Pump 1. The pump strainer pot must be filled with water before the pump is initially started. Follow these steps to prime the pump. a. Remove the pump lid and locking ring. b. Fill the pump strainer pot with water. c. - Page 8 • EN60335-2-41 Le fabricant, Pentair, est en droit de modifier les produits sans avis préalable tant que leurs caractéristiques n’en sont pas réellement modifiées. © 2012 Pentair. Tous droits réservés. Ce document est sujet à révision sans préavis. Marques de commerce et avis de non-responsabilité : 5PXF™, Sta-Rite™ sont des marques de commerce et/ou des marques déposées de Pentair et/ou de ses sociétés affiliées aux États-Unis et/ou dans d’autres pays.
-
Page 9: Informations Générales
POUR MINIMISER LES RISQUES DE BLESSURES PAR PIÈGE D'ASPIRATION : • Les piscines et les spas devraient être équipés de deux évacuations minimum par pompe. • Chaque couvercle d’aspiration doit être installé à au moins un mètre (1 m) l’un de l'autre, du point le plus proche au point le plus proche. -
Page 10: Installation Électrique
Section 3 Installation • Installez la pompe à proximité de la piscine en veillant à être aussi pratique que possible. • Utilisez une conduite d’aspiration courte et directe en pente continue pour éviter d'augmenter le temps d'amorçage. • La pompe devrait être placée sur une fondation solide et à niveau, et élevée de manière à éviter les déversements sur le moteur. •... -
Page 11: Mise En Marche / Fonctionnement
Assurez-vous de couper l’alimentation électrique quand vous connectez les câbles de la pompe. Vérifiez le sens de rotation des moteurs triphasés après chaque connexion. S'il ne correspond pas à la flèche sur le moteur, vous devez inverser deux connexions dans le boîtier de raccordement. Chaque moteur doit être mis à la terre. Les connexions qui ne sont pas conformes aux consignes de sécurité... - Page 12 1. Toutes les pièces en mouvement se situent à l’arrière de cette pompe. 2. Pour déposer et réparer le sous-ensemble du moteur, veuillez suivre les procédures suivantes : a. Coupez le disjoncteur de la pompe au niveau du panneau principal. b.
-
Page 13: Dépannage
a. Retirez le couvercle de la pompe et la bague de retenue. b. Remplissez le panier de pré-filtre de la pompe d'eau. c. Réinstallez le couvercle de la pompe et la bague de retenue sur le panier de pré-filtre. La pompe est à présent prête à l'emploi. d. - Page 14 • EN60335-2-41 Der Hersteller, Pentair, hat das Recht, die Produkte ohne vorherige Mitteilung zu ändern, sofern ihre Eigenschaften dadurch nicht verändert werden. © 2012 Pentair. Alle Rechte vorbehalten. Änderungen vorbehalten. Marken und Haftungsausschluss: 5PXF™, Sta-Rite™ sind Marken und/oder eingetragene Marken von Pentair und/oder ihren verbundenen Unternehmen in den Vereinigten Staaten und/oder anderen Ländern.
- Page 15 ZUR WEITGEHENDEN VERMEIDUNG DER GEFAHR VON VERLETZUNGEN DURCH ANSAUGUNG IST FOLGENDES ZU BEACHTEN: • Pools und Spas müssen mindestens zwei Abläufe pro Pumpe aufweisen. • Alle Ansaugöffnungsabdeckungen müssen in einem Abstand von min. einem Meter (1 m) voneinander, gemessen zwischen den beiden am nächsten zueinander liegenden Punkten, angeordnet werden.
- Page 16 Kapitel 3 Installation • Installieren Sie die Pumpe möglichst nahe am Pool. • Benutzen Sie eine direkte, kurze Ansaugleitung mit kontinuierlichem Gefälle, um lange Ansaugzeiten zu vermeiden. • Die Pumpe muss auf ein flaches, stabiles Fundament gestellt werden, das hoch genug ist, um ein Überfluten des Motors zu verhindern. •...
- Page 17 Stellen Sie sicher, dass die Stromversorgung ausgeschaltet ist, wenn Sie die Kabel für die Pumpe anschließen. Prüfen Sie bitte nach jedem Anschluss die Drehrichtung der Drehstrommotoren. Wenn sie nicht mit dem Pfeil am Motor übereinstimmt, müssen zwei Verbindungen am Anschluss getauscht werden. Alle Motoren müssen immer geerdet sein. Anschlüsse, die die vorstehend aufgeführte Sicherheitsanweisung nicht erfüllen, sind nicht durch die Gewährleistung gedeckt.
- Page 18 Zerlegung der Pumpe 1. Alle beweglichen Teile befinden sich bei dieser Pumpe in der hinteren Baugruppe. 2. Um die Motorbaugruppe zu entfernen und zu reparieren, gehen Sie wie folgt vor: a. Schalten Sie den Aus-Schalter für die Pumpe an der Haupttafel aus. b.
-
Page 19: Fehlerbehebung
Vorfüllen der Pumpe 1. Vor dem ersten Einschalten der Pumpe muss der Pumpensiebkorb mit Wasser gefüllt werden. Gehen Sie zum Vorfüllen der Pumpe wie folgt vor: a. Pumpendeckel und Sicherungsring entfernen. b. Pumpensiebtopf mit Wasser füllen. c. Pumpendeckel und Sicherungsring wieder auf den Siebtopf montieren. Die Pumpe ist jetzt bereit zum Ansaugen. d. - Page 20 - EN60335-1 - EN60335-2-41 De fabrikant, Pentair, heeft het recht om de producten te wijzigen zonder voorafgaande melding, voor zover hun eigenschappen hierdoor niet wezenlijk veranderd worden. © 2012 Pentair. Alle rechten voorbehouden. Dit document kan zonder voorafgaande kennisgeving gewijzigd worden.
- Page 21 OM HET GEVAAR VOOR LETSELS TEN GEVOLGE VAN ONGEVALLEN DOOR ZUIGKRACHT TE BEPERKEN: • moeten zwembaden of spa's over minimaal twee afvoeren per pomp beschikken; • moeten de deksels van de aanzuigopeningen minimaal één meter (1 m) van elkaar verwijderd zijn, gemeten vanaf de dichtst bij elkaar gelegen punten;...
- Page 22 Hoofdstuk 3 Installatie • Installeer de pomp zo dicht mogelijk bij het zwembad. • Gebruik een zo recht en kort mogelijke zuigleiding met een constante helling, zo vermijdt u lange ontluchtingstijden. • De pomp moet op een vlakke, stevige fundering gemonteerd worden die hoog genoeg is zodat de motor niet onder water kan komen te staan.
- Page 23 Vergewis u ervan dat de stroomtoevoer is afgesloten voor u de kabels van de pomp aansluit. Controleer de draairichting van de driefasige motor na elke aansluiting. Als die niet overeenstemt met de pijl aangegeven op de motor, dan dienen twee aansluitingen in de aansluitdoos omgekeerd te worden. Iedere motor moet een permanente aarding hebben. Aansluitingen die afwijken van de bovenvermelde voorzorgsmaatregelen, worden niet gedekt door de garantie.
- Page 24 Demontage van de pomp 1. Alle bewegende onderdelen bevinden zich in de achterste subgroep van de pomp. 2. Volg de hierna beschreven procedure om de motor te verwijderen voor herstelling. a. Schakel de stroomschakelaar van de pomp uit op het hoofdpaneel. b.
- Page 25 De pomp ontluchten 1. De voorfilter van de pomp moet met water gevuld worden voor de pomp de eerste keer wordt gestart. Volg de hierna beschreven stappen om de pomp te ontluchten. a. Verwijder het pompdeksel en de borgring. b. Vul de voorfilter van de pomp met water. c.
- Page 26 • EN60335-2-41 El fabricante, Pentair, tiene derecho a modificar los productos sin previo aviso mientras no modifique sus características. © 2012 Pentair. Todos los derechos reservados Este documento puede ser modificado sin previo aviso. Marcas comerciales y limitaciones de responsabilidad: 5PXF™, Sta-Rite™ son marcas comerciales o marcas comerciales registradas de Pentair o de sus filiales en Estados Unidos u otros países.
-
Page 27: Información General
PARA MINIMIZAR EL RIESGO DE LESIONES DEBIDO A RIESGO DE ATRAPAMIENTO POR ASPIRACIÓN: • Las piscinas y los balnearios deben utilizar como mínimo dos desagües por bomba. • Cada cubierta de aspiración debe instalarse a una distancia mínima de un metro (1 m) una de otra, medido desde el punto más cercano al punto más cercano. -
Page 28: Instalación Eléctrica
Sección 3 Aplicación • Instale la bomba lo más cerca posible de la piscina. • Utilice un conducto de aspiración directo y corto con una pendiente continua para evitar tiempos de cebado prolongados. • La bomba debe colocarse sobre una base plana y sólida, lo suficientemente alta como para impedir la inundación del motor. •... -
Page 29: Puesta En Marcha / Funcionamiento
Desconecte el suministro eléctrico al conectar los cables de la bomba Compruebe la dirección de giro de los motores trifásicos después de cada conexión. Si no se corresponde con la flecha dibujada en el motor, las dos conexiones deben intercambiarse. Cada motor debe estar siempre conectado a masa. Las conexiones no conformes con las instrucciones de seguridad arriba indicadas no quedan cubiertas por la garantía. - Page 30 Desmontar la bomba 1. Todas las piezas móviles están situadas en el subconjunto trasero de la bomba. 2. Para extraer y reparar el subconjunto del motor, siga los procedimientos siguientes: a. Desconecte el disyuntor de la bomba en el cuadro eléctrico. b.
-
Page 31: Localización Y Resolución De Problemas
a. Extraiga la tapa de la bomba y el anillo de bloqueo. b. Llene de agua la cámara de prefiltro de la bomba. c. Reinstale la tapa de la bomba y el anillo de bloqueo en la cámara de prefiltro. Ahora la bomba está lista para cebarla. d. - Page 32 • EN60335-2-41 Il produttore, Pentair, ha il diritto di modificare i prodotti senza preavviso, nella misura in cui tali modifiche non alterino le caratteristiche es- senziali dei prodotti. © 2012 Pentair. Tutti i diritti riservati. Il presente documento è soggetto a modifica senza preavviso.
-
Page 33: Informazioni Generali
PER RIDURRE AL MINIMO IL RISCHIO DI LESIONI DOVUTE AD DI INTRAPPOLAMENTO CAUSATO DALLA FORZA DI SUZIONE: • Piscine e vasche idromassaggio devono utilizzare un minimo di due drenaggi per pompa. • I coperchi delle bocchette di ripresa devono essere installati ad almeno un (1m) metro di distanza, misurata dal punto più... -
Page 34: Installazione Elettrica
Sezione 3 Installazione • Istallare la pompa il più vicino possibile alla piscina. • Utilizzare un tubo di aspirazione quanto dritto e corto possibile, disponendolo su un’inclinazione costante in modo da evitare tempi di adescamento prolungati. • La pompa deve essere montata su un basamento piatto e robusto, abbastanza alto per evitare che il motore si trovi immerso nell’acqua. -
Page 35: Manutenzione
Interrompere l'alimentazione elettrica durante il collegamento dei cavi alla pompa Controllare la direzione di rotazione dei motori trifase dopo ogni collegamento. Se la direzione non corrisponde alla freccia indicata sul motore invertire i collegamenti bifase nella scatola di collegamento. Ogni motore deve essere dotato di una messa a terra permanente. - Page 36 Smontare la pompa 1. Tutti le parti in movimento sono ubicate nel sottogruppo posteriore della pompa. 2. Per rimuovere e riparare il sottogruppo del motore, seguire queste procedure: a. Spegnere l'interruttore della pompa sul pannello principale. b. Svuotare la pompa togliendo i tappi di drenaggio. c.
-
Page 37: Ricerca Guasti
pompa seguire i passaggi di seguito illustrati. a. Rimuovere il coperchio della pompa e l'anello di fermo. b. Riempire d'acqua il portafiltro di aspirazione. c. Reinstallare il coperchio della pompa e l'anello di fermo sul portafiltro. La pompa è pronta per l'adescamento. d. - Page 40 Pentair International SRL. Copyright – Eingeschränkte Lizenz: soweit hierin nicht ausdrücklich zugelassen, dürfen die Inhalte dieses Dokuments ohne vorausgehende schriftliche Genehmigung der Pentair International SRL weder ganz noch auszugsweise und in gleich welcher Form und mit welchen Mitteln vervielfältigt werden.
Need help?
Do you have a question about the sta-rite 5PXF and is the answer not in the manual?
Questions and answers