
Related Manuals for SENSTAR FiberPatrol FP1100X Series


Summary of Contents for SENSTAR FiberPatrol FP1100X Series
- Page 1 ® FiberPatrol Ranging Fiber Optic Fence Protection Sensor Site Planning & Installation Guide FP1100X/FP1400 series FPDA0102-401, Rev F January 8, 2019...
- Page 2 The information provided in this guide has been prepared by Senstar Corporation to the best of its ability. Senstar Corporation is not responsible for any damage or accidents that may occur due to errors or omissions in this guide. Senstar Corporation is not liable for any damages, or incidental consequences, arising from the use of, or the inability to use, the software and equipment described in this guide.
-
Page 3: Table Of Contents
Table of contents 1 System description - - - - - - - - - - - - - - - - - - - - - - - - - - - - - - - - - - - - - - - -5 Principles of operation - - - - - - - - - - - - - - - - - - - - - - - - - - - - - - - - - - - - - - - - - - - - - - 5 FiberPatrol sensor system details - - - - - - - - - - - - - - - - - - - - - - - - - - - - - - - - - - - - - - 5 FP1100X configurations - - - - - - - - - - - - - - - - - - - - - - - - - - - - - - - - - - - - - - - - - - - - - - - - - - 6... - Page 4 Protecting swinging gates with FiberPatrol - - - - - - - - - - - - - - - - - - - - - - - - - - - - - - - - - - - 22 Gate protection for periodically bypassed gates (independent zones) - - - - - - - - - - - - - - - - 23 Determining cable length requirements for gates - - - - - - - - - - - - - - - - - - - - - - - - - - - - - - - 24 Using the cable management kit at the hinged side of protected swinging gates - - - - - - - - 24...
-
Page 5: System Description
System description Principles of operation The FiberPatrol fence-mounted perimeter intrusion detection sensor system, detects and locates intruders using fiber optic technology. FiberPatrol senses and locates minute vibrations in the fence fabric caused by climbing, cutting, lifting, or otherwise disturbing the fence fabric. A fiber optic sensor cable is attached to a perimeter fence. -
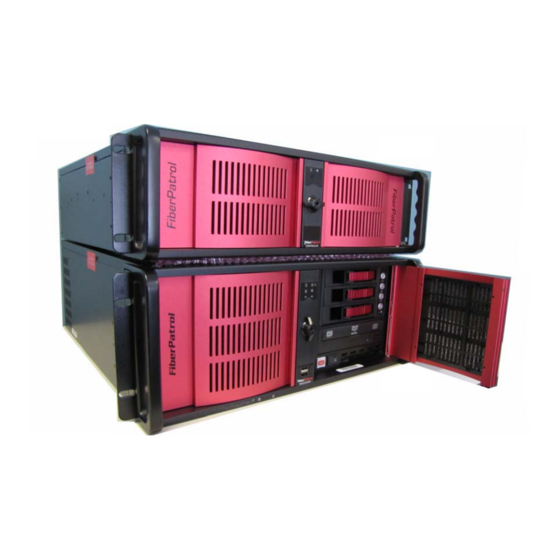
Page 6: Fp1100X Configurations
• outdoor rated splice enclosures for fiber termination and access to fibers • indoor components are rack-mountable in a standard EIA 19 in. equipment rack: • processor - locates disturbance, triggers alarms, monitors system status, includes FiberPatrol system software, configuration software and Network Manager software •... -
Page 7: Alarm Reporting
Note To ensure that there is enough sensor cable to cover the fence and any installation variations, Senstar recommends ordering a 15% overage (e.g., to protect 1 km of fence, order 1.15 km of sensor cable). FiberPatrol Site Planning & Installation Guide... -
Page 8: Fp1400 Sensors
The FiberPatrol FP1100X Series fence protection system is available in eight models, which are based on the required length of fiber optic cable. Careful site planning is essential to ensure the components that are ordered, are the correct components for the application. The following table... -
Page 9: Fiberpatrol Components
FiberPatrol components FiberPatrol components Processor The FiberPatrol processor supports two independent fiber optic sensors (S1, S2) and can monitor up to 1440 distinct alarm zones. The alarm zones are defined in software, and do not depend on cable length. The processor operates on 100 to 240 VAC, 50/60 Hz power and can annunicate alarm conditions with contact closure outputs or via the Network Manager software. -
Page 10: Controller
FiberPatrol components Controller The FiberPatrol controller (see Figure 2:) generates the laser light signal that is transmitted into the fiber sensors. The controller collects the backscatter reflections created by vibrations in the protected fence, analyzes the signal, and passes the data to the processor. Start module/fiber patch panel The start module (see Figure... -
Page 11: End Module
FiberPatrol components End module The end module terminates the laser light at the end of each detecting fiber, without causing undesirable reflections. There are 3 types of end modules available, a single end module (FPMA0212) a double end module (FPMA0222) and a combined double start/end module (FPMA0223).The end module can be located outdoors in a splice enclosure or indoors with the start module, in the fiber patch panel. -
Page 12: Cable Ties
FiberPatrol components cross section color coded individual fiber color coded 12 fiber buffer tube color coded 6 fiber buffer tube central strength member ripcord binder tape waterblock system MDPE outer jacket PE filler unit (X 3) Figure 7: FiberPatrol sensor cable/non-detecting lead cable Cable ties FiberPatrol sensor cable is attached to the fence with stainless steel cable ties. -
Page 13: Buried Vault
FiberPatrol components Buried vault Another method for zone to zone isolation is to move the sensor cable off the fence through conduit and then form a 13 m (43 ft.) isolation loop inside a buried vault. The cable is then run through another section of conduit and back onto the fence where it continues as another zone. -
Page 14: Site Planning
Site planning FiberPatrol configurations The recommended method for installing FiberPatrol sensor cable is to use the minimum number of splices possible; i.e., run a single length of cable from the equipment room to the fence, and continue for as far as site conditions will allow you to go. Use splices for the start module, the end module, and at any site features where a continuous run of cable is impractical or impossible. -
Page 15: Open-Ended Loop Configuration
FiberPatrol configurations In some instances it is desirable to have a single length of cable running between the equipment room and the start of the perimeter. This is most common in installations where the sensor unit equipment is located at a distance from the perimeter. In this case, a dual start/dual end module is located in the equipment room, and a single lead cable runs to the perimeter fence. - Page 16 FiberPatrol configurations splice enclosure dual end module FiberPatrol sensor cable fiber optic cable (sensor cable/lead cable) sensor unit S1 (sensor fiber 1 - internal to fiber optic cable) equipment S2 (sensor fiber 2 - internal to fiber optic cable) fusion splice fiber optic termination Note: Cable length = a + b + c + d + e + f Figure 11 FiberPatrol fully closed redundant loop configuration...
-
Page 17: Split Configuration
FiberPatrol configurations splice enclosure splice enclosure splice enclosure single end module single end module fiber optic cable (sensor cable/lead cable) S1 (sensor fiber 1 lead) sensor unit equipment S1 (sensor fiber 1 detecting) includes dual start module S2 (sensor fiber 2 lead) S2 (sensor fiber 2 detecting) fusion splice Note:... -
Page 18: Line Configurations
FiberPatrol configurations splice enclosure splice enclosure single end module single end module 25 km 25 km (max.) (max.) fiber optic cable sensor unit equipment fusion splice includes dual start module fiber optic termination Note: Cable length = 2a + b + c Figure 15 FiberPatrol split configuration (2 lead cables) Line configurations The line configuration is typically used when the sensor unit equipment is located at one end of the... -
Page 19: Extended Lead Configuration
FiberPatrol configurations Note: Cable length = a + b sensor unit equipment fiber optic cable (sensor cable/lead cable) S1 (sensor fiber 1 - internal to fiber optic cable) S2 (sensor fiber 2 - internal to fiber optic cable) fusion splice splice enclosure fiber optic termination splice enclosure... -
Page 20: Site Survey
Site survey Site survey The first step in installing a FiberPatrol fence protection system is to conduct a detailed site survey. The survey assesses the site conditions to determine the specific installation requirements including the fence type, fence condition, fence length, zone layouts, sensor cable route, non- detecting lead cable length, length of sensor cable required to cover the perimeter, and the location for the electronic components. -
Page 21: Fence Height Considerations
Site survey height for a weld mesh fence is 2.4 m (8 ft.) and climb-over deterrent hardware should be securely mounted on top. All components must be securely connected to prevent any metal on metal contact which can be caused by moderate to strong winds. Fence height considerations FiberPatrol will provide a good level of detection for fences up to 3 m (10 ft.) high with a single pass of cable. -
Page 22: Razor Ribbon/Concertina
Use tensioning wires to secure the coil and to prevent the razor ribbon from separating if it is cut. Due to the nature of razor ribbon, FiberPatrol does not recommend installing sensor cable directly on the razor ribbon. Contact Senstar Customer Service if your application requires that sensor cable be installed on razor ribbon. -
Page 23: Gates
Site survey Gates There are generally two types of gates used with fences, swinging gates and sliding gates. Sliding gates must be bypassed, and should be protected by another type of sensor (e.g., a microphonic non-fiber fence sensor, a microwave sensor, an IR beam). Swinging gates can be protected by FiberPatrol sensor cable. -
Page 24: Gate Protection For Periodically Bypassed Gates (Independent Zones)
Site survey Note FiberPatrol recommends creating a service loop on the hinged side of all protected gates. NOTE: double arrows indicate 30 cm (1 ft.) NOT TO SCALE 3/4 fence height seal conduit ends if area has periods of freezing weather 1/4 fence height split conduit... -
Page 25: Determining Cable Length Requirements For Gates
Site survey gate protection sensitivity loop cable management kit sensitivity loop sensitivity loop (split conduit) conduit 10 m service loop 13 m isolation loop 13 m isolation loop Figure 25 Independent gate zone (with buried isolation loops) sensitivity loop gate protection cable management kit NOT TO SCALE (split conduit) -
Page 26: Protecting Masonry Walls And Buildings
Site survey 1. Hold the conduit against the fence post and on the conduit, mark the positions of any hardware on the fence that will require notches in the conduit. 2. Make any required notches in the conduit. 3. Attach the sensor cable to the gate. 4. -
Page 27: Selecting Conduit For Below Ground Bypasses
Site survey respect min. turn radius P-brackets 60 cm (2 ft.) at corners spacing along edge of wall fence-mounted fence-mounted isolation loop isolation loop dual sensor cables outside and inside edges single sensor cable outside edge Figure 28 Protecting a masonry structure along the perimeter Selecting conduit for below ground bypasses When the sensor cable must go below ground to reach the other side of a gate, or go through or below a building or object, the cable must be protected by using conduit. -
Page 28: Solid Wall Conduit
Site survey flexible solid wall conduit is required for areas with freezing temperatures Figure 31 Solid wall conduit Solid wall conduit • Both ends of the conduit must be sealed to prevent water from entering the conduit and freezing. • Flexible conduit can be bent and formed into the required shape for a cable bypass. -
Page 29: Service Loops
Site survey NOTE: All double arrows indicate 30 cm (1 ft.) separation. All turns must respect the minimum bend radius. Figure 32 Sensitivity loop (heavy gauge post) NOTE: All double arrows indicate 30 cm (1 ft.) separation. All turns must respect the minimum bend radius. Figure 33 Sensitivity loop (corner post) Service loops Service loops provide extra sensor cable for making future repairs, and for making fusion splices... -
Page 30: Isolation Loops
Site survey service loop 5 loops 10 m (33 ft.) 60 cm of sensor cable (2 ft.) Figure 34 Service loop Isolation loops Isolation loops are recommended at the start point of the detecting cable, on both sides of gates that will be setup as independent zones, and at cable bypasses. - Page 31 Site survey fence-mounted fence-mounted isolation loop isolation loop Figure 36 Perimeter structure bypass (through structure) buried conduit buried isolation loop buried isolation loop Figure 37 Perimeter structure bypass (below ground with buried vaults) fence-mounted fence-mounted isolation loop isolation loop buried conduit Figure 38 Perimeter structure bypass (below ground) Page 30 FiberPatrol Site Planning &...
-
Page 32: Deploying The Sensor Cable
Site survey Deploying the sensor cable Note Install FiberPatrol sensor cable on the side of the fence that is opposite the threat (the secure side of the fence). There are two standard methods of deploying FiberPatrol sensor cable. 1. The cable drum can be mounted on a cable stand and then pulled around the perimeter. 2. -
Page 33: Site Analysis Checklist
Site survey service loops (10 m cable length, 60 cm diameter) splice enclosure fence-mounted isolation loop conduit Figure 40 Cable splice service loops and fence-mounted isolation loop at fully closed perimeter start/end point Site analysis checklist Description create a site plan accurate CAD drawings with precise measurements and/or GPS coordinates detailed description of fences (type, condition, height, fence rails, climb over deterrent hardware, other cables, conduit, or signs attached to fence) -
Page 34: Cable Requirements
Site survey Cable requirements Calculating the total length of fiber optic cable is one of the most critical phases of site planning. Other equipment requirements, including the necessary software license, are determined by the length of cable. The following table provides guidelines on how to determine how much cable is required. - Page 35 Site survey • stainless steel cable ties (1 tie per 60 cm (2 ft.) of cable, additional ties required for cable loops and outdoor splice enclosures, requires installation tool) • FiberPatrol cable vaults (optional) for buried isolation loops • conduit for below ground cable bypasses Page 34 FiberPatrol Site Planning &...
-
Page 36: Installing Fiberpatrol
Installing FiberPatrol FiberPatrol installation overview Note The FiberPatrol sensor cable requires professional installation by qualified personnel who are trained and certified in fiber optic cable installation to telecom industry standards. There are ten steps required to complete a FiberPatrol installation: 1. -
Page 37: Optical Fiber Safety
Optical fiber safety Use care when working with exposed optical fibers. The bare fibers are 125 microns in diameter and can easily penetrate skin. Always wear safety glasses when working with optical fibers. WARNING Always dispose of bare fibers in a sealed and labeled container that is specifically designed to contain fiber optic waste. -
Page 38: Cable Loss Limits (Maximum Attenuation)
Cable loss limits (maximum attenuation) Note Test the fibers from both ends of the cable before splicing the fibers to the start module and end module. After being fully attached to the fence, each spliced fiber must be tested using an OTDR operating at 1550 nm. - Page 39 60 cm (2 ft.) 110 mm (4.3 in.) secure cable at any min. bend radius changes in direction with a cable tie at each 45º point Figure 43 Cable tie spacing around corners • Ensure that the minimum bend radius (dynamic and static) is not exceeded during or after installation.
- Page 40 • Attach service loops beside a fence post on the lower section of the fence using cable ties at each 45º point of the loop service loops require five 60 cm cable loops (10 m of sensor cable) 60 cm (2 ft.) diameter attach service loops...
- Page 41 • Buried vault installation details • burial depth - flush with ground surface 46 cm (18 in.) (dig a deeper pit for below ground vault) • pit dimensions (nominal) - 51 cm (20 in.) deep X 76 cm (30 in.) wide X 107 cm (42 in.) long •...
-
Page 42: Fiberpatrol Sensor Cable And Below Ground Bypasses
60 cm (2 ft.) 30 cm (1 ft.) 30 cm (1 ft.) 60 cm (2 ft.) Figure 48 Laying cable in a figure-8 pattern FiberPatrol sensor cable and below ground bypasses FiberPatrol sensor cable typically passes through conduit that is buried below ground to get from one side of a gate to the other. -
Page 43: Fiberpatrol Installation
Figure 49 Solid wall conduit FiberPatrol installation 1. Ensure that there is enough sensor cable in the equipment room to reach the controller in the equipment rack and to create a 10 m service loop. 2. Run the sensor cable to the designated start point of the detecting cable. 3. -
Page 44: Attaching The Sensor Cable
Attaching the sensor cable FiberPatrol sensor cable is attached to the fence fabric with stainless steel cable ties. Figure 50 an overview of the recommended cable attachment procedure. • Install the sensor cable on the secure side of the fence (the side opposite the threat). •... -
Page 45: Masonry Walls And Buildings
• form the sensitivity loops • create a 10 m service loop on the hinged side(s) of gate • create 13 m isolation loops (if required) center the split conduit on the post and ensure the split loom attach the cable securely on the gate panel extends slightly above and below the ends of the conduit and the fence fabric leading up to the gate service loop... - Page 46 ® Self-tapping 3/16 in. by 1-1/4 in. concrete screws, such as Tapcon screws with slotted hex washer heads are recommended. The required mounting holes are 5/32 in. diameter and 1 1/2 in. deep and are centered 1.5 in. from the edge of the surface. The cable loop in the P-clamp is vinyl- coated and sized to grip a standard sensor cable snugly once the clamp is closed.
-
Page 47: Control Equipment Installation
Do not over-tighten to avoid stripping or shearing the screws. The sensor cable should be manually tensioned as it is being clamped and fastened to keep it straight and taut. Installed sensor cable must not sag or touch the surface. Sensor cable verification and test Before making the splices in the equipment room and to the end modules, do a continuity check of all spliced fibers and OTDR test the two sensor fibers (S1 and S2). - Page 48 controller processor Figure 54 FiberPatrol sensor unit (rear view) Cable ID Cable type Connector Connector Included D1 - D4 EIA-232 DB9-F DB9-M custom mixed signal 68-pin SCSI-M 68-pin SCSI-M 50 Ohm coax FO1 - FO4 fiber optic patch cable FC/APC FC/APC Cable identification details CAUTION...
-
Page 49: Fiberpatrol Splices
start module/fiber patch panel 1 2 3 4 5 6 FiberPatrol processor ETHERNET PS/2 or USB 3 4 DATA5 RF1 2 3 4 1 2 3 4 5 6 FC/APC DATA FiberPatrol controller PS/2 or USB LAN switch rack-mount keyboard/monitor/mouse Figure 55 FiberPatrol interconnect diagram FiberPatrol FiberPatrol... - Page 50 OTDR (typical results range from 0.01 to 0.03 dB loss per splice; maximum allowable loss per event is 0.1 dB). Figure 56 shows a splice tray and a dual start/end module. The equipment room fiber splices are identified in the following table. Note The loss at splices must not cause the average loss of the sensor cable to exceed 0.3 dB/km, as measured by the OTDR.
- Page 51 double start/double end module double start module start start fusion splices (X4) fusion splices (X2) to FiberPatrol controller to FiberPatrol controller non-detecting lead cable to perimeter non-detecting lead cables to/from perimeter Figure 57 FiberPatrol equipment room splice requirements (2 lead cables) double start/double end module start fusion splices (X4)
-
Page 52: Maintenance
Maintenance Recommended maintenance The FiberPatrol sensor requires minimal maintenance to ensure proper operation. However, setting up and following a maintenance schedule based on your site-specific requirements can ensure proper detection performance, prevent nuisance alarms and extend the operational lifetime of the system. The frequency at which the maintenance should be scheduled depends on your security requirements and on the installation environment. - Page 53 Recommended maintenance • use a hard, blunt tool (e.g., a screwdriver) to simulate a series of cut intrusions by tapping the fence fabric; verify that alarms are declared and accurately located each time • climb on the fence at several locations; verify that alarms are declared and accurately located each time 3.
-
Page 54: System Component List
System component list Component Part Number Description FiberPatrol processor FP1100X-01 FiberPatrol sensor unit for fence mounted applications: and controller up to 1.5 km (0.93 mi.) of cut-immune detection processing up to 3 km (1.86 mi.) of non cut-immune detection processing FiberPatrol processor FP1100X-03 FiberPatrol sensor unit for fence mounted applications:... - Page 55 Component Part Number Description rack-mount keyboard, GB0296-15 Rack-mount 15 in. LCD monitor with keyboard and mouse for monitor, mouse combo maintenance access to FiberPatrol processor rack-mount keyboard, GB0296-19 Rack-mount 19 in. LCD monitor with keyboard and mouse for monitor, mouse combo maintenance access to FiberPatrol processor rack-mount splice tray FPEM0400...
-
Page 56: Specifications
Specifications • FP1100X-01 - up to 1.5 km (0.93 mi.) of cut-immune fence detection Sensor unit part number - up to 3 km (1.86 mi.) of non cut-immune fence detection (Sensor unit includes • FP1100X-03 - up to 3 km (1.86 mi.) of cut-immune fence detection FiberPatrol processor &... - Page 57 • 1 target per zone for simultaneous alarms Target resolution • 1400-08 - 8 zones per system (expandable to 28 zones via Virtual alarm zones (software FP1400-EXP-04 expansion modules) configured) • 1400-12 - 12 zones per system (expandable to 44 zones via FP1400-EXP120-04 expansion modules) •...
- Page 58 • the minimum level that a localized disturbance must reach to be Disturbance Threshold accumulated and counted towards alarm generation, default = 5 • the minimum disturbance count that must accumulate in a location Alarm Threshold range and a time range in order to generate an alarm, default = 10 •...
- Page 59 Page 58 FiberPatrol Site Planning & Installation Guide...
-
Page 60: Location/Calibration Table
Location/calibration table tap point # description time/location 1 time/location 2 time/location 3 avg. location FiberPatrol Site Planning & Installation Guide Page 59... - Page 61 tap point # description time/location 1 time/location 2 time/location 3 avg. location Page 60 FiberPatrol Site Planning & Installation Guide...
Need help?
Do you have a question about the FiberPatrol FP1100X Series and is the answer not in the manual?
Questions and answers