
Related Manuals for Insignia NS-FWM27W1


Summary of Contents for Insignia NS-FWM27W1
- Page 1 USER GUIDE 16 Cycle High Efficiency Front-Loading Washer NS-FWM27W1 Before using your new product, please read these instructions to prevent any damage.
-
Page 2: Table Of Contents
Contents IMPORTANT SAFETY INSTRUCTIONS ........3 Features . -
Page 3: Important Safety Instructions
SAFETY & PRECAUTIONS NS-FWM27W1 Troubleshooting ............46 Understanding the error codes . - Page 4 SAFETY & PRECAUTIONS WARNING: Do not store or use gasoline or other flammable vapors and liquids in the vicinity of this or any other appliance. Basic precautions WARNING WARNING: To reduce the risk of fire, electric shock, or injury to persons when using your appliance, follow basic precautions, including the following: Read all instructions before using the appliance.
- Page 5 SAFETY & PRECAUTIONS NS-FWM27W1 Before the appliance is removed from service or discarded, remove the door and cut off the power cord. Do not reach into the appliance if the tub or agitator is moving. Do not install or store this appliance where it will be exposed to the weather.
- Page 6 SAFETY & PRECAUTIONS Before operating this machine WARNING • Packing materials may be dangerous to the kids. Please keep all packing materials (plastic bags, foams, etc.) far away from kids. • Washing machine shall not be installed in a bath room or very wet rooms as well as in rooms with explosive or caustic gases.
- Page 7 SAFETY & PRECAUTIONS NS-FWM27W1 • Flammable and explosive or toxic solvents are forbidden. Gasoline and alcohol etc. shall not be used as detergents. Please only select the detergents suitable for machine washing, especially for front loading. • Do not wash carpet in this machine.
- Page 8 SAFETY & PRECAUTIONS Plug the power plug into the wall socket in the right direction so that the cord runs towards the floor. • If you plug the power plug into the socket in the opposite direction, the electric wires within the cable may be damaged and this may result in electric shock or fire.
- Page 9 SAFETY & PRECAUTIONS NS-FWM27W1 • Water flowing out of the washer may cause burns or cause the floor to be slippery. This may result in injury. • Forcing the door open can damage the product or cause injury. Make sure to remove the packaging (sponge, styrofoam) attached to the bottom of the washer before using it.
- Page 10 SAFETY & PRECAUTIONS Do not clean the appliance by spraying water directly onto it. Do not use benzene, thinner, or alcohol to clean the appliance. This may result in discoloration, deformation, damage, electric shock, or fire. Unplug the power plug when the appliance is not being used for long periods of time or during a thunder/lightning storm.
- Page 11 SAFETY & PRECAUTIONS NS-FWM27W1 Do not wash thick, hard mats even if the washer mark is on the care label. This may result in injury or damage to the washer, walls, floor, or clothing due to abnormal vibrations. Do not operate the washer when the detergent dispenser is removed. This may result in electric shock or injury due to water leakage.
-
Page 12: Features
INSTALLATION INSTRUCTIONS If the washer is moved to a new location, have it checked and re-installed by a qualified service technician. Failure to follow this warning may result in electric shock or fire. Features Package contents Make sure that the following items came with your washer: Hose holder Transport hole plugs (4) Water hose (2) -
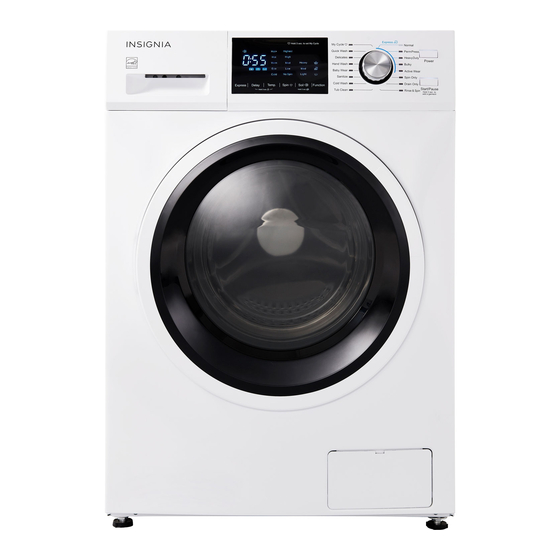
Page 13: Control Panel
INSTALLATION INSTRUCTIONS NS-FWM27W1 Back Water supply inlets Drain hose Power plug Control panel Buzzer Power ITEM DESCRIPTION • The initial display is the total time for the cycle you select. • While your washer is running, the display shows the cycle process and time remaining in the cycle. -
Page 14: Unpacking Your Washer
Notes: Check for damages to your washer and make sure that you received all parts. If your washer is damaged or parts are missing, contact Insignia Customer Support. CAUTION: Your washer is heavy. - Page 15 INSTALLATION INSTRUCTIONS NS-FWM27W1 Remove your washer from the packaging. Make sure that the small, triangular piece of foam comes off with the packaging base. If it doesn’t, lay your washer on its side, remove the foam, then set your washer upright.
-
Page 16: Choosing A Location
INSTALLATION INSTRUCTIONS Choosing a location WARNINGS: • Don’t install your washer in areas where water may freeze because your washer always retains some water in its water valve, pump, and hose areas. Frozen water can damage the belts, pump, hoses, and other components. •... -
Page 17: Washer Dimensions And Installation Measurements
INSTALLATION INSTRUCTIONS NS-FWM27W1 Washer dimensions and installation measurements 42.5in. (108 cm) Installing under a counter 2 in. (5 cm) 33.5 in. (85 cm) 23.5 in. (59.5 cm) 1 in. (2.5 cm) 1 in. (2.5 cm) www.insigniaproducts.com... - Page 18 INSTALLATION INSTRUCTIONS Installing in an alcove or closet If you install your washer in an alcove or closet, the front of the closet must have two unobstructed air openings for a combined minimum total area of 72 sq. in. (465 sq. cm) with a minimum clearance of 3 in. (7.6 mm) at the top and bottom. A slatted door with equivalent space clearance is acceptable.
- Page 19 INSTALLATION INSTRUCTIONS NS-FWM27W1 Installing in an alcove or closet Minimum clearances between your washer and adjacent walls or other surfaces are: • Either side: 1 in. (2.5 cm) • Rear: 1 in. (2.5 cm) • Closet Front: 2 in. (5.1 cm) •...
-
Page 20: Electrical Requirements
INSTALLATION INSTRUCTIONS Electrical requirements WARNING: To reduce the risk of fire, electric shock, or injury to persons, read the IMPORTANT SAFETY INSTRUCTIONS on page 3 before operating your washer. WARNINGS: • Connect to grounded 3-prong outlet with an individual 15 amp branch circuit protected by a 15 amp circuit breaker. -
Page 21: Water Requirements
INSTALLATION INSTRUCTIONS NS-FWM27W1 Water requirements To fill your washer in the correct amount of time, the water pressure needs to be between 0.05MPa~1MPa. If the water pressure is less than 0.05MPa: • The water valve may fail or may not shut off completely. -
Page 22: Step 2: Connect The Water Hoses
INSTALLATION INSTRUCTIONS Step 2: Connect the water hoses CAUTIONS: • Use new water supply hoses. Using old hoses can result in leakage or overflow that can damage your property. • Don’t connect multiple water supply hoses together to increase the length of the hose. - Page 23 INSTALLATION INSTRUCTIONS NS-FWM27W1 Connect the ends of the water supply hoses to the water supply intake connections at the back of your washer. The water supply hose connected to the hot faucet must be connected to the hot water supply intake and the water hose connected to the cold faucet must be connected to the cold water supply intake.
-
Page 24: Step 3: Connect The Drain Hose
INSTALLATION INSTRUCTIONS Step 3: Connect the drain hose CAUTION: Make sure that the connection between the drain hose and the wash basin, standpipe, or laundry tub is not airtight. Connect the drain hose in one of the following ways. In a wall standpipe Note: The wall standpipe drain requires a minimum diameter standpipe of 2"... - Page 25 INSTALLATION INSTRUCTIONS NS-FWM27W1 In a floor standpipe Note: For a floor standpipe, the capacity must be at least 17 gal. (64 L) per minute. The top of the standpipe must be between 2 ft. (60 cm) and 3.3 ft. (100 cm) from the bottom of your washer.
- Page 26 INSTALLATION INSTRUCTIONS In a laundry tub Notes: • The laundry tub needs a minimum capacity of 20 gal. (76 L). • The top of the laundry tub must be between 2 ft. (60 cm) and 3.3 ft. (100 cm) above the floor.
- Page 27 INSTALLATION INSTRUCTIONS NS-FWM27W1 In a floor drain system Notes: • A floor drain system requires a siphon break (not included). The siphon break must be a minimum of 28 in. (71 cm) from the bottom of the washer. • If the drain hose on the washer is shorter than the siphon break distance, attach an extra drain hose (not included) to the washer’s drain hose.
-
Page 28: Step 4: Level Your Washer
INSTALLATION INSTRUCTIONS Step 4: Level your washer CAUTION: Don’t use your washer without leveling it. If your washer isn’t level, it may: • Vibrate excessively which can cause your washer to malfunction • Make excessive noise Extend the leveling feet only as much as is necessary. If the feet are extended too much, your washer may vibrate. -
Page 29: Step 5: Power Your Washer
INSTALLATION INSTRUCTIONS NS-FWM27W1 Step 5: Power your washer • Plug the power cord into a well-grounded, 3-prong, 120 Volt 60 Hz approved electrical outlet, protected by a 12-amp fuse or comparable circuit breaker. Your washer is grounded through the third prong of the power cord. -
Page 30: Preparing A Load Of Laundry
OPERATING INSTRUCTIONS Preparing a load of laundry • If this is the first time you are washing an item, make sure that it is color-fast. Use a white rag or towel with a little detergent to wash a hidden part of the item. -
Page 31: Step 3: Load Your Washer
NS-FWM27W1 OPERATING INSTRUCTIONS Step 3: Load your washer CAUTION: Before loading your laundry, make sure that you remove coins, keys, and other hard objects, and that you close zippers. These items may damage clothes. Sort laundry by fabric type, soil level, color, and load size. -
Page 32: Step 5: Select The Appropriate Cycle And Options For The Load
OPERATING INSTRUCTIONS If you are using the Pre-Wash option, pour the recommended amount of laundry detergent directly into the pre-detergent compartment (I) before starting your washer. Pour the recommended amount of laundry detergent directly into the detergent compartment (II) before starting your washer. If you’re using color-safe bleach or liquid chlorine bleach, add it with the detergent to the detergent compartment. -
Page 33: Step 7: (Optional) Decrease The Wash Time
NS-FWM27W1 OPERATING INSTRUCTIONS Notes: • After the delay time is set, if you want to change the delay setting, press the Delay button again until the hour you want is reached. Release the button for three seconds. • If you decide to cancel the delay setting, you can either turn the cycle selector or press the Delay button until 0 is reached. -
Page 34: Setting The Child Lock
OPERATING INSTRUCTIONS Setting the child lock Your washer has a child lock function to prevent children from playing with your washer. When you turn on the child lock, the only buttons that work are the Power button and the Delay and Temp. buttons you use to turn off the child lock. Press and hold both the Delay and Temp. -
Page 35: Cycles And Settings
NS-FWM27W1 OPERATING INSTRUCTIONS Cycles and settings • o (circles) indicate that options available for a cycle. (dots) indicate the default settings. Temperature TEMPERATURE CYCLE COLD WARM HOT+ • Normal • Perm Press • Heavy Duty • Bulky • Active Wear... - Page 36 OPERATING INSTRUCTIONS Spin speed SPIN SPEED CYCLE NO SPIN HIGH HIGHEST • Normal • Perm Press • Heavy Duty • Bulky • Active Wear • Spin Only Drain Only • Rinse&Spin Tub Clean • Cold Wash • Sanitize • Baby Wear •...
- Page 37 NS-FWM27W1 OPERATING INSTRUCTIONS Soil level SOIL LEVEL CYCLE LIGHT MED. HEAVY • Normal • Perm Press • Heavy Duty • Bulky • Active Wear Spin Only Drain Only Rinse&Spin Tub Clean • Cold Wash • Sanitize • Baby Wear •...
- Page 38 OPERATING INSTRUCTIONS Function FUNCTIONS TIME EXTRA EASY CYCLE DELAY SAVE CYCLE WASH RINSE IRON Normal Perm Press Heavy Duty Bulky Active Wear Spin Only Drain Only Rinse&Spin Tub Clean Cold Wash Sanitize Baby Wear Hand Wash Delicates Quick Wash www.insigniaproducts.com...
-
Page 39: Maintaining Your Washer
NS-FWM27W1 OPERATING INSTRUCTIONS Maintaining your washer WARNINGS: Don't use solvents to clean your washer. They can damage the finish and create toxic gases that can harm you or explode. Don't sprinkle or spay water or other liquids directly on your washer. -
Page 40: Cleaning The Detergent And Softener Compartments
OPERATING INSTRUCTIONS Cleaning the detergent and softener compartments Open the drawer, then press down the arrow located on softener cover inside the drawer. Lift the clip up and pull out the drawer. Wash the compartments and grooves with water, then dry with a cloth. Restore the softener cover and push the drawer into position. -
Page 41: Cleaning The Inlet Filters
NS-FWM27W1 OPERATING INSTRUCTIONS Cleaning the inlet filters If water flows too slowly or not at all, you need to clean the inlet filter. Machine filter Turn off the water faucets. Unscrew the inlet pipe on the back of your washer from the tap. -
Page 42: Cleaning The Drain Filter
OPERATING INSTRUCTIONS Cleaning the drain filter CAUTION: Clean the filters frequently. Blocked filters may: • Keep your washer from draining water • Keep your washer from spinning • Cause loud or unusual noises from object caught in the filters Use a flat blade screwdriver to open the filter door located on the bottom right of the front of your washer. - Page 43 NS-FWM27W1 OPERATING INSTRUCTIONS Drain water into a bowl or bucket. Reset the drain hose. Rotate the filter counter-clockwise, then pull it out of your washer. Remove lint and other objects from the filter. www.insigniaproducts.com...
-
Page 44: Cleaning The Tub
OPERATING INSTRUCTIONS Slide the filter back in and rotate is counter-clockwise to lock it in place. Cleaning the tub The Tub Clean cycle is a self-cleaning cycle that removes the causes of odors that may occur inside your washer without using a cleaning agent. We suggest cleaning the tub about once a month. -
Page 45: Using The Emergency Door Release
NS-FWM27W1 OPERATING INSTRUCTIONS Using the emergency door release If the power fails or other circumstances prevent you from opening the door, you can use the emergency cord to open the door. WARNING: You can't use the emergency cord when you washer is running. If you must open the door, turn your washer off and wait for the water to cool before you use the emergency cord. -
Page 46: Storing Your Washer
USER MAINTENANCE INSTRUCTIONS Storing your washer You can damage your washer if you don’t remove water from hoses and internal components before storage. To prepare your washer for storage: Select the Quick Wash cycle and add bleach to your washer. Run your washer through the cycle without a load. - Page 47 USER MAINTENANCE INSTRUCTIONS NS-FWM27W1 PROBLEM SOLUTION Water leaks • Make sure that all hose connections are tight. See Step 2: Connect the water hoses on page 22 and Step 3: Connect the drain hose on page 24. • Make sure that the end of the drain hose is correctly inserted and secured to the drainage system.
-
Page 48: Understanding The Error Codes
USER MAINTENANCE INSTRUCTIONS PROBLEM SOLUTION The display panel • Make sure that the power cord is connected to a working does not light outlet. • Contact a qualified repair professional to check the display panel wiring. Items are still dirty •... -
Page 49: Specifications
16 Cycle High Efficiency Front-Loading Washer Specifications Dimension (H × W × D) 33.5 × 23.5 × 25.6 in. (85 × 59.5 × 65 cm) Net Weight 161 lbs. (73 kg) Washing Capacity 2.7 cu. ft. Power Supply 120 V, 60 Hz Rated Current 11 A Standard Water Pressure... -
Page 50: One-Year Limited Warranty
Product is determined to be defective by an authorized Insignia repair center or store personnel, Insignia will (at its sole option): (1) repair the Product with new or rebuilt parts; or (2) replace the Product at no charge with new or rebuilt comparable products or parts. - Page 51 • Damage due to incorrect operation or maintenance • Connection to an incorrect voltage or power supply • Attempted repair by any person not authorized by Insignia to service the Product • Products sold “as is” or “with all faults”...
- Page 52 1-877-467-4289 (U.S. and Canada) INSIGNIA is a trademark of Best Buy and its affiliated companies. Distributed by Best Buy Purchasing, LLC 7601 Penn Ave South, Richfield, MN 55423 U.S.A. V2 ENGLISH ©2020 Best Buy. All rights reserved. 20-0524...
Need help?
Do you have a question about the NS-FWM27W1 and is the answer not in the manual?
Questions and answers
Cleaning the tub. Page 44 reads add one cup of chlorine bleach to the bleach dispenser but there is no dispenser? Where should I put the chlorine bleach then?
Chlorine bleach should be added to the main detergent compartment after the washer has started and water begins to flow into the compartment. Do not pour undiluted bleach directly onto the load or into the tub.
This answer is automatically generated