Fluke PQ Window Instructions Manual

Fluke PQ Window Instructions Manual

Voltage / current measurement feed-through device for electrical enclosures

Advertisement

Quick Links

Voltage/Current Measurement Feed-Through
PQ Window (the Product) is an accessory that mounts to the
flat surface of a Type 12 electrical enclosure (derate to Type 1
during measurements). When the Product is installed and signal
feeds connected, you can safely perform voltage and current
measurements from outside the enclosure.
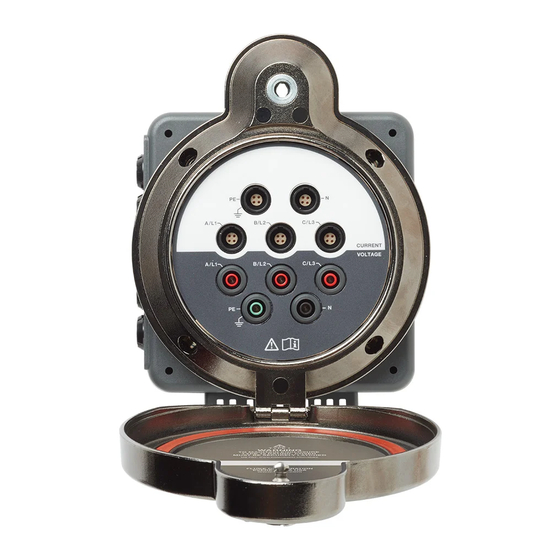
Standard 4 mm safety sockets on the front provides access
to the three phases (A/L1, B/L2, C/L3), Neutral N, and Earth/
Ground for voltage measurements. The voltage outputs
support instruments that are powered from the measurement
line with a maximum power of 100 VA.
The Product supports current measurement with Fluke
intelligent current sensors (iFlex1500-12, iFlex 3000-24,
i40S-EL and i400S-EL). Go to
compatible accessories.
The 354x FC, 173x Power, and 174x Power Quality Loggers
automatically read the sensor information, such as, the type,
serial number, scale factor, and phase angle compensation.
Use the optional adapter kit to connect instruments and
current sensors that have BNC connectors.
PN 4954885 October 2018 Rev. 1, 2/19
©2018-2019 Fluke Corporation. All rights reserved.
Specifications are subject to change without notification.
All product names are trademarks of their respective companies.
Fluke Corporation
P.O. Box 9090
Everett, WA 98206-9090
U.S.A.
Device for Electrical Enclosures
www.fluke.com
Fluke Europe B.V.
P.O. Box 1186
5602 BD Eindhoven
The Netherlands
PQ400
PQ Window
Instructions
for a full list of
ООО «Флюк СИАЙЭС»
125167, г. Москва,
Ленинградский проспект дом 37,
корпус 9, подъезд 4, 1 этаж

Advertisement

Table of Contents
loading
Need help?

Need help?

Do you have a question about the PQ Window and is the answer not in the manual?

Questions and answers

Subscribe to Our Youtube Channel

Summary of Contents for Fluke PQ Window

  • Page 1 Voltage/Current Measurement Feed-Through Device for Electrical Enclosures Instructions PQ Window (the Product) is an accessory that mounts to the flat surface of a Type 12 electrical enclosure (derate to Type 1 during measurements). When the Product is installed and signal feeds connected, you can safely perform voltage and current measurements from outside the enclosure.
  • Page 2 To contact Fluke, call one of the following telephone numbers: • Technical Support USA: 1-800-44-FLUKE (1-800-443-5853) • Calibration/Repair USA: • 1-888-99-FLUKE (1-888-993-5853) • Canada: 1-800-36-FLUKE (1-800-363-5853) • Europe: +31 402-675-200 • Japan: +81-3-6714-3114 • Singapore: +65-6799-5566 • China: +86-400-921-0835 •...
  • Page 3 • Only install the Product to the specified measurement category, voltage, or amperage ratings. • Do not exceed the Measurement Category (CAT) rating of the lowest rated individual component of a Product, probe, or accessory. • Do not use the Product if it is damaged. •...
  • Page 4 Symbols Symbol Description WARNING. RISK OF DANGER. WARNING. HAZARDOUS VOLTAGE. Risk of electric shock.  Consult user documentation. Measurement Category III is applicable to test and measuring circuits connected to the distribution  part of the building’s low-voltage MAINS installation. Measurement Category IV is applicable to test and ...
  • Page 5: Before You Start

    Unpack the Product when it arrives. See Figure 1. Identify and make sure all the parts are in the shipment: PQ Window Feed-Through Box Top Plate (installed on ) PQ Window Frame with Cover Top Plate Decal Set Screws: x6 flathead (installed) / x6 panhead Cable Marker Set Current Test Leads (x4)
  • Page 6 Pozidriv screwdriver #1 (not shown) Figure 2. Tool Requirements Accessories • Fuse, 2A • I17XX-BNC-M2M, Fluke-17XX 4-pin Male to BNC Male Cable 2 m (1x) • I17XX-BNC-M2F, Fluke-17XX 4-pin Male to BNC Female Cable 0.1 m (1x) • I17XX-FLEX2M-M2M4P, Fluke-17XX iFlex Male-Male Cable 2 m (4x) •...
  • Page 7: Site Preparation

    W Caution Make sure that the gaskets and sealing areas are clean. See Figure 4 to install: Insert the PQ Window frame into the punched hole. Make sure the cover opens downwards. Align and firmly hold the frame in place.
  • Page 8 This torque makes sure that the frame gasket is compressed for an optimum seal. Insert the PQ Window Feed-Through Box from the rear to the front plate.Fasten the front plate with the 6 panhead screws. If the space for the standard configuration is too small, remove the top plate and rotate in 90 °...
  • Page 9: Voltage Connections

    Voltage Connections To make voltage connections: On the Feed-Through Box, loosen the screws and remove the lid. In the electrical enclosure, make the voltage measurement connections with the rated wires for phase A/L1, B/L2, C/L3, Neutral N, and Protective Earth PE. Use the color codes that match the local requirements.
  • Page 10 Figure 5. Current Connections Secure the excess cable. Do not cut or alter the cable length. Connect the plugs into the sockets on the PQ Window. Verify connections to the correct phase. Use the BNC-to-4 pin male cables for current sensors with BNC output.
  • Page 11 Use the current test lead to connect the current measurement signal output of the PQ Window with the measurement instrument. Note Use the BNC-to-4 pin male 2 m or 0.1 m cable for Loggers with BNC input.
  • Page 12: Maintenance

    Maintenance Product maintenance consists of fuse replacement. WX Warning To prevent shock, injury, or damage to the Product: • De-energize the circuit before opening the case. • Make sure the circuit is secure against reenergizing of the installation. • Use only specified replacement fuses. Fuse Replacement To replace a fuse: De-energize the installation.
  • Page 13: Specifications

    Inside......140 mm x 158 mm x Di (W x H x D) = 58 – thickness of panel door in mm. Supported Electrical Enclosures UL 50/NEMA Environmental Enclosure ....... Type 1 (Type 12 when PQ Window cover is closed) Panel Thickness ..... max. 3.5 mm (10 gauge) Environment Temperature Operating/Storage ..
  • Page 14 Power Quality Loggers LIMITED WARRANTY AND LIMITATION OF LIABILITY This Fluke product will be free from defects in material and workmanship for one year from the date of purchase. This warranty does not cover fuses, disposable batteries, or damage from accident, neglect, misuse, alteration, contamination, or abnormal conditions of operation or handling.
  • Page 15 PQ400 Instructions Supplement Issue: 1 Part Number: 4954885 Print Date: October 2018 Issue Date: 3/19 Revision/Date: 1, 2/19 Page Count: This supplement contains information necessary to ensure the accuracy of the above manual. © 2019 Fluke Corporation. All rights reserved.
  • Page 16 Supplement PQ400 Instructions Change #1, On the 3 page, replace the 6 bullet with: Use a certified circuit breaker marked as the • disconnecting device in an easily reached location suitable for the wire gauge used for the voltage inputs to the Product. page, under Environment, replace On the 13 the Humidity with:...

This manual is also suitable for:

Pq400

Table of Contents