Table of Contents
Advertisement
The HB-1A MK2 covers the 20 and 40 meter amateur bands. (30 meters with modification.) It can
receive between 5 and 16 MHz. The IF bandwidth can be adjusted from 400 Hz to 3 kHz, allowing
reception of CW, SSB, and AM signals. It can be powered either by an internal Lithium-Ion battery or
an external power source.
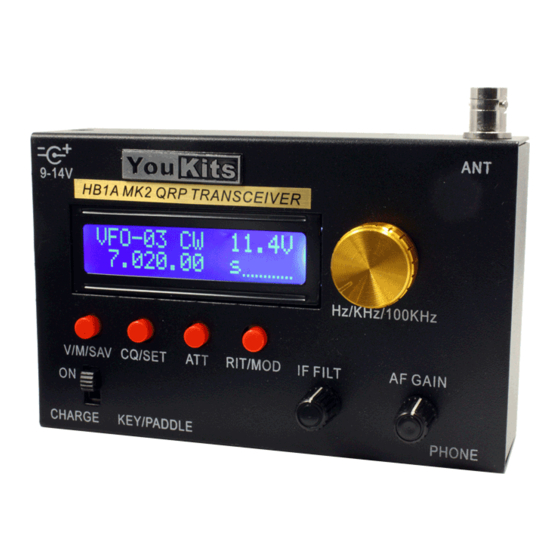
The LCD display shows the following:
Frequency
Operating Mode
Supply Voltage
Signal strength
Receiver Incremental Tuning (RIT)
Forward and Reflected Power
The 20 frequency storage memories can be used to change frequency and band. The tuning steps can
be set to 10 Hz, 100 Hz, 1 kHz, and 100 kHz for the amateur bands. Outside the amateur bands, tuning
steps can be set to 10 Hz, 100 Hz, 5 kHz, and 100 kHz. RIT tuning steps can be set to 10 Hz and 100
Hz.
Youkits HB-1A MK2 Manual
Edited and revised by K9MA
18.01.30
Advertisement
Table of Contents

Subscribe to Our Youtube Channel
Related Manuals for YouKits HB-1A MK2


Summary of Contents for YouKits HB-1A MK2
- Page 1 Edited and revised by K9MA 18.01.30 The HB-1A MK2 covers the 20 and 40 meter amateur bands. (30 meters with modification.) It can receive between 5 and 16 MHz. The IF bandwidth can be adjusted from 400 Hz to 3 kHz, allowing reception of CW, SSB, and AM signals.
- Page 2 Specifications Size: 132 x 85 x 35 mm (not including knobs, etc.) Weight: About 380 g (not including battery pack) Supply Voltage: 9-14 VDC Receive Supply Current: 80-90 mA Transmit Supply Current: 950 mA at 12 V Receive Frequencies: 5-16 MHz, continuous Transmit Frequencies: 7.0-7.3 MHz, 14.0-14.35 MHz (10.1-10.15 MHz with modification) VFO: DDS circuit with 50 MHz reference Display: 1602 LCD...
- Page 3 Key/Paddle Connect to dot paddle or straight key contact Connect to paddle dash or straight key ground* Connect to paddle or straight key ground* * Both must be connected to ground for use with a straight key. A monaural plug may also be used with a straight key. Operation When power is turned on with a paddle connected, the letter “A”...
- Page 4 RIT/MOD Button RIT Mode: Press this key to enter or exit the RIT function. A dash (-) will be displayed to the right of the frequency as shown above. In the RIT mode, the Tuning knob controls the offset of the received frequency from the transmit frequency. The transmit frequency is unchanged.
- Page 5 ATT/IF Key Attenuator: Press the ATT/IF key briefly to turn the receiver attenuator (ATT) on or off. The “S” in the display will change to “A” when the attenuator is ON. QSK Setup: To change the QSK mode, press and hold ATT/IF for two seconds. Pressing ATT/IF briefly will then cycle through Full (QSK), 250 ms, 500 ms, and 800ms.
- Page 6 Frequency Lock To lock the frequency, sumultaneously press V/M/SAV and RIT/MOD for about one second. Repeat to unlock. In the locked mode, the symbol “#” will be displayed next to the frequency, and rotation of the Tuning know will not change the frequency. CW Keyer Changing Speed: Press and hold CQ/SET for approximately one second, until the letter “S”...
- Page 7 Tune Function This function is to transmit continuously for antenna tuning, etc. If a straight key is connected, simply close the key to transmit. If a keyer paddle is connected, presss CQ/SET and hold for two seconds, until the letter “S” is heard, continue to hold until the letter “I”...
- Page 8 DDS Calibration This operation wil reset the 20 frequency memories to their original default values and allow calibration of the DDS frequency. Turn off power. Simultaneously press V/M/SAV and RIT/MOD, turn on power, and hold down the two keys until the display appears as shown below then release the keys. After a few seconds, the HB-1A will enter the DDS calibration mod and the display will appear as below.
Need help?
Do you have a question about the HB-1A MK2 and is the answer not in the manual?
Questions and answers