Advertisement
Quick Links
Advertisement

Related Manuals for Ranger design 1525-FS


Summary of Contents for Ranger design 1525-FS
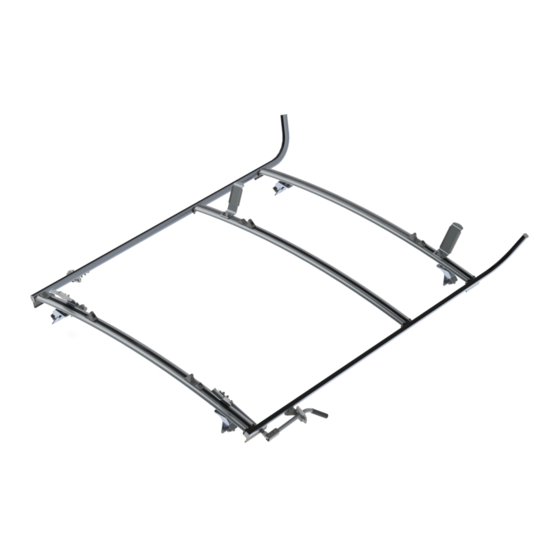
- Page 1 INSTALLATION GUIDE 1525-FS Combination Ladder Rack Express / Savana ( Aluminum )
- Page 2 QUICK START GUIDE Phase 1 - Assembly q 1.1 Setup............................... 3 - 4 q 1.2 Ladder Rack Assembly........................5 - 15 Phase 2 - Installation q 2.1 Ladder Rack Installation........................16 - 20 q 2.2 Note..............................REQUIRED ITEMS NOTE: Use Sawhorses if possible, or use the box as a flat protective surface on the ground or table. q Cordless Impact q Ratchet q Tape Measure...
- Page 3 Ladder Clamp Bar ( Passenger Side ) 15-3010 Ski ( Left ) 15-3011 Ski ( Right ) 15-4290 Front Hook 94-1010 Assembly Fastener Kit 96-1014 Install Fastener Kit 1525-FS Installation Guide | REV. C2 | Page 3 For technical support, contact us at 1-800-565-5321...
- Page 4 #90-327 Hex Bolt 3/8" × 2-1/2" Lock Nut 4× # 94-109 3/8" SS304wax #98-109 Flat Washer #94-109 Lock Nut Flat Washer 4× 3/8" # 98-109 SS304 1525-FS Installation Guide | REV. C2 | Page 4 For technical support, contact us at 1-800-565-5321...
- Page 5 HARDWARE USED 4× hardware is pre assembled #90-225 Hex Bolt 5/16" - 18 × 2" SS304 #98-117 Flat Washer #98-117 Flat Washer #94-111 Lock Nut 1525-FS Installation Guide | REV. C2 | Page 5 For technical support, contact us at 1-800-565-5321...
- Page 6 5/16" × 3/4" SS304 5/16" × 3/4" SS304 4× 4× #90-491 Hex Bolt #90-491 Hex Bolt 5/16" × 1" SS304 5/16" × 1" SS304 1525-FS Installation Guide | REV. C2 | Page 6 For technical support, contact us at 1-800-565-5321...
- Page 7 1.2.4 Install the feet on the first Front, and Rear Crossbows. HARDWARE USED 8× hand tighten the nuts Carriage bolts are already on the crossbows. #98-117 Flat Washer #98-123 Lock Washer #94-105 Hex Nut 1525-FS Installation Guide | REV. C2 | Page 7 For technical support, contact us at 1-800-565-5321...
- Page 8 Marker HARDWARE USED 4× Carriage bolts are already on the crossbows. #98-117 Flat Washer #98-123 Lock Washer #94-105 Hex Nut 12 - 3/4" 1525-FS Installation Guide | REV. C2 | Page 8 For technical support, contact us at 1-800-565-5321...
- Page 9 Cutter HARDWARE USED 4× hardware is pre assembled #90-491 Carriage Bolt 5/16" × 1" #98-117 Flat Washer #98-123 Lock Washer #94-105 Hex Nut 1525-FS Installation Guide | REV. C2 | Page 9 For technical support, contact us at 1-800-565-5321...
- Page 10 Cordless Impact q 1/2" Socket HARDWARE USED 4× Carriage bolts are already on the ski. #98-117 Flat Washer #98-123 Lock Washer #94-105 Hex Nut 1525-FS Installation Guide | REV. C2 | Page 10 For technical support, contact us at 1-800-565-5321...
- Page 11 Cutter HARDWARE USED 4× hand tighten the nuts #90-491 Carriage Bolt 5/16" × 1" #98-117 Flat Washer #98-123 Lock Washer #94-105 Hex Nut 1525-FS Installation Guide | REV. C2 | Page 11 For technical support, contact us at 1-800-565-5321...
- Page 12 HARDWARE USED 4× hand tighten the nuts #90-491 Carriage Bolt 5/16" × 1" #98-117 Flat Washer #98-123 Lock Washer #94-105 Hex Nut 1525-FS Installation Guide | REV. C2 | Page 12 For technical support, contact us at 1-800-565-5321...
- Page 13 Marker HARDWARE USED 4× hardware is pre assembled #90-487 Carriage Bolt 5/16" × 3/4" #98-117 Flat Washer #98-123 Lock Washer #94-105 Hex Nut 1525-FS Installation Guide | REV. C2 | Page 13 For technical support, contact us at 1-800-565-5321...
- Page 14 THIRD CROSSBOW TOOLS q Mallet end plug HARDWARE USED 6× #90-491 Carriage Bolt 5/16" × 1" SS304 1525-FS Installation Guide | REV. C2 | Page 14 For technical support, contact us at 1-800-565-5321...
- Page 15 #98-123 Lock Washer #94-105 Hex Nut 2× Carriage bolts are already on the ski. #98-160 Spacer #98-117 Flat Washer #98-123 Lock Washer #94-105 Hex Nut 1525-FS Installation Guide | REV. C2 | Page 15 For technical support, contact us at 1-800-565-5321...
- Page 16 2.1.1 Position the Ladder Rack ( minimum two persons ) on the roof, so that the feet sit in the gutters. NOTE: If you do not have a hoist, lift the ladder rack onto the roof manually. Ladder Rack 1525-FS Installation Guide | REV. C2 | Page 16 For technical support, contact us at 1-800-565-5321...
- Page 17 GUTTER CLIP TOOLS q Cordless Impact q 9/16" Socket HARDWARE USED 4× #90-327 Hex Bolt 3/8" × 2-1/2" #98-109 Flat Washer #94-109 Lock Nut 1525-FS Installation Guide | REV. C2 | Page 17 For technical support, contact us at 1-800-565-5321...
- Page 18 NOTE: If you have a third crossbow, center the third crossbow between the front and rear crossbows. THIRD CROSSBOW TOOLS q Ratchet q 1/2" Socket 1525-FS Installation Guide | REV. C2 | Page 18 For technical support, contact us at 1-800-565-5321...
- Page 19 Now adjust the front hook to be snug against the ladder rung and tighten the bolts on the front crossbow. TOOLS q Cordless Impact q 1/2" Socket front hook 1525-FS Installation Guide | REV. C2 | Page 19 For technical support, contact us at 1-800-565-5321...
- Page 20 The inner ladder side support must be adjusted according to the width of the step ladder. 1525-FS Installation Guide | REV. C2 | Page 20 For technical support, contact us at 1-800-565-5321...
- Page 21 If the handle is interfering with the door or roof of the vehicle, disassemble the handle, then assemble it in an alternate position as shown. Handle 1525-FS Installation Guide | REV. C2 | Page 21 For technical support, contact us at 1-800-565-5321...
- Page 22 “You have successfully installed your Ladder Rack Thank you for doing business with us.” cs@rangerdesign.com For any feedback or suggestions you may have, please contact: 1525-FS Installation Guide | REV. C2 | Page 22 For technical support, contact us at 1-800-565-5321...
- Page 23 INSTALLATION GUIDE 15-U2534 THIRD CROSSBOW Express / Savana ( Aluminum )
- Page 24 LADDER RACK WITH THIRD CROSSBOW Combination Ladder Rack Double Clamp Ladder Rack...
- Page 25 QUICK START GUIDE Phase 1 - Assembly q 1.1 Setup............................... 4 - 5 q 1.2 Third Crossbow Assembly....................... 6 - 7 REQUIRED ITEMS NOTE: Use Sawhorses if possible, or use the box as a flat protective surface on the ground or table. q Sawhorse ( Optional ) q Box PERSONS...
- Page 26 PHASE 1 – ASSEMBLY 1.1 SETUP 1.1.1 Unpack components; compare with the bill of materials. 10-602 10-448 10-411 15-2532 1.1.2 Verify all parts are present. BILL OF MATERIALS Item No. Description Qty. 10-411 Gutter Clip 10-448 “C” Foot ( Middle Foot ) 10-602 Insulator Pad 15-2532...
- Page 27 1.1.3 Fastener kits. 94-1015 Fastener Kit Fastener Assembly Carriage Bolt 4× 5/16"-18 × 1" # 90-491 SS304 4× for third crossbow assembly Hex Nut 4× # 94-105 5/16"-18 #90-491 Carriage Bolt 5/16" × 1" SS316wax #98-117 Flat Washer Flat Washer #98-123 Lock Washer 4×...
- Page 28 PHASE 1 – ASSEMBLY 1.2 THIRD CROSSBOW ASSEMBLY 1.2.1 Slide carriage bolts on the bottom face of the crossbow. NOTE: The track plug must be removed from the underneath of the crossbow, and reinstalled after the feet have been installed in the final position. TIPS: Use tape to keep the bolts from sliding off.
- Page 29 1.2.2 Install the feet on the crossbow. HARDWARE USED 4× hand tighten the nuts Carriage bolts are already on the crossbows. #98-117 Flat Washer #98-123 Lock Washer #94-105 Hex Nut 15-U2534 Installation Guide | REV. A1 | Page 7 For technical support, contact us at 1-800-565-5321...
- Page 30 “You have successfully assembled your Third Crossbow Your third crossbow is now ready to be incorporated into the ladder rack installation, please return to the install guide to complete installing your ladder rack.” cs@rangerdesign.com For any feedback or suggestions you may have, please contact: 15-U2534 Installation Guide | REV.
Need help?
Do you have a question about the 1525-FS and is the answer not in the manual?
Questions and answers