Table of Contents
Advertisement
Advertisement
Table of Contents

Subscribe to Our Youtube Channel
Related Manuals for Webdyn WebdynSunPM


Summary of Contents for Webdyn WebdynSunPM
- Page 1 USER GUIDE WebdynSunPM The monitoring gateway for your photovoltaic installations...
-
Page 2: Table Of Contents
Table of contents Glossary ......................5 Notes about this manual .................. 6 Scope ....................... 6 Target audience ..................6 Safety instructions.................... 7 Introduction ...................... 8 Presentation ..................... 8 4.1.1 Operating principles ................8 4.1.2 Interfaces ..................... 9 Characteristics ..................10 Quick Start ..................... - Page 3 10.2 Script management ................. 45 10.2.1 Script import ................... 45 10.2.2 Script activation/deactivation ............45 10.2.3 Script display .................. 46 10.2.4 Script export ................... 46 10.2.5 Script deletion ................. 46 Support ....................... 47 WebdynSunPM – User guide — Version 1.0...
-
Page 4: Glossary
Network Time Protocol An NTP server provides time synchronization of devices. Information System A server that exchanges data with a concentrator (configuration, data, alarms, etc.). WebdynSunPM – User guide — Version 1.0... -
Page 5: Notes About This Manual
USER GUIDE – WebdynSunPM Notes about this manual This guide describes how to perform a complete installation of the WebdynSunPM concentrator and how to operate the concentrator remotely. Scope This technical description is valid for firmware version 1.0. This manual will be updated as required following functionality changes to the product. -
Page 6: Safety Instructions
Please observe all safety instructions in the device notices. The WebdynSunPM product can be damaged by electrostatic discharges (ESD). Avoid contact with component connections and connector contacts. This device is not suitable for use in places where children might be present. -
Page 7: Introduction
Presentation Operating principles 4.1.1 The WebdynSunPM concentrator is designed to monitor all types of installations (photovoltaic or otherwise). To do this, the concentrator uses tools and protocols that enable the installation, operation and maintenance of equipment. The information collected (data, alarms, etc.) is analyzed and formatted before being sent to one or two servers using guaranteed security (confidentiality, loss, etc.). -
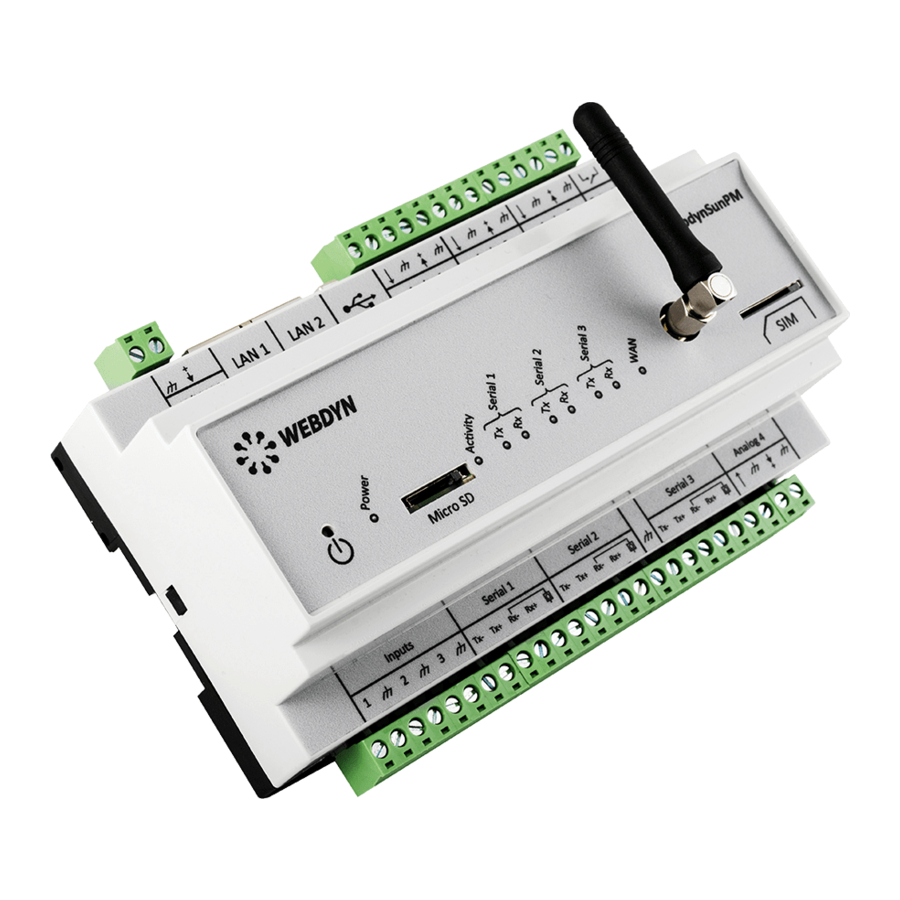
Page 8: Interfaces
WAN: connection status Power button Micro SD card slot 3 digital inputs (discrete or pulsed) 3 RS485/422 ports SIM card slot Aerial SMA connector for antenna USB port Reset button WebdynSunPM – User guide — Version 1.0... -
Page 9: Characteristics
Flash eMMc: 8 GB Modem GSM/GPRS/EDGE/3G modem - 3G: HSPA (B1 and B8) - 2G: EDGE, GSM, GPRS (B1 and B8) Embedded servers HTTP Protocols Modbus RTU Modbus/TCP Compatible protocols FTP/SFTP (CSV) MQTT (JSON) WebdynSunPM – User guide — Version 1.0... -
Page 10: Quick Start
USER GUIDE – WebdynSunPM Quick Start The purpose of this chapter is to describe how to quickly get started with the WebdynSunPM product. The product must therefore be set to its default factory configuration and switched off. Starting up the product The WebdynSunPM concentrator power supply accepts power from 12 to 24V. -
Page 11: Configuring The Concentrator
Serial port settings 5.3.1 The WebdynSunPM concentrator has three RS485/422 serial ports. Different communication protocols can be associated with each of these ports. All devices on the same port must therefore use the same protocol, as well as the same parameters (speed, data bits, stop bits and parity). -
Page 12: Network Settings
Network settings 5.3.2 The WebdynSunPM concentrator has two Ethernet ports and can therefore be integrated with two different networks. You can configure these networks via the "Settings" menu, and then the "Networks" submenu. If you don’t need to configure any IP devices and the connection to the information system (IS) is through a modem, skip this step. -
Page 13: Modem Settings
USER GUIDE – WebdynSunPM Configure the network settings listed below to integrate your WebdynSunPM concentrator into your facility's networks: o IP address o Subnet mask o Gateway (optional) o DNS server 1 (optional) o DNS server 2 (optional) Notes: If an Ethernet interface must access another network (for example: the IS accessible only via the internet), you must configure the gateway address (router) to exit the network, and thus access the internet. -
Page 14: Server Configuration
If it’s lower, the signal will not be strong enough to guarantee communication. Server configuration 5.3.4 The WebdynSunPM concentrator supports configuration of one or two servers for data and alarm storage, as well as the management of configuration and commands. From the "Settings" menu, select "Servers". - Page 15 Set the server connection schedule. This defines when and how frequently data is collected and stored on your server. o For a daily upload at midnight, activate the schedule and set the parameters as follows: WebdynSunPM – User guide — Version 1.0...
-
Page 16: Date And Time Configuration
Start by selecting the time zone. This is used to trigger schedules, as well as to timestamp data and alarms. You can set the time of the WebdynSunPM concentrator either manually or via an NTP server. To set the date and time manually, enter a date in the "Date (DD/MM/YYYY)" field using the "DD/MM/YYYY"... -
Page 17: Configuring Devices
Click on the "Force sync" button to trigger synchronization immediately. If the time synchronization is successful, close the pop-up window, and validate your changes. Configuring devices You can configure devices through the "Devices" menu. Start by clicking on the "Devices" menu. WebdynSunPM – User guide — Version 1.0... - Page 18 Define the acquisition period (device variable recording frequency) in minutes. Lastly, validate the new device by clicking on the tick symbol New devices will be added to the device list on the according to category and manufacturer. WebdynSunPM – User guide — Version 1.0...
-
Page 19: Interfaces
Interfaces Power supply The WebdynSunPM concentrator can be powered using 12 or 24V DC. The power supply is the two- point plug-in terminal block located at the top left of the box. Ensure you observe the wiring directions of the power supply. -
Page 20: Inputs/Outputs
In discrete mode, the concentrator can detect openings and closures of dry contacts to monitor the status of devices or to trigger alarms on status changes. In pulse mode, the WebdynSunPM concentrator manages the Class A (24 V) and B (5 V) pulse outputs of the meters according to IEC 62053-31:1998. -
Page 21: Analog Inputs
Analog inputs 6.2.2 The WebdynSunPM concentrator has four analog inputs for a current ranging from 4 to 20 mA or a voltage ranging from 0 to 10 V. You can choose between these two modes (4-20 mA or 0-10 V) via the software. -
Page 22: Relay Output
Three-wire cabling Do not operate a voltage higher than 12V, and a current higher than 24mA on these inputs. Relay output 6.2.3 The WebdynsunPM concentrator has a potential-free relay output. Relay characteristics: Maximum voltage: 24 V Maximum current: 1 A... -
Page 23: Serial Interfaces
USER GUIDE – WebdynSunPM Serial interfaces The WebdynSunPM concentrator has three RS485/422 serial ports. A communication protocol can be associated with each of these ports. All devices on the same serial port must use the same protocol and the same bus parameters (speed, data bits, stop bits, parity). - Page 24 In the latter (two wires), the same line is used for transmission and reception. It is therefore necessary to loop back on the WebdynSunPM transmission and reception hub. We recommend the use of shielded twisted pairs (general shielding) with a minimum cross-section of 0.20 mm², and an impedance of 120 ohms.
- Page 25 This end-of-line resistance must be of the same value as the line impedance; i.e., 120 Ω. If the WebdynSunPM concentrator is at the end of the line, activate the product's internal termination resistance, represented by the symbol.
-
Page 26: Network Interfaces
Network interfaces Ethernet 6.4.1 The WebdynSunPM concentrator has two Ethernet ports (LAN 1 and LAN 2) which are independent of each other. The WebdynSunPM concentrator can therefore connect to two separate Ethernet networks to communicate with local IP devices on the two different networks and/or to communicate with the IS. -
Page 27: Modem
USER GUIDE – WebdynSunPM Modem 6.4.2 The WebdynSunPM concentrator has a modem which is compatible with 2G et 3G networks. 2G: EDGE, GSM, GPRS (B1 and B8) 3G: HSPA (B1 and B8) The concentrator is compatible with all commercial operators and all SIM cards in mini SIM format (2FF). -
Page 28: Extension Interfaces
Micro SD 6.5.1 A micro SD slot is available on the front of the product. Compatible SD cards must be in micro SD format. The micro SD slot is reserved for future use. WebdynSunPM – User guide — Version 1.0... -
Page 29: Usb
USER GUIDE – WebdynSunPM 6.5.1 A USB port is available on top of the product next to the LAN connectors. The USB port is reserved for future use. WebdynSunPM – User guide — Version 1.0... -
Page 30: User Interface
Status indicators Power 7.1.1 This indicator represents the power status of the WebdynSunPM concentrator. The LED is lit as soon as a voltage is present on the power supply terminal block. If the voltage disappears, the light goes out. Activity 7.1.2... -
Page 31: Buttons
If the button is released after two seconds (two flashes), the concentrator restarts. If the button is released after five seconds (five flashes), the concentrator switches off. When the product has been stopped, it can be restarted by pressing the Power button. WebdynSunPM – User guide — Version 1.0... -
Page 32: Factory Reset
IP address 192.168.2.12 Subnet mask 255.255.255.0 The web interface of the WebdynSunPM concentrator is compatible with mainstream web browsers: Chrome (version 72.0 and higher); Firefox (version 65.0 and higher); and, Internet Explorer (version 11 and higher). Open your web browser and type the address: http://192.168.1.12... - Page 33 Home: Concentrator overview Devices: A list of devices connected to the concentrator and their configuration Settings: Concentrator settings (Serial ports, Networks, Modem, Servers, Date and Time) System: System management menu (Scenarios and Update) WebdynSunPM – User guide — Version 1.0...
-
Page 34: Devices
Note: For models based on serial protocols, you will first need to configure the communication protocol and its settings for the serial port you wish to use. Please refer to the chapter on serial port configuration for detailed instructions. WebdynSunPM – User guide — Version 1.0... -
Page 35: Device Configuration
Select the category of your device, along with the manufacturer and model. The dropdown list content will update based on your choices, and additional information may be required. With the new device details entered, validate the new device by clicking on the tick symbol. WebdynSunPM – User guide — Version 1.0... -
Page 36: Delete A Device
To delete a device, click on the device you wish to delete from the list, then click on the trash button. As a safeguard, the system will ask you to confirm the deletion before removing the device. WebdynSunPM – User guide — Version 1.0... -
Page 37: Edit Device Settings
Modify the fields you wish to change, then click on the tick button to confirm the changes, or the cross button to cancel any changes you made. The category, manufacturer and model cannot be changed in edit mode. WebdynSunPM – User guide — Version 1.0... -
Page 38: Duplicate A Device
Configuration management of remote devices depends on the type of server being used. For full details on how to manage device configuration via the IS, please refer to Appendix A. Recording variables Device variables are recorded at the frequency defined for each device. WebdynSunPM – User guide — Version 1.0... -
Page 39: Alarms
You can define a sending strategy for each alarm — "Delayed" or "Immediate". When "Delayed" is set, the alarm will only be sent at the next connection. When "Immediate" is set, the alarm is sent immediately. WebdynSunPM – User guide — Version 1.0... -
Page 40: Labels
"Device" / "Label" pair. It’s also possible to access all variables with the same label to define a common action for all these variables. Labels must be defined in the scripts. Once a script is imported into the concentrator, the labels declared in the script will be available. WebdynSunPM – User guide — Version 1.0... -
Page 41: Servers
To synchronize the time immediately, click on the "Force sync" button. Information System (Server) The Information system (IS) collects data and alarms reported by the WebdynSunPM concentrator, as well as allowing remote configuration and supervision of the concentrator (parameters, updating, etc.). - Page 42 USER GUIDE – WebdynSunPM The WebdynSunPM concentrator accepts up to two information systems. Each IS can have its own communication protocol. To configure an IS, activate it and provide a name to identify it. Next, define the protocol that will be used to access the IS (Ethernet or Modem).
- Page 43 Define the interval between triggers with a numeric value in minutes, and the number of iterations during the day. Click on the tick to confirm the settings. Once validated, another new, empty row will appear. There is no limit to the number of schedules you can create. WebdynSunPM – User guide — Version 1.0...
-
Page 44: 10 Scripts
10 Scripts 10.1 Introduction The WebdynSunPM concentrator includes a script engine (Lua) for advanced users to integrate local actions through predefined algorithms or those they have implemented. The Lua interpreter integrates Lua functions, as well as APIs specific to the WebdynSunPM concentrator, allowing access to the concentrator's data (devices, etc.). -
Page 45: Script Display
".lua" extension to be downloaded. Script deletion 10.2.5 You can delete obsolete scripts using the trash button. Script deletion is immediate. You will not be prompted to confirm the deletion. WebdynSunPM – User guide — Version 1.0... -
Page 46: 11 Support
USER GUIDE – WebdynSunPM 11 Support In case of any technical problems with our products, contact Webdyn support: Webdyn SA 26 Rue des Gaudines, 78100 Saint-Germain-en-Laye, France Email: support@webdyn.com Website: http://www.webdyn.com We will ask you to provide the following details: ... - Page 47 1) WebdynSun V1 Introduction: This type of server is used with the WebdynSun V1 concentrator. It has also been integrated with the WebdynSunPM concentrator for the deployment of WebdynSunPM concentrators with these same servers. Server types: FTP or SFTP Operating principles: Communication is done through file exchange.
- Page 48 USER GUIDE – WebdynSunPM Definition files (DEF) Currently, only Modbus devices are managed by the WebdynSunPM concentrator. The files defining these devices are contained in the "MODBUS/" subdirectory of the definition directory (by default, "DEF/"). These files describe the variables of the Modbus slaves connected to the concentrator, and the method (requests) for retrieving them.
- Page 49 20 => bit field + byte swap 21 => bit field + word swap signed Variable value 1 => signed 2 => unsigned position Variable position in the array 1 to N option1 Reserved option2 Reserved WebdynSunPM – User guide — Version 1.0...
- Page 50 4: current value 8: alarm trigger on state change Data files (DATA) Currently, only Modbus devices are managed by the WebdynSunPM concentrator. The data files for these devices are stored in the "MODBUS/" subdirectory of the data directory ("DATA/"). All data files are in CSV format, and are compressed using the gzip (".gz") format before being sent to the server.
- Page 51 The body section contains time-stamped data in the following format: DD/MM/AA-hh:mm:ss;value1;value2;….;valuen DD/MM/AA-hh:mm:ss;value1;value2;….;valuen … DD/MM/AA-hh:mm:ss;value1;value2;….;valuen The number of values per line depends on the number of variables collected for the device, and therefore on the definition file associated with the device. WebdynSunPM – User guide — Version 1.0...
- Page 52 For the Modbus/TCP protocol, enter the IP address and the port of the Modbus slave, as well as its Modbus address and the timeout (default = 5000 ms). Configure the available queries and variables of the Modbus slave. Query configuration: WebdynSunPM – User guide — Version 1.0...
- Page 53 The type of variable defines both its format and size. The following is a summary table of the available variable types. Label Format Size Signed Integer 8 bits Integer 8 bits Integer 16 bits Integer 16 bits Integer 32 bits Integer 32 bits Integer 64 bits WebdynSunPM – User guide — Version 1.0...
- Page 54 To configure a device with analog input (0-10V or 4-20mA), create a new device and select either "Analog generic device 0-10V" or "Analog generic device 4-20mA" from the "Model" dropdown list. Next, select the device input port (1, 2, 3 or 4). WebdynSunPM – User guide — Version 1.0...
- Page 55 USER GUIDE – WebdynSunPM Analog inputs are on the top and bottom right of the WebdynSunPM concentrator. To finalize device configuration, enter the scaling parameters and the unit. 3) Dry contact To configure a device with discrete output, create a new device and select the model "On-Off generic device".
- Page 56 USER GUIDE – WebdynSunPM Next, select the device input port (from 1 to 3). Digital inputs are located at the bottom left of the WebdynSunPM concentrator. Complete the configuration by setting the contact type to either "Normally open" or "Normally closed".
Need help?
Do you have a question about the WebdynSunPM and is the answer not in the manual?
Questions and answers