Table of Contents
Advertisement
Quick Links
www.ledtechnologies.co.uk
99 Dynamic Modes
29 Static Colors
Unit Length Adjustable
Speed Adjustable
Static Brightness Adjustable
4. Speed (Brightness) Adjust
Adjust the running speed of dynamic mode or brightness of
static color. There are 10 levels for both speed and brightness.
5. Pause / Play
Toggle between Play and Pause mode. It will quit pause and
start to play if changing the running mode.
6. Turn On / Standby
Turn on or switch to standby mode. The main unit will
memorize the current setting. When power on or turn on unit,
it will automatically restore to previous status.
7. Unit Length (Static Color) Adjust
Adjust playing unit length at dynamic modes or adjust color at
static color mode. At static color mode, press these keys to loop
chang
e 29 c
olors.
8. Program direct selecting keys
User can directly select program by the number and Enter key
in this area. For example, if you want program number 58,
please press number 5 and 8, then press Enter key to confirm.
The program '0' is static color mode. At this mode, user can
adjust brightness or color by SPEED and LENGTH keys.
9. Demo Mode
Switch to demo mode. In demo mode, the controller will
automatically cycle play 99 dynamic programs.
USER'S MANUAL
Card Type RF Remote
Ultra Slim Design
Loop Demo Mode
Drive up to 800 Pixels
Power off Memorize
2
Functions
2
1
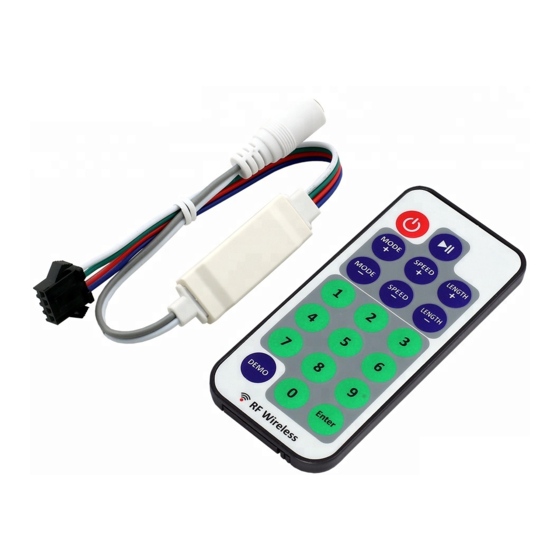
1. Power Input
The power supply input.
The DC jack's inner pole is positive
and sleeve is negative. Also please make sure the power
supply voltage is same as the LED load.
2. Signal Output
The control signal output connector to LED load.
3. Mode Adjust
Adjust running mode. Jump to next mode by press 'MODE+' or
jump to previous mode by press 'MODE-'.
10. Remote Controller Indicator
This blue indicator will light up when remote controller works.
In program direct selecting operation, this indicator will flash
slowly until Enter key pressed or no operation for a certain
time.
Hints: The remote controller works at radio frequency, the
signal can pass through barrier, so it's not necessary to aim at
the controller when operate the remote.
Installing
1. Power Supply
The power supply jack is a 5.5mm diameter DC socket. The
main unit can work at DC 5V to 24V. Since the power supply is
directly connected to the LED signal output, please make sure
the power voltage is same as the LED load, otherwise the
incorrect voltage may damage LED load!
When LED load is powered individually, the main unit can also
work with the LED load power, and the power supply to this
DC jack can be saved.
2. Output Signal
The output signal is in a SM type plug. The cable at the ' '
maker side is power supply, the cable sequence is power-
data-clock-ground. The controll signals are running at high
speed, led may not work properly if the data cable is too
long or get interfered. In This case, please shorten the data
cable from controller to LED or install the controller close to
LED.
10
5
6
3
7
4
8
9
Advertisement
Table of Contents

Summary of Contents for Rayrun R722
- Page 1 Functions www.ledtechnologies.co.uk USER'S MANUAL 1. Power Input The power supply input. The DC jack’s inner pole is positive and sleeve is negative. Also please make sure the power Card Type RF Remote 99 Dynamic Modes supply voltage is same as the LED load. Ultra Slim Design 29 Static Colors 2.
- Page 2 Programs 5. Cascading strip installation This controller can drive up to 800 pixels in series. At series installation, the power voltage on LED load might drop due to Static color Red-purple-red forward cable or PCB resistance, the brightness might drop with Full color forward flow Red-purple-red reverse increasing of series length.


Need help?
Do you have a question about the R722 and is the answer not in the manual?
Questions and answers