
Related Manuals for Fervi 0560

Summary of Contents for Fervi 0560
- Page 1 USE AND MAINTENANCE MANUAL Bench chamfering machine Art. 0560 ORIGINAL INSTRUCTIONS...
- Page 2 Manual on the date of issuance, listed on herein. However, the machine may undergo technical modifications in the future, which may also be significant, without the manual being updated. Contact FERVI for information on any variations that may have been made. VERSION. 1 February 2013...
-
Page 3: Table Of Contents
MACHINES AND ACCESSORIES Table of Contents INTRODUCTION .......................4 Graphic form of the alerts related to safety, operation, risk warnings ......4 Preface..........................5 GENERAL SAFETY WARNINGS ..................6 General safety regulations for machine equipment ............6 Safety rules for electric machine-tools................8 Technical support......................8 Other provisions ......................8 TECHNICAL SPECIFICATIONS ..................9 DESCRIPTION OF THE MACHINE .................. -
Page 4: Introduction
This manual is designed to provide the knowledge required for the use and maintenance of the B . 0560 and to provide the operator assigned to the ENCH CHAMFERING MACHINE device with a sense of responsibility and knowledge of its possibilities and limitations. -
Page 5: Preface
MACHINES AND ACCESSORIES 1.2 Preface For the safe and simple operation of the Chamfering machine, this manual must be read carefully to gain the necessary knowledge. In other words, the lifespan and performance of the machine are dependent on how it is used. Even if already familiar with the Bench chamfering machine, it is necessary to follow the instructions contained herein, in addition to the general precautions to be observed while working. -
Page 6: General Safety Warnings
MACHINES AND ACCESSORIES 2 GENERAL SAFETY WARNINGS 2.1 General safety rules for machine equipment Risks associated with the use of the machine DO NOT underestimate the risks associated with the use of the machine and concentrate on the work that is taking place. - Page 7 MACHINES AND ACCESSORIES 7. Keep the work area tidy and free from encumbrances. Untidiness causes accidents. 8. Make sure that your work environment is forbidden to children, strangers and animals. 9. Do not subject the machine to performance levels above those for which it was designed.
-
Page 8: Safety Rules For Electric Machine-Tools
MACHINES AND ACCESSORIES 2.2 Safety rules for electric machine-tools Changes to the electrical system Do not modify the machine's electrical system in any way. Any attempt to do so may impair the operation of the electrical devices causing a malfunction or accident. ... -
Page 9: Technical Specifications
MACHINES AND ACCESSORIES 3 TECHNICAL SPECIFICATIONS Model Art. 0560 Power (W) Voltage (V) Frequency (Hz) Rotation speed (rpm) 2,800 Mill size (mm) Chamfering capacity 45° (mm) Weight (kg) Chamfer angle 45° Material input angle 90° Guide width (mm) Guide length (mm) -
Page 10: Description Of The Machine
MACHINES AND ACCESSORIES 4 DESCRIPTION OF THE MACHINE The Bench chamfering machine is very simple to use and has been designed to chamfer the rough edges of metal parts and components. In particular, it is used to chamfer rough edges at 90°. -
Page 11: Description Of The Main Parts
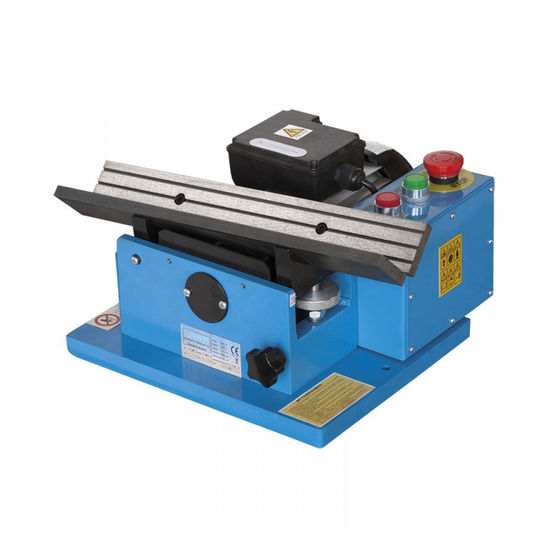
MACHINES AND ACCESSORIES 4.1 Description of the main parts Side view (piece input side). Side view (piece guide side). Tool detail Group of diagrams 1 - Main parts of the bench chamfering machine. Page 11 of 26... - Page 12 MACHINES AND ACCESSORIES 0560/01 Machine body 0560/06 Emergency stop 0560/11 Locking knob Insert locking 0560/02 Guide rail 0560/07 Power switch 0560/12 screw 0560/03 Electrical panel 0560/08 Locking micro-switch 0560/13 Milling cutter 0560/04 Power cord 0560/09 Drawer knob 0560/14 Wedge 0560/05...
-
Page 13: Plates
MACHINES AND ACCESSORIES 4.2 Plates The left side of the machine (guide rail side) features the following identification plate (Figure Figure 2 – Identification plate. 4.3 Pictograms The machine has the following signalling, warning, and prohibition pictograms (Diagram 3). WARNING DO NOT CARRY OUT WORK ON LIVE ELECTRICAL EQUIPMENT ... - Page 14 MACHINES AND ACCESSORIES Caption PLATE IN ITALIAN PLATE IN ENGLISH ATTENZIONE WARNING È VIETATO ESEGUIRE LAVORI SU DO NOT CARRY OUT WORK ON LIVE ELECTRICAL APPARECCHIATURE ELETTRICHE SOTTO EQUIPMENT TENSIONE ANY EXCEPTIONS MUST BE AUTHORISED BY THE EVENTUALI DEROGHE DEVONO ESSERE SENIOR MANAGER AUTORIZZATE DAL CAPO RESPONSABILE ...
-
Page 15: Machine Installation
MACHINES AND ACCESSORIES 5 INSTALLATION OF THE MACHINE The Bench chamfering machine is delivered fully assembled. For full grip to the supporting surface and the stability of the machine during its use, there are certain precautions to take into account for installation, therefore proceed as follows: Cleaning the machine Before installing the chamfering machine, remove the protective product from the components. -
Page 16: Main Switch And Control Switch
MACHINES AND ACCESSORIES 6 MAIN SWITCH AND CONTROL SWITCH 6.1 Main switch The main switch is on the right side of the machine (motor side). machine powered with this button. The switch can be positioned to “0” (no power to the machine), or "I" (machine powered, see Figure 4). -
Page 17: Operation
MACHINES AND ACCESSORIES 7 OPERATION 7.1 Precautions for use The Bench chamfering machine is very simple to use, but always requires due attention by the operator. Use of the machine The Bench chamfering machine must only be used with tools that are suitable for the type of material to be processed. -
Page 18: Before Using The Bench Chamfering Machine
MACHINES AND ACCESSORIES 7.2 Before using the Bench chamfering machine For safe operation of the machine it is advisable to perform some checks: 1. check that the power cord does not have any flaws or damage; 2. verify the correct operation of the stop/emergency switch; 3. -
Page 19: Adjusting The Bench Chamfering Machine
MACHINES AND ACCESSORIES 7.4 Adjusting the Bench chamfering machine To set the desired depth of chamfer, the adjusting screw (ref. 10 in figure 6) should be operated as follows: 1. unlock the adjustment screw by unscrewing the locking knob (ref. 11 in figure 6); 2. -
Page 20: Machine Safety Devices
MACHINES AND ACCESSORIES 8 MACHINE SAFETY DEVICES 8.1 Electrical safety devices The control switches inserted in the electrical circuit of the Bench chamfering machine are magnetic (see Chapter 6 of this manual). They guarantee against the danger the machine starting accidentally and/or when not desired since it can only be switched on by a voluntary action designed for the purpose and when the machine is receiving power. -
Page 21: Mechanical" Safety Devices
MACHINES AND ACCESSORIES 8.2 “Mechanical” safety devices 8.2.1 Interlocking of the guide rails The interlocking device (micro-switch) of the guide rail is designed to disconnect the supply to the electrical circuit when the guide is turned over to allow repairs or maintenance to be performed on the machine. -
Page 22: Maintenance
MACHINES AND ACCESSORIES 9 MAINTENANCE 9.1 Routine maintenance Electric shock Before any inspection or maintenance, turn off the machine and ALWAYS remove the plug from the power socket. This is to prevent the risk of electric shock. Clean and take care of the machine regularly to ensure perfect efficiency and a long lifespan. Using a compressor, regularly blow away the powder and processing residue produced by chamfering that accumulates on the machine. -
Page 23: Replacement Of Cutting Inserts
MACHINES AND ACCESSORIES 9.2 Replacement of cutting inserts Periodically check the state of wear of the cutting inserts of the milling cutter and, if necessary, replace them. Electric shock Before replacing the inserts, turn off the machine and ALWAYS remove the plug from the power socket. -
Page 24: Exploded View And Spare Parts
MACHINES AND ACCESSORIES 11 EXPLODED VIEW AND SPARE PARTS Page 24 of 26... - Page 25 MACHINES AND ACCESSORIES PART NUMBER DESCRIPTION 0560/01 MACHINE BODY 0560/02 GUIDES 0560/03 CONTROL BOX 0560/04 POWER CORD 0560/05 POWER SWITCH 0560/06 EMERGENCY 0560/07 START SWITCH 0560/08 START MICRO-SWITCH 0560/09 CHIPS COLLECTION TRAY 0560/10 CHAMFER ADJUSTMENT SCREW 0560/11 ADJUSTMENT LOCKING KNOB...
-
Page 26: Diagram Of The Electrical Circuit
MACHINES AND ACCESSORIES 12 DIAGRAM OF THE ELECTRICAL CIRCUIT Page 26 of 26...
Need help?
Do you have a question about the 0560 and is the answer not in the manual?
Questions and answers