Husqvarna AUTOMOWER 105 Operator's Manual
Hide thumbs
Also See for AUTOMOWER 105:
- Quick start manual ,
- Operator's manual (153 pages) ,
- Quick manual (8 pages)
Table of Contents
Advertisement
Available languages
Available languages
Quick Links
BEDIENUNGSANLEITUNG
DE
MANUEL D'UTILISATION
FR
MANUALE OPERATORE
IT
OPERATOR'S MANUAL
EN
H U SQVARNA AUTOMOWE R ®
105/310/315/420/430X /450X
Lesen Sie die Bedienungsanleitung sorgfältig durch und machen Sie sich mit dem Inhalt vertraut, bevor Sie den Mähroboter benutzen.
Veuillez lire attentivement le manuel d'utilisation et bien l'assimiler avant d'utiliser le robot de tonte.
Prima di usare il rasaerba robotizzato, leggere attentamente il manuale operatore e accertarsi di averne compreso le relative istruzioni.
Please read the Operator's Manual carefully and make sure you understand the instructions before using the robotic lawnmower.
1157864-39_SLIM_HQ_105-450_DEFRITEN_r2.indd 1
2016-02-19 16:07:47
Advertisement
Table of Contents

Related Manuals for Husqvarna AUTOMOWER 105


Summary of Contents for Husqvarna AUTOMOWER 105
- Page 1 BEDIENUNGSANLEITUNG MANUEL D’UTILISATION MANUALE OPERATORE OPERATOR’S MANUAL H U SQVARNA AUTOMOWE R ® 105/310/315/420/430X /450X Lesen Sie die Bedienungsanleitung sorgfältig durch und machen Sie sich mit dem Inhalt vertraut, bevor Sie den Mähroboter benutzen. Veuillez lire attentivement le manuel d’utilisation et bien l’assimiler avant d’utiliser le robot de tonte. Prima di usare il rasaerba robotizzato, leggere attentamente il manuale operatore e accertarsi di averne compreso le relative istruzioni.
- Page 2 FR : En cas de vol du robot de tonte, il est important de le signaler à Husqvarna AB. Contactez votre revendeur local et fournissez-lui le numéro de série du produit afin qu’il soit enregistré comme produit volé dans la base de données internationale. Il s’agit d’une étape importante de la procé- dure de protection contre le vol permettant de réduire l’intérêt à...
-
Page 3: Table Of Contents
1 Einführung und Sicherheit 1 Introduction et sécurité 1.1 Einführung 1.1 Introduction 1.2 Symbole auf dem Produkt 1.2 Symboles concernant le produit 1.3 Symbole in der Bedienungsanleitung 1.3 Symboles dans le manuel d'utilisation 1.4 Sicherheitsanweisungen 1.4 Consignes de sécurité 2 Vorstellung 2 Présentation 2.1 Aufbau des Geräts 2.1 Qu'est-ce que c'est ? -
Page 4: Einführung Und Sicherheit
Mähroboters kurz zusammengefasst. Eine vollständige Bedienungs- durch und machen Sie sich mit dem Inhalt anleitung befindet sich auf der Husqvarna Website. Dort finden Sie wei- vertraut, bevor Sie den Mähroboter benutzen. tere Informationen zu den Themen Installation, Menüs, Gartenbeispiele, Die Warn- und Sicherheitshinweise in dieser Wartung und Fehlersuche. -
Page 5: Symbole In Der Bedienungsanleitung
Rasensprenger und Mähroboter nicht gleichzeitig in Betrieb sind. • Ein Warnkästchen weist Sie auf die Verletzungsgefahr bei Nicht- beachtung der Anweisungen hin. Husqvarna AB übernimmt keine Garantie für die vollständige Kompatibi- lität zwischen dem Mähroboter und anderen kabellosen Systemen wie Fernbedienungen, Sendern, im Boden verlegten elektrischen WARNUNG Umzäunungen von Viehweiden o. - Page 6 DEUTSCH Halten Sie dabei den Mähroboter stets so, dass der Messerteller von Ihrem Körper entfernt ist. Automower 105 Automower 310/315 Automower 420/430X/450X WICHTIGE INFORMATIONEN Heben Sie den Mähroboter nicht an, wenn er in der Ladestation geparkt ist. Dadurch können die Ladestation und/oder der Mähroboter beschädigt werden.
-
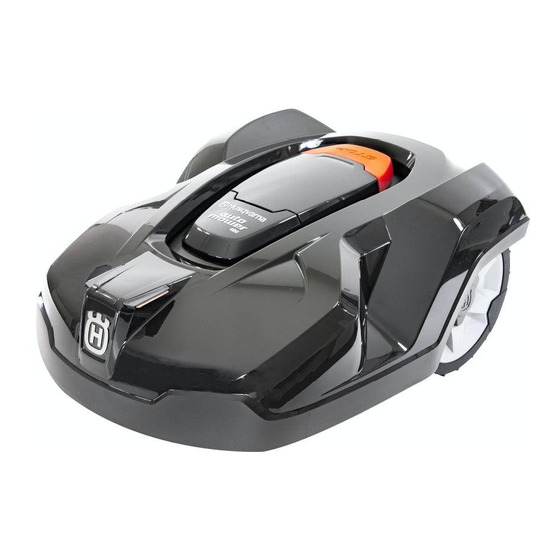
Page 7: Vorstellung
DEUTSCH 2 Vorstellung 2.1 Aufbau des Geräts Automower® 105 Die Nummern in der Abbildung stehen für Folgendes: Gehäuse 17. Schleifenkabel für Begrenzungskabel und Suchkabel* Abdeckung für Display, Tastatur und 18. Verbinder zum Anschließen des Schleifenkabels an die Schnitthöhenverstellung Ladestation* STOP-Taste/Sperrschalter zum Öffnen der 19. - Page 8 DEUTSCH Aufbau des Geräts Automower® 310/315 Die Nummern in der Abbildung stehen für: Gehäuse 19. Messerteller Abdeckung für Schnitthöheneinstellung 20. Gleitplatte Abdeckung für Display und Tastatur 21. Netzkabel (das Aussehen des Netzkabels kann sich je nach Markt unterscheiden) Stop-Taste/Sperrschalter zum Öffnen der Abdeckung 22.
- Page 9 DEUTSCH Aufbau des Geräts Automower® 420/430X/450X Automower 420 Automower 430X Automower 450X Die Nummern in der Abbildung stehen für Folgendes: Gehäuse 19. Handgriff Abdeckung für Display und Tastatur. 20. Hauptschalter Stop-Taste/Sperrschalter zum Öffnen der Abdeckung 21. Messerteller Befestigung für Zubehör, z. B. Scheinwerfer (nicht 22.
- Page 10 Reihe von Grundeinstellungen, siehe 3.8 „Erste Einrichtung roboter hauptsächlich bei trockenem Wetter mähen zu lassen. Der Mähroboter von Husqvarna kann auch bei Regen mähen. Nasses Gras bleibt jedoch leich- und Kalibrierung“ in der vollständigen Bedienungsanleitung auf der Husqvarna ter im Mähroboter hängen.
-
Page 11: Bedientafel
DEUTSCH 3 Bedientafel Automower ® Die Schnitthöhe kann zwischen MIN (2 cm) und MAX (5 cm) eingestellt werden. Einstellen der Schnitthöhe: Alle Befehlsformen und Einstellungen für den Mähroboter erfolgen über das Bedienfeld. Alle Funktionen sind über eine Reihe von Menüs zugänglich. Drücken Sie die STOP-Taste, um den Mähroboter anzuhalten und die Abdeckung zu öffnen. -
Page 12: Bedientafel Automower
DEUTSCH Auswahl des Betriebs Der Batteriezustand zeigt die noch verbleibende Batterieladung an. Während der Mähroboter aufgeladen wird, wird zudem über dem Batteriesymbol (A) ein Sie können durch mehrmaliges Drücken der Taste zur Auswahl des Betriebs Blitz angezeigt. Wenn Sie den Mähroboter ohne ihn aufgeladen zu haben in drei unterschiedliche Betriebsmodi auswählen. -
Page 13: Die Park-Taste Der Ladestation
Auswahlmöglichkeiten. Genauere Informationen darüber, wie jede Funktion ver- einstellungen vorgenommen wurden. wendet wird und welche Einstellungsmöglichkeiten zur Verfügung stehen finden Sie in der vollständigen Bedienungsanleitung auf der Husqvarna Website 3.3 Die PARK-Taste der Ladestation Timer Um ein optimales Mähergebnis zu erzielen, sollte der Rasen nicht Dieser Abschnitt behandelt den Automower 430X/450X. -
Page 14: Garantiebedingungen
Husqvarna AB. Bedienungsanleitung auf der Husqvarna Website. • Schäden, die durch die Verwendung von nicht Originalersatzteilen WICHTIGE INFORMATION und Zubehör von Husqvarna AB entstehen, wie etwa Klingen und Installationsmaterial. Versuchen Sie nicht, nichtaufladbare Batterien aufzuladen. • Schäden am Schleifenkabel. -
Page 15: Fehlersuche
übrig ist. Anweisungen hierzu finden Sie in der vollständigen Bedienungsanleitung auf der Husqvarna Website. 8 Umweltinformationen Durch Symbole auf dem Husqvarna-Mähroboter oder seiner Verpack- ung wird angezeigt, dass dieses Produkt nicht über den Hausmüll entsorgt werden darf. Übergeben Sie es zur Entsorgung stattdessen an eine entsprechende Recyclinganlage für elektrische und elektronische... -
Page 16: Technische Daten
Produktion sowie Abweichungen vom Prüfcode mit 1-3 dB(A). Die Geräuschemissionserklärung entspricht der Norm EN 50636-2-107:2015 Husqvarna AB übernimmt keine Garantie für die vollständige Kompatibilität zwischen dem Mähroboter und anderen kabellosen Systemen wie Fernbedienungen, Sendern, im Boden verlegten elektrischen Umzäunungen von Viehweiden o. Ä. - Page 17 Produktion sowie Abweichungen vom Prüfcode mit 1-3 dB(A). Die Geräuschemissionserklärung entspricht der Norm EN 50636-2-107:2015 Husqvarna AB übernimmt keine Garantie für die vollständige Kompatibilität zwischen dem Mähroboter und anderen kabellosen Systemen wie Fernbedienungen, Sendern, im Boden verlegten elektrischen Umzäunungen von Viehweiden o. Ä.
-
Page 18: Eg-Konformitätserklärung
DEUTSCH 10 EG-Konformitätserklärung 10.1 EU-Konformitätserklärung (nur gültig für die europäischen Versionen) Husqvarna AB, SE-561 82 Huskvarna, Schweden, Tel.: +46-36-146500, versichert hiermit, dass die Mähroboter der Serien Husqvarna Automower 105, Automower 310, Husqvarna Automower 315, Husqvarna Automower 420, Husqvarna Automower 430X und ®... -
Page 19: Introduction Et Sécurité
Un manuel de l’opérateur complet tonte. Les avertissements et instructions de est disponible sur le site Web d’Husqvarna. Vous y trouverez des informa- sécurité de ce manuel doivent être soigneuse- tions supplémentaires sur notamment l’installation, les menus, des ment respectés pour assurer l'efficacité... -
Page 20: Symboles Dans Le Manuel D'utilisation
AVERTISSEMENT de tonte et l'arroseur simultanément. Texte Husqvarna AB ne garantit en aucun cas la compatibilité totale entre le robot de tonte et d'autres types de dispositif sans fil comme des télé- • Une boîte d'informations signale le risque de dommages matériels, commandes, des transmetteurs radio, des boucles d'écoute, des clôtu-... - Page 21 FRANÇAIS Transportez le robot de tonte en utilisant la poignée, avec le disque de coupe éloigné du corps. Automower 105 Automower 310/315 Automower 420/430X/450X INFORMATION IMPORTANTE Ne soulevez pas le robot de tonte lorsqu'il est garé dans la station de charge. Cela peut endommager la station de charge et/ou le robot de tonte.
-
Page 22: Présentation
FRANÇAIS 2 Présentation 2.1 Qu'est-ce que c'est ? Automower® 105 Les numéros de l'illustration représentent : Carrosserie 17. Bobine de câble pour le câble périphérique et le câble guide* Capot de l’écran, du clavier et du réglage de la hauteur de coupe 18. - Page 23 FRANÇAIS Qu'est-ce que c'est ? Automower® 310/315 Les numéros de l’illustration représentent : Carrosserie 18. Interrupteur principal Capot de réglage de la hauteur de coupe 19. Disque de coupe Capot d’accès à l’écran et au clavier 20. Disque de protection Bouton STOP/Bouton de blocage de l’ouverture du 21.
- Page 24 FRANÇAIS Qu’est-ce que c’est ? Automower® 420/430X/450X Automower 420 Automower 430X Automower 450X Les numéros de l'illustration représentent : Carrosserie 18. Châssis contenant l’électronique, la batterie et les moteurs Capot d’accès à l’écran et au clavier. 19. Poignée Bouton STOP/Bouton de blocage de l'ouverture du capot 20.
- Page 25 50 à 90 minutes. Le temps de charge peut varier, entre autres, en fonction de la température ambiante. Technique de tonte Le système de coupe du robot de tonte Husqvarna repose sur un principe effi- Automower 105 Automower 310/315/420/430X/450X cace à...
-
Page 26: Panneau De Commande
FRANÇAIS Automower ® Le panneau de commande est constitué d’un écran et d’un clavier. Toutes les informations sont affichées sur l’écran et toutes les saisies sont effectuées à La hauteur de coupe peut être réglée de 2 cm (MIN) à 5 cm (MAX). Pour égler l’aide des touches. -
Page 27: Panneau De Commande D'automower ® 310/315/420/430X/450X
FRANÇAIS Le réglage Home est également utilisé après une nouvelle installation ou après modification d'une installation existante, pour tester si le robot de tonte peut suivre le câble guide et s'arrimer à la station de charge. • AUTO. Mode de fonctionnement automatique standard dans lequel •... -
Page 28: Bouton Park De La Station De Charge
Cette option ne s'affiche pas si aucun l’opérateur complet sur le site Web d’Husqvarna. réglage de minuterie n'a été fait. Minuterie 3.3 Bouton PARK de la station de charge... -
Page 29: Conditions De Garantie
6.3 Station de charge Stockez la station de charge et l’alimentation électrique à l’intérieur. Le Husqvarna AB garantit le fonctionnement de ce produit pendant deux câble périphérique et le câble guide peuvent rester dans le sol. Protégez ans (à compter de la date d'achat). Cette garantie couvre les pannes les extrémités des câbles de l’humidité... -
Page 30: Dépannage
Web d’Husqvarna pour les instructions. 8 Informations environnementales Le symbole sur le robot de tonte Husqvarna ou sur son emballage indique que ce produit ne peut pas être traité comme un déchet domestique ordin- aire. Il convient plutôt de l'envoyer dans un centre de recyclage adapté... -
Page 31: Caractéristiques Techniques
La déclaration sur les émissions sonores est conforme à la norme EN 50636-2-107:2015 Husqvarna AB ne garantit en aucun cas la compatibilité totale entre le robot de tonte et d'autres types de dispositif sans fil comme des télécommandes, des transmetteurs radio, des appareillages auditifs, des clôtures électrifiées enterrées pour animaux ou autres. - Page 32 La déclaration sur les émissions sonores est conforme à la norme EN 50636-2-107:2015 Husqvarna AB ne garantit en aucun cas la compatibilité totale entre le robot de tonte et d’autres types de dispositif sans fil comme des télécommandes, des transmetteurs radio, des appareillages auditifs, des clôtures électrifiées enterrées pour animaux ou autres..
-
Page 33: 10 Déclaration De Conformité Ce
10.1 Déclaration de conformité CE (uniquement applicable aux versions européennes) Nous, Husqvarna AB, SE-561 82 Huskvarna, Suède, tél : +46-36-146500, déclarons, sous notre seule responsabilité, que les robots de tonte Husqvarna Automower® 105, Automower® 310, Automower® 315, Automower® 420, Automower® 430X et Automower® 450X portant les numéros de série de l’année 2015 semaine 44 et ultérieurs (l’année est indiquée en clair sur la plaque d’identification et suivie du numéro de série) -
Page 34: Introduzione E Sicurezza
Portare l’interruttore principale in Husqvarna AB applica una politica di sviluppo continuo dei propri pro- posizione 0 prima di eseguire le ispezioni dotti e si riserva quindi il diritto di apportare, senza alcun preavviso, e/o la manutenzione. -
Page 35: Simboli Riportati Nel Manuale Operatore
Un riquadro di avvertenza indica che sussiste il rischio di lesioni personali, soprattutto in caso di mancato rispetto delle istruzioni. Husqvarna AB non garantisce la completa compatibilità fra il rasaerba robotizzato e altri tipi di sistemi wireless, quali telecomandi, trasmettitori radio, apparecchi acustici, recinti elettrici interrati per animali o simili. - Page 36 ITALIANO Trasportare il rasaerba robotizzato per il manubrio con il disco delle lame lontano dal corpo. Automower 105 Automower 310/315 Automower 420/430X/450X INFORMAZIONI IMPORTANTI Non sollevare il rasaerba robotizzato quando è parcheggiato nella stazione di ricarica. Ciò potrebbe provocare danni alla stazione di ricarica e/o al rasaerba robotizzato.
-
Page 37: Presentazione
ITALIANO 2 Presentazione 2.1 Identificazione delle parti Automower® 105 I numeri in figura rappresentano: Scocca 17. Matassa per cavo perimetrale e cavo guida* Coperchio per display, tastiera e regolazione dell'altezza 18. Connettore per il collegamento del cavo alla stazione di di taglio ricarica* Pulsante di arresto/Gancio per aprire il coperchio... - Page 38 ITALIANO Identificazione delle parti Automower® 310/315 I numeri in figura rappresentano: Scocca 20. Piastra sottodisco libera Portello per la regolazione dell'altezza di taglio 21. Alimentatore (l'aspetto dell'alimentatore può essere diverso a seconda del mercato) Portello per display e tastiera 22. Matassa per cavo perimetrale e cavo guida* Pulsante di arresto/Gancio per aprire il portello 23.
- Page 39 ITALIANO Identificazione delle parti Automower® 420/430X/450X Automower 420 Automower 430X Automower 450X I numeri in figura rappresentano: Scocca 19. Impugnatura Portello per display e tastiera 20. Interruttore principale Pulsante di arresto/Gancio per aprire il portello 21. Disco lame Montaggio per accessori, ad es. fari (non disponibile con 22.
- Page 40 Automower 105 Automower 310/315/420/430X/450X Tecnica di taglio Il sistema di taglio nel rasaerba robotizzato Husqvarna si basa su un Quando l’interruttore principale è impostato su 1 per la prima volta, inizia principio di risparmio energetico. A differenza di molti rasaerba tradizio- una sequenza di avvio che include una serie di importanti messe a nali, il rasaerba robotizzato taglia l'erba, invece di staccarla.
-
Page 41: Pannello Di Comando
ITALIANO Automower ® Il pannello di comando è costituito da un display e una tastiera. Tutte le informazioni vengono visualizzate sul display e l'immissione avviene tra- È possibile regolare l'altezza di taglio da MIN (2 cm) a MAX (5 cm). Per mite i pulsanti. -
Page 42: Pannello Di Comando Automower ® 3310/315/420/430X/450X
ITALIANO rasaerba robotizzato resta parcheggiato nella stazione di ricarica. Quando la selezione della modalità operativa passa ad AUTO, il rasaerba robotizzato lascia per prima cosa la stazione di ricarica e ricomincia a falciare. • L'impostazione di regolazione dell'altezza viene visualizzata come È... -
Page 43: Pulsante Parcheggio Della Stazione Di Ricarica
Questa opzione non viene visualizzata se non menu principale. Per informazioni più dettagliate su come utilizzare ogni ci sono impostazioni del timer. funzione e sulle opzioni disponibili, vedere il Manuale operatore com- pleto sul sito Web Husqvarna. 3.3 Pulsante PARCHEGGIO della stazione di Timer ricarica Il prato non dovrebbe essere tagliato troppo spesso per ottenere Questa sezione si riferisce all’Automower... -
Page 44: Termini Di Garanzia
Manuale operatore completo sul sito Web Husqvarna. • Danni causati dal mancato utilizzo dei ricambi originali e degli INFORMAZIONI IMPORTANTI accessori Husqvarna AB, quali, ad esempio, le lame e il materiale di installazione. Non tentare di ricaricare le batterie non ricaricabili. •... -
Page 45: Anomalie Di Funzionamento
In caso di malfunzionamento, il display visualizzerà un messaggio d’er- rore. Per maggiori dettagli sui messaggi che potrebbero essere visualiz- zati, vedere il Manuale operatore completo sul sito Web Husqvarna. Ulteriori suggerimenti sulle azioni da intraprendere in caso di guasto o ulteriori sintomi sono disponibili sul sito www.automower.com. -
Page 46: Dati Tecnici
Dichiarazioni sulle emissioni di rumore conformi alla normativa EN 50636-2-107:2015 Husqvarna AB non garantisce la completa compatibilità fra il rasaerba robotizzato e altri tipi di sistemi wireless, quali telecomandi, trasmettitori radio, apparecchi acustici, recinti elettrici interrati per animali o simili. - Page 47 Dichiarazioni sulle emissioni di rumore conformi alla normativa EN 50636-2-107:2015 Husqvarna AB non garantisce la completa compatibilità fra il rasaerba robotizzato e altri tipi di sistemi wireless, quali telecomandi, trasmettitori radio, apparecchi acustici, recinti elettrici interrati per animali o simili.
-
Page 48: Dichiarazione Di Conformità Ce
Automower® 105, Husqvarna Automower® 310, Husqvarna Automower® 315, Husqvarna Automower® 420, Husqvarna Automower® 430X e Husqvarna Automower® 450X con numeri di serie a partire dall’anno 2015, settimana 44 (l’anno è chiaramente indicato sulla targhetta dati di funzionamento, seguito dal numero di serie), sono conformi alle disposizioni della DIRETTIVA DEL CONSIGLIO: •... -
Page 49: Introduction And Safety
1 and the correct occuring to other people or their property. PIN code has been entered. Turn the main Husqvarna AB has a policy of continuous product development and the- switch to 0 before carrying out any inspec- tions and/or maintenance. -
Page 50: Symbols In The Operator's Manual
ENGLISH 1.3 Symbols in the Operator’s Manual Husqvarna AB does not guarantee full compatibility between the robotic lawnmower and other types of wireless systems such as remote con- trols, radio transmitters, hearing loops, underground electric animal fen- • A warning box indicates the risk of personal injury, especially if the cing or similar. - Page 51 ENGLISH Carry the robotic lawnmower by the handle with the blade disc away from the body. Automower 105 Automower 310/315 Automower 420/430X/450X IMPORTANT INFORMATION Do not lift the robotic lawnmower when it is parked in the charging station. It can damage the charging station and/ or the robotic lawnmower.
-
Page 52: Presentation
ENGLISH 2 Presentation 2.1 What is what? Automower® 105 The numbers in the illustration represent: Body 17. Loop wire for boundary loop and guide wire* Cover to display, keypad and cutting height adjustment 18. Connector for connecting the loop wire to the charging station* Stop button/Catch to open the cover 19. - Page 53 ENGLISH What is what? Automower® 310/315 The numbers in the illustration represent: Body 20. Skid plate Hatch to cutting height adjustment 21. Power supply (the appearance of the power supply may differ depending on market) Hatch to display and keypad 22.
- Page 54 ENGLISH What is what? Automower® 420/430X/450X Automower 420 Automower 430X Automower 450X The numbers in the illustration represent: Body 19. Handle Hatch to display and keypad. 20. Main switch Stop button/Catch to open the hatch 21. Blade disc Mounting for accessories, e.g. headlights (not available 22.
- Page 55 When the main switch is set to 1 for the first time, a start-up sequence begins which includes a number of important basic settings, see 3.8 First The cutting system in the Husqvarna robotic lawnmower is based on an start-up and calibration in the complete Operator’s Manual on efficient and energy saving principle.
-
Page 56: Control Panel
ENGLISH Automower ® The display texts are shown in English in the manual, but you will see the texts on the product display in the choosen language. The cutting height can be varied from MIN (2 cm) to MAX (5 cm). To adjust the cutting height: IMPORTANT INFORMATION Press the STOP button to stop the robotic lawnmower and open the... -
Page 57: Control Panel Automower ® 310/315/420/430X/450X
ENGLISH The Home setting is also used after a new installation or when changes are made to an existing installation to test if the robotic lawnmower can follow the guide wire and dock with the charging station. • The height adjustment setting is displayed as a scale/numerical •... -
Page 58: The Charging Station's Park Button
For more detailed information about how each function is used are no Timer settings. and which setting options are available, see the complete Operator’s manual on Husqvarna’s website. 3.3 The charging station’s PARK button Timer:The lawn should not be cut too often to obtain the best This section applies to Automower 430X/450X. -
Page 59: Guarantee Terms
Damage caused by improper battery storage or battery handling. neutralizing agent, seek medical help if it comes in contact with the eyes. • Damage caused by using a battery that is not a Husqvarna AB original battery. For more detailed information on maintenance, please see the complete Operator’s manual on Husqvarna’s website. -
Page 60: Troubleshooting
Operator’s manual on Husqvarna’s website for instructions. -
Page 61: Technical Data
1-3 dB(A). The noise emission declarations conforms to EN 50636-2-107:2015 Husqvarna AB does not guarantee full compatibility between the robotic lawnmower and other types of wireless systems such as remote controls, radio transmitters, hearing loops, underground electric animal fencing or similar. - Page 62 1-3 dB(A). The noise emission declarations conforms to EN 50636-2-107:2015 Husqvarna AB does not guarantee full compatibility between the robotic lawnmower and other types of wireless systems such as remote controls, radio transmitters, hearing loops, underground electric animal fencing or similar.
-
Page 63: Ec Declaration Of Conformity
Automower® 105, Husqvarna Automower® 310, Husqvarna Automower® 315, Husqvarna Automower® 420, Husqvarna Automo- wer® 430X and Husqvarna Automower® 450X with serial numbers dating year 2015 week 44 and onwards (the year is clearly stated on the rating plate, followed by the serial number), comply with the requirements of the COUNCIL’S DIRECTIVE: •... - Page 64 AUTOMOWER® est une marque déposée appartenant à Husqvarna AB. Copyright © 2016 HUSQVARNA. Tous droits réservés. AUTOMOWER® è un marchio di proprietà di Husqvarna AB. Copyright © 2016 HUSQVARNA. Tutti i diritti riservati. AUTOMOWER® is a trademark owned by Husqvarna AB. Copyright © 2016 HUSQVARNA. All rights reserved.
Need help?
Do you have a question about the AUTOMOWER 105 and is the answer not in the manual?
Questions and answers