Advertisement
Quick Links
Assembly Book
Revised June 19, 2019
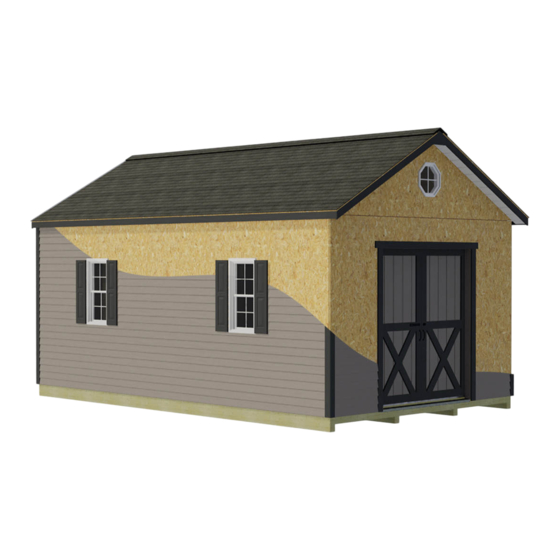
South Dakota II
Building Size 12'x16'
Manufactured by Reynolds Building Systems, Inc.
205 Arlington Drive
Greenville, PA 16125
800-245-1577
This manual is copyrighted. Under the copyright laws, this manual
may not be copied, in whole or in part, without consent from Reynolds
Building Systems, Inc.
© Copyright 2018
Advertisement

Related Manuals for Best Barns South Dakota II


Summary of Contents for Best Barns South Dakota II
- Page 1 Assembly Book Revised June 19, 2019 South Dakota II Building Size 12'x16' Manufactured by Reynolds Building Systems, Inc. 205 Arlington Drive Greenville, PA 16125 800-245-1577 This manual is copyrighted. Under the copyright laws, this manual may not be copied, in whole or in part, without consent from Reynolds Building Systems, Inc.
- Page 2 Unpack all items & organize according to size and type. This will make items easier to find when instructed. Review the parts list on the back page. Should there be missing items or sub-par material contact Best Barns Customer Service. DO NOT discard any material including the pallet until your project is complete. Assembly: Review all instructions before you begin.
- Page 3 Optional Wood Floor System Foundation size is 12'-0" x 16'-0". Check local building codes in your area, the construction may have to change. For a concrete slab, install sill sealer as a moisture barrier between the concrete and the wall plates. Foam sill sealer can be purchased at home centers in rolls 3-1/2" or wider. 1.
- Page 4 Step 1 Assemble Sidewalls Do not discard any material until construction is complete, including short 2x4 blocks. 1. Cut (2) two 2x4-16' to a length of 185". Position the boards together and indicate with 'X' marks where the wall studs will be located. Wall Plates 185"...
- Page 5 Step 3 Assemble 12' Back Wall 1. Cut (2) two 2x4-12' to a length of 144". Position the boards together and indicate with 'X' marks where the wall studs will be located. Wall Plate 144" Top Wall Plate Bottom Plate 24"...
- Page 6 Step 4 Assemble Front Wall Frame 1. Cut (2) two 2x4-12' boards to a length of 144" for wall plates. Position the boards together and indicate with 'X' Marks where the wall studs will be located. Install these Studs Centered 33"...
- Page 7 Step 5 Set Wall Panels 1. Erect back wall and side walls. Secure walls together at the corners. Use (4) four 10d sinkers per corner. Brace side walls with pre-cut wall studs to hold walls secure and plumb. 2. Starting at back corner install a OSB panel flush with the OSB on back wall and flush with top plate.
- Page 8 Step 6 Assemble Roof Gables 1. Cut (2) two 2x4-12' boards to a length of 144". 2. Place one of the 144" boards on the floor along with (2) two 80-1/2" long 2x4 rafters as shown below. Bottom 144" plate will be on edge. Rafters will lay flat. There are short 2x4s, that may have an angle on one end, supplied in the kit.
- Page 9 Step 7 Assemble Roof Trusses 1. Place (2) two 80-1/2" long 2x4 truss rafters and a 82" long collar tie together as shown below. The collar tie has an angle cut on both ends. Insure the collar tie ends are at equal distances from truss top.
- Page 10 Step 8 Install Primed Soffit and Fillers 1. Install a 7" wide x 48-3/4" siding panel over the side wall with the primed side facing down. The 'tongue' edge should be flush with front wall plate, NOT over OSB. Tack the soffit with a couple 6d common nails.
- Page 11 Step 10 Install Siding on Gables 1. Locate pre-cut gable OSB. Install OSB above the lower OSB wall panels and flush with ends of gable frame. Use 6d common nails. 2. Repeat to install siding on the other gable frame. Step 11 Install 2x4 Tie Plates on Side Walls 1.
- Page 12 Step 12 Layout Roof Trusses & Install Soffit Blocks 1. Starting on back corner measure from the backside of the 2x4 gable frame when marking the location of the first truss. Continue 24" spacing to other gable. Important: When marking the opposite wall, place the 'X' mark on the same side of the line so your trusses are parallel when they are installed.
- Page 13 Step 13 Install Rear Gable Trim The front gable trim will be installed in a later step. Rear Gable Install (4) four small OSB fillers, packed with the hardware, over the 2x4 soffit blocks. Fillers will be flush with the gable OSB. Use 6d common nails.
- Page 14 Step 14 Install Fascia on Side Walls 1. Install a 1x4-6' white pine fascia board against the rear gable trim. Install the fascia so the bottom edge of the roof sheathing will rest on the edge of the 1x4. See Detail 'E'. Use a straight edge to align the 1x4 board with the top of the trusses.
- Page 15 Step 15B Install Roof Sheathing continued Sheets should meet at center of trusses when installed 4. From 4x8 sheets of OSB cut to the sizes indicated with an * below. Repeat for opposite side. 36-1/2" x 48" 36-1/2" x 48" 36-1/2"...
- Page 16 Step 17 Install Door Flashing 3-1/2"x5" Flashing 1. Locate in the pocket door box (2) two 3-1/2" x 5" metal flashing and bend along width to 90 degrees. Install at each corner of the door opening. These will be covered in the next steps.
- Page 17 Step 20 Install Pocket Doors Track 1. Install a 68-1/2" long Track Support Assembly 82-3/4" from the floor. Important: measure from the bottom of the 2x3 on the support assembly to the floor. Insure the notched end of track is center of door opening. Use 2-1/2" screws. 2x3 Track Support Assembly 2x8 Door Header Notch...
-
Page 18: Install Doors
Step 21A Install Doors 1. Select the door with the siding and trim board extending past the 2x4 frame, see detail below. Standing on the inside of building slide the rollers on the left side track as shown below. If it is necessary to adjust the door height one or both door carriers can be adjusted. Loosen screws that secure carrier(s) to the door. - Page 19 Step 21B Install Doors continued 1. Hang the other door. On this door, install a sliding door latch, on the lower back of the door to secure this door in place when closed. You will need to drill a hole in the floor for the round shaft to drop into. 2.
- Page 20 South Dakota 12x16 Material List 2x4 for Collar Ties 82" 14 ea. Gussets 7/16" 10" x 24" 2x4 for Truss Rafters 80-1/2" 28 ea. Gussets 7/16" 12" x 24" 2x4 for Gable Studs 23-1/2" 1 ea. Sheathing 7/16" 20" x 48" 2x4 for Soffit Blocks 5"...
Need help?
Do you have a question about the South Dakota II and is the answer not in the manual?
Questions and answers