Table of Contents
Advertisement
Available languages
Available languages
Quick Links
Advertisement
Table of Contents

Related Manuals for KitchenAid KSMFGA


Summary of Contents for KitchenAid KSMFGA
- Page 1 KSMFGA KSMVSA W11373925A.indb 1 7/18/2019 12:41:30 PM...
-
Page 2: Parts And Features
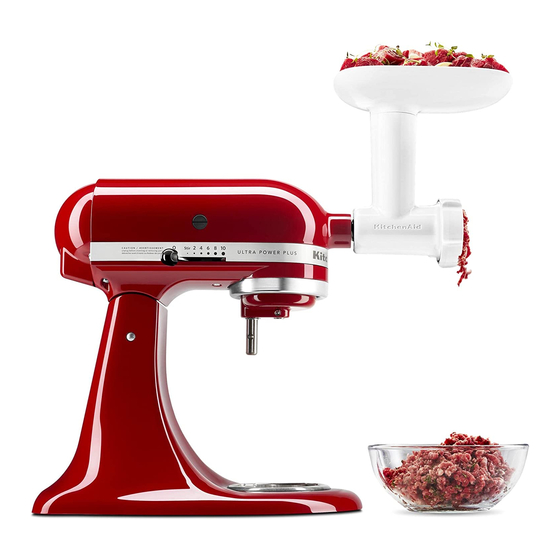
PARTS AND FEATURES FOOD GRINDER ATTACHMENT Food Pusher Blade Removable Tray Coarse (6 mm) Grinding Plate Main Housing Fine (4.5 mm) Grinding Plate Grind Screw Collar SLICER/SHREDDER ATTACHMENT Medium Shredding Release Lever Coarse Shredding Blade Attachment Housing Slicing Blade Large Food Pusher Feed Tube Small Food Pusher W11373925A.indb 2... -
Page 3: Product Safety
6. Avoid contacting moving parts. Keep fingers out of discharge opening. 7. The use of attachments not recommended or sold by KitchenAid may cause fire, electric shock, or injury. 8. Never feed food by hand. Always use the food pusher. -
Page 4: Getting Started
GETTING STARTED GUIDE TO GRINDING NOTE: None of the parts and accessories of this KitchenAid ® Food Grinder attachment (model KSMFGA) are compatible with the parts and accessories of the KitchenAid ® Metal Food Grinder Attachment or previous KitchenAid ®... -
Page 5: Product Usage
PRODUCT USAGE ASSEMBLING THE FOOD GRINDER ATTACHMENT Sharp Side Insert the Grind Screw into the Main Place the Blade over the end of the Grind Housing securely. Screw. Notch Place the desired Grinding Plate over the Place the Collar on the Main Housing, Blade, matching the notch of the plate with turning clockwise by hand until secured but the tab on the bottom of the Main Housing. - Page 6 PRODUCT USAGE ASSEMBLING THE ATTACHMENT TO THE STAND MIXER Unplug and turn the Stand Mixer off (0). Remove the attachment hub cover. Tighten the Stand Mixer attachment hub Insert the attachment shaft Housing into the knob until the attachment is completely attachment hub.
- Page 7 PRODUCT USAGE GRINDING WITH THE FOOD GRINDER WARNING Rotating Blade Hazard Always use food pusher. Keep fingers out of openings. Keep away from children. Failure to do so can result in amputation or cuts. Feed Tube Cut food into small strips or pieces sized to Turn the Stand Mixer to Speed 4 and feed fit into the feed tube.
-
Page 8: Care And Cleaning
NOTE: For best cleaning, rinse blades immediately after use. If necessary, use a dish washing brush. FOR DETAILED INFORMATION ON USING THE ATTACHMENTS Visit www.kitchenaid.com/quickstart for additional instructions with videos, inspiring recipes, and tips on how to use and clean your Stand Mixer attachments. W11373925A.indb 8... -
Page 9: Warranty And Service
IF THIS PRODUCT FAILS TO WORK AS WARRANTED, CUSTOMER’S SOLE AND EXCLUSIVE REMEDY SHALL BE REPAIR OR REPLACEMENT ACCORDING TO THE TERMS OF THIS LIMITED WARRANTY. KITCHENAID AND KITCHENAID CANADA DO NOT ASSUME ANY RESPONSIBILITY FOR INCIDENTAL OR CONSEQUENTIAL DAMAGES. This warranty gives you specific legal rights and you may also have other rights which vary from state to state or province to province. -
Page 10: Hassle-Free Replacement Warranty-Canada
Call toll-free 1-800-807-6777. For service information in Mexico: Call toll-free 01-800-0022-767. ®/™ ©2019 KitchenAid. All rights reserved. KITCHENAID and the design of the stand mixer are trademarks in the U.S. and elsewhere. Used under license in Canada. W11373925A.indb 10 7/18/2019 12:41:33 PM... -
Page 11: Pièces Et Caractéristiques
PIÈCES ET CARACTÉRISTIQUES HACHOIR D’ALIMENTS Poussoir Lame Plateau amovible Disque de hachage grossier (6 mm) Boîtier principal Disque de hachage fin (4,5 mm) Vis de hachage Collier TRANCHEUSE/RÂPE Râper moyen Levier de dégagement Lame pour râper grossièrement Logement à accessoires Lame pour trancher Poussoir de grande taille Tube d’alimentation Poussoir de petite taille... -
Page 12: Sécurité Du Produit
6. Éviter tout contact avec les pièces mobiles. Tenir les doigts à l’écart de l’orifice de sortie. 7. L’utilisation d’accessoires non recommandés ou non vendus par KitchenAid peut causer un incendie, une décharge électrique ou des blessures. 8. Ne jamais introduire les aliments à la main. Toujours utiliser le poussoir pour introduire les aliments. -
Page 13: Pour Commencer
POUR COMMENCER GUIDE AU HACHAGE REMARQUE : Aucun des pièces et accessoires du hachoir d’aliments KitchenAid ® (modèle KSMFGA) n’est compatible avec les pièces et accessoires du hachoir d’aliments en métal KitchenAid ® ou du hachoir d’aliments KitchenAid ® précédent (modèles KSMMGA, FGA, SSA, FVSP, FVSFGA, FPPA, KSMFPPA, GSSA, KSMGSSA, KN12AP) et vice versa. -
Page 14: Utilisation Du Produit
UTILISATION DU PRODUIT ASSEMBLAGE DU HACHOIR D’ALIMENTS Côté tranchant Insérer de façon sécuritaire la vis de Placer la lame sur l’extrémité de la vis de hachage dans le boîtier principal. hachage. Ergot Encoche Placer le disque de hachage par-dessus la Placer le collier sur le boîtier principal, en lame, en faisant correspondre l’encoche le tournant dans le sens horaire à... - Page 15 UTILISATION DU PRODUIT FIXATION DE L’ACCESSOIRE AU BATTEUR SUR SOCLE Débrancher le batteur sur socle, puis Retirer le couvercle de la prise à déplacer le bouton d’alimentation sur off accessoires. (arrêt) (0). Serrer le bouton de la prise à accessoires Insérer le logement de l’arbre de du batteur sur socle jusqu’à...
- Page 16 UTILISATION DU PRODUIT HACHAGE AVEC LE HACHOIR D’ALIMENTS AVERTISSEMENT Danger avec la lame rotative Toujours utiliser un poussoir pour introduire les aliments. Ne pas approcher les doigts des ouvertures. Conserver hors de portée des enfants. Le non-respect de ces instructions peut causer une amputation ou des coupures.
-
Page 17: Entretien Et Nettoyage
Au besoin, utiliser une brosse à vaisselle. POUR OBTENIR DES RENSEIGNEMENTS DÉTAILLÉS SUR L’UTILISATION DES ACCESSOIRES Visiter le www.kitchenaid.com/Quickstart pour des instructions supplémentaires avec des vidéos, des recettes qui inspirent et des conseils sur la façon d’utiliser et de nettoyer le batteur sur socle. -
Page 18: Garantie Et Dépannage
SI CE PRODUIT NE FONCTIONNE PAS TEL QUE GARANTI, LE SEUL ET UNIQUE RECOURS DU CLIENT CONSISTE À EN OBTENIR LA RÉPARATION OU LE REMPLACEMENT CONFORMÉMENT AUX TERMES DE LA PRÉSENTE GARANTIE LIMITÉE. KITCHENAID ET KITCHENAID CANADA DÉCLINENT TOUTE RESPONSABILITÉ AU TITRE DES DOMMAGES FORTUITS OU INDIRECTS. - Page 19 Pour des informations concernant toute intervention de dépannage au Mexique : Composer sans frais le 01 800 0022-767. ®/™ ©2019 KitchenAid. Tous droits réservés. KITCHENAID et la forme du batteur sur socle sont des marques de commerce aux É.-U. et ailleurs. Utilisé sous licence au Canada. W11373925A.indb 19...
-
Page 20: Piezas Y Características
PIEZAS Y CARACTERÍSTICAS ACCESORIO PARA MOLER ALIMENTOS Empujador de alimentos Cuchilla Bandeja removible Disco de molienda gruesa (6 mm) Alojamiento principal Disco de molienda fina (4,5 mm) Tornillo para moler Collar ACCESORIO PARA REBANAR/RALLAR Rallado medio Palanca de desenganche Cuchilla para rallado grueso Alojamiento del accesorio Cuchilla para rebanar Empujador de alimentos grande... -
Page 21: Seguridad Del Producto
6. Evite tocar las piezas que estén en movimiento. Mantenga los dedos fuera de la abertura de descarga. 7. El uso de accesorios no recomendados ni vendidos por KitchenAid puede provocar un incendio, un choque eléctrico o lesiones. 8. Nunca introduzca los alimentos con las manos. Siempre utilice el empujador de alimentos. -
Page 22: Cómo Comenzar
GUÍA PARA MOLER NOTA: ninguna de las piezas y accesorios de este Accesorio para moler alimentos KitchenAid ® (modelo KSMFGA) es compatible con las piezas y accesorios del accesorio de metal para moler alimentos KitchenAid ® o modelos anteriores de accesorios para moler alimentos KitchenAid ®... -
Page 23: Uso Del Producto
USO DEL PRODUCTO ARMADO DEL ACCESORIO PARA MOLER ALIMENTOS Lado filoso Inserte el tornillo para moler en el Coloque la cuchilla sobre el extremo del alojamiento principal con firmeza. tornillo para moler. Lengüeta Muesca Coloque el disco de molienda que desea Coloque el collar en el alojamiento principal, sobre la cuchilla, alineando la muesca del girando con la mano hacia la derecha hasta... - Page 24 USO DEL PRODUCTO CÓMO COLOCAR EL ACCESORIO EN LA BATIDORA CON BASE Desenchufe y ponga la batidora con base Quite la cubierta del receptáculo para en la posición off (0) (Apagado [0]). accesorios. Ajuste la perilla del receptáculo para Inserte el alojamiento del eje del accesorio accesorios de la batidora con base hasta en el receptáculo para accesorios.
- Page 25 USO DEL PRODUCTO CÓMO MOLER CON EL MOLINO DE ALIMENTOS ADVERTENCIA Peligro con las Cuchillas Giratorias Siempre utilice el empujador de alimentos. Mantenga los dedos fuera de las aberturas. Mantenga fuera del alcance de los niños. No seguir estas instrucciones puede ocasionar amputación o cortaduras.
-
Page 26: Cuidado Y Limpieza
Si es necesario, use un cepillo para lavar platos. PARA OBTENER INFORMACIÓN DETALLADA SOBRE CÓMO USAR LOS ACCESORIOS Visite www.kitchenaid.com/quickstart para ver instrucciones adicionales con videos, recetas inspiradoras y consejos sobre cómo usar y limpiar los accesorios de la batidora con base. -
Page 27: Garantía Y Servicio Técnico
SI ESTE PRODUCTO NO FUNCIONA COMO SE HA GARANTIZADO, EL ÚNICO Y EXCLUSIVO RECURSO DEL CLIENTE SERÁ EL DE REPARARLO O REEMPLAZARLO SEGÚN LOS TÉRMINOS DE ESTA GARANTÍA LIMITADA. KITCHENAID Y KITCHENAID CANADA NO SE RESPONSABILIZARÁN POR DAÑOS INCIDENTALES O CONSECUENTES. - Page 28 Para obtener información acerca del servicio en México: Llame sin cargo al 01-800-0022-767. ®/™ ©2019 KitchenAid. Todos los derechos reservados. KITCHENAID y el diseño de la batidora con base son marcas registradas en EE. UU. y en otros países. Usado en Canadá bajo licencia. W11373925A.indb 28...
- Page 29 W11373925A.indb 29 7/18/2019 12:41:41 PM...
- Page 30 W11373925A.indb 30 7/18/2019 12:41:41 PM...
- Page 31 W11373925A.indb 31 7/18/2019 12:41:41 PM...
- Page 32 LATIN AMERICA: KitchenAid-Latam.com ®/™ ©2019 KitchenAid. All rights reserved. KITCHENAID and the design of the stand mixer are trademarks in the U.S. and elsewhere. Used under license in Canada. Tous droits réservés. KITCHENAID et la forme du batteur sur socle sont des marques de commerce aux É.-U.
Need help?
Do you have a question about the KSMFGA and is the answer not in the manual?
Questions and answers