Table of Contents
Advertisement
Quick Links
Advertisement
Table of Contents

Related Manuals for Metal Work ONE


Summary of Contents for Metal Work ONE
- Page 1 UTILISATION ET MAINTENANCE USE AND MAINTENANCE...
-
Page 2: Caracteristiques Techniques
From left to right * Le débit total des 3 prises d’air ne peut être supérieur à 4000 Nl/min * Total flow rate from two supplementary outlets and the main one cannot exceed à 6.3 bar avec une ∆P de 1 bar. -
Page 3: Flow Charts
COURBES DE DEBIT FLOW CHARTS Pm = 8 bar - 0.8 MPa - 116 psi 1/4” Pressions d’entrée / Preset pressure Débit / Flow rate 3/8” Pm = 8 bar - 0.8 MPa - 116 psi Pressions d’entrée / Preset pressure Débit / Flow rate 1/2”... -
Page 4: How To Use
ONE as close as possible to the lubrifi cateur en aval du ONE, et le plus près devices involved. possible de l’appareil à lubrifi er. - Page 5 Merely turn the manual V3V Pour les utiliser, dévisser les bouchons A7. valve, if there is one, to off, or switch off the NB: Avant de dévisser les bouchons A7, il est electricity supply to any solenoid valves. If there nécessaire de sectionner l’alimentation d’air...
-
Page 6: Condensate Drain
ECHAPPEMENT DE L’AIR AIR EXHAUST Les différents échappements sont collectés sur un seul orifi ce 1/4’’. ONE has a single compressed air relief valve at the bottom. Celui-ci permet d’évacuer l’air du circuit aval quand: Downstream air is discharged when: 1. -
Page 7: Connexion Electrique
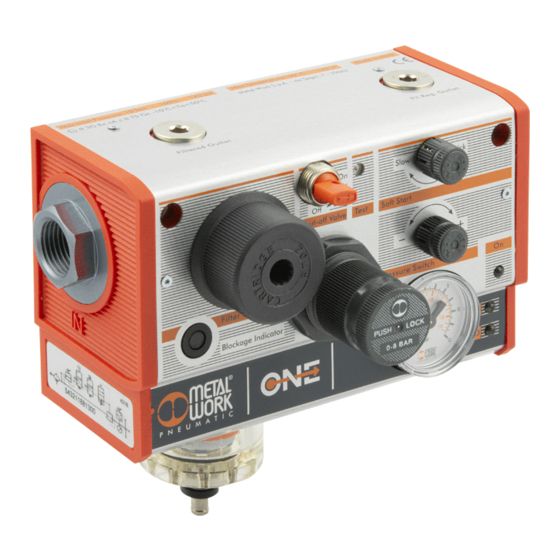
Dans le cas où aucune fonction électrique n’est présente sur l’appareil, Even if one of these functions is not present, it is always a 5-pin ce connecteur n’est pas présent. Connecter électriquement les fonctions connector. - Page 8 La cartouche fi ltrante est montée horizontalement. Son remplacement The fi lter cartridge is positioned horizontally. To replace it, merely s’effectue très facilement en démontant le bouchon frontal. ONE est unscrew the plug on the front. The unit contains an automatic on-off équipé...
- Page 9 REGULATION DE LA PRESSION PRESSURE REGULATION 1. Tourner le bouton de réglage jusqu’à obtenir la valeur de pression 1. Turn the knob until you read the desired value on the gauge. désirée en la visualisant sur le manomètre. 2. Then press the knob to lock it. 2.
-
Page 10: Pressure Switch
SOFT START VALVE (APR) Le démarreur progressif proposé sur ONE est totalement innovant au ONE’s soft start valve is completely new compared to others currently on regard des modèles présents actuellement sur le marché. Il permet de the market. The pressure is increased gradually whatever the fl ow rate of the utilities. - Page 11 SCHEMA ELECTRIQUE DU PRESSOSTAT / PRESSURE SWITCH WIRING DIAGRAM ROUGE/RED JAUNE/YELLOW CHARGE/LOAD CHARGE/LOAD COURBE DE L’HYSTERESIS DU PRESSOSTAT / PRESSURE SWITCH HYSTERESIS CHART Pression de commutation supérieure (bar) High switching pressure (bar) Pression de commutation inférieure (bar) Low switching pressure (bar) BOUTON DE SECURITE SECURITY KNOB NOTA: Tirer pour extraire le bouton du pressostat/APR.
-
Page 12: Maintenance
MAINTENANCE MAINTENANCE L’unique opération de maintenance prévue sur ONE est le remplacement de The only routine maintenance required is replacement of the filter la cartouche filtrante. Pour les informations vous reporter au paragraphe cartridge. Refer to the section entitled “FILTER” for instructions. - Page 13 NB: Maintenance must be carried out by properly qualifi ed and trained qualifi ées. personnel. Avant toute intervention sur ONE, sectionner l’air comprimé et Before doing anything, switch off the compressed air supply and cut off débrancher le connecteur électrique M12.
- Page 14 (F) supplementary outputs 6. Dévisser les 2+2+2 vis (G) présentent sur le 3 faces du ONE 6. Unscrew the 2+2+2 screws (G) on the three sides of the guard 7. Extraire le carter de protection (H) en tirant vers vous 7.
- Page 15 REMPLACEMENT DU REGULATEUR PILOTE REPLACING THE PILOT REGULATOR 1. Démonter le carter de protection 1. Remove the guard 2. Dévisser l’écrou de blocage de la tête du régulateur (A) 2. Remove the regulator knob (A) 3. Dévisser la cloche du régulateur (B), en utilisant la clef de démontage 3.
-
Page 16: Replacing The Pressure Switch
No other interventions should be required during the life of the unit. It is maintenance ne devrait avoir lieu pendant la durée de vie du produit. important, however, to bear in mind that all the component parts of ONE Vous devez tenir compte des paramètres suivants: can be disassembled.
Need help?
Do you have a question about the ONE and is the answer not in the manual?
Questions and answers