Advertisement
Quick Links
A412DA303
08/2015
Manufactured by
All Medicus Co., Ltd.
#7102~7107, #7402, #7403, #7406, 140,
Beolmal-ro, Dongan-gu, Anyang-si,
Gyeonggi-do 431-804 REPUBLIC OF KOREA
www.allmedicus.com
EU Representative
MT Promedt Consulting GmbH
Altenhofstr. 80, D-66386 St. Ingbert, Germany
Tel.: +49 6894 - 58 10 20
BLOOD
GLUCOSE
MONITORING
SYSTEM
Blood Glucose Monitoring System
User Manual
AGM-3000
Advertisement

Related Manuals for Medicus Gluco Dr. Plus


Summary of Contents for Medicus Gluco Dr. Plus
- Page 1 A412DA303 MONITORING SYSTEM 08/2015 Blood Glucose Monitoring System User Manual Manufactured by All Medicus Co., Ltd. #7102~7107, #7402, #7403, #7406, 140, EU Representative Beolmal-ro, Dongan-gu, Anyang-si, MT Promedt Consulting GmbH AGM-3000 Gyeonggi-do 431-804 REPUBLIC OF KOREA Altenhofstr. 80, D-66386 St. Ingbert, Germany www.allmedicus.com...
- Page 2 TEST SUMMARY Apply the blood drop This summary is intended only as a to the side edge of quick reference and is not a substitute the yellow window of for GlucoDr Plus Blood Glucose the test strip. Monitoring System User Manual. Please read the entire this User Manual before you begin testing.
- Page 3 “Thank you for using Blood Glucose Monitoring System” This User Manual will tell you all you need to know about the system and how it works. Please read this carefully before using the meter.
- Page 4 Precautions for Use - The GlucoDr Plus Meter is designed for use with GlucoDr Plus Test Strips (manufactured by All Medicus Co., Ltd.) only. - The GlucoDr Plus Blood Glucose Monitoring System is calibrated to produce values equivalent to results on plasma specimens obtained from a laboratory analyzer (YSI 2300 STAT Plus).
- Page 5 - Rapid change in temperature may cause inaccurate test results in reading. When taking the meter from cold to warm area or from warm to cold area, let the meter sit for about 30 minutes to adjust to the room temperature. - Do not drop the meter.
- Page 6 Table of Contents · Getting Started GlucoDr Plus Blood Glucose Monitoring System l 01 GlucoDr Plus Meter l 02 GlucoDr Plus Meter LCD Display l 04 GlucoDr Plus Test Strip l 05 · Before Testing Checking the Code Number l 06 Checking Your System with GlucoDr Plus Control Solution l 09 Preparing the Lancing Device l 14...
- Page 7 GlucoDr Plus Blood Glucose Monitoring System Carrying case User Manual GlucoDr Plus Meter GlucoDr Plus Test Strips Battery Lancing Device Upon request of distributor, actual package may consist of all Lancets or part of items described above.
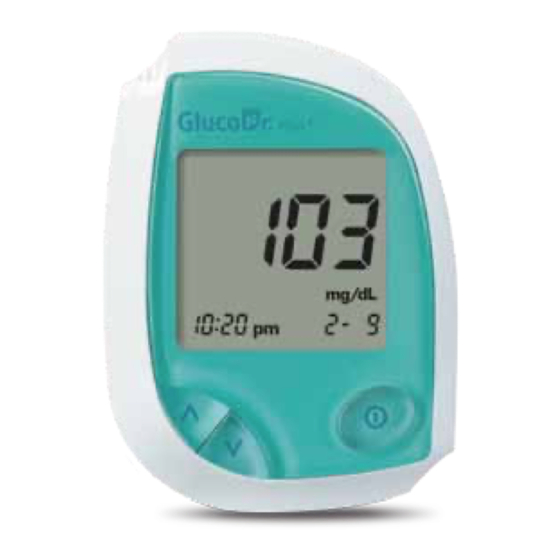
- Page 8 GlucoDr Plus Meter Test Port - Insert the GlucoDr Plus Test Strip for testing. Then the meter turns on and displays the code number automatically. LCD Display - Test results, icons, symbols and simple messages appear here. UP/DOWN Button - Change the code number in the CODE MODE. - Recall the stored test result in the MEMORY MODE.
- Page 9 Data Port - Transfer your test results from the meter to a computer. Battery Cover...
- Page 10 GlucoDr Plus Meter LCD Display Battery life. SET MODE. AVERAGE MODE. MEMORY MODE. CODE MODE. MEMORY and CODE NUMBER. The meter displays the current memory order number in the MEMORY MODE. The meter displays the current code number in the CODE MODE. STRIP ICON.
- Page 11 GlucoDr Plus Test Strip Grip - Hold this part to insert or remove test strip. Yellow Side-edge - Apply blood sample here; blood is absorbed automatically. Confirmation window (Reaction chamber) - Make sure the confirmation window fills completely. Gold electrodes - Insert into test port.
- Page 12 Checking the Code Number Code numbers are used to calibrate your meter with the test strips for accurate test results. Whenever you test, you must check if the code number displayed on the meter matches the one on the test strip vial. Turn on the Meter Press the power button to turn on the meter.
- Page 13 Enter the CODE MODE You can enter the CODE MODE by pressing the power button for one second. Then the code number blinks on the meter display. - Check the code number on the test strip vial before inserting the test strip. - You can not change the code number after the test strip is inserted into the test port.
- Page 14 - To change the code number faster, press and hold UP/DOWN button. Save the Code Number When the code number is correctly adjusted, press and release the power button. A new code number will be saved and appear on the meter display.
- Page 15 Checking Your System with GlucoDr Plus Control Solution Control solution test is to check the performance of your meter and test strips. GlucoDr Plus Control Solution contains a measured amount of glucose that reacts with the GlucoDr Plus Test Strips. The control solution test confirms that your meter and test strips are working correctly.
- Page 16 - Do not drink the control solution. - Tightly close the cap of control solution vial and store at a room temperature after the test. Insert a Test Strip Insert a test strip, with the printed side facing up, into the test port of the meter. Gently push it all the way in until it goes no further.
- Page 17 Apply Control Solution Shake the control solution vial well. Prepare a drop of the control solution on a clean plate. Slowly let the side edge of the yellow window of the test strip touch the drop of the control solution following the finger symbol. Once the confirmation window fills completely, your meter will begin the countdown.
- Page 18 The Control Solution range printed on the test strip vial is for the GlucoDr Plus Control Solution only. It is used to check the performance of your meter and test strips. It is NOT a recommended range for your blood glucose level. Compare Control Solution Test Results Compare the control solution test result to the control solution range printed on the test strip vial.
- Page 19 If your control solution test results continue to fall outside the range printed on the test strip vial, the GlucoDr Plus Blood Glucose Monitoring System may not be working properly. - If this is the case, do not use the system to test your blood glucose levels. - Contact your local distributor.
- Page 20 Preparing the Lancing Device Remove the cap Turn the cap of the lancing device counter-clockwise to remove the cap. Insert a Lancet into the Lancet Holder. Insert the lancet firmly into the holder until it comes to a full stop. When the lancet is placed in the lancing device, twist off the protective disk of the lancet.
- Page 21 Adjust the Puncture Depth Setting The dial for setting the puncture depth is at the tip of the lancing device. Higher number indicates deeper puncture. Thus, dial to the lower number for thin skin. Charge the Lancing Device. Draw back the end part of lancing device until it clicks, and then release it.
- Page 22 - To reduce the risk of infection, never share a lancet with another person. - Lancets are for single use only. Always use a new sterile lancet. - Used strips, lancets and meter may be considered bio-hazardous waste in your area. Make sure to follow your healthcare professional’s recommendations or local regulations for proper disposal.
- Page 23 Performing the Blood Glucose Test with GlucoDr Plus GlucoDr Plus Meter GlucoDr Plus Test Strip Lancing Device Lancets...
- Page 24 Insert a Test Strip Insert a test strip, with the printed side facing up, into the test port of the meter. Push it all the way in until it goes no further. The meter will turn on automatically and beep. Then the code number and the BLOOD DROP ICON will appear.
- Page 25 Apply the Blood Sample Apply the round drop of blood to the side edge of the yellow window of the test strip and then blood drop will be absorbed into the narrow channel. Touch and hold the blood drop to the side edge of the yellow window of test strip until blood completely fills the confirmation window and the meter beeps.
- Page 26 Test Results Appear in 5 seconds Once the meter completes the countdown from “5” to “1”, your test result will appear on the meter display. If you remove the test strip immediately, only the test result (without recording the event) will be automatically saved in the meter memory.
- Page 27 Entering the EVENT RECORD MODE For effective diabetes management, stored test results with your condition will help you and your healthcare professional to track changes in your blood glucose level. Press UP/DOWN Button After the Test Press UP/DOWN button after the test. Once the test result appears on the meter display, press any of UP/DOWN button to enter the EVENT RECORD MODE.
- Page 28 Once you remove the test strip from the meter, you cannot go back to the EVENT RECORD MODE. Do not remove the test strip from the meter until selecting an EVENT ICON is completed. MEAL ICON STRESS ICON Select this icon when you have Select this icon when you have a test after meal (food intake).
- Page 29 Understanding Your Test Results The GlucoDr Plus Meter will display test result between 20 and 900 mg/dL (1.1~50 mmol/L). If your test result is lower than 20 mg/dL (1.1 mmol/L), “Lo” will appear on the meter display. If your test result is higher than 900 mg/dL (50 mmol/L), “HI” will appear on the meter display. - If “HI”...
- Page 30 Recalling the Previous Test Results The GlucoDr Plus Meter has a memory capacity to store up to 250 most recent test results with date, time and event. It also provides you averages of your blood glucose test results over a period of time (1~28d). You can review the test results stored in the memory by the following steps.
- Page 31 Recall your Test Results Press and release UP/DOWN button once to make the most recent test result appear on the meter display. Every time you press and release UP/DOWN button, the meter will display the next result up to 250 test results. Press and hold UP/DOWN button in the MEMORY MODE in order to view the test results faster.
- Page 32 Setting the Meter The GlucoDr Plus Meter comes with the time, date, alarm(0), average day(7d) and unit of measurement presents (mg/dL) preset. However, if you need to change the setting of the meter, or if you replace the battery, you need to enter the SET MODE and reset them. It is important to set the correct time and date.
- Page 33 Press and release the power button in order to advance to the next setting steps in the SET MODE. Press and release UP/DOWN button to adjust the number in the SET MODE. To move faster, press and hold UP/DOWN button. Set the Hour The Hour flashes.
- Page 34 Set the Month The Month flashes. Press and release UP/DOWN button until you get the correct month. If you press and release the power button, the meter will advance to the Day Setting. Set the Day The Day flashes. Press and release UP/DOWN button until you get the correct day.
- Page 35 Set the Average Period The Average Period flashes. Press and release UP/DOWN button until you get the period of average setting that you want (1~28d). If you press and release the power button, the meter will advance to the Alarm Setting. Set the Alarm (up to 4 different Alarms a day) The Alarm times flash.
- Page 36 Totally four different alarms can be set. You can continually set alarm right after the first setting. Press and release the power button after you complete the first alarm time setting. Then “2” appears, you can repeat to set the next alarm time.
- Page 37 Installing Battery Two AAA batteries will provide you enough power to perform about 5,000 tests. The meter will alert you when the energy level is getting low by displaying the message( ). In this case you can test a few more times but the battery should be replaced to new one as soon as possible.
- Page 38 Remove the Battery Cover Press down the top of the battery cover then pull it out. The battery cover will be released. Replace the Battery Remove the old battery and put the new one. Close the Battery Cover Insert the battery cover tab into the matching hole on the meter, and push down until you hear the cover click into place.
- Page 39 Display Message Guide Message System check. The meter is ready The meter is ready The meter displays This display always for you to insert a for a blood drop countdown from appears when you test strip. or control solution. 5 to 1, while What it means.
- Page 40 Message A blood glucose A blood glucose System is ready to Your blood test result in test result in record the EVENT glucose result is mg/dL. mmol/L. ICON which higher than What it means. correlate with your 900 mg/dL test result. (50 mmol/L).
- Page 41 Message Your blood glucose A blood glucose Battery is low but The energy level result is lower than test result stored in you can still of the battery is 20 mg/dL the memory. perform a few too low to provide What it means.
- Page 42 Message The average of No test result in The meter is used The used test strip blood glucose test memory. outside the was inserted in the results for the past proper range of test port. What it means. 7 days. temperature.
- Page 43 Message There may be a The blood sample The meter has an The meter has a problem with the or control solution internal electric problem with strip test strip. It may was improperly circuit problem. connection. What it means. have been applied or there damaged or was an electronical...
- Page 44 Troubleshooting Guide Troubleshooting Cause Action 1. The meter does not turn on Batteries are dead. Replace the batteries. after inserting a test strip. The batteries are installed Check if batteries are correctly incorrectly or there is no battery installed.(See pages 31-32) in the meter.
- Page 45 Specifications Product Name GlucoDr Plus™ Blood Glucose Monitoring System Model Name AGM-3000 Assay Method Electrochemical method Sample Type Fresh capillary, venous, and arterial whole blood Sample Volume Minimum 1.5 ㎕ Measurement Range 20~900 mg/dL (1.1~50 mmol/L) 5 seconds Measurement Time Calibration Plasma-equivalent Battery Type...
- Page 46 Performance Characteristics - The performance of the GlucoDr Plus Test Strips has been evaluated in clinical tests. Accuracy: - The accuracy of the GlucoDr Plus Blood Glucose Monitoring System was assessed by comparing blood glucose test results obtained from 100 diabetic patients with those obtained using YSI Model 2300 STAT Plus Glucose Analyzer.
- Page 47 Explanation of Symbols CAUTION This product fulfills the requirements of Directive 98/79/EC on in vitro diagnostic medical device. For in vitro diagnostic use Do not dispose the instrument in the urban waste. Consult User Manual...
Need help?
Do you have a question about the Gluco Dr. Plus and is the answer not in the manual?
Questions and answers