Table of Contents
Advertisement
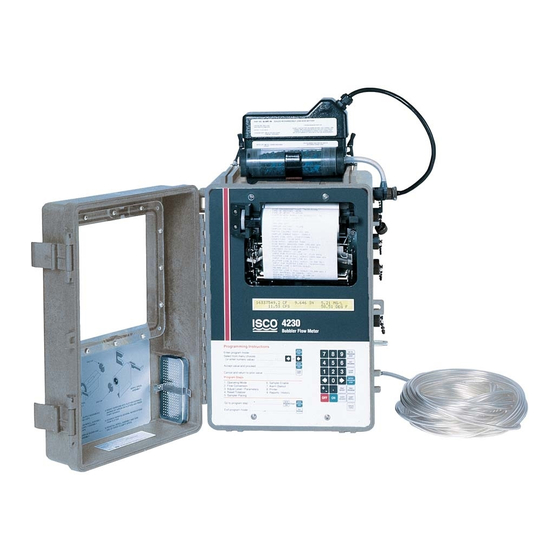
4230 Bubbler
Flow Meter
The 4230 Bubbler Flow Meter Pocket Guide
is provided as a handy field reference. It is
not intended to replace the instruction
manual, but complements it by providing
condensed instructions. Study the manual
thoroughly before installing or operating the
flow meter.
COPYRIGHT © 1994 by
Teledyne Isco, Inc., 4700 Superior St.,
Lincoln, Nebraska, U.S.A. 68504
Phone: (402) 464-0231
Toll Free: (800) 228-4373
FAX: (402) 465-3022
www.isco.com
Part #60-3233-102
Revision H, May 11, 2006
Advertisement
Table of Contents

Related Manuals for ISCO 4230


Summary of Contents for ISCO 4230
- Page 1 4230 Bubbler Flow Meter The 4230 Bubbler Flow Meter Pocket Guide is provided as a handy field reference. It is not intended to replace the instruction manual, but complements it by providing condensed instructions. Study the manual thoroughly before installing or operating the flow meter.
- Page 2 WARNING The installation and use of this product may require you to work in locations where you could be seriously injured or even killed. Take whatever precautions are necessary to ensure your safety before entering the installation. Never work alone or unsupervised. Install and operate this product in accordance with all applicable safety and health regulations, as well as any appropriate local ordinances.
-
Page 3: Table Of Contents
Table of Contents Getting Started 1.1 Becoming Familiar with the 4230 Flow Meter ......1-1 1.1.1 Selection of a Power Source . . 1-2 1.1.2 Turning the Flow Meter On . - Page 4 2.4.4 Step 4 - Reset Totalizer ..2-17 2.4.5 Step 5 - Sampler Pacing ..2-17 2.4.6 Step 6 - Sampler Enable ..2-19 2.4.7 Step 7 - Alarm Dialout Mode 2-20 2.4.8 Step 8 - Printer .
- Page 5 Table of Contents Battery ....4-9 4.4.2 Five Station Battery Charger 4-9 4.4.3 Self-Discharge Characteristic . . . 4-10 4.4.4 Hazards of Overcharging . . . 4-11 4.4.5 Charging from Another Source .
-
Page 7: Getting Started
The 4230 Flow Meter is a microprocessor-equipped flow meter capable of measuring flow rate in a wide variety of open channels. The 4230 Flow Meter uses the bubbler method for sensing level. A small air pump and reservoir provide a source of pressurized air. -
Page 8: Selection Of A Power Source
For very remote sites where changing the battery is difficult, Teledyne Isco offers the Solar Panel Battery Charger, used with the Lead-Acid Battery. You may also power the 4230 Flow... -
Page 9: Turning The Flow Meter On
Meter with a deep-cycle R-V or marine battery. You must mount these larger batteries externally, as they are quite large. Teledyne Isco offers a special connect cable for them. 1.1.2 Turning the Flow Meter On After you have connected the flow meter to power, turn the flow meter on with the ON button located on the keypad. -
Page 10: Checking The Installation
4230 Bubbler Flow Meter Note Teledyne Isco recommends setting the bubble rate in the shop first, as this is easier with a small container of clear water placed beside the flow meter. Using a different length and diameter bubble line than the installation will result in an inaccurate setting. - Page 11 Section 1 Getting Started If the installation is temporary, make sure the flow meter is installed so it is not difficult to reach in case you need to change the programming or chart paper. The unit should not be a hazard to anyone entering the manhole.
-
Page 12: Bubble Lines In High-Velocity
“zero” point. Note The 4230 Flow Meter cannot measure level below the bubble line outlet. If you wish to measure accurately down to the “zero” level of the device, install the bubble line outlet one to two inches below the “zero”... -
Page 13: Clogging Bubble Lines
This is preferable to increasing the bubble rate, and is highly recommended where the flow meter is powered from AC. Teledyne Isco has stainless steel bubble line extensions available that may be helpful, and for situations where algae tends to grow in the lines, copper tubing is useful. -
Page 14: Options And Capabilities
1.3 Options and Capabilities 1.3.1 Flow Metering Inserts For temporary monitoring purposes in 6", 8", 10", and 12" round sewer pipes, Teledyne Isco offers flow metering inserts that have a built-in bubbler and form a round orifice or v-notch weir in the flow stream. -
Page 15: Connection To A Sampler
Section 1 Getting Started 1.3.2 Connection to a Sampler A 4230 Flow Meter can control a sampler in a flow-proportional sampling mode. This means the sampler will take a sample after a specific volume has passed through the flow stream, rather than after a particular interval of time. -
Page 16: Data Acquisition And Storage (Flowlink ® )
1.3.4 Data Acquisition and Storage ® (Flowlink As mentioned in previously, all 4230 Flow Meters contain memory you can allocate to store level, rainfall, and sample data. You can interrogate this information for later processing. To set up the flow meter’s memory for data storage, you must use Flowlink, Teledyne Isco’s proprietary data acquisition... - Page 17 Refer to the Flowlink manual for further information. Note Storage of data is not automatic in the 4230 Flow Meter. You must use programs from Flowlink software to initialize, partition, and size the memory, and also to retrieve the stored data.
-
Page 18: Parameter Sensing With The 4230 Flow Meter
4230 Bubbler Flow Meter 1.3.5 Parameter Sensing with the 4230 Flow Meter The 4230 Flow Meter also has the capability of displaying, recording, and (if Flowlink software is used) storing data from parameter sensors. The sensors available from Teledyne Isco for... - Page 19 Figure 1-3 YSI 600 Multi-Parameter Sonde (End cover removed to show sensors) Note The 4230 Flow Meter has only one parameter sensing port. You must select temperature, D.O. with temperature, or pH with temperature. (D.O. and pH require temperature monitoring for proper operation.) If...
- Page 20 4230 Bubbler Flow Meter you want to change your selection later, you can. You will need the correct probe and module and you will have to change the program in the flow meter. Note All brands or product names used in this text are trademarks or registered trademarks, and are the property of their respective companies or organizations.
-
Page 21: Programming Introduction
Programming Introduction 2.1 Why Programming Is Necessary You must program the 4230 Flow Meter to accurately monitor a flow stream. You must also install the level measuring device, a bubbler tube. The installation usually includes a primary measuring device, a structure placed in the stream that regulates flow. -
Page 22: Operation Of The Keypad And Display
Time and date are replaced by pH/D.O. and temperature if you are sensing parameters. The (X X) to the right of the time indicates letters that may appear from time to time on the 4230 Flow Meter. - Page 23 Section 2 Programming Introduction The letter C appears when the flow meter is communicating with a remote computer (Flowlink applications only). The letter Z appears when the flow meter is doing an auto-zero. The letter P appears when the flow meter is purging the bubble line.
-
Page 24: Keypad Functions
4230 Bubbler Flow Meter The program consists of steps and substeps. The steps are listed on the flow meter front panel. Most steps contain several substeps. Generally, you need to complete all the substeps before stopping, or the flow meter will reject the changes you made for that step after it times out. - Page 25 Section 2 Programming Introduction • Clear Entry–Lets you return to the previous entry for a program step if you have changed the entry, but have not yet pressed Enter. • Enter/Program Step–This key has two functions. One is to enter a program selection into the flow meter’s memory (Enter).
- Page 26 4230 Bubbler Flow Meter • Chart Advance–Pressing this key causes the paper chart to advance through the printer at the fastest possible speed. Nothing will be printed while you press this key. • Chart Reroll–You can unroll the chart from the take-up roll to look at it by pulling it out with your hands.
-
Page 27: Programming Procedure
Section 2 Programming Introduction • Manual Purge key–This key lets you purge the bubble line on the 4230 Flow Meter at any time. 2.3 Programming Procedure To begin programming, turn on the flow meter and wait for the display to settle. Then either press the Enter/Program Step key (generally referred to as Enter) or the Go To Program Step key. - Page 28 4230 Bubbler Flow Meter want to go back, use the left arrow key until the option reappears. When the desired selection is flashing, press Enter. The display will then automatically advance to the next step of the program. All of the program steps contain several “substeps”...
- Page 29 Print Program key as soon as the display returns to the normal operating condition, displaying level and total flow, etc. Following are the steps to program a 4230 Flow Meter: 1. Operating Mode 2. Flow Conversion 3.
-
Page 30: Description Of Program Steps
4230 Bubbler Flow Meter 2.4 Description of Program Steps 2.4.1 Step 1 - Operating Mode Step 1, Operating Mode, determines how you set up the flow meter. In this step there are two choices, Program and Setup. Program advances you to step 2, and from there on you correlate the flow meter to the flow stream. -
Page 31: Step 2 - Flow Conversion Type
2.4.2 Step 2 - Flow Conversion Type Step 2, Flow Conversion Type, determines how the flow meter calculates flow rate and total flow. For a 4230 Flow Meter, flow rate is calculated by knowing the measured level and (usually) the characteristics of a structure called a primary measuring device. - Page 32 Flow Calculations Without Primary Devices – Note that it is not always necessary to have a primary measuring device. The 4230 Flow Meter can measure level and calculate flow without any primary device being installed in the flow stream. Sometimes the shape of the flow stream itself forms the primary device.
- Page 33 Section 2 Programming Introduction opening or a V-notch that forms a weir, forms a primary device. The conversion types available are WEIR/FLUME, MANNING, DATA POINTS, EQUATION, and FLOW METERING INSERTS. Use Weir/Flume flow conversion when your primary device is a weir or a flume. A weir is a wall or dam across the flow stream.
- Page 34 The 4230 Flow Meter has space for four sets of data with as many as fifty points per set. The flow 2-14...
-
Page 35: Step 3 - Adjust Level, Parameters
The 4230 Flow Meter reads the upstream level (the water backs up behind the insert) and calculates the flow through the insert from this measured level. - Page 36 It is intended for use in research, assessment, and regulatory compliance. The sonde attaches to the modified RAIN GAUGE connector on the 4230 Flow Meter. Flow meters having only a 4-pin rain gauge connector will not support the YSI Sonde. If you wish to upgrade your flow meter to use this system, contact the factory.
-
Page 37: Step 4 - Reset Totalizer
2.4.5 Step 5 - Sampler Pacing It is common to use a flow meter with an Isco sampler. Typically the flow meter signals the sampler to take a sample after a certain volume has passed. - Page 38 Flowlink is Teledyne Isco’s proprietary data acquisition and management software. Flowlink works with personal computers, modems, and laptop computers to monitor flow meters from a distance.
-
Page 39: Step 6 - Sampler Enable
Section 2 Programming Introduction You can also use a pair of conditions, or if you are using the YSI 600 sonde, you can select multiple conditions from its sensors. 2.4.6 Step 6 - Sampler Enable Sampler Enable means that in a combination flow meter/sampler pair, the flow meter controls the sampler’s ability to run its own program. -
Page 40: Step 7 - Alarm Dialout Mode
D.O., pH, and the YSI outputs. 2.4.7 Step 7 - Alarm Dialout Mode This feature lets you program a 4230 Flow Meter to signal a remote location through a telephone line. This feature is useful for transmitting alarm conditions or other information to a remote location. -
Page 41: Step 8 - Printer
2.4.8 Step 8 - Printer The 4230 Flow Meter has a built-in printer. The printer is also capable of plotting linear data along with printing alphanumeric (letters and numbers) messages. In this step you set the speed for the chart to advance, from "... -
Page 42: Step 9 - Reports/History
50 history items and 200 sample events at a time. 2.5 Interpreting the Program Screens Following are the program screens as they appear on the display of a 4230 Flow Meter. Explanations of most of the screens will be provided. 2-22... - Page 43 Section 2 Programming Introduction Important Some items that appear in these menus will have parentheses (...) around them. This means that the item may or may not appear on your flow meter. Choices you make early in the program will make some options unavailable later.
- Page 44 4230 Bubbler Flow Meter 2-24...
-
Page 45: Programming
4230 Bubbler Flow Meter Section 3 Programming 3.1 Step 1 - Operating Mode Turn on the machine. Wait for the display to settle. Then press the Enter/Program Step (Enter) key. The following will appear (step 1). If the following menu does not appear, press Exit Program, then Go To Program Step, then press 1. - Page 46 4230 Bubbler Flow Meter Then: SETUP OPTIONS: 'EXIT' TO QUIT • OPTIONAL OUTPUTS • • REPORT SETUP • And: SETUP OPTIONS: 'EXIT' TO QUIT • LCD BACKLIGHT • •(LANGUAGE) • •PROGRAM LOCK • Finally: SETUP OPTIONS: 'EXIT' TO QUIT • (LANGUAGE) • • PROGRAM LOCK • • PROGRAM •...
- Page 47 D.O., dissolved oxygen. Note If you are using the Isco D.O. sensor or are sensing D.O. with the YSI Sonde, select as long an interval as is practical for your application. The reasoning is that the D.O.
- Page 48 SUPER BUBBLE MODE • ON • • OFF • Super Bubble is an Isco feature that increases the air supply to the bubble line when the flow meter senses a rapidly rising liquid level. This allows the level measurement to be more accurate and to react more quickly.
- Page 49 Section 3 Programming re-established, the flow meter cannot accurately measure the level. Super Bubble helps maintain accurate level measurement by filling the bubble line with air, ensuring that the bubble rate will re-establish quickly when the level stabilizes. Operation of Super Bubble will cause an increase in power consumption, because the air pump must run.
- Page 50 4230 Bubbler Flow Meter the Setup menu. Press Enter. The following will appear: MODEL 4230 HW REV: XXXXXX SW REV X.XX ID XXXXXXXXXXX • HW REV refers to the hardware revision number. • SW REV refers to the software revision number.
- Page 51 Section 3 Programming Return to the Setup menu if the unit has not already done so. This time select ENABLE/ALARM HYSTERESIS from the menu. Press Enter. The following will appear: LEVEL ENABLE/ALARM HYSTERESIS X.XXX FT (or meters) The HYSTERESIS menu lets you set the range over which the level (or other condition) can vary before the flow meter responds to the change.
- Page 52 4230 Bubbler Flow Meter but broad enough to ignore minor changes that could cause chattering. Press Enter again and the following will appear: FLOW RATE ENABLE/ALARM HYSTERESIS X.XXX CFS (Or other units of measure.) The next three menus may appear or not, depending on selections you made earlier in Program.
- Page 53 Section 3 Programming The following will appear if you are measuring D.O: DO ENABLE/ALARM HYSTERESIS X.XXX PPM (or mg./l depending on the units selected in Program.) A set of menus similar to those shown above for pH, D.O., and temperature will then appear for the YSI 600 Sonde, if you have selected it.
- Page 54 10-50 mA (not supported by the flow meter). Teledyne Isco offers two different arrangements for the 4-20 mA control circuit. You can have either or both with the same flow meter. One...
- Page 55 1. If the battery is continuously on charge (for example with a Solar Panel Battery Charger). 2. If the battery is very large, such as a deep-cycle or marine type battery, or an Isco 35 Ampere-hour lead-acid battery. 3. Use only one 4-20 mA output.
- Page 56 4230 Bubbler Flow Meter section How to Make Battery Calculations, at the end of Section 1 in the manual. The following menus determine the behavior of the 4-20 mA current outputs. If you select ANALOG OUTPUT (another term for the 4-20...
- Page 57 Section 3 Programming If you select RANGE, the following will appear: OUTPUT RANGE • 0 - 20 mA • • 4 - 20 mA • This menu lets you select the current value for zero-percent (baseline) compatible with your equipment (internal 4-20 mA board only). If you select SMOOTHING from the ANALOG OUTPUT menu the following will appear: SMOOTHING...
- Page 58 Serial Output port. Special cables may be required. Contact Teledyne Isco technical support for more information. Command Line: (Use the INTERROGATOR connector.) The lines of text contain the port values for each port that is turned on.
- Page 59 Section 3 Programming DATA command will use a special command response protocol. The following table provides the ASCII codes for port types and standard units of measure. Table 3-1 ASCII Output Codes Code Parameter Units Description String (enclosed in quotes) Unit specific identifier Unsigned long Model...
- Page 60 4230 Bubbler Flow Meter Table 3-1 ASCII Output Codes Code Parameter Units Current day’s rain (tips Tips since midnight) Previous day’s rain (tips Tips since midnight) pH units Dissolved Oxygen Milligrams per liter Temperature Degrees Celsius YSI 600 pH pH units...
- Page 61 Section 3 Programming Table 3-1 ASCII Output Codes Code Parameter Units YSI 600 Sonde Degrees Celsius Temperature Sampler Enable Status Logical Bottle Number and Days Time Check sum (does not Unsigned long include the check sum, carriage return, and line feed) Note The output string for a given flow meter will have values only for those parameters it is currently measuring.
- Page 62 4230 Bubbler Flow Meter often as you want. Type ‘Q’ to leave the command response interface. In addition to the port values, the data includes the flow meter’s current time, the bottle number and time stamp of the three most recent sample events, the previous day’s...
- Page 63 Section 3 Programming If you select SERIAL OUTPUT from the OPTIONAL OUTPUTS menu, the following display will appear: PERIODIC SERIAL OUTPUT • ON • • OFF Selection of OFF from this menu will disable this feature, and there will be no further references to it.
- Page 64 Enter. The display will return to the SETUP menu. The alarm box, also called the High-Low Alarm Box is an Isco product that allows you to operate control relays to signal alarms when flow rate rises above or falls below a certain set value.
- Page 65 Section 3 Programming This time, select REPORT SETUP with the arrow key. Press Enter. REPORT SETUP • REPORT A • • REPORT B • This step lets you determine the contents of the reports generated by the flow meter. The report generator can create two different reports (A and B) that can be identical or very different.
- Page 66 4230 Bubbler Flow Meter Select YES if you want RAINFALL to appear in the report. Note that you must have a rain gauge connected to the flow meter to sense rainfall occurrence. Press Enter. The following will appear: REPORT SETUP •...
- Page 67 Section 3 Programming This time select YSI 600. The following display will appear: YSI DATA IN REPORT • YES • • NO • Press Enter again and the display will return to the REPORT SETUP menu. REPORT SETUP • FLOW • • DO/PH • • YSI 600 • • SAMPLE HISTORY • Select SAMPLE HISTORY.
- Page 68 4230 Bubbler Flow Meter Press Exit to leave the program. Then press Enter and reselect SETUP. The Setup menu will reappear: SETUP OPTIONS: 'EXIT' TO QUIT • STATUS • • REPORT SETUP • • LCD BACKLIGHT • SET CLOCK, SITE ID, MEASUREMENT...
- Page 69 Section 3 Programming selection if the flow meter is battery-powered, but installed in an environment where the lighting is poor. CONTINUOUS will cause the backlight to be lit continuously. Where the flow meter is powered by an AC power supply, battery life considerations do not intervene.
- Page 70 Further changes will require entry of the password, which is the model number of the flow meter, 4230. If you select ON, there is a time-out before the lock engages. If you continue to work through the rest of the program, the lock will not engage until you are done.
- Page 71 Section 3 Programming the flow meter will also remove that condition from the program. Consider all aspects of your program before you make any changes! Press Enter and the SETUP menu will reappear. step 1 - Program: SELECT OPTION • PROGRAM • • SETUP • PROGRAM will be flashing.
- Page 72 4230 Bubbler Flow Meter NOT MEASURED will also appear if you keep moving with the right arrow key. This step establishes the units of measure the flow meter will use in all subsequent displays and calculations. gallons per second gallons per minute...
- Page 73 Section 3 Programming meter’s Parameter Port or Rain Gauge Port (for the Rain Gauge or YSI 600 Sonde). You can only have D.O./temperature, pH/temperature or temperature alone on a given flow meter, unless you use the YSI 600 Sonde. The YSI 600 Sonde provides multiple outputs simultaneously.
- Page 74 4230 Bubbler Flow Meter You must have an Isco 674 Rain Gauge connected to the flow meter through the Rain Gauge Port to sense rainfall. MM = millimeters. The rain gauge is factory-calibrated. If you do not want to use a rain gauge, you would select NOT MEASURED for this step.
- Page 75 Some dissolved oxygen is necessary for the survival of aquatic life in these waters. You must have an Isco Dissolved Oxygen Probe to sense dissolved oxygen. The probe attaches to the module, which attaches to the Parameter Port.
- Page 76 The YSI 600 Sonde attaches to the Rain Gauge connector on the 4230 Flow Meter. Note that this connector must be a special, modified connector with nine pins.
- Page 77 Section 3 Programming Note The 4230 Flow meters with 4-pin Rain Gauge connectors cannot support the YSI 600. It is necessary to return the flow meter to the factory for modifications. In addition to the connector, there are significant internal modifications to the flow meter’s electronics and software.
- Page 78 4230 Bubbler Flow Meter NO is the default. If you select YES, the following will appear: WARNING! DO NOT DISCONNECT POWER YSI COMMUNICATION CHECK. PLEASE WAIT... CAUTION Do not disconnect either the sonde or flow meter power during a communications check. The memory in the sonde can be damaged by a power failure occurring during an update.
- Page 79 Section 3 Programming Note Selection of NOT MEASURED from any of the YSI menus will keep you from activating that function later in the program. If you wish to make use of the YSI 600 sonde’s pH measurement capability, select pH. If you do not, select NOT MEASURED.
-
Page 80: Step 2 - Flow Conversion
4230 Bubbler Flow Meter be able to identify that gross changes are occurring in the ionic content of the stream. If you move with the right arrow, the following options will appear on the display: YSI 600 CONDUCTIVITY PARAMETER • YSI T.D.S. • • NOT MEASURED •... - Page 81 TYPE OF DEVICE: • WEIR • • FLUME • For detailed information on weirs and flumes, refer to the Isco Flow Measurement Handbook, available from Teledyne Isco. Consulting the manufacturer of the specific weir or flume is also worthwhile. Note that for weirs and flumes, there is a preferred location for installing the level measuring device.
- Page 82 4230 Bubbler Flow Meter If you select CIPOLLETTI for weir, the following will appear: CIPOLLETTI WEIR ENTER CREST LENGTH XX.XXX FEET (or meters) If you selected FLUME for the type of standard device, the following display will appear: SELECT TYPE OF FLUME •...
- Page 83 Section 3 Programming If you select LEOPOLD-LAGCO for flume, the following will appear: LEOPOLD-LAGCO FLUME SIZE • 4"• •6"• •8"• •10"• •12"• •15"• •18"• •21" • If you press the right arrow key several times, the sizes shown below will move onto the screen: LEOPOLD-LAGCO FLUME SIZE •...
- Page 84 4230 Bubbler Flow Meter If you select EQUATION the following display will appear: ENTER EQUATION UNITS Q = XXX.XXXH^X.XX + XXX.XXXH^X.XX This step allows you to enter an equation that is appropriate for your flow situation. The equation is expressed in the general form of Q =...
- Page 85 Section 3 Programming Roughness coefficients are published in the Isco Open Channel Flow Measurement Handbook. You must know the material the pipe is made of. The roughness coefficients are published for all common materials in three grades: minimum, normal and maximum. Then: MANNING ROUND PIPE DIAMETER = X.XXX FEET (or meters)
- Page 86 4230 Bubbler Flow Meter If you select TRAPEZOID for the Manning flow conversion, the following displays will appear: MANNING TRAPEZOID SLOPE = X.XXXXX ROUGH = X.XXX (Slope and roughness are entered as for ROUND PIPE.) Then: MANNING TRAPEZOID TOP WIDTH = X.XXX FEET (or meters)
- Page 87 DATA POINT flow conversion allows you to enter measured level and flow rate values for a number of different points. The 4230 Flow Meter can accept as many as four sets of data points with each set containing up to fifty points.
- Page 88 4230 Bubbler Flow Meter After the FLOW RATE UNITS menu has appeared, the next menu is: SET X (1-4): (0) POINTS ENTERED • ADD POINT • • (UNITS) • Then: SET 1 DATA POINT 1 ENTER: 0.00 (level units) 0.000 (units of volume)
-
Page 89: Flow Metering Inserts
ENTER: XX.XX (level units) XXX.XXX (volume) 3.2.1 Flow Metering Inserts There is one more possible flow conversion for the 4230 Bubbler Flow Meter. This option will appear as FLOW METERING INSERTS. These devices are metal inserts for 6", 8", 10", and 12"... -
Page 90: Enter Maximum Head - All
4230 Bubbler Flow Meter Then: SELECT FLOW INSERT SIZE • 6" • • 8" • • 10" • • 12" • 3.2.2 Enter Maximum Head - All Models Before advancing from step 2 (Flow Conversion) to step 3 (Adjust Ports), the flow... -
Page 91: Outputs
Section 3 Programming Note If you do not turn on the 4-20 mA output(s) in step 1, the menus determining its (their) operation will not even appear later in the program. If you need this function and cannot find the appropriate menus in step 2, return to step 1, Setup and check to see that you have not inadvertently switched the option off. -
Page 92: Step 3 - Port To Adjust
4230 Bubbler Flow Meter for the current loop minimum in Setup. The units are the units of measure appropriate for the option you selected; for example, feet or meters for level, degrees F or C for temperature, mg./l for dissolved oxygen, etc. - Page 93 Section 3 Programming because it doesn’t need calibration. When you select step 3 the following will appear: PORT TO ADJUST • NONE• •(LEVEL)• •(pH)• •(D.O.)• •(YSI 600)• LEVEL will not show up if you are using the flow meter only for parameter sensing. Likewise, pH and/or D.O.
- Page 94 4230 Bubbler Flow Meter You should remove the bubbler and mounting ring to measure the level if either of the following occur: • If it is not possible to measure the level upstream when the bubbler is installed, (cramped quarters inside smaller pipes).
- Page 95 Section 3 Programming Errors in level measurement have a greater effect on flow calculations at low liquid levels. Dimensional errors are more significant at higher levels. If you select pH for port to adjust, the following display will appear. (Note that pH will not appear as an option unless you have selected it in step 1.) If you want to measure pH and pH does not appear in this step, you must go back...
- Page 96 4230 Bubbler Flow Meter If you select D.O. for port to adjust, the following will appear: DISSOLVED OXYGEN CALIBRATION • D.O. STANDARD • • ABS BAROMETRIC PRESSURE • > ALTITUDE is just off screen to the right. If you select D.O. STANDARD for the calibration method, the following display will appear: D.O.
- Page 97 Section 3 Programming If you select ALTITUDE for D.O., the following will appear: UNITS FOR ALTITUDE ENTRY • FT • • M • Select the appropriate units and press Enter. ALTITUDE ALTITUDE = X.XX FT (or meters) Enter the altitude for your location. Then: WRAP D.
- Page 98 ALTITUDE is just off screen to the right. Programming for YSI 600 D.O. is essentially the same as that described for the Isco D.O. sensor on the preceding section, with the exception that you always place the sensor in a cup, rather than wrap a moist cloth around it as is done for the Isco D.O.
- Page 99 Section 3 Programming name for the unit of conductance, which is also the reciprocal of the ohm. The siemen was formerly called the mho (ohm spelled backwards), and that term is more familiar to some. PPT is parts per thousand. Select the standard most suitable for your application.
-
Page 100: Step 4 - Reset Totalizer
This step lets you reset the flow meter’s internal flow totalizer. Note that there is the possibility of more than one totalizer. The 4230 Flow Meter can maintain a separate totalizer for the time the sampler is enabled through the sampler enabling feature (step 6). - Page 101 VOLUME will not appear if the flow meter is measuring level only, or is being used for parameter monitoring. The FLOWLINK menu option will not appear unless Flowlink, Teledyne Isco’s proprietary data acquisition and storage software, is installed and pacing has been downloaded from Flowlink.
- Page 102 4230 Bubbler Flow Meter locally with a laptop computer and cable. In any event, if the sampler pacing definition is controlled by Flowlink, it can only be changed through Flowlink. If you select CONDITIONAL, the following will appear: CONDITION •(LEVEL)••(FLOW RATE)••(RAINFALL)••(D.O.)••(pH)•...
- Page 103 Section 3 Programming and recheck your programming. If you did not make the proper selections there, certain menu options will not appear here, as they would have been locked out. The YSI 600 conditions of pH, D.O., CONDUCTIVITY, and TEMPERATURE will only appear on the menu if you have turned them on in steps 1 and 3.
- Page 104 4230 Bubbler Flow Meter After you have determined what condition will signal the sampler and under what circumstances, the following menu will appear: SELECT OPERATOR • DONE • • OR • • AND • SELECT OPERATOR allows you to trigger the sampler from a single condition or from two conditions.
-
Page 105: Step 6 - Sampler Enable
Section 3 Programming The next screen on the flow meter (after you have established the conditions for sampler pacing) will request the following. (Entering 0 sends no pulses.): CONDITION TRUE PACING INTERVAL PACE EVERY X MINUTES This option lets you send flow pulses periodically to the sampler when the conditions you established for sampler pacing are being met. - Page 106 4230 Bubbler Flow Meter When you select or advance to step 6, the following display will appear: SAMPLER ENABLE MODE • DISABLE • • ENABLE • • CONDITIONAL • • (STORM) • (FLOWLINK) may also appear. The FLOWLINK menu option will not appear unless Flowlink software has been installed.
- Page 107 Section 3 Programming over which the rainfall occurs. Finally, you enter a time since the last rainfall. You must have an Isco Rain Gauge to measure rainfall. The following menus are the STORM sequence: LEVEL GREATER THAN X.XXX FT(Or other units, as selected.)
- Page 108 4230 Bubbler Flow Meter If you select CONDITION from SAMPLER ENABLE, the following will appear: CONDITION • (LEVEL) • • (FLOW RATE) • • (D. O.) • • (pH) • TEMPERATURE, RAINFALL, YSI pH, YSI D.O., YSI CONDUCTIVITY and YSI TEMP may also appear.
- Page 109 Section 3 Programming If you select RATE OF CHANGE, the flow meter will ask you to enter two values, one for the condition, and the other for a period of time over which the change occurs. After you have determined what condition will signal the sampler and under what circumstances, the following menu will appear: SELECT OPERATOR...
- Page 110 4230 Bubbler Flow Meter require activation in step 1 and use of the appropriate sensor. Only one parameter condition (pH, D.O.) can be measured by the flow meter at a time. pH and D.O. will not appear on the display at the same time.
-
Page 111: Step 7 - Alarm Dialout Mode
Section 3 Programming Select YES to reset the sampler enable feature; select NO to leave the sampler enabled. PRINTER ON/OFF WITH ENABLE • YES • • NO • This selection allows you to turn the flow meter’s printer on or off when the sampler is enabled from the flow meter. - Page 112 4230 Bubbler Flow Meter If you select DISABLE, this option will be inactivated until you change the selection later. The program will advance to the next step. If you select STORM, the flow meter will request definitions similar to those for STORM in sampler enable.
- Page 113 Section 3 Programming If you select CONDITIONAL, the following will appear: CONDITION • (LEVEL) • • (FLOW RATE) • • (D. O.) • • (pH) • TEMPERATURE, RAINFALL, YSI pH, YSI D.O., YSI CONDUCTIVITY, and YSI TEMP may also appear. As mentioned previously, some of these menu options may not appear depending on selections you made earlier in the program.
- Page 114 4230 Bubbler Flow Meter As described previously for sampler enabling, this step allows you to combine conditions to produce an alarm dialout signal. Select DONE if you need only one condition to trigger the alarm. If you want either of two conditions to trigger an alarm, select OR.
- Page 115 Section 3 Programming often written. Pressing the . (decimal) key inserts a , . If you want to signal more than one remote number at a time, the numbers are arranged in decreasing priority. NUM 1 carries the highest priority, followed by NUM 2 and so on. After you have entered the numbers, the flow meter will request: DELAY BETWEEN DIALOUTS...
-
Page 116: Step 8 - Printer
4230 Bubbler Flow Meter complete; then press *-X-X-X. The X-X-X are the three digits of the site ID number. 3.8 Step 8 - Printer This step sets up the operation of the flow meter’s internal printer. This printer also functions as a plotter. Note that the... - Page 117 Section 3 Programming deal of activity in your installation, and you must use all three data lines, selection of a faster chart speed will probably produce a chart more easily read and interpreted. After you select the printer speed, the flow meter will ask you to define what input you want depicted by printer LINE A.
- Page 118 4230 Bubbler Flow Meter You would enter here the lowest pH value you expect to see in your flow stream: PRINTER LINE A FULL SCALE X.XX pH(or other condition, as selected previously) Enter here the highest pH value (or other condition) you expect to see in your stream.
- Page 119 Section 3 Programming Because of the over-range feature, you can set a full-scale value that gives you good resolution on the chart. At the same time, the automatic over-range will prevent the loss of data if the plotted line rises past the full-scale point. For the other conditions, the full-scale units will be appropriate for what is being measured (D.O., pH, temperature, etc.) Note that the flow meter...
-
Page 120: Step 9 - Reports/History
4230 Bubbler Flow Meter You must have an Isco Rain Gauge connected to the flow meter to measure rainfall. Output is recorded in either inches or millimeters. Note that there is only one over-range for rainfall. 3.9 Step 9 - Reports/History This step lets you set up the flow meter to print periodic reports. - Page 121 Section 3 Programming DAYS or MONTHS could also appear depending on what you selected for the previous step. The time selected becomes the time interval that will be covered in the report. Then the flow meter will ask you when you want the first report printed: PRINT REPORT A AT YR: XXXX MONTH: XX DAY: XX HR: XX MIN: XX...
- Page 122 4230 Bubbler Flow Meter time interval that will be covered in the report. Then the flow meter will ask you when you want the first report printed: PRINT REPORT A AT YR: XXXX MONTH: XX DAY: XX HR: XX MIN: XX...
- Page 123 Section 3 Programming changes will be erased, but the flow meter will again begin keeping track of changes the next time you change the program. Flow Meter History Contents – D.O. ADJUSTED REPORT B TURNED ON pH ADJUSTED REPORT A TURNED OFF LEVEL ADJUSTED REPORT B TURNED OFF FLOW CONVERSION CHANGED TOTALIZER RESET...
- Page 124 4230 Bubbler Flow Meter 3-80...
-
Page 125: Maintenance
Maintenance Depending on where you install the flow meter, relatively little needs to be done to keep the 4230 Flow Meter in good condition. Following the simple procedures outlined in the following sections will ensure a long, trouble-free life for the flow meter. -
Page 126: Care Of The Case Seal
4230 Bubbler Flow Meter solvents (such as gasoline) or halogenated cleaning solvents (contain chlorine), that could attack the plastic used in the case or cause the permanent fogging of the window. 4.1.1 Care of the Case Seal Periodically inspect the case seal and clean it if necessary. -
Page 127: Changing The Printer Paper And Ribbon
Section 4 Maintenance Keep the external connectors clean by keeping the mating connectors or the protective caps on unused connectors tightly screwed on. Under severe operating conditions you may spray the threads only of the connectors with a cleaner/lubricant (such as Jif or WD-40) to prevent corrosion. -
Page 128: Installing The New Roll Of Paper
4230 Bubbler Flow Meter with your thumb pressed against one of the slots in the white end cap. 4. Snap the white end cap free from the two black catches on the end of the spool. 5. Pull the paper roll off the spool with your other hand. - Page 129 Section 4 Maintenance 5. Fold the paper over on itself so the end is straight and stiffer than a single layer of paper would be. 6. Unroll a few inches of the paper and set the roll on top of the cabinet. 7.
-
Page 130: Ink Ribbon Replacement
4230 Bubbler Flow Meter 14. Be careful to push it all the way back in, so that the take-up gear on the end of the spool assembly will reengage. 15. When the take-up spool is back in place, again push the Paper Reroll key to remove any slackness in the paper. -
Page 131: Maintenance Of The Bubble Line
Reinstall the paper take-up roll if necessary. 4.3 Maintenance of the Bubble Line Periodically inspect the bubble line on the 4230 Flow Meter to make sure that it is not kinked, frayed, cut, nicked, clogged, or otherwise damaged. If you find the bubble line damaged, you should replace it. -
Page 132: Automatic Air Purge
4.3.1 Automatic Air Purge The 4230 Flow Meter is equipped with an automatic purge feature to periodically clear the bubble line with a blast of air from the pump. -
Page 133: Charging The Nickel-Cadmium
4.4.1 Charging the Nickel-Cadmium Battery Charge the nickel-cadmium battery either with an Isco Power Supply, Isco Battery Charger, or Isco Five Station Battery Charger. All supply the proper DC charging current. Chargers designed for lead-acid batteries are usually not... -
Page 134: Self-Discharge Characteristic
Because the nickel-cadmium battery shows an almost-constant output voltage regardless of charge, voltage measurements are of no value. Teledyne Isco recommends you charge the battery for 15 to 18 hours. While charging, the battery will stay cool to the touch. When charged, it will feel warm, as the charging current turns into heat. -
Page 135: Hazards Of Overcharging
4.4.5 Charging from Another Source Teledyne Isco does not recommend chargers for the nickel-cadmium battery other than those listed, as you could damage the batteries or the charger if they are incompatible. Chargers delivering too much current to the batteries may overheat them. -
Page 136: Memory Effects Temporary
This should not exceed 450 mA. Be sure of proper polarity before connecting any other equipment. If an Isco Power Pack is used, you can overcharge the battery occasionally with little risk. However, avoid repeated overcharging. -
Page 137: Using The Lead-Acid Battery
4.4.8 Using the Lead-Acid Battery Teledyne Isco also offers a lead-acid battery. Made with a gelled-electrolyte lead-acid battery, this power source differs significantly from the nickel-cadmium battery in behavior and charging requirements. -
Page 138: Using Other Types Of Batteries
If it feels warm, it may already be overcharged. If you use an Isco Power Supply, you may use the charging table printed on the side of the battery or monitor the charging voltage with a reliable digital voltmeter and discontinue charging when the meter reads 14.5 VDC. -
Page 139: Attaching The Battery
4.4.10 Attaching the Battery To use these batteries, plug the M/S connector on the Isco battery cable into the +12 VDC connector of the flow meter. Connect the leads on the other end of the cable to the positive and negative terminals of the battery. -
Page 140: Regenerating The Desiccators
4.5 Regenerating the Desiccators The 4230 Flow Meter has a reuseable desiccant canister inside the case and a desiccant cartridge mounted on top of the case. The... - Page 141 Section 4 Maintenance regenerating, or replace it with the spare canister in the accessory package. Remove the canister by loosening the two thumbscrews which secure the mounting bracket. Remove the canister and heat it in a vented oven at 300°F (150°C) for about three hours, or until the blue or yellow color returns.
-
Page 142: Regenerating The External Desiccant Cartridges
4230 Bubbler Flow Meter 4.5.2 Regenerating the External Desiccant Cartridges Teledyne Isco uses two types of silica gel: • One chemical looks like small beads or pellets that are blue-black when dry, pale pink to transparent when saturated. • The other chemical looks like coarse sand, yellow when dry, dark green when saturated. - Page 143 Section 4 Maintenance CAUTION There have been reports of fumes coming out of the desiccant during regeneration. While we have been unable to verify this, just to be sure, we urge you to take no chances. Use a vented oven in a well-ventilated room.
- Page 144 4230 Bubbler Flow Meter 4-20...
Need help?
Do you have a question about the 4230 and is the answer not in the manual?
Questions and answers